
If you like this article, be sure to check out more Azure articles and other how-to posts on cloud computing, system administration, IT, and DevOps on adamtheautomator.com!
After building my Pluralsight course Microsoft Azure Cognitive Services: Custom Text to Speech, I've been playing around more with Azure's various APIs. I recently found myself using the Azure Video Indexer and decided to begin poking at it with PowerShell. Here's a brief rundown.
To get started, you either first have to sign up for a trial account which includes 2,400 minutes of free indexed usage via the API or create a Video Indexer account in your Azure subscription. For now, I decided to just use the free trial since I was just testing it out.
Subscribing to the Authorization Product API
The first task is authenticating to the Azure Video Indexer. To do this, you first need to subscribe to the Authorization Product API. You'll do that by logging into the Video Indexer developer portal, clicking on the Products section and clicking Subscribe. For a full rundown, check out the Microsoft tutorial Use the Video Indexer API.
Finding Your Account ID
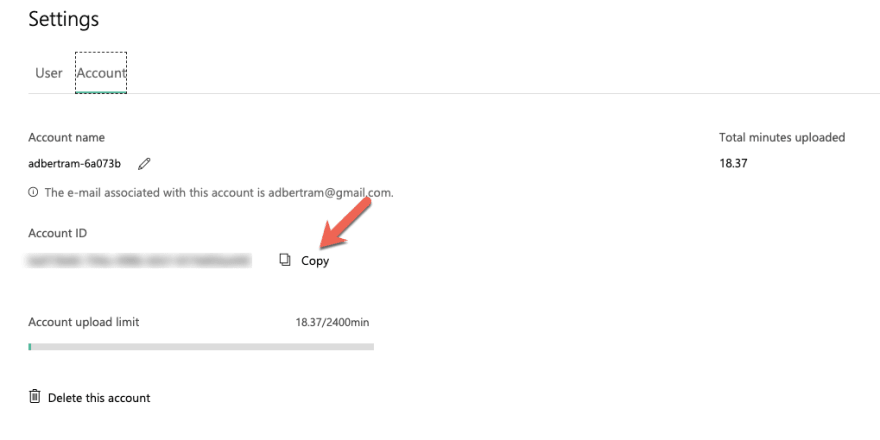
Once you've subscribed to the Authorization Product, you'll then need your account ID. There are a few ways to get this but the easiest is by heading to your Azure Video Indexer service page. If this link doesn't bring you directly to your Account section on the Settings page, click on your user profile in the upper-right corner of the page and choose Settings as shown below then once there, click on Account.

Once on the Account section, copy your Account ID as shown below.
Finding Your API Key
Next, you'll need to find your API key. Your API key can be found in on your Authorization product subscription in the Video Indexer Developer Portal. If this link doesn't bring you directly there, navigate to the Video Indexer Developer Portal home page, click on Products --> Authorization and then on the Authorization product you've already subscribed to as shown below.

Once in the Authorization product, you should see your primary and secondary key. You just need your primary one for now.
Click on Show next to your primary key to see your personal API key then copy the key to your clipboard.

Setting up PowerShell Variables
Let's now start building the PowerShell script. I like to define values in variables that I'll be using throughout my script. I'll do that now. Notice that I'm also using TLS1.2. This is required.
[Net.ServicePointManager]::SecurityProtocol = [Net.SecurityProtocolType]::Tls12
$apiUrl = 'https://api.videoindexer.ai'
$apiKey = 'XXXXXX'
$accountId = 'XXXXXXXX'
$location = 'trial'

## eastus2, westus2, etc
$accountUrl = "$apiUrl/$location/Accounts/$accountId"
Getting an Access Token
By now, you should have two critical pieces of information; your account ID and your API key. If so, you can now get an access token. The endpoint URI to grab an access token is required in the form of:
https://api.videoindexer.ai/auth/<Location>/Accounts/<AccountID>/AccessTokenYou already have your account ID but the location can be tricky to find. Since we're using a trial key, the location is trial.
Also, the authentication URI has an optional query parameter called allowEdit. This query parameter defines if the token you're getting here will be able to modify resources when it's used. That means if you'll be able to use HTTP methods like POST and PUT rather than just GET requests. In this article, we will be uploading a video, so we need to have this capability with the access token. The authentication URI then ends up looking like this:
$tokenUri = "https://api.videoindexer.ai/auth/$location/Accounts/$accountId/AccessToken?allowEdit=True"You'll need to pass the API key to the access token request via headers using the Ocp-Apim-Subscription-Key key. Below you'll see the way you can run the Invoke-RestMethod command to make the API call. Once this runs, you should have a shiny new access token stored in the $token variable.
$headers = @{
    'Ocp-Apim-Subscription-Key' = $apiKey
}

$params = @{
    'Uri' = $tokenUri
    'Headers' = $headers
    'Method'  = 'GET'
}

$token = Invoke-RestMethod @params
Uploading a Video
Once you've got a token, let's upload a sample video to test it out. You can upload a video two ways either via uploading a video on your own or using a URL. I'll use a URL. To do that, you'll use the Videos API passing the name of the video that will be displayed in the Video Indexer console, the videoUrl query parameter specifying the URL to the video to upload and since my video is in English, I'm using the language parameter although is not required.
Also notice below that the URL must be URL-encoded so I'm using the UrlEncode() method to make that happen then passing that URL to the Invoke-RestMethod command.
$videoName = 'testing'
$videoUrl = ''
$encUrl = [System.Web.HttpUtility]::UrlEncode($videoUrl)
$uploadVideoUrl = "$accountUrl/Videos?name=$videoName&accessToken=$token&videoUrl=$encUrl&language=en-US"

$params = @{
    'Uri' = $uploadVideoUrl
    'Method' = 'POST'
}

$uploadedVideo = Invoke-RestMethod @params
Wait for Indexing
This will upload the video to Azure Video Indexer and indexing will immediately start. You could stop here but there are so many other things to do! Just for fun, let's download the transcription that's created. Before we can do that, we'll need to wait for the transcription to finish.
To wait for the indexing to complete, we'll make another API call to the Videos endpoint and this time query the Index path of the video we just uploaded. Since API result was captured in the $uploadedVideo variable, we can reference the id property building the correct URI.
We'll then build a while loop which continually checks the state property. When the state property value is no longer Uploaded or Processing, it's done!
$videoUri = "$accountUrl/Videos/$($uploadedVideo.id)/Index?accessToken=$token"

while ((Invoke-RestMethod -Uri $videoUri -Method 'GET').state -in @('Uploaded', 'Processing')) {
    Write-Host "Waiting for video to index..."
    Start-Sleep -Seconds 5
}
Getting a Video Transcript
At this point, we can do just about anything but I personally needed to pull video transcripts. I create a small code snippet to make that happen using the Captions endpoint as shown below.
## Allowed values: Vtt/Ttml/Srt/Txt/Csv
$captionUri = "$accountUrl/Videos/$($uploadedVideo.id)/Captions?accessToken=$token&format=Txt"
$captions = Invoke-RestMethod -Uri $captionUri -Method 'GET'
Summary
The code covered in this article works but it's not useful on it's own if you intend to use Azure Video Indexer in production or even seriously in a test environment. I recommend building a PowerShell module which gives you the ability to compartmentalize a lot of this code into functions.
For an example, check out my AzTextToSpeech module for inspiration. It'd require quite a bit of modification but does have some similarities.


Top comments (0)