2020 has been unique, unusual and a different type of year. It became a reason for many changes and one of those changes are going virtual from in-person meetups. Virtual meetups have become an essential tool for the community. It's become quite easier to invite anyone to your meetups and learn from them.
Last week, some friends have approached me for a talk on AI Builder & Power Virtual Agents for their next meetup. I inquired about the level of their audience and got to know that I would have to keep with the basics. So this became the first time when I am going to deliver something from the scratch on this topic.
I always get fascinated by the idea of democratizing AI and make it accessible for everyone but this does not come without limitations or known challenges. Keeping this discussion for some other day / post.
Instead of going directly to my favorite topic i.e. the Bots (aka Power Virtual Agents), I wanted to give audience a walk through of AI Builder and how can they infuse artificial intelligence into their applications without writing a single line of code. Therefore, out of 10-12 capabilities which include Custom and Pre-trained models of AI Builder, I thought to go with 3 of my favorite ones. Out of those 3, I will be covering the one with Object Detection as I think this would give you some idea of creating your next best app.
Object Detection
In the machine learning world, object detection is a common Computer Vision problem. It’s different than a simple image classification because it goes a little deeper, tries to locate and categorizes objects within the images.
Behind the scenes, the AI Builder Object Detection is using Azure Custom Vision technology.
As a normal practice of my exploration or learning, I try to see what (and how) others have learnt from it by either blogging, podcasting or creating a video on YouTube / Twitch. This gives me more than one perspective of a technology that is always better than having a restricted thought about it.
As soon as I started looking for Object Detection, I found out that a lot of folks have created some awesome content (intermediate to advanced) along with a few very basic ones (beginner). I did not search a lot but what I saw from Microsoft MVP Yash Agarwal was just perfect. I had an idea of what I wanted to build as an example so I started looking for the similar implementation to get some inspiration. Interestingly, I stumbled upon my own colleagues blog on the similar topic. Do check out his site if you're interested in learning about Microsoft Dynamics 365 Field Service.
After looking at that (and some other short video / posts), I thought to finally build up something and make it available for broader audience here.
Ensure Safe Distancing in Retail Stores
The example is super simple (perfectly targeted for Beginners). We will create an app (A Power App) that will periodically count the number of people in any retail store such as cafe, restaurant or your favorite parlor. If the number of people exceeds the limit, an SMS will be sent as a notification to the responsible person for that business.
Did you like the idea? 💡 Please let me know your thoughts in the comments section!
P.S. My demo may not seem to be a good fit for the use-case I have defined in the header but I wanted to be mindful of privacy and did not have time to record it in a cafe with proper permissions.
Pre-Requisites
The motive of this post is educational which definitely can lead to a production level solution but this example is just a hint towards that. Don't worry! We will build all the functionality what I have written in bold letters. However, you need below stuff to get started;
- If you do not have the trial environment right now then just secure it from here.
- Very little experience of Power Apps. If you do not know how to create apps using Microsoft Power Apps then please go through this FREE training material.
The AI Builder
This short video is the best explanation of AI Builder so I will gracefully skip the intro and directly come to the real part. The Object Detection model.
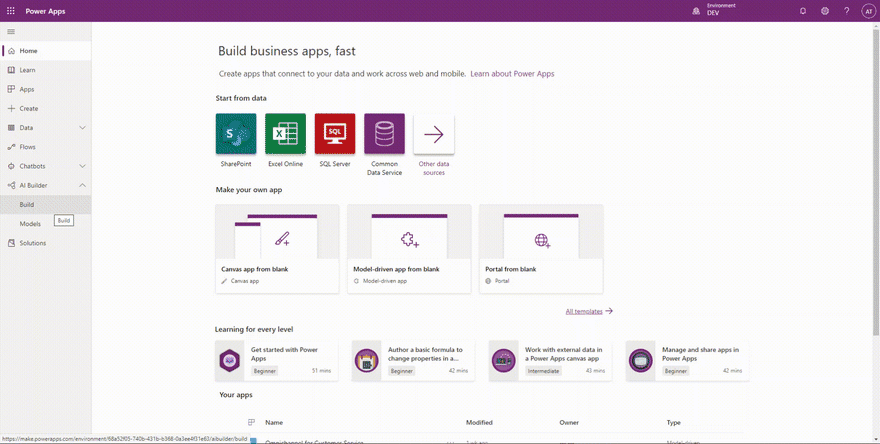
First of all, just go to https://make.powerapps.com/, expand AI Builder from your left pane, click on Build. This will open up the list of models you can create, select Object Detection and then choose a name of your model. I gave my model name as People Counter.
In case you want to read more about AI Builder Object Detection, Microsoft Docs is your best friend!
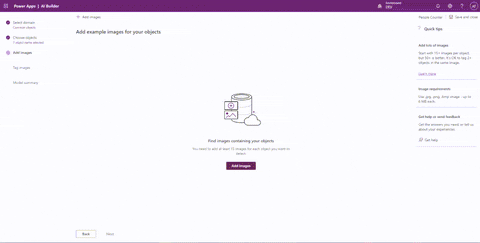
Then, choose the Common Objects followed by the name of your object. We're just using a single object called Person so it's OK not to Select from database, otherwise you have an option on top!
Now, let's talk about about adding the Images. You can choose different sources; I've used my local machine in below example. Generally, you need minimum 15 pictures per object but as we only have one object, you can use at least 15 images. The more the merrier though..
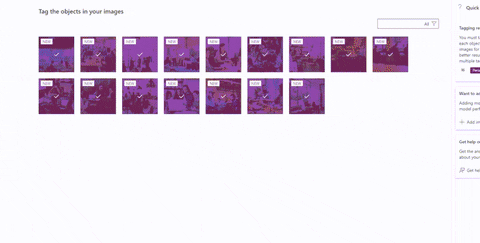
Once the images are uploaded, you can easily tag them by either drawing a bounding box around it or just hover it on the object and it magically shows you a hint of box which you can then click and tag. Truly magical!
Always consider responsible AI metrics whenever you're creating such solutions.
Now after tagging all the images, you should train your model that'd learn to detect the Persons from your image. Once it's trained, you can evaluate your model by uploading a new image which was not a part of your training set. If you're satisfied with the result, you can go and publish it.
You can see my model's accuracy was just 75% - it's because of the amount & quality of the data. For better results, always learn about the quality image collection.
That's it. Your model is now ready to be consumed either in Power Apps or Power Automate.
This means we're 50% done with our stuff. Now let's move on to the Power Apps.
The Canvas App
So now, you can create a Canvas App where we will be using this model. But before we go with the integration of our model, let's see what we have to develop. You will be using a camera feed to get the get the images (frames), send it a Flow (Power Automate) where you'll use the Detect and Count Object in Images action, apply the business logic (i.e. to send SMS via Twilio) and then get the total count in the response to the app.
Camera's OnStream & StreamRate
As per the official docs, you can use the Stream, StreamRate, and OnStream properties to automatically capture images on a timer, for example snapping a picture every minute to create a time-lapse sequence.
When I read this initially, I was super delighted but unfortunately, I could not find any example on the docs so I had to look for other resources such as Community Forums etc. However, I was able to get an idea to work with this.
So first, let's understand the two most important properties of Camera control.
StreamRate
- This defines as the frequency of updating an image on the Stream property of the Camera; often calculated in milliseconds. Such as 100 (1/10th of a second) to 3,600,000 (1 hour)
OnStream
- This defines the functionality as how the app should perform when the specific Stream is updated.
For example, if you have set your StreamRate property to 5000 (this mean, it will update the Stream property of the Camera on 10th second) and then it will fire the event OnStream so you can define your logic there.
Since we get the concept, now let's drag the Camera control, Timer control and an Image control to see how our app is going to behave.
- Set the Image's property to Camera.Stream
- On your Camera's OnStream property, Set a variable captureTrigger with the value 0. Set this variable as a StreamRate as well.
- Now, OnTimerEnd trigger of your Timer, just set the captureTrigger's value to 100
So what will happen is, as soon as the Timer's OnTimeEnd is triggered, it will snap a picture of the frame within 1/10th of the second from the Camera's stream and show that on the Image control. You can always tweak your timer depending upon the use-case and occupancy rate of the business. ⬇
Check out this video for Camera Timelapse Demo
Now, our photo capturing mechanism is in-place. Let's go to Power Automate and do some magic there.
The Flow(s)
You can now create a flow which will use an AI Builder action called Detect and Count Object in Images. As soon as you select this action, you should be able to see your AI Model in a drop down list, select People Counter and then in Image field, choose the content from Power Apps (below image is for your reference).
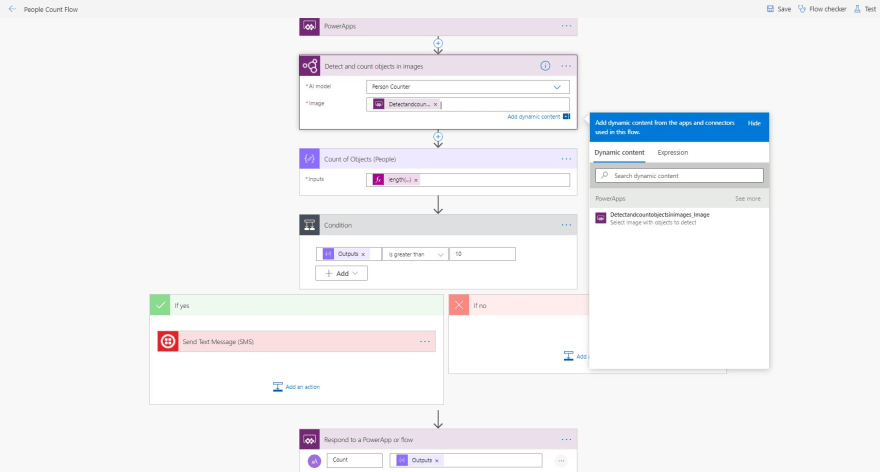
Then you can write a simple logic to count the objects, and if the count is greater than the threshold (in my case it's 10) then you can just send a SMS using Twilio's connector.
For the sake of this demo, I've used Twilio which has an easy trial process. However, you can always use a different mechanism such as Email, writing it to the Excel file, notifying an IoT device and so much more.
Regardless of the notification, you can return the Count to the Power Apps by using the Respond to a Power App or Flow action. This way you can retain the values in your Power Apps as well.
As you'd notice in my demo, I am using this code in OnEndTimer trigger; it's because I am setting up the Gallery with the snapshots captured. You may not necessarily need this but it's just to show the last few images sent and processed through PowerApps ↔ Power Automate (Flow).
So that's how you can build a simple yet very useful solutions using AI Builder capabilities in Power Platform. The demo which I built/showcased here is up on my GitHub repo with the AI Model.
I really wanted to extend the functionality to draw the bounding boxes around the detected persons but I'd leave this to you.
Please feel free to fork / download and play with that. Furthermore, if you've got any questions around this post or anything in general about AI Builder then please feel free to comment or connect with me on Twitter.
Until next time.


Oldest comments (0)