
NX Workspaces is a powerful tool for scaffolding enterprise level starting points for typescript and node.js monorepos. In this post we will be scaffolding a simple React & Express app that we will deploy to Heroku. We will using yarn as package manager.
Use NX cli to generate new React & Express app
Run the following command in your terminal.
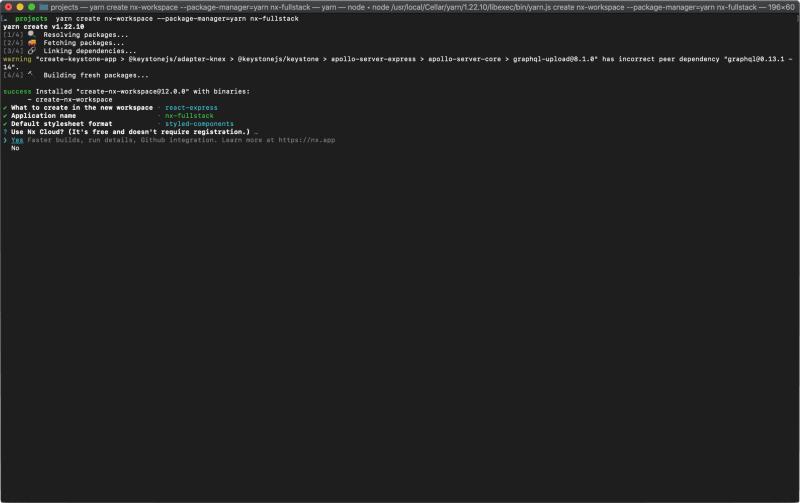
yarn create nx-workspace --package-manager=yarn nx-fullstack
Or if you prefer npm
npx create nx-workspace nx-fullstack
Define you project configuration
You'll be greeted by this prompt. Select react-express in the CLI list. Name your application nx-fullstack. Select styled-components as your styling solution. Select if you want sign up for the NX Cloud. The CLI will now scaffold your project.
Run your newly generated app locally
Cd in to your newly created folder with the command cd nx-fullstack. Inside the folder run
yarn nx run-many --target=serve --projects=nx-fullstack,api --parallel=true
Wait for the client nx-fullstack and the backend api to start. Go to http://localhost:4200 in your browser. Confirm that the client app at apps/nx-fullstack/src/app/app.tsx is talking to the backend at apps/api/src/main.ts. You should see the text Welcome to the api! in the browser.

Update apps/api/src/main.ts to serve the built nx-fullstack client once built
import * as express from 'express';
import * as path from 'path';
import { Message } from '@nx-fullstack/api-interfaces';

const CLIENT_BUILD_PATH = path.join(__dirname, '../nx-fullstack');

const app = express();
app.use(express.static(CLIENT_BUILD_PATH));

const greeting: Message = { message: 'Welcome to api!' };

app.get('/api', (req, res) => {
  res.send(greeting);
});

app.get('*', (request, response) => {
  response.sendFile(path.join(CLIENT_BUILD_PATH, 'index.html'));
});

const port = process.env.PORT || 3333;
const server = app.listen(port, () => {
  console.log('Listening at http://localhost:' + port + '/api');
});
server.on('error', console.error);
Update build script in package.json and commit it to git
"build": "yarn nx run-many --target=build --projects=nx-fullstack,api --parallel=true"
Update start script in package.json and commit it to git
"start": "node dist/apps/api/main.js"
Deploy app to Heroku
Sign up for a free account at Heroku here. Install the Heroku CLI by running the command below in the terminal.
brew tap heroku/brew && brew install heroku
Run the heroku login command
heroku login
Heroku will ask you to authenticate yourself in the browser.

Once it's complete you can return to the terminal. You're now logged in.
Create a Heroku deploy target
Run the CLI command for creating a new deploy target in your Heroku account.
heroku create
Once it's finished it will look like this.
Procfile in the root of your project
Create a Procfile in the root of your project and add the following
web: yarn start
Deploy code to Heroku
Make sure all your changes in the repo are commited. Then run
git push heroku master
Visit your deployed fullstack app
Use the CLI command below to open up your deployed app in your default browser.
heroku open
Voila!
Your fullstack NX Workspace app is now deployed and running on Heroku.
Final code
The final deployed code can be found here.
Where to go next?
Egghead.io have a great free course on the nuts & bolts of NX Worskpaces Scale React Development with Nx.


Top comments (7)
Hi! You pushing your whole project to heroku is there any downsides to it when project becomes quite large? Is there a way to push only the final build?
Hello Alex,
So NX workspaces has this quite cool concept that is called Computation Caching that you can use with their NX Cloud service.
So NX could keep track of what you've already built, return the result of that and only build new code changes. Basically you would never need to rebuild the same code twice.
Here is a article describing it more in detail
Computation Caching | The Fundamentals Behind Nx’s Lightning Fast Execution
This is a great free resource if you are interested in getting into the nuts & bolts of NX workspaces
Scale React Development with Nx
Does this tutorial require a paid version of heroku or is does it use the free tier?
This tutorial will work with the heroku free tier as well. No need to upgrade your plan unless you need additional features.
There is a section "Update apps/api/src/main.ts to serve the built nx-fullstack client once built"
It is not clear to me what to change in the file for that step
Here you need to update the express to serve the static build of the frontend app. It is these lines that you need to add
and