I originally posted this article on Medium
If you’ve been building web services on GCP Cloud Functions or Cloud Run, then you might have noticed that Google Cloud has been missing an important piece of infrastructure: an API Gateway.
While AWS has had its Amazon API Gateway for a few years now, GCP had no equivalent service (there was Cloud Endpoints but I think the scope is a bit different), leaving developers to build custom solutions … But not anymore ! GCP has recently announced the brand new Google Cloud API Gateway, so I thought I’ll give it a try. It’s still in beta so do take that into consideration before using it in your production systems.
Why do I need an API gateway ?
Looking at RedHat’s definition:
An API gateway is an API management tool that sits between a client and a collection of backend services.
To make this more concrete and easier to understand, let’s quickly jump to the example we’ll be building in this article.
A tale of 2 Microservices
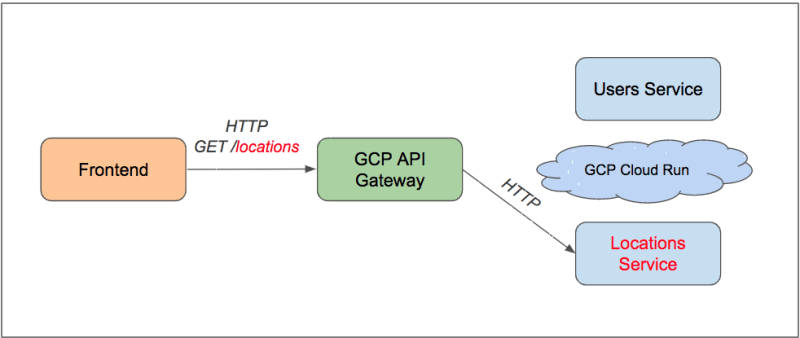
For this article we’ll be building a fictional app that consists of 2 backend components:
- Users service: a simple microservice with an http API that returns a list of users in JSON format, hosted on GCP Cloud Run.
- Locations service: a simple microservice with an http API that returns a list of locations in JSON format, also hosted on GCP Cloud Run (but it could also be a GCP Cloud Function for example).
We’d like to provide unified access to those 2 services through an API gateway. Any frontend component can then connect to the API gateway, and the gateway will then route the requests to the proper backend service. Here is are a couple of schemas that illustrate our goal:

Let’s code
You can follow along using this github repository I’ve prepared. It contains all of the code and commands needed to run the project.
I’ve wrapped most shell commands for the project in this Makefile, you can refer to it for the details about the commands:
GCP setup
I’ve detailed here the preliminary steps required to setup the GCP environment for this project. It’s mostly authenticating, creating a new GCP project, a service account with the right permissions and enabling the cloud APIs.
Backend services
The microservices themselves are very simple Go api servers based on chi router. Here is the handler section for the users service, it has a single route and returns a static list of users as JSON:
The locations service is very similar:
Both services are containerized, we just build and push them to GCP Container Registry using GCP Cloud Build (CI/CD) so they’re ready to deploy to GCP Cloud Run.
Build/Push users service container:
$ # PROJECT\_ID holds the GCP project id
$ PROJECT\_ID=$PROJECT\_ID make gcr-push-users
Build/Push locations service container:
$ PROJECT\_ID=$PROJECT\_ID make gcr-push-locations
A bit of Terraform magic
We’re deploying the Cloud Run services using Terraform. If you haven’t used it yet you should check it out as it’s a fantastic Infrastructure as Code tool and it can make your DevOps workflows much cleaner.
The most important part of the terraform configuration is this section where we declare the cloud run service, using the service container we pushed earlier:
If you’re trying to deploy the project and you’re confused about the terraform variable values that you should use in the terraform.tfvars file (not committed into the repo), here are the values from my specific setup/gcp project as an example:
To start deploying services we first create a Terraform plan, where Terraform calculates the changes it needs to make to the infrastructure:
$ make tf-plan
Then we apply the changes:
$ make tf-apply
which will produce an output similar to:
Outputs:

locations-svc-url = [https://locations-svc-qqx6qmklha-ew.a.run.app](https://locations-svc-qqx6qmklha-ew.a.run.app)
users-svc-url = [https://users-svc-qqx6qmklha-ew.a.run.app](https://users-svc-qqx6qmklha-ew.a.run.app)
The backend services are deployed and ready to use.
The API Gateway
We can finally move on to the API gateway. Unfortunately at the time of writing this article, GCP API Gateway doesn’t seem to be supported yet in Terraform’s Google Cloud provider, so I couldn’t include it in the Terraform configuration. However I did find this github issue discussing its possible implementation, so support might be added in the future. As a consequence, for this step we’re back to imperative gcloud shell commands.
The most important configuration element for our API Gateway is the OpenAPI spec:
It describes our API and instructs the API gateway to route specific HTTP request paths to our backend services.
We can now deploy the gateway:
$ # PROJECT\_ID and REGION hold the GCP project id and region
$ PROJECT\_ID=$PROJECT\_ID REGION=$REGION make deploy-api-gateway
then we print the gateway url:
$ PROJECT\_ID=$PROJECT\_ID REGION=$REGION make get-gateway-url
which should output something like:
[https://gateway-demo-4s0vqu9q.ew.gateway.dev](https://gateway-demo-4s0vqu9q.ew.gateway.dev)
Let’s test the API gateway /users route:
$ curl -s [https://gateway-demo-4s0vqu9q.ew.gateway.dev/users|jq](https://gateway-demo-4s0vqu9q.ew.gateway.dev/users%7Cjq)
[
  {
    "id": 1,
    "name": "Mike"
  },
  {
    "id": 2,
    "name": "John"
  }
]
And now the /locations route:
$ curl -s [https://gateway-demo-4s0vqu9q.ew.gateway.dev/locations|jq](https://gateway-demo-4s0vqu9q.ew.gateway.dev/users%7Cjq)
[
  {
    "id": 1,
    "name": "London",
    "country": "UK"
  },
  {
    "id": 2,
    "name": "Paris",
    "country": "FR"
  }
]
It works, and we are done 🎉🎊.
Conclusion
Obviously In this simple example we’ve only scratched the surface of the capabilities such a service can provide. For example we haven’t discussed any of the more advanced features like authentication or rate limiting. Feel free to give it a try and let me know what your first impressions are. You can check out the full docs here.


Top comments (0)