Introduction
[Note: this tutorial was written by commission for Fauna, Inc]
In part 1 of this article, you were introduced to a simple Elm JAMstack site called Shall We Play?, an application for scheduling game nights with friends. Shall We Play? lacked secure login and database support, making it a minimally useful site for scheduling game nights but a perfect site for introducing FaunaDB, a multi-region, zero-operation database with native support for GraphQL.
Part 1 focused on creating a GraphQL schema for supporting secure login and pulling restricted data from the database. Additionally, it introduced the sophisticated attribute-based access control features of FaunaDB which was used to back the GraphQL schema and provide identity services.
Part 2, the final part of this article, will continue building upon the work done in part 1 by updating Shall We Play? to take advantage of this new GraphQL service using an Elm package called elm-graphql by Dillon Kearns.
This part of the article assumes you are comfortable with using a command-line, git source control, and package managers like npm. Additionally, you should have a rudimentary understanding of Elm. If you are new to Elm, take some time to review the official Elm guide up through the Installation chapter. Don't worry if you don't have any practical experience with Elm, I'll walk you through everything.
Ready to go? Great! Let's dive in.
Connecting Shall We Play? to FaunaDB through elm-graphql
If you completed all the steps outlined in part 1 of this article to set up our GraphQL service, then we are now ready to add login services to Shall We Play?. The ideal way for this to happen is for you to join me in the coding process, just like you joined me when setting up our GraphQL schema and database in part 1.
Setting Up Shall We Play? for Local Development
The Shall We Play? starter application is an open source project on GitHub. Before you get started with this section, you will need to create a fork of the application so you can run and edit it locally.
First, create a free GitHub account if you need to, then log into GitHub and go to the Shall We Play? project. Click on "Fork" in the upper right.

Once the project has completed forking, clone the project to your local system.

The
masterbranch is the starting point for part 2. I would recommend creating a branch off ofmasterbefore continuing with the tutorial in case you need to back and up and try again or want to go a different direction later.
For managing the project during development, we use some Node.js tools, so you will need to install Node.js. As of the time of this writing, I am using Node.js v13.12.0 and npm v6.14.4. Go ahead and make sure you have Node.js properly installed; refer to the installation instructions for your particular system, if necessary.
Next, you will need an editor. If your preferred editor does not have good language support for Elm, please give VSCode a try with the Elm tooling extension. However, there are actually a lot of good editors out there with Elm support, including Vim.
Now we will need to install some npm packages to get things going. Bring up a terminal in the root directory of the project and run npm install. Once npm is finished installing, test the current version of the application by running npm start.
$ npm start

> shallweplay@0.0.1 start /Users/dbj/Documents/Family/Dirk/XetiCode/projects.nosync/internal/shallweplay
> npx elm-live ./src/Main.elm --dir=./static -o -- --output=./static/assets/js/shallweplay.js --debug

elm-live:
  Server has been started! Server details below:
    - Website URL: http://localhost:8000
    - Serving files from: ./static

elm-live:
  The build has succeeded.

elm-live:
  Watching the following files:
    - src/**/*.elm
npm start runs the elm-live tool which will install any elm packages that are needed, compile the code, and bring up the application in your default browser. While running, elm-live will continue to watch the Elm files in your source directory and, when they change, recompile them and reload the browser view.
Have a look around to re-familiarize yourself with the application; it should behave identically to the deployed version.
A Bit About Elm
Elm is both a functional language and an architecture for web applications. The architecture imposes a simple data-flow pattern that is easy to reason about, as illustrated by the following diagram taken from the official Elm guide:

Elm renders the initial HTML for the site. Then, as users interact with the site, they generate messages, which are sent to Elm. Elm processes the messages, updates the model (data) and generates new HTML based upon the updated model. Simple. Elegant.
Where things might get challenging is in learning to read and think functionally if your experience is not with functional languages. Pure, functional languages are as orthogonal to the traditional object-oriented paradigm as you can get; it really is a different way of thinking. But the payoffs are worth it.
As noted before, as we go through the exercise of modifying our application, I will explain things with the assumption that you have gone through the official Elm guide, at least through the Installation section. The good news is, Elm is expressive, and if you are familiar with JavaScript or other languages, and you read my explanations, you should be able to understand most of what is happening even if the details of the code are not clear.
A Tour of the Project
Let's take a look at the project structure. If you look inside the "src" directory, you should see 3 files:
- Colors.elm
- DataModel.elm
- Main.elm
The Colors.elm file specifies the colors used on the website. The coloring of the site was in honor of my wife's favorite color. No comments, here, OK?
The DataModel.elm file has our model, most of our types, and the functions that support them.
The Main.elm file is the entry point into our application; it manages our message handling, and renders our view.
Let's dig deeper into our data model; go ahead and open the DataModel.elm file in your editor. First you will notice our Model record, which is our persistent state between messages. We store, among other things, the current logged in Player, if any, a full list of Players, and a full list of Events.
type alias Model =
    { input_user_name : UserName
    , input_password : Password
    , m_player : Maybe Player
    , players : Players
    , events : Events
    , m_possible_event : Maybe PossibleEvent
    , m_poss_event_elem_info : Maybe Dom.Element
    , login_offset : Float
    , login_field_with_tab_index : LoginField
    , dragged_player_position : PlayerPosition
    , drag : D.State UserName
    }
After the model, the core types are declared, such as Player, Event, and Invite.
type alias Player =
    { user_name : UserName
    , member_since : Int
    }

type alias Event =
    { id : EventId
    , organizer_user_name : UserName
    , millis : Int
    , title : String
    , description : String
    , venue : String
    , status : EventStatus
    , invites : Invites
    }

type alias Invite =
    { for_user_name : UserName
    , status : InviteStatus
    }
The Player record tracks everything we need to know about a player. The Event record tracks the details about organized events including which player organized the event and what players were invited. The Invite record simply tracks which player the invite is for, and what their invite status is.
The type we will be most concerned about in this article will be the Player type.
Now let's look at the Main.elm file. The code is delineated informally by commented section headers:
- Main and Init
- Subscriptions and Commands
- Msg and Update
- Views
- Helpers
Take a look at the "Msg and Update" section. Here you will see our Msg type which defines all of the messages that could be received through various interactions by users and other side effects (like system events or XHR requests). The update function must deal with every one of these messages; Elm ensures this through the use of the case statement.
Now scroll on down to the "Views" section. Notice that the model is available to these views through the entry point view function. This allows our views to respond to changes in the model.
For the HTML/CSS generation, I have chosen to use an excellent package called elm-ui. It is a low level abstraction of HTML and CSS (i.e., it does not define components). Elm also provides formal HTML and CSS packages so you can operate at that level if desired, and indeed, the HTML package is a complement to using elm-ui.
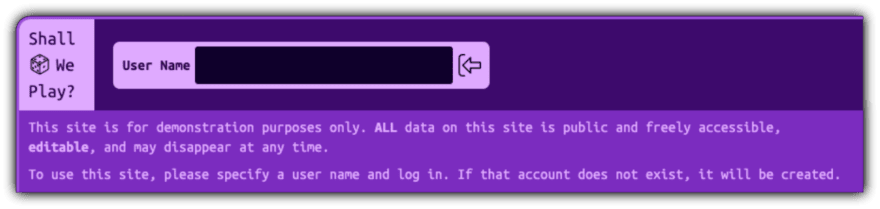
Showing The Password Field
While we are in the "Views" section of the code, I'd like you to bring up the application if it is not running (run npm start from the root directory) and then look at the loginLogoutRowView function:
loginLogoutRowView : Model -> E.Element Msg
loginLogoutRowView model =
    E.row
        [ E.width E.fill
        , E.spacing 20
        , E.moveLeft model.login_offset
        ]
        [ loginView model.input_user_name model.login_field_with_tab_index
        , passwordView model.input_password model.login_field_with_tab_index
        , logoutView model.m_player
        ]
The last list in this function is a list of child views which are aligned in a single row. However, only one of these views will be visible at a time, and that is based on a single offset value set on the model called login_offset. The current value of this offset now shows the loginView.

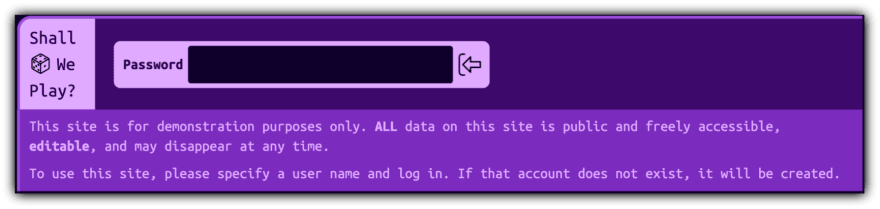
Go ahead and log in with any user name. Once you do, the logoutView is shown. Note that the passwordView was skipped because the offset was set to go past it.
For our very first change in the app, we will update the login flow so it shows the passwordView after the loginView. We will do this by updating the function that controls the offset after providing a user name.
I like to run the application while I am editing the files so I can receive immediate feedback on my changes. elm-live will compile and reload the site when it notices changes to the code, or, if there is a compiler error, it will display the compiler error right in the window. Make sure elm-live is running while we make these next changes.
The first place we need to update the offset is in the updateModelFromEnteredUserName model handler in the Main.elm file. Right now this function jumps from the loginView right to the logoutView at offset 804. Let's change this to jump to the passwordView which is at offset 402. Additionally, we need to control where tabbing can go in the DOM, so change NoField to PasswordField to keep the passwordView in the DOM's tabbing order:
{ model | login_offset = 402.0
        , login_field_with_tab_index = PasswordField
}
As a matter of interest, the
updateModelFromEnteredPasswordfunction, which deals with the submitted password, already sets the correct offset to move from the password field to the logout field.
Let's test our small change by logging in; you should now see the password field instead of the logout button. Small victories, right?

Notice that even though we have not yet provided a password or completed the login process, the main view still changes to look like the user is logged in, showing the events summary to the right and the details of the events below. Let's work on fixing that next.
Showing The Logged In Main View At The Right Time
Right now the application simply looks to see if there is a valid Player record in the model to determine whether a player is "logged in". Now that we will be requiring a password and a valid login token from FaunaDB before we will consider the player logged in, let's change this logic from looking for a valid player to looking for a login token.
We need to have a place to store the authentication/authorization token, so let's do that right in the Player record.
Open the DataModel module in your editor. First, to keep the code easier to understand, let's create a type alias for the token, which, under the hood, is a String. Put this after the Password type alias:
type alias Token =
    String
Now lets update the Player record to take a Maybe Token called m_token ("m" for "Maybe"):
type alias Player =
    { user_name : UserName
    , member_since : Int
    , m_token : Maybe Token
    }
We use a Maybe Token because we will not always have a token, and, as you know, there is no such thing as null in Elm (which is a very good thing).
We also have a player constructor function called newPlayer which we need to update to set a default value for m_token:
newPlayer user_name =
    Player user_name 0 Nothing
Nothing is one of the type variants for the Maybe type, and it represents the absence of a value.
Remember, in our reactive Elm architecture, the view is always driven by changes in the model. So now that we want our view to only show us the logged in main view once we are truly logged in, we need to update the view logic to look for the presence of a player token. This logic is in the mainView function in the Main module; open the Main.elm file in your editor.
The mainView function looks at whether there is a player record, and if there is, it considers the player logged in. Now we need to update this function to look a little deeper in the player record for a token, and if present, we consider the player logged in. Here is what the code should look like:
mainView model =
    case model.m_player of
        Nothing ->
            plainMainView

        Just player ->
            case player.m_token of
                Nothing ->
                    plainMainView

                Just _ ->
                    eventsMainView model player
We also need to update the youHaveView because it displays the event summary if the player is logged in:
youHaveView events m_player =
    Maybe.andThen
        (\player ->
            player.m_token
                |> Maybe.map
                    (\_ ->
                        E.column
                            [ E.width E.fill
                            , E.spacing 8
                            ]
                            [ youHaveEventsView events player
                            , youHaveInvitesView events player
                            ]
                    )
        )
        m_player
Here again, we just drilled down to see if there was a token, and if so, display the summary.
In Elm, compiler errors are not actually dreaded (unlike some other languages ;). Elm's error messages are quite informative and often guide you right through the fix. When you get a compiler error, don't read the error quickly - read it and stop and think about it a second. I find if I jump to conclusions too quickly, I sometimes miss what the error is saying. In Elm, the compiler is your BFF.
Go ahead and test out your app. When you enter a user name, you are brought to the password field, but now you should not see the logged in main view. The journey of a 1000 lines of code begins with the first change (or something like that).
Adding A Little Polish
When the app showed the password field, did you notice how you had to tab or click to get the focus to try to enter your password? Let's fix this annoyance, shall we? When you first launch Shall We Play?, the user name field immediately has the focus. We can use the same mechanism for giving focus to the password field after the user enters a user name.
Go to the update function type signature. Notice that the update function returns a tuple with a Model and a Command (Cmd).
update : Msg -> Model -> ( Model, Cmd Msg )
Commands are one way to send asynchronous messages out from the type-protected, pure space of Elm to a part of the runtime that does not have the same guarantees. (These are called side effects.) Using the Browser.Dom module, we can actually send a command to the DOM to set focus on a specific field.
Go to the focusFieldWithId function; this function takes the id of the DOM element you want to focus on and calls the Dom.focus task as a command.
focusFieldWithId id =
    Task.attempt (\_ -> NoOp <| "focus field with id " ++ id) (Dom.focus id)
This function is used by the focusUserNameField function which passes in the id for the user name field. Let's create a similar function for the password field, leveraging the focusFieldWithId function; don't forget to add the function's type signature:
focusPasswordField : Cmd Msg
focusPasswordField =
    focusFieldWithId (fieldIdForLoginField PasswordField)
You will notice from the focusFieldWithId function that the message that we get back from the focus command is called NoOp. This is a message that basically means we do not want to do anything specific in response to the command completing. This makes sense as we won't know what to do next until the user enters a user name or password.
Now that we have a new focusPasswordField command, we need to make sure it is called once a user enters a user name. The message that is sent when a user enters a user name is called EnteredUserName and it is handled by the update function. Let's take a quick look at the EnteredUserName message handler:
EnteredUserName ->
    ( updateModelFromEnteredUserName model
    , commandFromEnteredUserName model.input_user_name
    )
The EnteredUserName message handler calls the commandFromEnteredUserName command handler. Let's take a look at what it does:
commandFromEnteredUserName user_name =
    let
        cleaned_user_name =
            cleanedLoginString user_name
    in
    if isUserNameValid cleaned_user_name then
        blurUserNameField

    else
        Cmd.none
If the user name coming in from the EnteredUserName message is valid, a command called blurUserNameField is sent. Blurring is the opposite of focusing, meaning an element that is blurred no longer has focus. Let's replace this command with our new focusPasswordField command.
...
  if isUserNameValid cleaned_user_name then
      focusPasswordField

  else
      Cmd.none
Test our change. How did it go?
The
blurUserNameFieldcommand that we replaced is no longer being used, so we could delete this function. However, you may have guessed that we will need a similar function soon for the password field, so we will leave this function alone for now and repurpose it shortly.
Wiring Up The Password Field
Now we need to update the password field so it completes the login process once the password is submitted.
But before we do that, let's stop and take a look at what is happening to our model when our user name and password is being entered. We can do this by looking at the built-in debug panel.
Make sure your application is running and visit the site. In the bottom right, you have probably noticed the white tangram in a blue box:

You may have even been tempted to click on it. If you did, a debug pane should have come up. Bring up the debug pane now.

Remember that the Elm Architecture is about reactive message passing. The Elm debugger displays all the messages it receives and records the model at each message. Since the model drives the view, we essentially have a time-traveling debugger which can scrub back and forth through time so we can see the state of the app and the view at any point we want. This is a great way to zero in on bugs that are driven by data and logic errors, but it is also a great way to simply see what is happening with our app, like an x-ray.
Notice that there is already one message waiting for us - the NoOp message, which has the payload of "focus field with id user_name". This is the message that gets sent when the app first starts up so that the user name field is focused and waiting for the user to type. Look at the model. Notice that both input_password and input_user_name have empty strings as their values.
Now, go ahead and type a user name and hit return. Notice that your focus command was received and that input_user_name contains the user name you entered.

Go ahead and scrub back through time using the slider at the top-left, and watch the input_user_name field change. You will also see the view change. (OK, confession. Sometimes I just play with the scrubber when I need a quick break from coding… it's just too cool. ;)
I have noticed that, on macOS, if I run my browser in full screen mode and then I try to interact with the Elm debugger, it can be painfully slow responding to clicks. If you notice the same, simply bring the browser out of full screen mode and all should work just fine.
And now go ahead and enter a password and make sure that the input_password field in the model is being updated properly while you type. If the UI isn't responsive, it's because you used the scrubber which paused Elm; hit the blue and white "play" button in the upper-left of the debugger and you should be good to go.

Now that we know the password is being saved, let's update the app to complete the login process after the password is submitted. Let's take a look at the updateModelFromEnteredPassword function:
updateModelFromEnteredPassword model =
    let
        cleaned_password =
            cleanedLoginString model.input_password
    in
    if isPasswordValid cleaned_password then
        { model
            | login_offset = 804.0
            , login_field_with_tab_index = NoField
        }

    else
        model
This function looks at the stored password in the model, and if the password is valid, we update the login_offset field to show the logout field as well as taking the password field out of the tab order in the DOM. What we need to do in addition is to:
- Call the
createAndOrLoginPlayerGraphQL mutation - Clear the password from the model (don't want that sitting around)
- Blur the password field so it no longer has focus (to avoid keystrokes in the password field while it is not visible)
As we update the code to complete the login process, we are going to fudge step 1 above, and just make the model think we have made a GraphQL call and have received back a token. Wiring up elm-graphql will be quite an undertaking, and I would rather be sure we have everything else working before we start down that road.
Sending off a request through GraphQL will involve sending a command that should return a message with our login token. Let's wire that up now. First, let's go to our Msg type and add a message called LoggedInPlayer that has a payload of type Token. Let's place it below the EnteredPassword variant.
| LoggedInPlayer Token
Now update the update function to handle this new Msg. Create a message handler that uses a model handler to update the model. This message handler will not need to send any commands, so we don't need a command handler. Place the new message handler next to the EnteredPassword message handler, just like with the Msg variants list.
LoggedInPlayer token ->
      ( updateModelFromLoggedInPlayer model token
         , Cmd.none
      )
Create the updateModelFromLoggedInPlayer model handler in its proper place next to the other model handlers. At this point, it should just set the token on the current player in the model:
updateModelFromLoggedInPlayer : Model -> Token -> Model
updateModelFromLoggedInPlayer model token =
    case model.m_player of
        Just player ->
            let
                updated_player =
                    { player | m_token = Just token }
            in
            { model | m_player = Just updated_player }

        Nothing ->
            model
Let's go to the update function and look at the EnteredPassword message handler. We know that this is called when the player has submitted the password, so in response to this, we want to try to create and/or log them in. Update the message handler to send a command called createAndOrLoginPlayer, passing in the input_user_name and input_password from the model:
EnteredPassword ->
   ( updateModelFromEnteredPassword model
   , createAndOrLoginPlayer model.input_user_name model.input_password
   )
Create the createAndOrLoginPlayer command function below the focusPasswordField command. This function will create a placeholder task that will return immediately with the LoggedInPlayer message carrying a pseudo token string, as though it had come from FaunaDB.
createAndOrLoginPlayer : UserName -> Password -> Cmd Msg
createAndOrLoginPlayer user_name password =
    Task.perform LoggedInPlayer (Task.succeed "abcdefgHIJKLMNOP1234560987")
With this command in place, we can now test the handling of our login flow without needing to wire up elm-graphql at this moment.
Using our debugger, let's test our command to see if it actually sets a token value for the current player. Take a look. That should put a smile on your face. :)

Let's complete our last two easy tasks of clearing the password and removing focus from the password field when the password has been entered. First, update the updateModelFromEnteredPassword model handler to clear the input_password field in the model:
...
  if isPasswordValid cleaned_password then
      { model
          | login_offset = 804.0
          , login_field_with_tab_index = NoField
          , input_password = ""
      }

  else
      model
Next, we will return to the blurUserNameField and rename it to blurPasswordField. Be sure to change the message that gets passed into NoOp (as it is visible in the debugger, and we don't want that message to be misleading) and be sure to use PasswordField to generate the field id:
blurPasswordField : Cmd Msg
blurPasswordField =
    Task.attempt (\_ -> NoOp "blurPasswordField") (Dom.blur (fieldIdForLoginField PasswordField))
Now we can send this command out as part of the EnteredPassword message handler.
But wait! We are already sending out the createAndOrLoginPlayer command in this message handler; can we possibly send two at once? The answer is, of course, Yes! Simply combine them using the Cmd.batch function, which batches a list of commands:
EnteredPassword ->
   ( updateModelFromEnteredPassword model
   , Cmd.batch [ createAndOrLoginPlayer model.input_user_name model.input_password, blurPasswordField ]
   )
Let's test everything out and make sure it all works. Use the debugger to see if we are still setting the token properly, that the input_password field is reset, and if typing on the keyboard once logged in updates the input_password field, which it shouldn't, because we blur the password field:

Assuming your testing went well, (and I'm sure it did,) we are now ready to implement "la pièce de résistance": we get to integrate elm-graphql with our application so we can log in using our GraphQL service. Woot!
Integrating elm-graphql into our application
Now that we are ready to integrate elm-graphql into our application, lets step back a moment and talk about elm-graphql and how to set it up within our project.
elm-graphql was created by Dillon Kearns. It is an elm package that fully supports all GraphQL features in a type-safe way. elm-graphql is also an npm command-line utility that will get your project ready to work directly with your schema by auto-generating decoders, query functions, and other necessary functionality. All we need to do is provide elm-graphql our GraphQL endpoint and a key with permissions to access it.
FaunaDB provides the same GraphQL endpoint to all customers: https://graphql.fauna.com/graphql. The way FaunaDB knows which schema and database need to handle specific requests, then, is by the key that is provided along with each request. We will need to generate a server key that we can provide elm-graphql to access our schema. Don't worry, this is the only use for this key; it will never be used by the client directly:
- Log into your FaunaDB account; you should be brought to your FaunaDB Console Home
- Go to the DB Overview for your "swp" database by clicking on the name of the database
- Go to the Keys page by clicking on the "SECURITY" tab to the left
- Create a new Key by clicking on the "NEW KEY" link

- Set the Role to
Serverand give the key a name (the key is arbitrary, but should be descriptive)
- Save the key and then record the server key that is displayed for later use (this will be the only time you will see the key)
We will now use this key to execute a script that uses elm-graphql to generate our project's GraphQL files under the namespace "SWP":
- Make sure the application is not running
- Open a terminal and navigate to the root of your Shall We Play? project directory
- Generate our "SWP" elm-graphql files for our project by executing the following command:
FAUNA_KEY=<fuana-server-key> npm run build-gql
Where <fauna-server-key\> is replaced with the server key generated before in step 6
Note for the curious, the "build-gql" script makes the following call:
npx elm-graphql https://graphql.fauna.com/graphql --base SWP --output src --header \"authorization: Bearer ${FAUNA_KEY}\"
When this script has completed running, you should see a brand new folder in your "src" directory called "SWP". This directory houses all the files that were auto-generated by elm-graphql. Because we will not be updating these files directly, it is safe to auto-generate our files again, should our schema ever change.
Let's take a look at some of the files that were generated. Browse the Mutation.elm and Query.elm files at the root level of the "SWP" folder.
createAndOrLoginPlayer :
    CreateAndOrLoginPlayerRequiredArguments
    -> SelectionSet String RootMutation
createAndOrLoginPlayer requiredArgs =
    Object.selectionForField "String" "createAndOrLoginPlayer" [ Argument.required "user_name" requiredArgs.user_name Encode.string, Argument.required "password" requiredArgs.password Encode.string ] Decode.string
allUserNames : SelectionSet (List String) RootQuery
allUserNames =
    Object.selectionForField "(List String)" "allUserNames" [] (Decode.string |> Decode.list)
You should see functions whose names match the query and mutation we defined in our schema as well as those added by FaunaDB.
There are also some sub-folders, the most interesting of which is the Object folder, which has a Player.elm file in it. Go ahead and look at this file, and notice that it has functions for each field of our GraphQL Player type.
user_name : SelectionSet String SWP.Object.Player
user_name =
    Object.selectionForField "String" "user_name" [] Decode.string


member_since : SelectionSet Int SWP.Object.Player
member_since =
    Object.selectionForField "Int" "member_since" [] Decode.int
Each of these functions returns what is called a SelectionSet; more on that soon.
Now that we have generated elm-graphql files specific to our project, Let's establish a basic nomenclature and context for GraphQL so we can apply that to how elm-graphql sees the GraphQL world.
Relating GraphQL to elm-graphql
GraphQL has fundamentally just 2 types: Object types and Scalar types. (Enums, Union types, and Interfaces, for example, are just special derivations on these two types.) An Object type has fields. Each field has a type, which can either be Object or Scalar. Ultimately, as you follow the fields down the object hierarchy to the "leaves" of the type structure, they will all be scalar types.
In GraphQL, there are 3 parts to defining a query:
- The operation type (and sometimes an operation name and variables)
- The entry point or root field of the query
- The shape and domain of the data you want back.
The operation type will be one of "query", "mutation", or "subscription". The entry point of the operation is known as a root field. Root fields are defined in the schema in one of 3 special Object types: Query, Mutation, and Subscription (as you might have guessed). Depending on what type is returned from a root field, you will define selection sets to specify the shape (what fields) and domain (using arguments, custom resolvers, etc) of the data you want back. Selection sets are delineated by paired curly braces ({}).
As an example, imagine you have the following types defined in your schema:
type Player {
  user_name: String!
  member_since: Int!
}

type Event {
  organizer: Player!
  title: String!
  description: String
}

type Query {
    allEvents : [Event!]
}
Using this schema we could craft a query operation like the following:
query {
    allEvents {
        title
        organizer {
            user_name
        }
    }
}
In this example, everything between the first set of curly braces is called the root selection set, then allEvents has its own selection set, title has no selection set (because it is a scalar) and organizer has its selection set.
Now let's context switch to elm-graphql. elm-graphql is centered around the SelectionSet type. Any query must have a root SelectionSet, which represents the root field in a GraphQL query. SelectionSets can be nested, just like in a GraphQL query. SelectionSets play a dual role, however, in that they also define what types your data will be decoded to when the data conforming to your root SelectionSet is returned. Because of this dual nature, every field in your GraphQL types, scalar or no, will have its own SelectionSet to facilitate its decoding.
As an example, take a look at the SWP.Object.Player module. This module defines a SelectionSet for each field of the Player GraphQL type. Notice that user_name, for example, is a String scalar type, but it still has a SelectionSet so it can be decoded:
user_name : SelectionSet String SWP.Object.Player
user_name =
    Object.selectionForField "String" "user_name" [] Decode.string
SelectionSets are also used to represent GraphQL fragments as any SelectionSet can be combined with another related SelectionSet.
The SelectionSet type definition is defined with two placeholder type variables:
type SelectionSet decodesTo typeLock
The first type variable is labeled decodesTo and represents the Elm type that this particular SelectionSet should decode to. For example, for the user_name field above, the first type variable is specified as "String", meaning this field should be decoded to a String. The second type variable is labeled typeLock and it represents the context for this specific SelectionSet. Again, looking at user_name above, the context of this specific field is the Player GraphQL Object type. The typeLock ensures that fields from different GraphQL Object types cannot be decoded into the same context.
Assembling our allEvents GraphQL query above with SelectionSets might look something like the following:
type alias Player : {
    user_name: String
}

type alias Event : {
    title : String
    , organizer : Player
}

playerSelectionSet : SelectionSet Player SWP.Object.Player
playerSelectionSet =
    SelectionSet.succeed Player
        |> SelectionSet.with SWP.Object.Player.user_name

eventSelectionSet : SelectionSet Event SWP.Object.Event
eventSelectionSet =
    SelectionSet.succeed Event
        |> SelectionSet.with SWP.Object.Event.title
        |> SelectionSet.with (SWP.Object.Event.organizer playerSelectionSet)

rootQuery : SelectionSet (Maybe (List Event)) Operation.RootQuery
rootQuery = Query.allEvents eventSelectionSet
The two type aliased records are used to capture the data from decoding players and events. Notice that these records do not need to have all of the possible fields for the GraphQL types we defined. The playerSelectionSet function builds upon the field-level SelectionSet for user_name to create a SelectionSet that can decode to a Player. The eventSelectionSet function builds upon both a scalar field SelectionSet and the custom playerSelectionSet to properly decode to the Event type. And the allEvents root field builds upon the eventSelectionSet to build a root query that we can call.
The purpose of the illustration above is to demonstrate how to map a GraphQL schema to elm-graphql. Understanding how to build out SelectionSets in elm-graphql is the most critical part of leveraging this package.
Enough of the theoretical examples… let's dig in and we'll learn the rest of what we need to know about elm-graphql while we implement our GraphQL call to FaunaDB.
Connecting elm-graph To Our GraphQL Service
We will divide up the task of building and executing our createAndOrLoginPlayer mutation into 5 easy steps (seriously, they are not too hard ;):
- Assemble our SelectionSets for the mutation
- Assemble our query request
- Assemble our query response handling
- Test it out
- Do a happy dance because it works!
Step 5 is my favorite.
Let's create a new module that will act as a bridge between our main application code and the "SWP" elm-graphql framework. Call it "Bridge.elm" and save it at the root level of the "src" folder.
In part 1 of this article, we called our createAndOrLoginPlayer mutation from the GraphQL Playground provided by FaunaDB. Let's review that mutation operation here again:
mutation CreateAndOrLoginPlayer {
  createAndOrLoginPlayer(user_name:"cool_user_name", password:"even_cooler_password")
}
The root field of the mutation selection set returns a simple String, which is our token for the logged in player. This means we will not need to assemble any custom SelectionSets. That is good news for our first effort, nice and simple.
In our Bridge module, then, let's move on to step 2 and create our query request. We will start by importing the modules we are going to need – here is how to start the file:
module Bridge exposing (..)

import DataModel exposing (Password, Token, UserName)
import Graphql.Http as Http
import Graphql.Operation exposing (RootMutation)
import Graphql.SelectionSet exposing (SelectionSet)
import SWP.Mutation as Mutation
elm-graphql provides an Http module to create and send GraphQL requests and handle errors. Using this module, we will need to send our request to our FaunaDB endpoint along with our "bootstrap" custom key as a Bearer token. In this light, lets create a few constants in our Bridge module for these two data points; be sure to use your own custom key:
endpointURL : String
endpointURL =
    "https://graphql.fauna.com/graphql"

customKeyBearerToken : String
customKeyBearerToken =
    "Bearer zzA20468euAbCdEMOlvgSa8xRvJLRBQH7BfXh4iu"
Remember, due to the way we set up our access control in FaunaDB, it is safe to include this custom key in our client-side code, but do be sure it is the "bootstrap" key, and not the server key that we used earlier.
Next, let's put together our root field mutation SelectionSet. elm-graphql created the building blocks for us in the "SWP/Mutation.elm" file; take a look again at the createAndOrLoginPlayer function.
createAndOrLoginPlayer :
    CreateAndOrLoginPlayerRequiredArguments
    -> SelectionSet String RootMutation
createAndOrLoginPlayer requiredArgs =
    Object.selectionForField "String" "createAndOrLoginPlayer" [ Argument.required "user_name" requiredArgs.user_name Encode.string, Argument.required "password" requiredArgs.password Encode.string ] Decode.string
Notice its first parameter is a record with the required data to make our createAndOrLoginPlayer GraphQL mutation call. This ensures that there is no way we can call our mutation without providing the necessary parameters.
Let's add a function to our Bridge module that creates our root field mutation SelectionSet with the required user name and password data:
mutationCreateAndOrLoginPlayer : UserName -> Password -> SelectionSet Token RootMutation
mutationCreateAndOrLoginPlayer user_name password =
    let
        required_arguments =
            Mutation.CreateAndOrLoginPlayerRequiredArguments user_name password
    in
    Mutation.createAndOrLoginPlayer required_arguments
We are almost done with step 2. All that is left is to assemble our GraphQL.Http.Request. Our request will be a mutation operation with an endpoint and an authorization header that contains our custom key. Our root SelectionSet we created in the previous step will be our entry point into the operation:
requestCreateAndOrLoginPlayer : UserName -> Password -> Http.Request Token
requestCreateAndOrLoginPlayer user_name password =
    Http.mutationRequest endpointURL (mutationCreateAndOrLoginPlayer user_name password)
        |> Http.withHeader "authorization" customKeyBearerToken
We are now done with step 2, except, instead of exporting everything out of the Bridge module on the first line, which is not necessary, let's limit our exports to the requestCreateAndOrLoginPlayer function.
module Bridge exposing (requestCreateAndOrLoginPlayer)
…
Now we are ready to move on to step 3 which will take place completely within our Main module. Luckily, we have already put in a nice faux login sequence, so we only need to tweak a few things, and it should "just work".
Open the Main.elm file in your editor. Let's start by importing our Bridge module and the Graphql.Http module we will need to send the request:
import Bridge exposing (requestCreateAndOrLoginPlayer)
import Graphql.Http as Http
Next we need to update the handling of the LoggedInPlayer message. Let's tweak the signature of this Msg variant like so:
| LoggedInPlayer (Result (Http.Error Token) Token)
Instead of LoggedInPlayer carrying back just the Token, it will now carry back a Result. A Result, if it is an error, will carry back a Graphql.Http.Error, or, if it is successful, will carry back the Token.
Of course, since we changed the signature of the message, there will be a ripple effect; we will need to update the message handler in the update function, and the model handler for the message itself. The message handler should now look like this:
LoggedInPlayer response ->
   ( updateModelFromLoggedInPlayer model response
   , Cmd.none
   )
Pretty straight forward, we grab the response and pass it on to the model handler to deal with. The changes in the model handler are more extensive:
updateModelFromLoggedInPlayer : Model -> Result (Http.Error Token) Token -> Model
updateModelFromLoggedInPlayer model response =
    case response of
        Ok token ->
            case model.m_player of
                Just player ->
                    let
                        updated_player =
                            { player | m_token = Just token }
                    in
                    { model | m_player = Just updated_player }

                Nothing ->
                    model

        Err _ ->
            model
OK, so maybe not that much more extensive, but it could have been. Let me explain.
Rather than first looking for whether we have a player or not in the model, we now first look to see if the result was Ok or an Err. If the result was Ok, then we grab the token and proceed as we did before by storing the token in the current player, if any. However, if the request had an error, we… well… we do nothing, just return the model. This is not good! What we should do here is handle the error in a thoughtful manner. For example, if the error was a network error, perhaps we could put up a message and ask the user to try again. Or if the error was a GraphQL error, we could check the error and give the user a chance to respond to it, like when an incorrect password is entered. You see, this could have (and should have) been much more extensive of a change!
So this does beg the question why didn't I do it? And the short answer is, so you would have something fun to do after you complete this article! In either case, PLEASE do not ignore thoughtful and thorough error handling in your production code. 'Nuff said!
There is now one final change we need to make before we test our code and see if we have successfully joined our front-end to the backend – we need to update the command that makes the mutation request to use our updated message and new Graphql.Http.Request. This is what it should now look like:
createAndOrLoginPlayer user_name password =
    Http.send LoggedInPlayer (requestCreateAndOrLoginPlayer user_name password)
OK – that's it! We are now done with step 3 and are ready for step 4 - Testing! Start the app, load the front page, bring up your debugger so you can see your messages and model, and let's give it a try!
Here is what I saw when I tried logging in with a new player named "Dirk":

And here is what it looked like in the application:

I hope there were no hidden cameras recording me doing step 5! 🕺🏼🎉🕺🏼
Wait. Wait. I almost forgot. Let's look at the database and see if our new account shows up:

Just like we'd hoped!
Play around a little more. Try logging out and logging back in with the same account. Is a new record created? Log in with a few more new accounts. Enjoy the fruits of your labor for a moment. And when you are ready, we'll move on to using that token to fetch a list of all other players.
One More Time About Error Handling
In playing with logging into different accounts, were you curious enough to test logging back in with a wrong password? I was, and here was what the payload for the LoggedInPlayer message looked like:
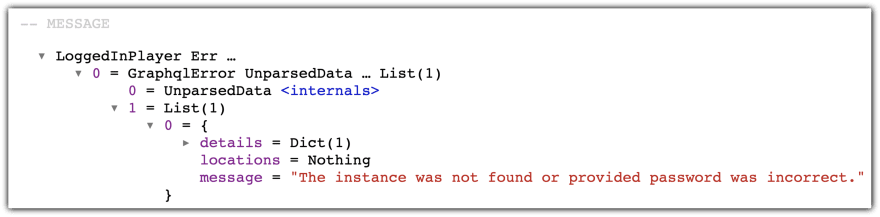
This message is from FaunaDB letting us know that the player instance could not be found or the password was incorrect. In a useful app, we would, of course, let the user know and give them an opportunity to try again.
Getting All User Names
The purpose of saving our login token in the Player record was so that we could use it to get back the user names of all registered players so that we would know whom we could invite to our gaming events. We want to be sure not to send too much data back to the client, so we only send the user names. The user name alone is enough information for us to invite players to events, because, in addition to being the visual presentation of a Player, the user name is the Player's unique identifier in the client application.
Before we add fetching user names to the client, we actually have to clean up some things. You have noticed that even when you created your first real Player, you actually see a list of players after logging in. This is because, for the "stage0" version of the app, I was starting up with some locally created players and events, just so there'd be something to see. Before we start fetching the user names actually stored in the database, we should remove this demo data.
In the DataModel module, go to the defaultModel constant and replace the startingPlayers and startingEvents dictionaries with empty dictionaries (Dict.empty):
defaultModel =
    { input_user_name = ""
    , input_password = ""
    , m_player = Nothing
    , players = Dict.empty
    , events = Dict.empty
    , m_possible_event = Nothing
    , m_poss_event_elem_info = Nothing
    , login_offset = 0.0
    , login_field_with_tab_index = UserNameField
    , dragged_player_position = emptyPlayerPosition
    , drag = D.init
    }
Now delete the startingPlayers and startingEvents dictionaries found in the same module. Log in and take a look at how it looks now:

Ahh… nice and sparkly.
Now we are ready to apply the same 5 easy steps we used to add login functionality to fetching all user names with our newly minted login token:
- Assemble our SelectionSets for the query
- Assemble our query request
- Assemble our query response handling
- Test it out
- Do a happier dance to 'Staying Alive' by the BeeGees because it works!
Step 5 is still my favorite.
When we put together our GraphQL query for createAndOrLoginPlayer, we didn't need a step 1 to assemble any custom SelectionSets because all we were getting back was a String, and this decoding was handled directly in the root field SelectionSet auto-generated by elm-graphql. However, for our query for allUserNames, we are going to do some SelectionSet wrangling to make sure the data comes back in a form that is easily consumable by our application's model.
First, remember that the user names coming back from allUserNames is a list of strings. However, in our model, we track the set of all players in an Elm Dict.
type alias Players =
    Dict UserName Player
An Elm Dict has a nice convenience function to populate it from a List called fromList:
fromList : List ( comparable, v ) -> Dict comparable v
Notice that fromList takes a list of tuples that are composed of a "comparable" key and an arbitrary value. Hmm… this is not exactly what we are getting back from our GraphQL query. Rather, we are getting back a list of comparable UserNames (Strings). For us to easily populate our Players Dict, we will have to transform our SelectionSet of UserNames to a SelectionSet of tuples of type (UserName, Player). No problem.
To accomplish this, we will use a SelectionSet function called map. map takes the decodeTo type of a SelectionSet and transforms it to another decodeTo type:
map : (a -> b) -> SelectionSet a typeLock -> SelectionSet b typeLock
Here a represents the incoming decodeTo type and b represents the outgoing decodeTo type. As noted above, the type we want to transform to is a tuple of type (UserName, Player). Let's first go to our DataModel module and create a new type alias for this type and call it PlayerAssociation:
type alias PlayerAssociation =
    ( UserName, Player )
Next, lets to go our Bridge module and update our imports so we have what we need to work with; note that some of these are updated imports and some are new:
import DataModel exposing (Password, PlayerAssociation, Token, UserName, newPlayer)
import Graphql.Operation exposing (RootMutation, RootQuery)
import Graphql.SelectionSet as SelectionSet exposing (SelectionSet)
import SWP.Query as Query
Now we will create a root field query that will perform the SelectionSet transformation we described above using SelectionSet.map. Let's call this query queryAllUserNames:
queryAllUserNames : SelectionSet (List PlayerAssociation) RootQuery
queryAllUserNames =
    Query.allUserNames
        |> SelectionSet.map
            (\user_names ->
                List.map
                    (\user_name ->
                        ( user_name, newPlayer user_name )
                    )
                    user_names
            )
Notice that we used a constructor called newPlayer to help us generate new players easily. We are now done with step 1.
In step 2, as per normal, we will assemble our query request. The mutation request we created earlier relied on the custom key that all instances of Shall We Play? use to create and log in new players. However, this custom key, thankfully, does not have permission to grab the user name list. To grab the user name list, we need an authorized login token. Let's create a request called requestAllUserNames that takes this token:
requestAllUserNames : Token -> Http.Request (List PlayerAssociation)
requestAllUserNames token =
    Http.queryRequest endpointURL queryAllUserNames
        |> Http.withHeader "authorization" ("Bearer " ++ token)
In order to call this new request from the Main module, we'll need to expose this function:
module Bridge exposing (requestAllUserNames, requestCreateAndOrLoginPlayer)
We are now done with Step 2.
Step 3 will require the biggest changes to the application, all within the Main module. As with all commands, we are going to need a Msg variant so we know when the command has completed. This particular message, shall we call it ReceivedUserNames, will return with the result of the query, which will hopefully be a list of UserNames... wait, I mean, a list of PlayerAssociations… nice, right? Let's add this message, which takes a Result, to our Msg variants list:
| ReceivedUserNames (Result (Http.Error (List PlayerAssociation)) (List PlayerAssociation))
And, of course, Elm will not let us get away with not handling this message in our update function; be sure to specify a model handler:
ReceivedUserNames response ->
   ( updateModelFromReceivedUserNames model response
   , Cmd.none
   )
In our model handler for ReceivedUserNames, we will need to create a new Dict of players. Luckily, thanks to our SelectionSet wrangling, our data is coming back to us in the exactly the form we need to easily create our Players Dict:
updateModelFromReceivedUserNames : Model -> Result (Http.Error (List PlayerAssociation)) (List PlayerAssociation) -> Model
updateModelFromReceivedUserNames model response =
    case response of
        Ok player_associations ->
            { model | players = Dict.fromList player_associations }

        Err _ ->
            model
A red light should have gone off when you noticed I had no error handling here, right? OK. Move along, move along.
We are almost done assembling our puzzle pieces. They are fitting together very nicely, by the way. We now need to create the command that sends the query request. But before we can do that, we need to update the Bridge import to include our new request:
import Bridge exposing (requestAllUserNames, requestCreateAndOrLoginPlayer)
In the tradition of naming our command after the GraphQL query, let's call our command allUserNames and pass in the token we need from the currently logged in player:
allUserNames : Token -> Cmd Msg
allUserNames token =
    Http.send ReceivedUserNames (requestAllUserNames token)
We have our command ready, now all we need to do is discuss when we will call it. Thinking back to the login flow, a player provides their user name, then their password. Then we send off the createAndOrLoginPlayer mutation and receive back the LoggedInPlayer response, where we parse the result and store the login token. I think it makes sense to request all user names right when the token comes back with the LoggedInPlayer message.
Let's look at the current implementation of the LoggedInPlayer message handler in the update function:
LoggedInPlayer response ->
   ( updateModelFromLoggedInPlayer model response
   , Cmd.none
   )
We receive the message response, which is of type Result (Http.Error Token) Token. We don't know at this point if we actually have a valid token so we can't call our allUserNames command here. Looks like we need a command handler to deconstruct the response and retrieve the token, just like the updateModelFromLoggedInPlayer model handler does. Update the LoggedInPlayer message handler with a new command handler called commandFromLoggedInPlayer:
LoggedInPlayer response ->
   ( updateModelFromLoggedInPlayer model response
   , commandFromLoggedInPlayer response
   )
And the details of the commandFromLoggedInPlayer command handler:
commandFromLoggedInPlayer : Result (Http.Error Token) Token -> Cmd Msg
commandFromLoggedInPlayer response =
    case response of
        Ok token ->
            allUserNames token

        Err _ ->
            Cmd.none
If the token is part of the response, we call the allUserNames command with the token and await the juicy details. Note that we wouldn't necessarily need to do any error handling here, because the model handler is also looking at the response and could deal with the error there. Just sayin'.
That's it. Step 3 is done. Time for step 4. I don't know about you, but my stomach is telling me I'm anxious to see the results. Let's give it shot, shall we?
If you haven't been developing with the application running (which I do recommend, as you know), go ahead and launch the app now. Log in and see if you have a user list!
Here is what I see:

And on my screen:

Woot!! Step 5 here I come! Go ahead, click on the link. You know you want to! 'Staying Alive' by the BeeGees. 🕺🎊🕺 🎉🕺.
Congratulations for completing this tutorial!
Retrospective and Conclusion
Let's review what we have accomplished over the course of this article. In part 1 you were introduced to a starter JAMstack site for scheduling game nights with friends called Shall We Play?. Shall We Play?, an Elm application, had rudimentary features, but was not backed by any identity management or data storage, making it shiny but of no real value.
You then learned about FaunaDB, a database built from the ground up for the serverless, JAMstack architecture. We leveraged FaunaDB's native support for GraphQL and built-in identity management to construct a secure GraphQL schema to back Shall We Play?. We developed these services independent of Shall We Play?, knowing that if we designed a good schema, Shall We Play? would be able to easily interface with this service.
In part 2 we turned our sites to the Shall We Play? application and interfaced it with our GraphQL service using an Elm package called elm-graphql. This integration required us to introduce passwords to the login flow, and otherwise only required a few new messages to account for the client-server interactions via GraphQL. Thanks to the intuitive design of elm-graphql, we used the same concepts we knew from GraphQL to easily build out our interface.
Shall We Play? now has secure login and can fetch a list of all registered players. While this is not enough of an improvement to make it good at scheduling gaming events, it is certainly a great example of the power and flexibility of the triumvirate of Elm, GraphQL, and FaunaDB.
While what we have covered is not a complete solution by any means, you should see a clear path to leveraging these technologies to get you the rest of the way simply and securely.
Thanks for joining me!


Top comments (0)