Dear Laravel,
It is said developers all around the world either love, or hate you. As a junior full stack web dev with an admittedly strong
preference for front-end development, it's challenging to remain unbiased towards a server-side PHP framework. After merely
dipping my toes in your ocean of possibilities, however, I
confess I'm unwilling to give up on my journey of exploration
just yet. Today, I'm ready to face a new obstacle: host your
projects online.Wish me luck!
Small vs big(ger) projects
In a previous article I created a step-by-step tutorial to help newbies such as myself get started with hosting a website. Somewhere along the way, however, it became clear to me that there's somewhat of a discrepancy between projects that can be reduced to a simple index file and more comprehensive projects, with subsequently a more complex folder structure, such as those created in Laravel. Who would've thunk it?
In the first scenario, a clean drag-and-drop approach with a FTP program such as FileZilla is enough to make your code appear outside of your local environment. Laravel projects, require a few extra steps. Hence, this tutorial as a knight in shining armour in the occasion you got stuck at "Step 7 - Upload your website files", - just like me.
The next steps are meant to seamlessly follow up the initial tutoria. So, before you start, make sure you have:
- A webhosting package at your disposal, linked to your local files
- A connected domain name
Gottit? Okay, let's go!
- Finetune PHP settings
- Add a subdomain
- Update the SSL settings
- Recompile for production
- Upload your files
- Update your .env file
- Upload your database(#step7)
- Update your .env file
- Update local changes(#step9)
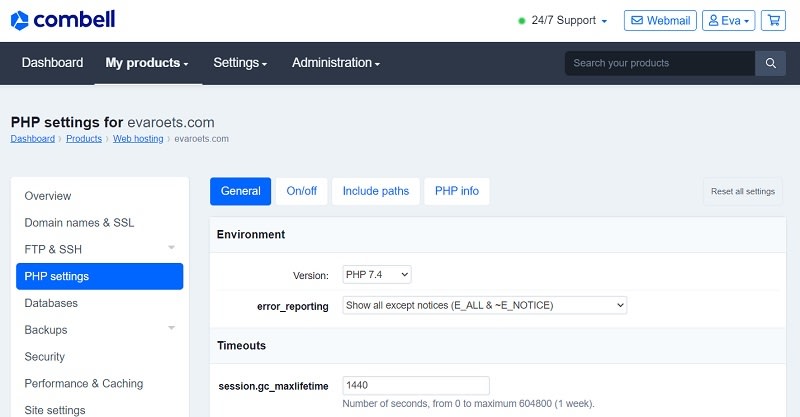
1. Finetune PHP settings
Click the My Products drop-down menu and select Webhosting > Manage hosting > PHP settings (in the left sidebar menu). Select the PHP version corresponding to your local environment under the General menu tab. Add any additional extensions you need under the On/off menu tab, although default settings should suffice.
2. Add a subdomain
Click the My Products drop-down menu again and select DNS & Forwarding Management. Next, click Add website to create a new subdomain for your Laravel site.
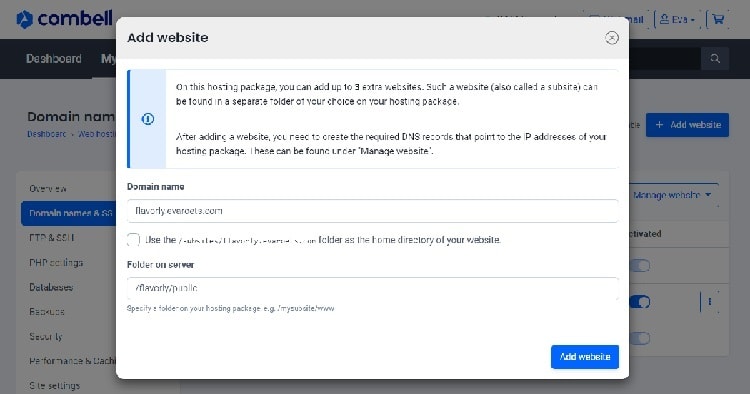
- Add a domain name, for example yourLaravelProjectName.yourDomain.com,
- Uncheck the checkbox,
- Specify a folder on the server, for example yourLaravelProjectName/pulic;
3. Update the SSL settings
Click the Manage website of your subdomain and select SSL settings. Next, activate Forcing HTTPS. Bear in mind that changes could take up to 15min to take effect.

4. Recompile for production
As you may remember, the app.css and app.js scripts of your project aren't ready for production, as they aren't minimized and thus still a lot of overhead code. Before uploading your local files, and every time you update your code:
- Stop the watch script with
Ctrl + C, - Run the command
npm run prod, - Upload all required files to your hosting (see next step),
- Restart the watch script with
npm run watch;
5. Upload your files (finally!)
Make sure your are connected to your hosting via (S)FTP or SSH:
- Go back to FileZilla and select all local site folders on the left side panel; except .git, .idea, database, node_modules and tests,
- Also select the .env file,
- Simply drag and drop these folders and files to the www folder on the right side panel to upload to your hosting,
- Sit back and be patient, this may take a few minutes,
- Cross your fingers and test your website's homepage*
* A multitude of things potentially go wrong here, depending on your project and set-up. As the list would be too extensive for this article - and it's impossible for me to guess, go for the default approach: Google your error message and/or ask help from someone more experience. Sorry, guys.
6. Update your .env file
After the last step and the likelihood of potential errors, I'm giving a chance to catch your breath here. This next step is clean and simple. Go back to FileZilla and update the (remote, not local) .env file:
APP_NAME="The name of your website"

APP_ENV=production

APP_KEY=base64:e77jPGGcqZ4sNADHI5f/icC+LFnBw34hpRJKSf2ftnI=

APP_DEBUG=false

APP_URL=https://the-name-of-your-website
💡 If you're trying to solve production errors, temporarily set APP_DEBUG=true. This will give you, and any other visitors, detailed error information. Be sure to switch back to APP_DEBUG=false to display the 500 | Server Error as soon as you're done debugging.
7. Upload your database (optional)
If you're working with a database and you've successfully uploaded your project , you should be getting the following error message: SQLSTATE[HY000] [1045] Access denied for user 'username'@'localhost'. This means it's high time to get that database connected too! First, go to your local phpMyAdmin:
- Select your project database on the left,
- Select the menu tab Export and save the .sql file locally,
Next, go back to the Combell control panel,
- Click the My Products drop-down menu and select Webhosting > Manage hosting > Databases (in the left sidebar menu),
- Click Add to create a new database on your hosting,
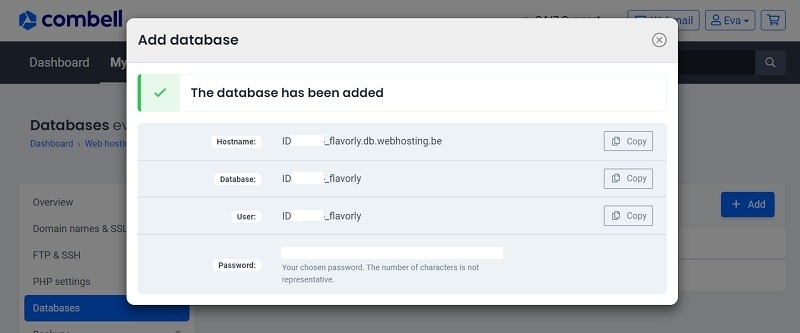
- Open your remote phpMyAdmin via the three vertical dots on the right side of the created database,
- Select the menu tab Import and import your previously saved .sql file;
8. Update your .env file
Let's do it again: update that update the (remote, not local) .env file:
DB_CONNECTION=mysql

DB_HOST=IDxxxxxx_flavorly.db.webhosting.be

DB_PORT=3306

DB_DATABASE=IDxxxxxx_flavorly

DB_USERNAME=IDxxxxxx_flavorly

DB_PASSWORD=xxxxx
This is the moment of truth: navigate to one of pages relying on the database in your browser and verify the database connection. Again, there's a number of potential errors that may occur here. Hopefully, there's none (too much) of that and you're now the proud owner of your own live website!
9. Update local changes (optional)
A project is never truly finished, am I right? So, when you make any changes to your local project files,
- Recompile your assets for production,
- Upload files individually to your remote host,
- Don't forget to delete files from your remote host as well,
- In case you update your composer packages, delete the whole external vendor folder and upload it again.
Not quite venturing to any Laravel projects yet and looking more for a step-by-step guide starting from scratch to host your website? I got you covered!


Oldest comments (0)