Created: Apr 7, 2021 2:25 PM
Last year I had the opportunity to learn SwiftUI development and specifically to work on making views more accessible. At that time, I set up for the team a list of best practices. Today, I've decided to share those with you.
How VoiceOver works
First let's see how VoiceOver works. VoiceOver is the screen reader used on iOS by users with low vision or who are blind. Here are several gestures that you can perform anywhere on the screen, that allows you to navigate through visual elements :
➡️ swipe to the right to go to next element
⬅️ swipe to the left to go to previous element
⬇️ ⬆️ swipe top to bottom or bottom to top allows you to do an action that you can configure with the rotor (see below)
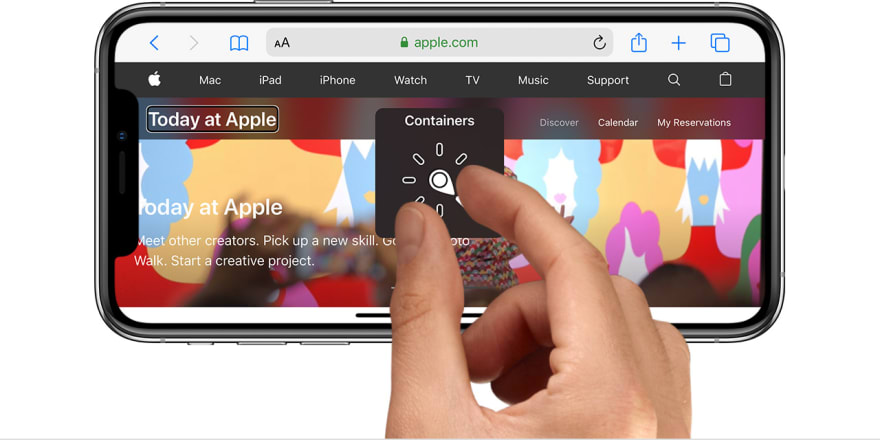
🔂 drawing a circle with 2 fingers will open what is called the "Rotor". It allows you to configure swipe action top <-> bottom, for example : Navigation between headers or containers.
👆 single tap on an item to read an element.
👆👆 double tap to activate an element for example a button.
When an element is focused, VoiceOver will give user information about it. Basically VoiceOver read 4 properties for each element :
- Label : for exemple the text of the element "Today"
- Value : "Wednesday 8th of July" (it can give more information related to the Label. It's not mandatory, but can be useful for EditText for example).
- Trait : "Button" or "Static text" or "Heading" or "Container" or "Adjustable"
- Hint : To give a hint to the user about the action that can be performed on this element. for example "swipe top or bottom to change the value of this element" (not mandatory also)
Those 4 properties are pronounced in this order.
How I test accessibility
One good practice I applied to make my application usable for people with visual impairment was testing 2 different use cases :
- Use VoiceOver and validate that the user experience is good 🔊
- Test my application with different font size in accessibility parameters 🔎 (that can be done easily with the Accessibility Inspector. You can find it in XCode menu ⇒ Open Developer Tool ⇒ Accessibility inspector)

Of course, there are other use cases to make an app accessible, and visual impairment is not the only thing you should care about.
Use case 1 : using VoiceOver 🔊
Here are some test I perform to test user experience with VoiceOver :
- User can easily go from an element to another, and the order of element is logical
- User can identify the goal of an element thanks to a good combination of label / value / trait / hint
- VoiceOver does not focus on decorative elements such as image background.
- Some elements are grouped to facilitate comprehension and navigation (for example : an icon and its label)
- If using modal view, make sure that the content underneath is not accessible through VoiceOver
Use case 2 : change the font size 🔎
Here are some test I perform for this use case :
- Texts scale when changing for a larger font in accessibility settings
- User can still see all the content
- Nothing overlaps
Best practice list
When my test fails, most of the time I use a solution from the following list :
1/ Make the font scalable
If you have trouble having your font scaling up with accessibility settings, you should probably take a look at this tutorial : https://www.hackingwithswift.com/quick-start/swiftui/how-to-use-dynamic-type-with-a-custom-font
2/ Change the reading order with voiceOver
In some situations I had to tell VoiceOver which element to focus on before another one.
HStack {
    buttons().accessibility(sortPriority: 1)
    toggle().accessibility(sortPriority: 2)
}.accessibilityElement(children: .contain)
In this example, toggle will have focus before buttons when the user navigate between elements with VoiceOver.
3/Combine elements together
To prevent users from navigating through every single piece of elements when it's not needed, I group elements together and set a specific label for this group.
HStack{
    Button(....)
    Text(.....)
}.accessibilityElement(children: .combine)
.accessibility(label: Text("Title"))
Example :

4/ Change the trait type
In some situation, I wanted had to add or remove a trait :
Text(title)
  .accessibility(addTraits: .isHeader)
  .accessibility(removeTraits: .isStaticText)
5/ Disable visibility of an element
A good practice in accessibility is to hide decorative elements such as background images.
HStack(){
    //...
}.background(
        Image(I.home_nav_background)
            .accessibility(hidden: true)
)
6/ Add a more explicit label
For example, in my app I displayed a time in this format HH:mm. To make it more understandable with VoiceOver, I had to override the label of the Text (overwise VoiceOver was saying something like "HH colon mm")
Text(hour)
.accessibility(label: Text(hour.toSpelloutAccessibleTime(format : "HH:mm")))
7/ Adapt the design when the font becomes larger
It can be useful t to adapt design when the font become larger. Here is how I've done it.
@SwiftUI.Environment(\\.sizeCategory) var sizeCategory: ContentSizeCategory

// Then you can simply use greater than and less than comparator to change property values for example
HStack{
    //
}.frame(height: sizeCategory > .extraLarge  ? 100 : 40)
Conclusion
That's it for the best practices I've tried to apply when I was developing in SwiftUI last year. The Swift API has probably evolved by now, so my best advice for SwiftUI beginner like I was (and that I actually still are as I am an android developer) is to learn from Hacking with swift website. There is a series of articles about accessibility : https://www.hackingwithswift.com/books/ios-swiftui/accessibility-introduction
If you are not familiar with accessibility and the usage of VoiceOver, I also advise you to try VoiceOver on a real device. You can have a look to this video to learn more about how to use VoiceOver on your iPhone
I Hope my personal best practice will help you. Don't hesitate to reach out on Twitter : @FannyDemey


Top comments (0)