
Author: Chris Anderson
Date: April 9, 2019
Originally posted on the Fauna blog.
GraphQL is a common language that backend and frontend developers can use to specify the shape and content of the data they request. By decoupling backend development from frontend API requirements, GraphQL removes tons of friction from the development process and allows frontend developers to make progress without waiting on backend changes. Similarly, it allows backend developers to focus on the logical aspects of providing a data API, not the procedural headaches involved in formatting the data for the front end. Because it’s such a compelling technology, there is an abundance of GraphQL middleware, caches, developer tools, and other components.
FaunaDB is proud to join this ecosystem with the beta release of our GraphQL API. This post shows you how to get started. Simply supply a GraphQL schema definition and FaunaDB is ready to handle your queries. Thanks especially to Erick Pintor and the engineering team for their hard work on this feature.
This series will continue and cover more advanced features like relations. If you start writing code today, please join our community Slack and let us know how it’s going. These are beta features, so your feedback today would have a big impact on the production release.
Steps to get started
By following these steps, you’ll be up and running with the FaunaDB GraphQL API. It should take about 15 minutes, or less if you are already familiar with the tools.
1. GraphQL schema definition file
First you need a GraphQL schema definition file. You’ll upload this file to our GraphQL endpoint URL. Here is a simple example:
type Todo {
   title: String!
   completed: Boolean
}
type Query {
   allTodos: [Todo!]
   todosByCompletedFlag(completed: Boolean!): [Todo!]
}
To follow along at home, put this in a file called schema.gql. We’ll use curl to upload it to the FaunaDB GraphQL import API.
2. Create a database using Fauna Shell and a provision a key
To create a database with Fauna Shell, and import your GraphQL schema, issue the following commands and copy the key secret (it doesn't matter what name you give your database, just be consistent):
$ fauna create-database graphql
created database 'graphql'
$ fauna create-key 'graphql'
creating key for database 'graphql' with role 'admin'
 created key for database 'graphql' with role 'admin'.
 secret: <key-secret>
 To access 'graphql' with this key, create a client using
 the driver library for your language of choice using
 the above secret.
Alternatively, you can create a database via dashboard.fauna.com, and provision a server secret. Copy this secret for the next command.

3. Import the graphql file into FaunaDB’s GraphQL endpoint
The FaunaDB GraphQL API can import your schema definition, creating all of the classes and indexes as necessary. The key secret you just provisioned (followed by the : character) is sent as an HTTP header to scope the query to the database you just created. Run this command to import your schema:
$ curl -u <key-secret>: https://graphql.fauna.com/import --data-binary "@schema.gql"
Schema imported successfully.
Use the following HTTP header to connect to the FaunaDB GraphQL API:

{ "Authorization": "Basic <encoded secret>" }
You can see in the result that the GraphQL schema was imported successfully. Looking at the database in the Shell, you can see the generated schema:
graphql> Paginate(Union(Classes(), Indexes()))
{ data:
  [ Class("Todo"),
    Index("todosByCompletedFlag"),
    Index("allTodos") ] }
You can see FaunaDB has generated a schema to support your GraphQL environment. The Fauna Shell can be useful for understanding the underlying indexes and classes, but everyday work can be done via GraphQL. Once we are connected via the GraphQL explorer, we can view the schema in GraphQL form.
4. Open GraphQL Playground
Open GraphQL Playground https://electronjs.org/apps/graphql-playground, and connect it to https://graphql.fauna.com/graphql.
You'll have to configure GraphQL Playground to send a base64 encoded "Authorization" header with your secret in it. This is provided as part of the response to importing a schema.
In GraphQL Playground, configure the headers tab with:
{
   "Authorization": "Basic <encoded-secret>"
}
5. Inspect the GraphQL schema
FaunaDB adds a few metadata attributes to the GraphQL schema that you provided, and you can see this in GraphQL Playground:
directive @collection(name: String!) on OBJECT
directive @index(name: String!) on FIELD
directive @embedded on OBJECT
directive @relation(relation: String) on FIELD
directive @unique(unique: String) on FIELD
scalar Date

scalar Long

type Mutation {
  createTodo(data: TodoInput!): Todo!
  updateTodo(
    id: ID!
    data: TodoInput!
  ): Todo
  deleteTodo(id: ID!): Todo
}

type Query {
  findTodoByID(id: ID!): Todo
  todosByCompletedFlag(
    _size: Int
    _cursor: String
    completed: Boolean!
  ): TodoPage!
  allTodos(
    _size: Int
    _cursor: String
  ): TodoPage!
}

scalar Time

type Todo {
  _id: ID!
  _ts: Long!
  title: String!
  completed: Boolean
}

input TodoInput {
  title: String!
  completed: Boolean
}

type TodoPage {
  data: [Todo]!
  after: String
  before: String
}
One of my favorite things about GraphQL is first class support for inspecting the schema, and seeing exactly how FaunaDB models objects and inputs in GraphQL is a powerful aid in development.

6. Run GraphQL Queries
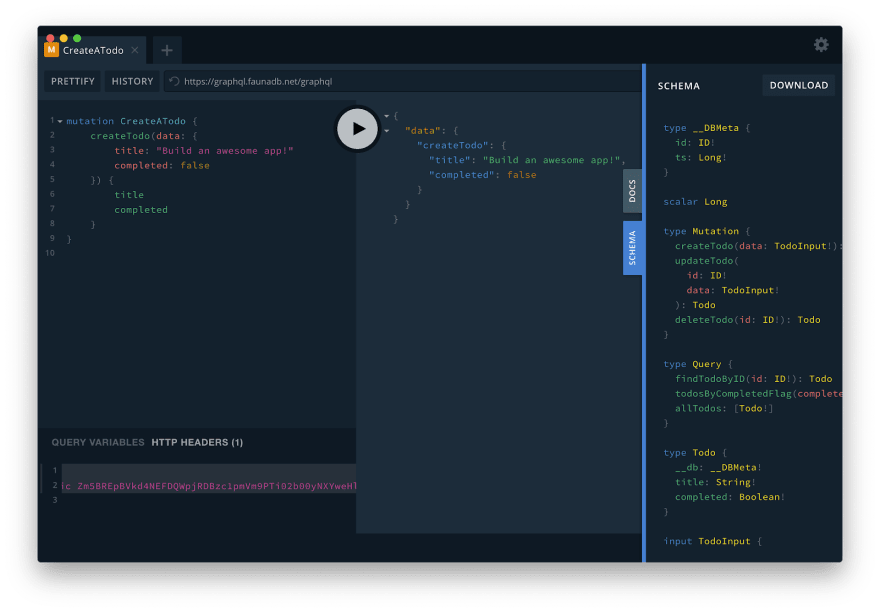
Once connected, you can run queries like the following to create a todo:
mutation CreateATodo {
   createTodo(data: {
   title: "Build an awesome app!"
   completed: false
   }) {
       title
       completed
   }
}
Once you have created a few todos, you can list them with this query:
query FindAllTodos {
  allTodos {
    data {
      _id
      title
      completed
    }
  }
}

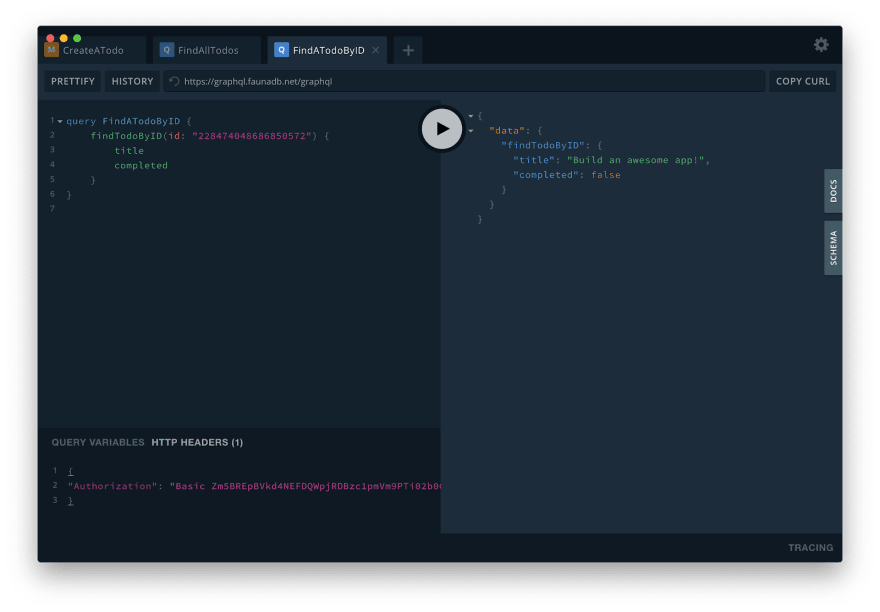
Or you can look up an individual todo by its ID. Take one of the IDs from the last query's result, and paste it in place of in the following query:
query FindATodoByID {
   findTodoByID(id: "<id>") {
       title
       completed
   }
}
You can also update a todo by its ID. Just paste one of the IDs in place of in this query:
mutation UpdateATodo {
   updateTodo(id: "<id>", data: {
       title: "Build two awesome apps!"
       completed: true
   }) {
       title
       completed
   }
}
Similarly, delete a todo, based on its id, with this query:
mutation DeleteATodo {
   deleteTodo(id: "<id>") {
       title
   }
}
Automatic index generation
When a parameter is defined with a flag, it can be used as an index term. For example, this query lists all todos that are completed:
query FindAllCompletedTodos {
  todosByCompletedFlag(completed: true) {
      data {
        title
      }
  }
}

In Part 2 of this series, we’ll look at relationships by expanding our example to include lists, so that we can query for all of the todos in a list, retrieving their title and other metadata in a compact GraphQL representation that’s right for your app.


Top comments (0)