
Table of contents:
- introduction
- First steps
- Setting up the environment folder
- creating the custom environment
- How to exit from the environment
- Final thoughts
Introduction
to be able to learn machine learning with python we have to set up the environment first.
To create machine learning environments for python we need Anaconda, a software that has all the packages that we need to actually begin.
Anaconda weight circa 3 gigabytes of space and has all the tools that we may need, but for beginners it is overwhelming and we'll never use all of it, at least for now, all of it, that's why we'll download miniconda, with all the packages that we need for then import them in jupyter notebook, a good software to display data.
First steps
The link for miniconda is here.
On the page you'll see something similar to this:
 click the first one
To download miniconda you have to go through all the same steps for installing any other software, so I'll not cover this part. You can just click next without changing anything for then waiting for the extraction.
 This is an old image, so expect to install a higher version
After the installation is completed to set up the environment you have to open the anaconda prompt, a special command prompt used for activating our machine learning environment.

After you have opened it you'll see in front of you the anaconda command prompt.

So now that we have all the basics done, let's go through the next part.
Setting up the environment folder
First of all, we want to create the folder on the desktop so that you can access it easily, to do so you have to do
(base) C:\Users\name> cd Desktop
where "name" is the name of your users, as you have already seen, mine was "gabri"
with this, you are now on the desktop and the command prompt will now look like
(base) C:\Users\name\Desktop>
and now we have to just create the folder that will contain the project for then download the packages in it.
(base) C:\Users\name\Desktop> mkdir sample_project
and then
(base) C:\Users\name\Desktop> cd sample_project
Now that we are in the folder where everything about our project will be stored, we can proceed with making it our custom environment.
Creating the custom environment
To effectively create the custom environment in the sample folder you just type this in the command prompt
(base) C:\Users\name\Desktop\sample_project> conda create --prefix ./env pandas numpy matplotlib scikit-learn
But what are we doing here?
We are creating the folder env that will be our custom environment.
After typing the command you'll see something very similar to

Scrolling down you'll see the request to proceed.
Just type y.

After the end of the downloads, the environment will be created and to activate you'll have to type
(base) C:\Users\name\Desktop\sample_project\env> conda activate C:\Users\name\Desktop\sample_project\env
Now the "(base)" will vanish and the path will look similar to
(C:\Users\name\Desktop\sample_project\env) C:\Users\name\Desktop\sample_project\env>
Now I have, on purpose, not installed yet jupyter notebook.
I did so to show you how to install packages/components even after the setup of an environment is completed.
You type
(C:\Users\name\Desktop\sample_project\env) C:\Users\name\Desktop\sample_project\env> conda install jupyter notebook
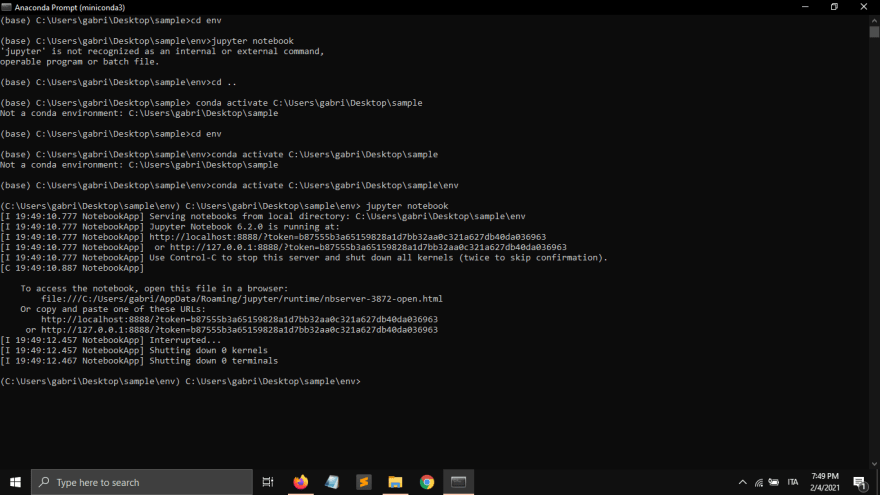
After the download is finished you can open jupyter notebook writing its name in the anaconda command prompt
(C:\Users\name\Desktop\sample_project\env) C:\Users\name\Desktop\sample_project\env> jupyter notebook
Jupyter notebook interface
Jupyter will open its interface in your browser, where you'll see something similar to this
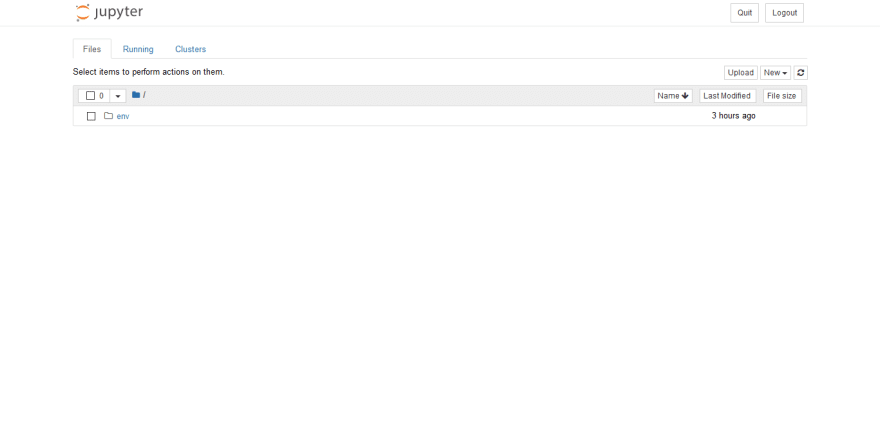
To create a notebook file we go on new and then click on python 3

And after the click, it will open a new tab

This is similar to the shell in python and you can actually write commands for then execute them with shift + enter

Now, the last step is to import all the libraries that we'll need to begin machine learning.
Type in the jupyter notebook shell
import pandas as pd
import numpy as np
import matplotlib.pyplot as ply
import sklearn # abbreviation of sci kit

And this is all to set up our machine learning environment
How to exit from the environment
To go out from our environment we have to open the anaconda command prompt and press control + c and then enter
then we simply type conda deactivate

Now the this is no more a machine learning environment but a simple folder again.
Final thoughts
Now that we have done all that we needed to set up our machine learning environment we have to just begin working.


Oldest comments (0)