In this post I will be discussing how you can create a signed apk and .aab file from your react native app which will be production ready and can be deployed to google play store or any other play store.
In my previous post I discussed about integrating Splash Screens to your react native app by giving a list of steps.
I will be doing the same for this post.
Step 1:
First complete your react native app code and test it vigorously. Do not test it yourselves. Just give it to your friends and relatives such that they see the bugs you had forgotten to fix or you had never even thought of.
Because I had two Intent Filter in my splash screen code so two icons were present as you can see my below,

My friend pointed it out and I removed it and it works fine now.
I updated the code of my previous post as well.
So please test your app perfectly before launching because if you are a single developer like me it will be really hard to find bugs.
Now back to the objective of this post , we will need to create a production ready key store for our react native app which will identify us as the owner of the app for 27 years.
At first if you want to have a debug key do as follows,
Go to your android/app folder in terminal and create a debug key with the below code,
keytool -genkey -v -keystore debug.keystore -storepass android -alias androiddebugkey -keypass android -keyalg RSA -keysize 2048 -validity 10000
The default password is android
So for production ready code, go to the root of your react native app folder and copy and paste the code below in terminal and do as follows,
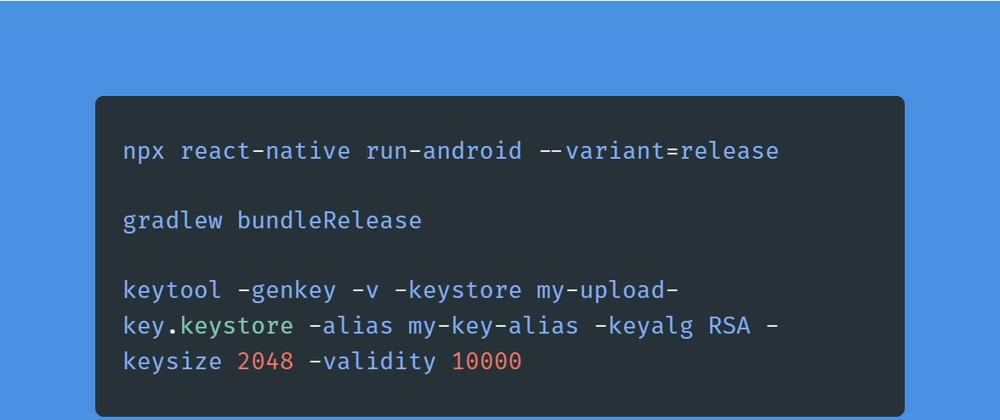
keytool -genkey -v -keystore my-release-key.keystore -alias your_alias_name -keyalg RSA -keysize 2048 -validity 10000
The alias name must be set by you. So after running the command you will be shown some questions, answer them and use "y" for the last command to get your production ready keystore in the root folder of your react native app.

Now if you want to view your keystore you can either use a terminal command or you can download a keystore viewer for system.
So for terminal use the below code in terminal where your keystore is located,
keytool -v -list -keystore name_of_keystore.keystore
Or you can use this software to easily view keystore files. You have to download it from their website: keystore-explorer.
I use the second method as it is really easy to open your app by just clicking on it and giving the password name.
Step 2:
Now you have to move the keystore file from root folder to android/app folder.

After successfully doing that hop on to the gradle.propertiesfile in android/gradle.properties
Now add the following code in the file.
MYAPP_UPLOAD_STORE_FILE=release.keystore
MYAPP_UPLOAD_KEY_ALIAS=alias
MYAPP_UPLOAD_STORE_PASSWORD=Password-Typed-while-creating-keystore
MYAPP_UPLOAD_KEY_PASSWORD=Password-Typed-while-creating-keystore
Make sure you change the values. On to the next step.
Step 3:
Hop on to android/app/gradle.build and add the below code.
....Here some code resides

signingConfigs {
        debug {
            storeFile file('debug.keystore')
            storePassword 'android'
            keyAlias 'androiddebugkey'
            keyPassword 'android'
        }

       release {
            storeFile file('release.keystore')
            storePassword 'password'
            keyAlias 'alias'
            keyPassword 'password'
        }
    }

buildTypes {
        release {
            ...
            signingConfig signingConfigs.release
        }
    }

....Here some code resides
Add them precisely at the above mentioned parts to not get errors.
Step 4:
So all the required code has been inserted, now lets build the signed apk.
Go to terminal and copy paste the below code from your root folder.
cd android
gradlew bundleRelease
It will take some time to build and you will get an .aab file in your android/app/build/outputs/bundle/release/app.aab folder.
Now Google wants .aab file but Amazon and Samsung want an Apk. So to get an Apk simply run the below command to get an apk for testing purposes in the root folder of your app.
npx react-native run-android --variant=release
Now for production ready Apks do as below,
cd android
gradlew assembleRelease
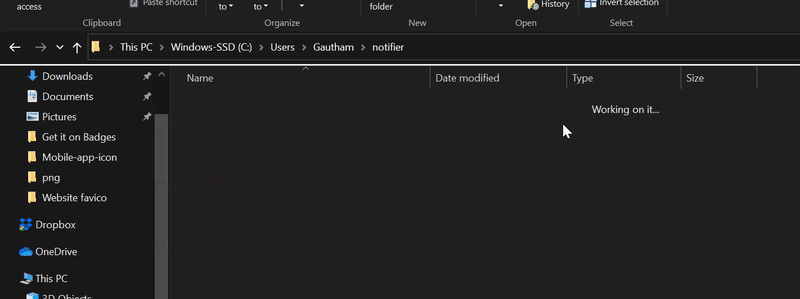
You will get an Apk in the C:\Users\Gautham\notifier\android\app\build\outputs\apk\release folder.
The final structure of your build folder will look like below.
Congratulations you have made yourselves a signed apk which will can be published to the app store instantly(if they review and accept it!!!),
So that's how you create an signed Apk for your react app.
The resources I used is from the react native documentation React Native signed apk and some stack overflow posts.
If you want to learn about gradlew assembleRelease and other gradlew stuff just go to this stackoverflow link.
Just a snippet copy pasted from the above link:
Usage
- I use assembleRelease to build an apk that I want to share with other people.
- I use installRelease when I want to test a release build on a connected device.
- I use bundleRelease when I am uploading my app to the Play Store.
I have successfully submitted my app for review in Amazon and Samsung play stores with the above mentioned concepts. I Think they will accept my app and will be live by Dec 30 2020. Wish me luck in the comments!!!
In my next post I will discuss how to publish your app for review for google with afore mentioned steps.
If you want to know about publishing to Samsung and Amazon please mention it below in the comments.
Thank you for reading!!
Check out my portfolio: Gautham's portfolio
Check out my blog: coding-magnified.tech
Check React Project about budgeting: neo-budget


Oldest comments (0)