While image recognition is a seemingly simple task for humans to do, it’s actually a very complicated process. Computers can already “see” images in the sense that they store the data of every tiny pixel to make up the full picture. However, recognizing patterns in this data and creating a quickly searchable memory of common patterns is extremely difficult.
Fortunately, Google Cloud provides a very simple API to detect the content of images using computer vision. This can be useful to categorize images, recognize text, or even moderate content to prevent inappropriate images from being posted on your site. In this article, we will quickly build CatBook—an image sharing site which only allows pictures with cats in them, no dogs allowed!
Can Has Cats?
Cats are awesome. Let’s build an app where people can post pictures of their cats… but what if somebody uploads a dog? Manually moderating our uploads to only contain cats would be overly time-consuming. To solve this problem, we’ll use computer vision to detect the content of each upload, and reject anything other than cats. In this tutorial, we’ll show you how to quickly build a sleek modern interface to automatically moderate images using computer vision.

Users can upload pictures of cats to CatBook, but not dogs, even if they are really “cute”.
Try out the finished project demo yourself.
Project Setup
To build CatBook, we will use React, Node.js, Heroku, and Google Cloud. We will use Heroku to host a simple Node.js + Express web server which connects to Google Cloud for Cloud Vision. While we could use AppEngine, Heroku makes it easier to get an app running quickly with minimal setup. Just push code updates to GitHub and it automatically updates your app! This is great for a small project and allows you to quickly iterate while developing and testing. If CatBook takes off, then it can also scale for millions of cats lovers!

Start with a Basic “Hello World” App
First, we’ll create a basic “Hello World” app to get our project dependencies and app installation setup. We’ll add our frontend and backend afterward. Start by creating a new directory for CatBook. We will use a monorepo file structure, so the client and server files will all live within the same repository. Run git init and npm init -y in this folder to generate a repo and package.json file. Next, bootstrap a basic React project by running npx create-react-app client. This will set up React inside the client subfolder, which is where the frontend of our application will live.
# create catbook folder and cd into it
mkdir catbook && cd $_
# initialize project
git init
npm init -y
# create react app
npx create-react-app client
Now we’ll set up a basic static server. First create a folder called server. Initialize a package.json and install the dependencies below. Some of these will not be used until later in this article, but we might as well install them now.
# cd out of the client directory
cd ..

# make the server folder and cd into it
mkdir server && cd $_

# initialize package.json
npm init -y

# install dependencies
npm i express dotenv multer @google-cloud/vision
Let’s create a static server with Express to serve up our React app. Create a file called index.js in the server folder and add the following code. Locally, we will develop with the server on port 8080, but Heroku automatically assigns a port via the PORT environment variable. To handle both cases, we’ll serve on either the environment variable if it exists, or default to port 8080.
/server/index.js
const express = require('express');

const app = express();

app.use(express.static(path.join(__dirname, '../client/build')));

// start the server
const port = process.env.PORT || 8080;
app.listen(port, () => console.log(`Hello world! Listening on port ${port}`));
We’ll also create a start script for the server to run this file. Open the server’s package.json and add a start script like so:
/server/package.json
"scripts": {
  "start": "node index.js",
  "test": "echo \"Error: no test specified\" && exit 1"
},
Now, before we can test this, we need to build the React app. First cd into the client folder, then run npm run build to build the app. When it finishes building, we can run our express server and test it out on localhost:8080.
cd ../client
npm run build
cd ../server
npm start
# Hello world! Server now listening on localhost:8080
If you see the React starter page, you’re ready to deploy this initial app! First, create a GitHub repository and push your project to it. Now, let’s create a Heroku app and set up automatic deployments from this repository.
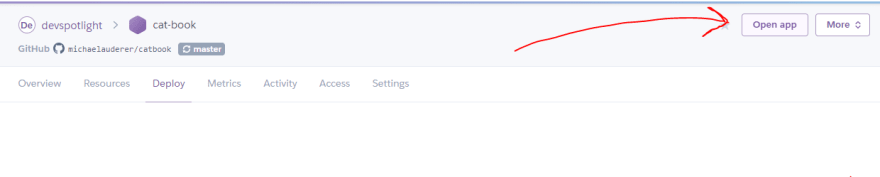
From the top-right corner of the Heroku dashboard, click New > Create new app.

Give your app a suitable name, then from the Deploy tab, select GitHub as the Deployment Method.

In the next section, search for your GitHub repository and select it to connect it to your Heroku app. Then, in the section below, click “Enable Automatic Deploys”. Now, when you push commits to your master branch, Heroku will automatically deploy the latest version of your app! This allows your master branch to serve as a single source of truth for your app—the live version always represents the code in the master branch. There is no concern over exactly which code has been deployed.

Now, to make the code we already pushed live, click Deploy Branch in the final Manual Deploy section.

Now, in the top-right corner of your Heroku app, click Open App. This will open a new tab to the URL of your live site!
Now that we have a Heroku app set up with automatic deployments from GitHub, we can simply push changes to our repository so they automatically update on our live site.
Set Up Google Cloud Vision API
In order for CatBook to work, we need to build a backend which accepts image uploads and connects to Google Cloud for image recognition. In this section, we’ll set up Google Cloud Vision API and build a server to handle image uploads, as well as sending back all the most recent cat uploads.
Google Cloud
First, create a new Google Cloud project. From the sidebar, click APIs & Services, then click Enable APIs and Services at the top of the page.

This is where you can enable a wide variety of APIs and Services within your Google Cloud project. Search for “vision” and click Cloud Vision API, then click Enable.

Now, the Cloud Vision API is enabled for this project. The final step from the Cloud Console is to create a service account key. This will authenticate our Node.js server to access the APIs in our Google Cloud project. To do this, go to the create service account key page. Select New service account from the service account dropdown list, then give it a name. From the Role dropdown list, select Project > Owner. Make sure the Key Type is set to JSON, then click Create.

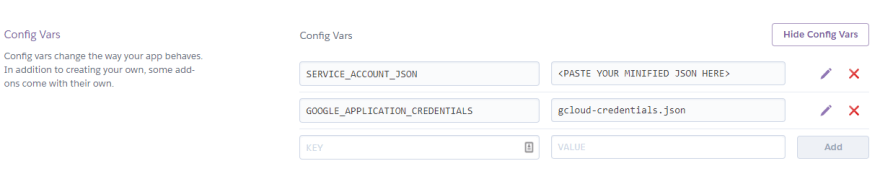
This will download a JSON file to your computer. However, it’s best if we don’t actually store this file in our repository. Instead, we will convert it into an environment variable and set it through the settings of our Heroku app. This allows us to keep the credentials out of our repository, and it also provides a way to easily change the credentials without having to re-deploy the entire app.
First, run npx minify-json /path/to/service-account-key.json. This will minify the file into a single line. Then, open the file and copy the minified JSON. Create a file called .env in your server folder, pasting the minified json as the first value:
/server/.env
SERVICE_ACCOUNT_JSON=<PASTE YOUR MINIFIED JSON HERE>
GOOGLE_APPLICATION_CREDENTIALS=gcloud-credentials.json
Now, go to your Heroku app dashboard and open the Settings tab. In the Config Vars section, click Reveal Config Vars. This is where you can add environment variables for your Heroku app. Add the same keys/values as you just added to the .env file.
All set! Now we’ll be using our local .env file during development, and the Heroku Config Vars in production. In this example, we’re using the same variables. However, in a live project, this makes it very easy to have various environments, database connections, credentials, and so on for development, staging, and production.
Create a Back-end Server with Node
With our credentials in place, we’re ready to build the core of our application! Open the server/index.js file. We will only use this file for the server to keep things simple for this article.
At the top of the file, we need to initialize dotenv to read our .env file, if it exists.
// load environment variables from .env file, if it exists
require('dotenv').config();
Now, let’s import everything we’ll need. We’re also promisifying some file-system functions to make our code a bit cleaner later on.
// import dependencies
const path = require('path');
const util = require('util');
const fs = require('fs');
const express = require('express');
const multer = require('multer');
const { ImageAnnotatorClient } = require('@google-cloud/vision');

// promisify the filesystem functions we need
const readdirAsync = util.promisify(fs.readdir);
const statAsync = util.promisify(fs.stat);
const unlinkAsync = util.promisify(fs.unlink);
Now, since Google Cloud SDK needs a JSON file for authentication, we’ll need to write out the service account key from the environment variable to a file on the server. Make sure to use the synchronous version writeFileSync, because this needs to be finished before booting up the server.
fs.writeFileSync(path.join(__dirname, 'gcloud-credentials.json'), process.env.SERVICE_ACCOUNT_JSON);

// create Cloud Vision client
const visionClient = new ImageAnnotatorClient();
Next, let’s initialize an Express app and create an uploads folder. We’ll then configure multer to use this upload folder for file uploads, which is middleware used later in our post request handler.
// create express app
const app = express();

// define path for file uploads
const uploadPath = path.join(__dirname, 'uploads');

// create the upload folder if it doesn't exist
if (!fs.existsSync(uploadPath)) {
 fs.mkdirSync(uploadPath);
}

// configure multer to use the uploads folder
const upload = multer({ dest: 'uploads/' });
Now it’s time to set up our post request handler. This handler will take care of image uploads, sending them to the Google Cloud Vision client and storing them only if they’re a cat. The handler then sends back an error if the image is not a cat.
// handle post requests with images to the /upload path
app.post('/api/upload', upload.single('image'), async (req, res) => {
 try {
   if (!req.file) {
     res.sendStatus(500);
     return;
   }

   // get the file path uploaded via multer
   const filePath = req.file.path;

   // send the image to gcloud for label detection
   const results = await visionClient.labelDetection(filePath);

   // pull label data out of the response from google
   const labels = results[0].labelAnnotations.map(x => x.description.toLowerCase());

   // check if we can has cat
   const hazCat = labels.includes('cat');

   if (hazCat) {
     res.status(201).json({ message: 'Thanx 4 has cat.' });
   } else {
     // remove the non-cat from our server
     await unlinkAsync(filePath);
     res.status(400).json({ message: 'No has cat!' });
   }
 } catch (err) {
   console.error(err);
   res.sendStatus(500);
 }
});
Now we’ll be able to upload cats to the server, but this is CatBook, so we also want to display a feed of cats! First we need a get request handler for retrieving individual cats. This is a simple function which simply sends back a file from the server based on the cat ID.
// handle requests to individual cats
app.get('/api/cats/:id', (req, res) => {
 const { id } = req.params;
 const catPath = path.join(uploadPath, id);
 res.sendFile(catPath);
});
Next, we need a way to get the feed of latest cats. We’ll send back the most recent 20 cats uploaded to the server. To do this, write another get request handler for retrieving a “cat feed”.
// handle get requests to retrieve the last uploaded cat
app.get('/api/cats', async (req, res) => {
 try {
   // read our uploads directory for files
   const files = await readdirAsync(uploadPath);

   // read file stats asyncronously
   const stats = await Promise.all(
     files.map(filename =>
       statAsync(path.join(uploadPath, filename))
         .then(stat => ({ filename, stat }))
     )
   );

   // sort files chronologically and slice the last 20
   const cats = stats
     .sort((a, b) => a.stat.mtime.getTime() - b.stat.mtime.getTime())
     .map(stat => stat.filename)

   res.status(200).json({ cats, message: 'Here r catz' });
 } catch (err) {
   console.error(err);
   // if there's an error, just send an empty array
   res.status(500).json({ cats: [], message: 'Internal server error' });
 }
});
Finally, finish off the server with the code we previously had for serving the built react site and listening on the proper port.
// serve static frontend from all other routes
app.use(express.static(path.join(__dirname, '../client/build')));

// start the server
const port = process.env.PORT || 8080;
app.listen(port, () => console.log(`Server listening on port ${port}`));
That’s it! Our server is ready to go. Continue to the next step where we build our frontend. If you want to test the server so far, you can use Postman to easily test out these endpoints.
Build the Frontend in React
We have a backend going, so now it’s time to build a nice frontend for CatBook. Change the directory back into the client folder and install two dependencies: http-proxy-middleware, which we’ll use for development, and reactstrap, which will make it easy to build a nice interface. We’ll also remove all the demo files in the src folder, since we’ll be creating our own from scratch.
cd ../client
npm i http-proxy-middleware reactstrap bootstrap
rm src/*
Now we’ll start by bootstrapping React in /client/src/index.jsx. Follow the instructions for setting up reactstrap by importing bootstrap to your index.jsx file.
We’ll also need to create a proxy file, /client/src/setupProxy.js. This file tells react-scripts to proxy any requests to the /api route back to the server running on localhost:8080. This only impacts development, but it’s important to have in order for our API calls to work locally!
Now we’ll add some basic CSS in /client/src/index.css. We hardly need much at all, and while there are better ways to use styles in react (such as Styled Components or Radium), those are outside the scope of this tutorial. The “crossed” class will be used later to show that dogs (and other non-cats) are not allowed! ;)
Now, we’ll need a button to click which will upload our cats! We’ll create an UploadButton component, which accepts a loading prop to make it disabled while loading. This will provide some nice feedback to the user while uploading cats (or forbidden non-cats)!
/client/src/upload-button.jsx
import React, { PureComponent } from 'react';
import { Button } from 'reactstrap';

class UploadButton extends PureComponent {
 fileInputRef = React.createRef();

 handleClick = () => {
   this.fileInputRef.current.click();
 }

 render() {
   const { children, loading } = this.props;

   return (
     <div>
       <input
         ref={this.fileInputRef}
         accept="image/*"
         style={{display: 'none '}}
         type="file"
         onChange={this.props.onUpload}
       />
       <Button
         color="primary"
         disabled={loading}
         onClick={this.handleClick}
       >
         {children}
       </Button>
     </div>
   )
 }
}

export default UploadButton;
Now, it’s time to create the meat of our frontend application. The App component will handle all the API calls and display the main content of CatBook. First, start by importing what we need, including our newly created UploadButton component, and set up the App component with some state.
/client/src/app.jsx
import React, { Component } from 'react';
import { Nav, NavItem, NavLink, Navbar, NavbarBrand } from 'reactstrap';
import UploadButton from './upload-button';

class App extends Component {
 state = {
   loading: false,
   success: null,
   message: '',
   preview: null,
   cats: []
 };
We’ll give this component a function to fetch cats from the server. This will fetch a list of the latest 20 cats from the /api/cats endpoint, then individually fetch each image and shift it into the component state. We’ll also run this function when the component mounts.
 componentWillMount() {
   this.fetchCats();
 }

 fetchCat = (id) => {
   return new Promise(async (resolve) => {
     // fetch the cat image from our server
     const res = await fetch(`/api/cats/${id}`);
     const catBlob = await res.blob();
     // create an object URL to display in an <img> element
     const url = URL.createObjectURL(catBlob);
     // shift the cat into state
     this.setState(prevState => ({
       cats: [{ id, url }, ...prevState.cats]
     }), resolve);
   })
 };

 fetchCats = () => {
   this.setState({ cats: [] }, async () => {
     const res = await fetch('/api/cats');
     const { cats } = await res.json();
     for (const cat of cats) {
       await this.fetchCat(cat);
     }
   })
 };
Now we can receive cats, but we need a function to upload them. This handler will be used in our UploadButton’s onUpload event prop, which triggers when a file is selected. Here, we create some FormData from the selected file, update the state to loading (for our loading spinner on the UploadButton), and send the file to the server. If the file is not a cat, we’ll display it as a crossed-out preview to show the user that he or she cannot upload dogs (or other non-cats)!
 handleUpload = async (event) => {
   const file = event.currentTarget.files[0];
   const formData = new FormData();

   // show loading spinner
   this.setState({ loading: true, preview: null, message: '' });

   // add the file to the form data
   formData.append('image', file);

   try {
     // send the form data to our server
     const res = await fetch('/api/upload', {
       method: 'POST',
       body: formData
     });

     // parse the server response as json
     const { message } = await res.json();
     // we should receive a 201 response if successful
     const success = res.status === 201;
     this.setState({ success, message });

     // read the uploaded file
     const reader = new FileReader();
     reader.onload = (e) => {
       console.log(e.target.result);
       if (success) {
         // shift the uploaded cat onto the state
         this.setState(prevState => ({
           cats: [{ id: prevState.cats.length, url: e.target.result }, ...prevState.cats]
         }));
       } else {
         this.setState({ preview: e.target.result });
       }
     }
     reader.readAsDataURL(file);

   } catch (err) {
     console.error(err);
   }

   // hide loading spinner
   this.setState({ loading: false });
 };
Last but not least, the render function for our App component puts everything together and binds all the proper state values to the page.
   return (
     <>
       <Navbar color="light" light>
         <NavbarBrand href="/">CatBook</NavbarBrand>
         <Nav>
           <NavItem>
             <NavLink href="https://github.com/michaelauderer/catbook" target="_blank">GitHub</NavLink>
           </NavItem>
         </Nav>
       </Navbar>
       <div style={{ padding: 32 }}>
         {message && <h6>{message}</h6>}
         {preview && (
           <div className="crossed">
             <img src={preview} alt="upload preview" style={{ maxHeight: 300 }} />
           </div>
         )}
         <UploadButton
           onUpload={this.handleUpload}
           loading={loading}
           success={success}
         >
           Upload Cat
         </UploadButton>
         <br />
         <br />
         <hr />
         <br />
         <h6>Recent cats:</h6>
         <br />
         {cats.map(cat => (
           <div key={cat.id}>
             <img src={cat.url} alt="cat" style={{ maxHeight: 300 }} />
           </div>
         ))}
       </div>
     </>
   );
 }
}

export default App;
Congratulations! We’ve now built a fully featured CatBook, both front and back. Commit these changes to GitHub and watch as it automatically deploys via Heroku. Very convenient!
Securing Our Cats
If we want to take this one step further, we could add extra security to our system. This will help prevent those nefarious dogs from attacking our systems. Heroku offers site-to-site VPN connections with GCP. Instead of exposing our servers to the open internet, we can put them behind a secure VPN connection. Effectively, this means our Heroku dyno and GCP are routed on the same internal network. If we want to extend our GCP footprint with additional servers or APIs, we can do it securely without the complexity of managing a public-facing server. This allows you to use Heroku and GCP together, even for applications that have sensitive data or strict compliance requirements.
Conclusion
Computer vision is an extremely powerful tool which is changing the way computers interface with the world around them. CatBook is really only the beginning; you can take this starter project and with only a few modifications, turn it into something completely different! Heroku makes it simple to automatically deploy fast and scalable applications directly connected to your GitHub repository. Learn more about Heroku for building your next great project.


Oldest comments (2)
Are the APIs free? what is the cost/image? how many image/sec at what latency? can it support real time video?
Is it better (energy, latency, throughput) to do the classification on the device using or use cloud APIs
Thanks.
The first 1000 images/mo are free which you can see on Google's pricing page cloud.google.com/vision/pricing. I think the vision API is designed for images but you can submit stills from your videos. The GCP platform is fairly scalable can handle high volumes of requests. For a social media use case like this one you'd want to do filtering server side to prevent cases where people try to bypass on-device filtering.