In this guide, we will be walking through the process of setting up a single node, private Ethereum blockchain using the Geth client. The purpose of this guide is to help readers understand how the blockchain works from the miners' perspective and what goes into the mining process. Although this guide touches on key areas of the Ethereum mining process, it is by no means an exhaustive guide.
It is also important to note that the Ethereum tokens which will be mined using this guide are not useful outside our private blockchain and can not be transferred or used on the public Ethereum network.
What is Ethereum
Ethereum is a decentralized platform that runs smart contracts; applications that run exactly as programmed without the possibility of downtime, censorship, fraud, or third-party interference.
It is a technology that is home to digital money, global payments, and applications. The community has built a booming digital economy, bold new ways for creators to earn online, and so much more. It's open to everyone, wherever you are in the world – all you need is the internet.
What is Geth
Geth, also known as Go-Ethereum, is a command-line tool for running an Ethereum node; it is implemented in the Go programming language and is one of the three original implementations of the Ethereum protocol alongside Aleth (C++) and Trinity (Python).
Installing and running Geth
Geth supports a variety of Operating systems and instructions on how to download and install Geth for your OS can be found here.
After installing Geth, Open a command-line interface and create a private-blockchain directory to house the blockchain data for our new private blockchain and navigate into it:
mkdir private-blockchain && cd private-blockchain
To verify that Geth was properly installed run:
geth
Geth should connect to the public Ethereum blockchain (Mainnet) and begin the search for peers as well as syncing blockchain data (block headers, transactions, state, and receipts trees). Your command-line should look like this:
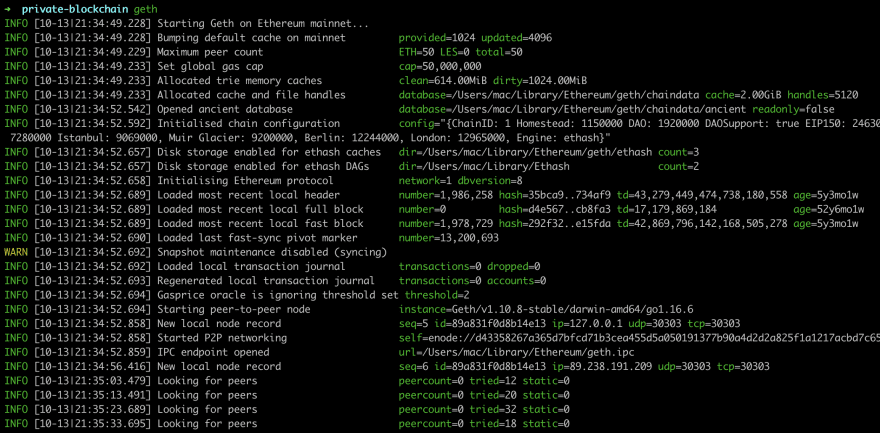
Note: Geth attempts to download an entire blockchain into your PC which might take several days as well as use up a ton of computer disk space, Since mining the public Ethereum network isn’t the purpose of this guide, use “Control C” to stop this process.
Setting up a private Ethereum blockchain
To clarify what we’ll be doing here:
- We will be creating two Ethereum accounts on Geth:
account 1andaccount 2. The first account will serve as our master account and will hold any Ethereum token (expressed in Wei) we earn from mining new blocks on this private blockchain. - We’ll also be running a single node private blockchain on our local computer.
- We’ll go ahead and mine some new Ethereum blocks on our private blockchain and be rewarded with some tokens (Wei).
- Finally, we will create an Ethereum transaction by sending some earned tokens from our master account (account 1) to account 2.
1. Creating two new Ethereum accounts on Geth
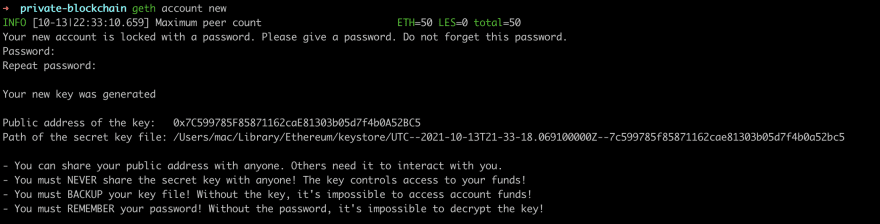
To create Account 1, run the command:
geth account new
This will open an interactive interface and prompt you to enter a password (make sure to remember this password as it will be used later). You should also copy out the newly generated public address key somewhere as you’d be needing it later in this guide. Your terminal should look like this:
Repeat the above process to create Account 2.
2. Creating a single node private blockchain
We’ll be needing a genesis block to create our blockchain network, don’t know what a genesis block is? Well, A Genesis Block is the name given to the first block of a blockchain, such as Bitcoin. A blockchain consists of a series of blocks that are used to store information related to transactions that occur on a blockchain network. Each of the blocks contains a unique header, and each such block is identified by its block header hash individually.
Inside the private-blockchain directory, create a json file with the name genesis-block.json and copy in the below content:
{
  "config": {
    "chainId": 15,
    "homesteadBlock": 0,
    "eip150Block": 0,
    "eip155Block": 0,
    "eip158Block": 0,
    "byzantiumBlock": 0,
    "constantinopleBlock": 0,
    "petersburgBlock": 0,
    "ethash": {}
  },
  "difficulty": "1",
  "gasLimit": "8000000",
  "alloc": {},
}
Next, initialize Geth using our newly created genesis-block.json file like so:
geth --datadir . init genesis-block.json
Your console should look like this:

Notice how the last line says “Successfully wrote genesis state”, this simply means we’ve successfully created our private blockchain, we can go ahead and get it started by running:
geth --allow-insecure-unlock --datadir . --keystore ~/Library/ethereum/keystore --networkid 4568 --http --http.addr '0.0.0.0' --http.corsdomain "*" --http.port 8502 --http.api 'personal,eth,net,web3,txpool,miner' --mine --miner.etherbase=YOUR_ETHEREUM_ADDRESS_HERE
Note: Remember to replace YOUR_ETHEREUM_ADDRESS_HERE above with the public address key of Account 1 you created above. Doing that simply tells our private blockchain where to send the tokens reward whenever a new block is successfully mined by our node. At this stage, your console should look like this:

Note: running the above command starts an interactive session that continues to print stuff to the console, thereby not allowing us to type in new commands. Leave it running that way and open a new console, then navigate into the private-blockchain directory and type in this command to begin interacting with our private blockchain:
geth attach geth.ipc
This will load the web3 module into the console and expose a ton of functions. Let us check the account balances for the two newly created accounts using the exposed functions, run:
eth.getBalance(eth.accounts[0])
eth.getBalance(eth.accounts[1])
Both account balances should return 0, this is because we’re yet to perform any mining activity.
3. Mining Ethereum blocks
To begin mining on our private blockchain, we simply need to run:
miner.start()
Allow it to run for a while and then stop the process with:
miner.stop()
Notice that you’ve been rewarded with some tokens (depending on how long you left it running) for mining new blocks, this can be verified by checking the balance of account 1, our master account.
eth.getBalance(eth.accounts[0])
4. Sending Tokens (Wei) from one account to another
Before we can transfer tokens between accounts, we will need to authenticate as the owner of the sending account, in this case, account 1.
personal.unlockAccount(eth.accounts[0])
This will prompt you to enter your password. Once that is completed, we can go ahead and transfer some tokens to account 2.To transfer tokens, we simply use eth.sendTransaction() which accepts a bunch of parameters but most are optional and can be left out as reasonable defaults are used under the hood.
In your terminal, run:
eth.sendTransaction({from: eth.accounts[0], to: eth.accounts[1], value: 500000})
if you've followed up till this point, your terminal should look like this:
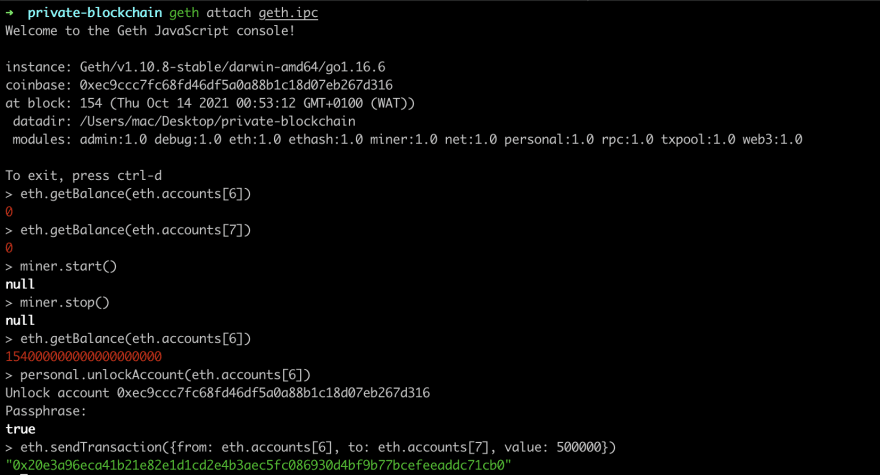
Note: In the image above:
- I used accounts on indices 6 and 7 as opposed to indices 0 and 1, this is because I have performed these tasks several times resulting in me having more than 2 accounts.
- Value here is in Wei (default) (Where 1 Ether equals 1 x 10 ^ 18 Wei).
At this point, the transaction has been created but has not been mined. Remember we ran miner.stop() just before creating this transaction, what happens under the hood is that this transaction is added to the mempool (queue) of transactions waiting to be added to a block by a miner, and given that we are the only miners on this network, we will have to mine this transaction ourselves. Now go ahead and mine a new block by running:
miner.start()
Give it a couple of seconds then run:
miner.stop()
You can verify that some tokens were sent to the receiving account by running:
eth.getBalance(eth.accounts[1])
That's it, you've successfully set up and mined a single node, private Ethereum blockchain.
References
https://www.investopedia.com/terms/g/genesis-block.asp
ConsenSys blockchain developer Bootcamp resource
https://geth.ethereum.org
https://ethereum.org/en


Oldest comments (7)
This article is very elaborate and englighting 🔥
Thank you Edwin.
Hi Arinze,interesting post.I wonder if these steps will work on a fork of Geth called MEV-Geth?Whats the difference between mining vanilla Geth vs MEV-Geth?Thanks
github.com/flashbots/mev-geth/blob...
Why my accounts does not listed in my blockchain?
i keep getting
Fatal: invalid genesis file: invalid character '}' looking for beginning of object key string
i've tried different text editors.
i've tried typing it out manually.
same error.
any suggestions?
{
"config": {
"chainId": 15,
"homesteadBlock": 0,
"eip150Block": 0,
"eip155Block": 0,
"eip158Block": 0,
"byzantiumBlock": 0,
"constantinopleBlock": 0,
"petersburgBlock": 0,
"ethash": {}
},
"difficulty": "1",
"gasLimit": "8000000",
"alloc": {}
}
Great tutorial!
I followed your path and have created such a project. Thank you!
BTW, I wonder if we could connect to our private blockchain account1 and account2 using MetaMask?