This article is part of oAuth series using AWS Cognito, see links to other articles in Series Summary: oAuth Made Simple with AWS Cognito.
In previous post - Setting up implicit grant workflow in AWS Cognito, step by step, we show that it takes only 4 simple steps in order to set up implicit grant workflow in AWS Cognito. With that, you can start using AWS Cognito to protect your web server and its resources. However, implicit grant is deprecated and no longer recommended. Why?
As you can see from its Testing Time section, the access token issued by AWS Cognito is returned directly back to the client side and used to access other resources on the server side. The same token can be also used to access Cognito Auth APIs and retrieve other user information. Consequently, it is a highly sensitive piece of information and by allowing client side direct access exposes a significant security risk.
Authorization code grant type is recommended as replacement as a standard practice when it comes to client side authentication for either web or mobile applications. How and why is authorization code grant type better? In the next section, we will deep dive into a typical login workflows through authorization code grant type to find out.
Typical Login Workflows through Authorization Code Grant Type
When we use a web or mobile application, if you exit the app and come back within a short period, you usually have the convenience of access without the need to login again. What goes behind it in order to achieve it? The first workflow we will go through explains exactly how. See its sequence diagram below.
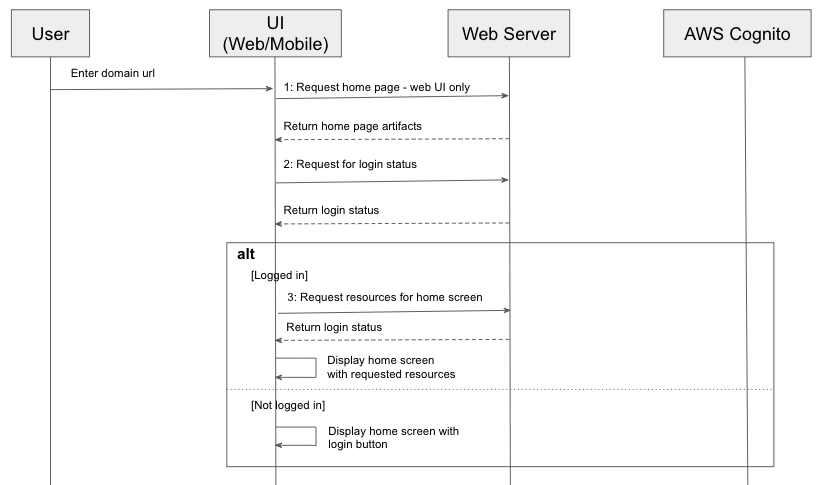
As you can see from the above diagram, once the client loads up all the artifacts (as in Step 1, which is only needed for web applications, as mobile app has all client resources as part of its installation bundle), the first thing is to call web server to check its login status, by passing in a session token which it saves locally (either in session or local storage or cookie for web applications or keychains for iOS app or Shared Preferences for Android app). If the session token is still valid, it will request for the resources for home screen (Step 3), and render home screen without requiring further authentication. However, if the login status check returns false, the session token is removed from the client storage, and the home screen is displayed with login button, allowing users to re-authenticate using the login workflow as described in the next sequence diagram.
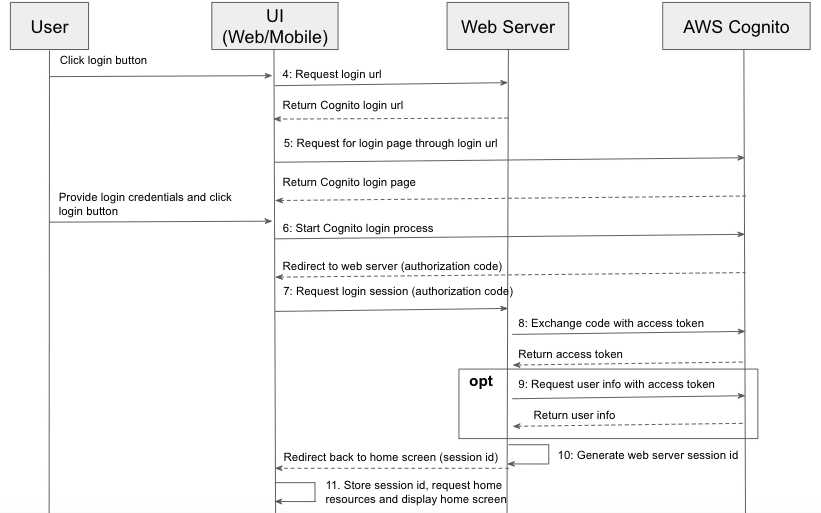
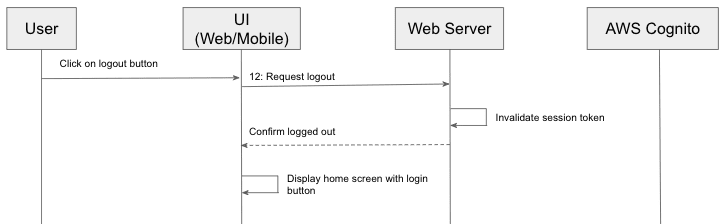
This diagram is the meat of login workflow using authorization code grant type. Once the user clicks login button, the first request the client (either mobile or web application) will make to the server is to request for a login url, which points to the login page of AWS Cognito. Some application may opt to hard code this on the client side, however, I would recommend to request dynamically from web server as the url usually would contain a client ID (issued by AWS Cognito, see Step 2 of previous article, app client ID and secret setting). By not hardcoding it on the client side, web server can rotate its app client credentials periodically which is generally required for security compliance, without the need to release a new version of client (even though web application does not need installation, it still require a change to its client artifacts on server side). The login url call usually returns a HTTP code of 302 (or newer standard calls for either 303 or 307), and so the browser would redirect to login url automatically and load the login page of Cognito page that you set up in precious article with custom domain prefix for this web server. Once the user provides login credential and clicks the login button, the Cognito authentication process kicks off. Assuming that user provides a correct login credentials, the process would end up by redirecting browsers back to the callback url that is set up previously using Cognito (see Step 3 of previous article, call back url part) with a query parameter named “code”. The callback url is usually set up to be one endpoint exposed by web server, and so once the browser points to this url, it triggers the server side logic to exchange the code for an access token with Cognito, validating that this user is a valid user and optionally the web server can make another call to retrieve extra user info including email, phone number, etc, using App Client ID and Secret as client credentials to authenticate with Cognito auth API. Afterwards, the web server would generate its own session token, and redirect the browser to home screen with session token as part of query parameters. Once the client receives the token, it can use it to request for any protected resources on the server side, and it may also opt to store it locally so that the user does not need to re-authenticate if she comes back before the token expires, as explained in previous workflow. Once users no longer requires the application, (s)he may want to terminate the session explicitly by triggering a log out workflow. By logging out explicitly, it notifies the web server to invalidate the session token permanently, hence no one can exploit the token for any ill purpose, like described in the following sequence diagram.
To summarize, there are generally 3 webflows related when it comes to login workflows through authorization code grant type using AWS Cognito (or any other identity provider). To support these workflows, web server would usually need to expose the following 4 endpoints, with each of them handling their own responsibility.
- Login url endpoint (Step 4) returns a login url to web or mobile client, pointing to AWS Cognito login page. It usually would contain an app client ID and call back url which points to the exchange code endpoint of web server, that is explained next.
- Exchange code endpoint(Step 7) exchanges an authorization code for an access token with AWS Cognito, and optionally requests and stores for later use some user information like email, user sub, and custom user attributes if any.
- Login status endpoint (Step 2) returns the login status of client, by passing in a session token stored locally. If it does not find one stored locally, it would skip this step.
- Logout endpoint (Step 12) would trigger the process on the web server side to invalidate the session token issued earlier by exchange code endpoint.
Through all 4 endpoints, the access token is never returned directly back to client. Instead, only authorization code which is usually one time use only and short lived is returned to client side, and passed to web server where it is exchanged for an access token through a secure channel, which is never exposed to client side. Hence, compared to implicit grant type, authorization code grant type is inherently more secured and recommended as a replacement for implicit grant type for both web and mobile applications.
Setting Up Authorization Code Grant Type in AWS Cognito
Now that we know what the login workflows look like if we want to go with authorization code grant type, next in this section, we will talk about how to enable this grant type in Cognito. We would follow exactly the same 4 simple steps as described in previous article - Setting up implicit grant workflow in AWS Cognito, step by step when setting up implicit grant type, except that in step 3 - Config App Client Settings, we want to select authorization code grant type instead of (or in addition to) implicit grant type, like in the following snapshot.

As we would need app client ID and secret in order to retrieve login url and user info (see Step 9 in previous section), we also want to note down the app client secret in Step 2 (of previous article), before moving to next section.
Testing Time
Now comes the fun part. We will go through all the different calls in the previous section using browser and curl commands. It will help readers to have better ideas over how each step works in authorization code grant type. First, assemble a url in the format of https://<domain prefix>.auth.us-east-1.amazoncognito.com/oauth2/authorize?client_id=<client id>&redirect_uri=<url encoded call back url>&scope=openid&response_type=code. In our case, it would be
https://sunnyoauth.auth.us-east-1.amazoncognito.com/oauth2/authorize?client_id=1vvp0tt53g1uhntoa5bmvnvk2a&redirect_uri=https%3A%2F%2Fexample.com&scope=openid&response_type=code
Copy and paste the above url into Chrome browser. Follow instructions to sign up a new account (for the first time only), or sign in if you have an existing account. Continue to follow the instructions, until you get a url in the format of
<callback url>/?code=<authorization code>
Save the <authorization code> for our next step. Also execute the following command in terminal to create a base64 encoded client credentials, and save it for next step.
echo -n <client id>:<client secret> | base64
It is worth noting that the authorization code is one time use and valid for only 5 minutes. It is designed this way on purpose for security considerations.
Next we will show how we can exchange the authorization code above for an access token, by passing in the base64 encoded client credentials and authorization code. Assemble a curl command in the following format:
curl --location --request POST 'https://<domain prefix>.auth.us-east-1.amazoncognito.com/oauth2/token' \

--header 'Authorization: Basic <base64 encoded client credentials>' \

--header 'Content-Type: application/x-www-form-urlencoded' \

--data-urlencode 'code=<authorization code>' \

--data-urlencode 'grant_type=authorization_code' \

--data-urlencode 'redirect_uri=<callback url>'
In our case, it would be the following url (for security purpose, I exclude the encoded client credentials part).
curl --location --request POST 'https://sunnyoauth.auth.us-east-1.amazoncognito.com/oauth2/token' \

--header 'Authorization: Basic <base64 encoded client credentials>' \

--header 'Content-Type: application/x-www-form-urlencoded' \

--data-urlencode 'code=102b28e1-51ea-48f6-bc55-97533d88cf30' \

--data-urlencode 'grant_type=authorization_code' \

--data-urlencode 'redirect_uri=https://example.com
And the result will contain an access token as one of fields as shown below:
{

   "id_token": "eyJraWQiOiJZSHE1...<others skipped to save space here>",

   "access_token": "eyJraWQiOiJmYUd...<others skipeed to save space here>",

   "refresh_token": "eyJjdHkiOiJKV1...<others skipped to save space here>",

   "expires_in": 3600,

   "token_type": "Bearer"

}
With the access token in hand, through the same process in previous article, we can get the user info through /oauth2/userInfo by passing in the access token in “Authorization” http header, with the value in the format of Bearer <access token>. Copy and paste the following curl command and run it through the terminal:
curl -X GET https://sunnyoauth.auth.us-east-1.amazoncognito.com/oauth2/userInfo -H 'Authorization: Bearer <access token>'
And the result is shown below:
{"sub":"95fb5614-18b0-4f48-b49e-d8601934a1df","email_verified":"true","email":"fakeemail@hotmail.com","username":"jinlianwang"}
And the same as pointed out in previous article, the access token is a JWT token and can be inspected using online JWT inspector to see its payload.
Summary
This concludes this quick introduction over how to use authorization code grant type to authenticate users to your web or mobile apps. In summary, compared to implicit grant workflow, it is more complicated to support authorization code grant workflow. Web servers would usually need to expose 4 endpoints, such as login url, login status, exchange code and log out. Using browser and curl command, we showed how an authorization code can be retrieved, and exchanged for an access token in AWS Cognito. Hope that would help you understand how to implement the 4 endpoints for your web server. In next article, we will provide a sample project implementing these 4 endpoints through a AWS Lambda function. Stay tuned!
Update (5/16/2021): Finished sample projects demoing how to support authorization code grant type using AWS Lambda and Cognito. I implemented it in two different languages, this one in Python and another in Java. For readers who may have a language preference for Node.js, there may be an upcoming implementation soon if I find time. The corresponding web client is implemented using Angular framework, and find its github repo here. Web client is deployed in S3 bucket, feel free to give it a try (your registration information will not be used for any purpose than your trying) at oAuth Demo Project.
Update (6/1/2021): Just implemented a sample project in Node.js using AWS Lambda, API Gateway and Cognito. Will try to find some time to write up an article sharing more details over Java/Node.js/Python implementations next. Stay tuned.


Top comments (1)
hi! I know this is kinda old post but I was thinking what tokens do you save in the session storage? (to avoid logging in again) is it still the access token retrieved by using the authorization code?