
Chatbots are a powerful way to provide conversational experiences for any software product. Each conversational experience depends on the implementation of the chatbot to either be a good or poor experience for the end user. The modern day world is living in the technology wave of Artificial Intelligence and bots are a huge part of it.
In this tutorial, we are going to build a chatbot application from scratch using Dialogflow and React Native. The main reason to use Google's Dialogflow for this tutorial is that you do not have to go through a hefty signup process by providing your card details, unlike other bot frameworks or similar service providers.
What are we going to build? Let us build a chatbot that returns the current date when asked in different ways.
The complete code for this tutorial can be found inside this GitHub repository.
Requirements
In order to follow this tutorial, you will need:
-
react-native-cliversion2.0.1or above available vianpm - Knowledge of React, React Native and JavaScript
- A Google account
-
react-native-gifted-chat, which provides a customizable and complete chat UI interface -
react-native-dialogflow, which will help us bridge our app with Google Dialogflow’s SDK
Getting Started
In order to get started, the first requirement to use react-native-cli and create a new project directory. Run the following command from your terminal.
react-native init RNDiagflowChatbot

# traverse inside the directory
cd RNDiagflowChatbot
Also, make sure that you are now inside the project directory in your terminal window. This step is required since we are going to add three npm packages that are going to help us build our Chatbot app.
npm install --save react-native-gifted-chat react-native-dialogflow react-native-voice
Note that we are not going to use react-native-voice directly but you are required to install and link to the React Native project. The reason is react-native-dialogflow requires react-native-voice as a peer dependency. The next step is to link the Dialogflow SDK library to the React Native project.
react-native link react-native-dialogflow
react-native link react-native voice
You will get a success message when the linking process is complete. Also, to prevent the application from crashing later when we are running it, you have to add some permissions for iOS inside the file iOS/RNDiagflowChatbot/Info.plist, inside the root <dict> tag.
// Info.plist

  <key>NSSpeechRecognitionUsageDescription</key>
  <string>Your usage description here</string>
  <key>NSMicrophoneUsageDescription</key>
  <string>Your usage description here</string>
  <key>UIRequiredDeviceCapabilities</key>
Now, let us move on to create the first chat component. We will be using the App component inside the App.js file but you are most welcome to refactor your code later.
// App.js
import React, { Component } from 'react';
import { StyleSheet, Text, View, Image } from 'react-native';
import { GiftedChat } from 'react-native-gifted-chat';

class App extends Component {
  state = {
    messages: [
      {
        _id: 1,
        text: `Hi! I am the FAQ bot 🤖 from Jscrambler.\n\nHow may I help you with today?`,
        createdAt: new Date(),
        user: {
          _id: 2,
          name: 'FAQ Bot',
          avatar: 'https://i.imgur.com/7k12EPD.png'
        }
      }
    ]
  };

  onSend(messages = []) {
    this.setState(previousState => ({
      messages: GiftedChat.append(previousState.messages, messages)
    }));
  }

  render() {
    return (
      <View style={{ flex: 1, backgroundColor: '#fff' }}>
        <GiftedChat
          messages={this.state.messages}
          onSend={messages => this.onSend(messages)}
          user={{
            _id: 1
          }}
        />
      </View>
    );
  }
}

export default App;
We start by requiring the necessary components, including GiftedChat from the react-native-gifted-chat package. In the component's state, you will find one static or welcome message whenever the component gets rendered initially.
The createdAt time will display the current time and date in the chat UI. The user object is the user sending messages — in our case, the bot. It is defined with properties like username, its unique ID, and an avatar. The react-native-gifted-chat automatically adds a circle avatar in the UI.

The line <View style={{ flex: 1, backgroundColor: '#fff' }}> in the render function shows that you can add your own custom styling along using Gifted Chat's components. The GiftedChat component can take props like messages from our component's initial state, an onSend prop that is a callback function used when sending the message, and the user ID of the message.
This is how easy to implement a chat interface in a React Native app. To run your app in an iOS simulator, run the command react-native run-ios. For Android users, run the command react-native run-android and do make sure you have the Android emulator (or commonly known as Android Virtual Device) running the background.
See the current state of our application in action below.

Google's Dialogflow Setup
Dialogflow is a Natural Language Processing (NLP) service from Google. It has many integrations, SDKs for many languages and prebuilt agents. It works very straightforward with Google Assistant. Visit the Dialogflow website and create a new account or log-in with your existing Google ID. Once you are logged in, you will be welcomed by a screen that consists of different Agents.

Click on the Create Agent button to make one. We are going to name our agent: faq-bot. Fill in the details like below.
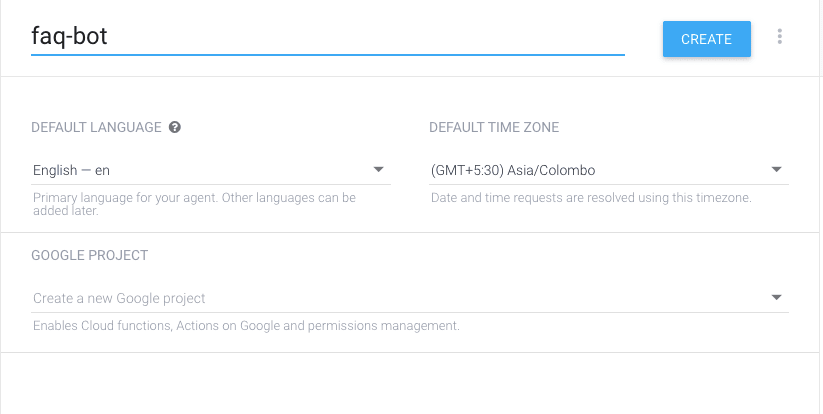
After filling out the details, click on the button Create.
Generally, for small applications, you will have one agent. In Dialogflow, the basic flow of conversation involves these steps:
- The user giving input
- Your Dialogflow agent parsing that input
- Your agent returning a response to the user
These agents can understand the vast and varied nuances of human language and translate that to standard and structured meaning that your apps and services can understand. Each agent contains different intents.
An intent is the action or the response sent back to the user in the chatbot application. It can contain different types of responses or actions. The next step in the process is to create your first intent.

An intent can be a simple text response that is displayed back to the user or a set of trained phrases. There are also actions and parameters that extract information from user queries. Examples of this kind of information include dates, times, names, places, and more.
Right now, we do not have any intent created of our own. Let us create one in the next section.
First Dialogflow Intent
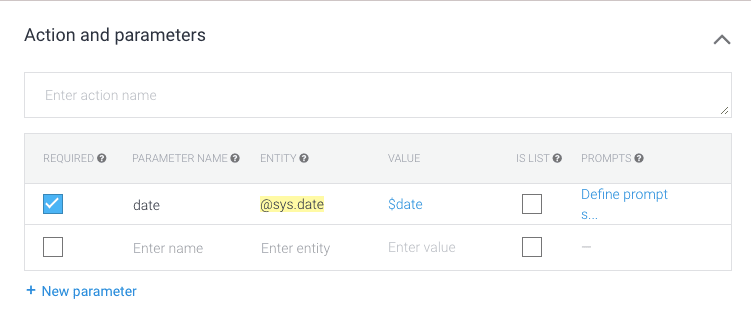
Let us add our first intent which we are going to call date.current. The purpose of this intent is to return the current date back to the user when asked. We can add pre-defined common training phrases to identify what the user is asking to our bot. Take a look below at the following training phrases.

Since “date” as a keyword is available in Dialogflow's API, it is automatically considered to be a parameter to take action on.
The Last step in this process is to add a text response for the user to receive.

Do not forget to click the Save button at the top of the dialog.
Connecting Dialogflow with React Native
We need a few access keys to use Dialogflow's npm package with our app. Right now, from the console window, go to Settings (it is a cogwheel icon next to the agent's name).

Then click on the value next to Service Account.

Once in the service account, find the account named Dialogflow Integrations, and scroll to the right until you see the three dots. Click on this menu, and click Create Key.

Download it as JSON file, and open that file in an editor. You will find the following content in this file.
{
  "type": "service_account",
  "project_id": "faq-bot-XXXX",
  "private_key_id": "XXXX",
  "private_key": "-----BEGIN PRIVATE KEY-----XXXX\n-----END PRIVATE KEY-----\n",
  "client_email": "XXXX",
  "client_id": "XXXX",
  "auth_uri": "XXXX",
  "token_uri": "XXXX",
  "auth_provider_x509_cert_url": "XXXX",
  "client_x509_cert_url": "XXXX"
}
Every key in the JSON file will have its value (in place of XXXX) some of them are sensitive.
Building the Chatbot
Now, create a new file called env.js and inside place the same values as above.
// env.js

export const dialogflowConfig = {
  type: 'service_account',
  project_id: 'faq-bot-XXXX',
  private_key_id: 'XXXX',
  private_key: '-----BEGIN PRIVATE KEY-----XXXX\n-----END PRIVATE KEY-----\n',
  client_email: 'XXXX',
  client_id: 'XXXX',
  auth_uri: 'XXXX',
  token_uri: 'XXXX',
  auth_provider_x509_cert_url: 'XXXX',
  client_x509_cert_url: 'XXXX'
};
You are now exporting the configuration object which you will be requiring among other things in the App.js file.
import { Dialogflow_V2 } from 'react-native-dialogflow';

import { dialogflowConfig } from './env';
Also, we are refactoring the user object by separating it from the state like below.
const BOT_USER = {
  _id: 2,
  name: 'FAQ Bot',
  avatar: 'https://i.imgur.com/7k12EPD.png'
};
The state now looks like below.
state = {
  messages: [
    {
      _id: 1,
      text: `Hi! I am the FAQ bot 🤖 from Jscrambler.\n\nHow may I help you with today?`,
      createdAt: new Date(),
      user: BOT_USER // <= note this
    }
  ]
};

Let us now use a lifecycle method componendDidMount to apply Dialogflow's configuration.
componentDidMount() {
    Dialogflow_V2.setConfiguration(
      dialogflowConfig.client_email,
      dialogflowConfig.private_key,
      Dialogflow_V2.LANG_ENGLISH_US,
      dialogflowConfig.project_id
    );
  }
All the values inside Dialogflow_V2.setConfiguration() are coming from the env.js file. In the onSend function, you have to make sure that it sends the text of the message to the Dialogflow agent. Refactor it like below.
onSend(messages = []) {
    this.setState(previousState => ({
      messages: GiftedChat.append(previousState.messages, messages)
    }));

    let message = messages[0].text;
    Dialogflow_V2.requestQuery(
      message,
      result => this.handleGoogleResponse(result),
      error => console.log(error)
    );
  }
The method Dialogflow_V2.requestQuery is used to send a text request to the agent. It contains three parameters:
- the text itself as the first parameter; in our case
message - the
resultanderrorcallback functions
The function handleGoogleResponse(result) was created to handle the response coming back and then call the sendBotResponse() function.
handleGoogleResponse(result) {
    let text = result.queryResult.fulfillmentMessages[0].text.text[0];
    this.sendBotResponse(text);
}

sendBotResponse(text) {
    let msg = {
      _id: this.state.messages.length + 1,
      text,
      createdAt: new Date(),
      user: BOT_USER
    };

    this.setState(previousState => ({
      messages: GiftedChat.append(previousState.messages, [msg])
    }));
  }
The sendBotResponse function then updates the state of the App component and displays whatever response back to the user in the chat interface. See the application in action below.

You can find the complete code for App.js below.
// App.js

import React, { Component } from 'react';
import { StyleSheet, Text, View } from 'react-native';
import { GiftedChat } from 'react-native-gifted-chat';
import { Dialogflow_V2 } from 'react-native-dialogflow';

import { dialogflowConfig } from './env';

const BOT_USER = {
  _id: 2,
  name: 'FAQ Bot',
  avatar: 'https://i.imgur.com/7k12EPD.png'
};

class App extends Component {
  state = {
    messages: [
      {
        _id: 1,
        text: `Hi! I am the FAQ bot 🤖 from Jscrambler.\n\nHow may I help you with today?`,
        createdAt: new Date(),
        user: BOT_USER
      }
    ]
  };

  componentDidMount() {
    Dialogflow_V2.setConfiguration(
      dialogflowConfig.client_email,
      dialogflowConfig.private_key,
      Dialogflow_V2.LANG_ENGLISH_US,
      dialogflowConfig.project_id
    );
  }

  handleGoogleResponse(result) {
    let text = result.queryResult.fulfillmentMessages[0].text.text[0];
    this.sendBotResponse(text);
  }

  onSend(messages = []) {
    this.setState(previousState => ({
      messages: GiftedChat.append(previousState.messages, messages)
    }));

    let message = messages[0].text;
    Dialogflow_V2.requestQuery(
      message,
      result => this.handleGoogleResponse(result),
      error => console.log(error)
    );
  }

  sendBotResponse(text) {
    let msg = {
      _id: this.state.messages.length + 1,
      text,
      createdAt: new Date(),
      user: BOT_USER
    };

    this.setState(previousState => ({
      messages: GiftedChat.append(previousState.messages, [msg])
    }));
  }

  render() {
    return (
      <View style={{ flex: 1, backgroundColor: '#fff' }}>
        <GiftedChat
          messages={this.state.messages}
          onSend={messages => this.onSend(messages)}
          user={{
            _id: 1
          }}
        />
      </View>
    );
  }
}

export default App;
Conclusion
The possibilities of using a powerful API such as Dialogflow are endless. In no time, you can build up your own chatbot interface inside a React Native application as a valuable support or marketing tool.
We hope this tutorial provided you an easy walkthrough to grab the concepts and build something of your own.
Lastly, if you're building React Native applications with sensitive logic, be sure to protect them against code theft and reverse-engineering with Jscrambler.
This article was originally published on the Jscrambler Blog by Aman Mittal.


Top comments (0)