This is a simple calculator created only with HTML, CSS and JS. It will enhance your basics of JavaScript which is more important than learning new technologies.
Prerequisite Knowledge
Basics of HTML, CSS, JavaScript and desire to create something new.
What you’ll learn
- CSS Flexbox
- Grid Layout
- JS Array Methods
- Logical Thinking
- DOM Manipulations
Let's Start
As in our to do list we will create the sketch of calculator and then convert it into prototype.
1. Brainstorming
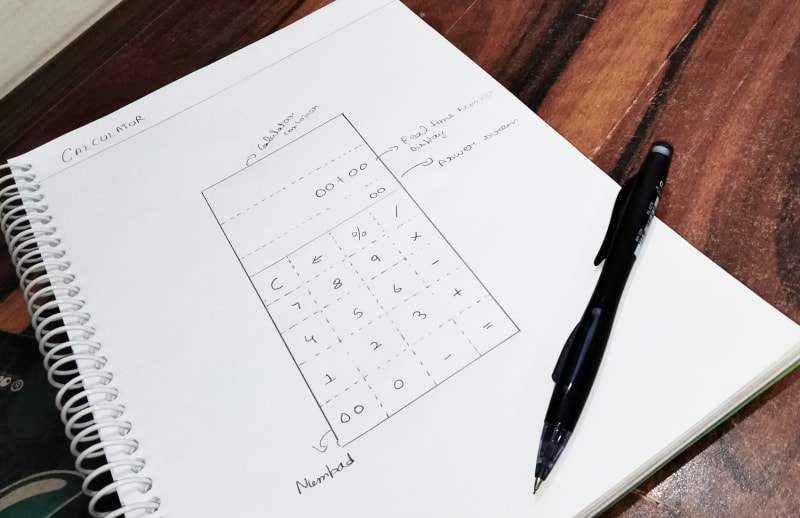
This is the most important stage of any project, when we have to print our ideas on a paper. Before we start to code, our mind should be clear about project looks and its features.
2. Create Prototype

You can use your favorite UX/UI designing software. Mine is Adobe Xd.
3. Create Project Directory
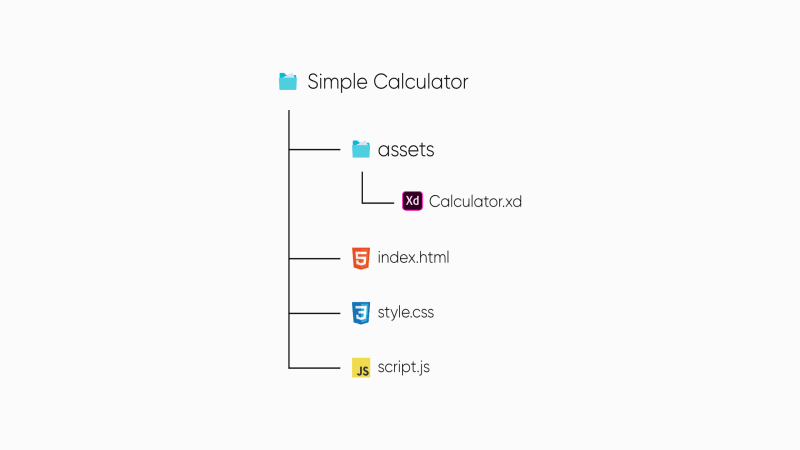
- First create a folder called Simple Calculator.
- Create another folder called Designs, where you can save all your project * assets.
- Now create HTML file called index.html
- Create a CSS file called style.css
- Create a JavaScript file called script.js
4. Make HTML Structure
Open index.html into your favorite text editor and start creating the structure of calculator.
<!DOCTYPE html>
<html lang="en">
<head>
<meta charset="UTF-8" />
<meta http-equiv="X-UA-Compatible" content="IE=edge" />
<meta name="viewport" content="width=device-width, initial-scale=1.0" />
<title>Calcualtor :: By Karan Kumar</title>
</head>
<body>
<div class="container">
<section id="Display-area">
<div class="currentInput"></div>
<div class="answerScreen">0</div>
</section>
<section class="keypad-btns">
<button type="button" class="fun_btn" id="clear" value="">
C
</button>
<button type="button" class="fun_btn" id="erase" value="">
⬅
</button>
<button type="button" class="fun_btn" value="/">/</button>
<button type="button" class="fun_btn" value="%">%</button>
<button type="button" class="num_btn" value="7">7</button>
<button type="button" class="num_btn" value="8">8</button>
<button type="button" class="num_btn" value="9">9</button>
<button type="button" class="fun_btn" value="*">x</button>
<button type="button" class="num_btn" value="4">4</button>
<button type="button" class="num_btn" value="5">5</button>
<button type="button" class="num_btn" value="6">6</button>
<button type="button" class="fun_btn" value="-">-</button>
<button type="button" class="num_btn" value="1">1</button>
<button type="button" class="num_btn" value="2">2</button>
<button type="button" class="num_btn" value="3">3</button>
<button type="button" class="fun_btn" value="+">+</button>
<button type="button" class="num_btn" value="00">00</button>
<button type="button" class="num_btn" value="0">0</button>
<button type="button" class="num_btn" value=".">.</button>
<button type="button" class="fun_btn" id="evaluate" value="">=</button>
</section>
</div>
</body>
</html>
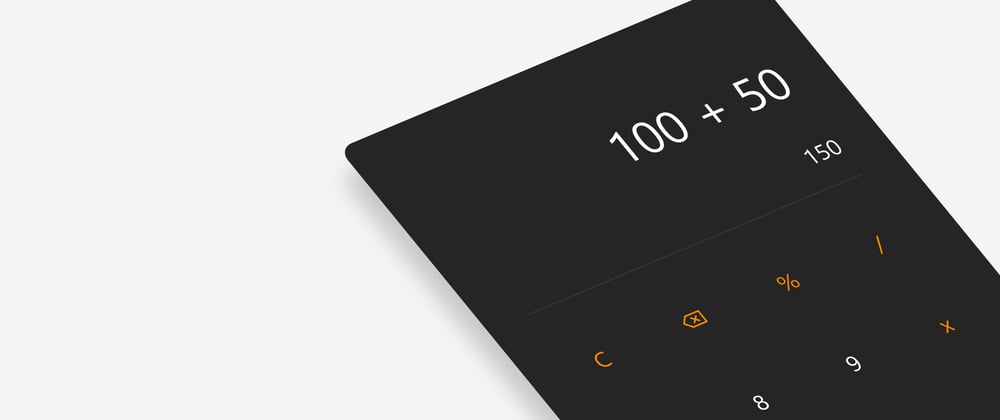
Output -

5. Add CSS Styling
In order to add CSS styling first we have to link our style.css with index.html file.
<head>
<link rel="stylesheet" href="style.css" />
</head>
And we can easily do that using link tag inside <head> tag of index.html file
Now open the style.css file and write this code to add styling.
* {
    font-family: "Segoe UI", Tahoma, Geneva, Verdana, sans-serif;
}

body {
    background-color: #f5f5f5;
    min-height: 90vh;
    display: flex;
    justify-content: center;
    align-items: center;
}

.container {
    background-color: #131313;
    max-width: 300px;
    height: auto;
    display: flex;
    flex-direction: column;
    justify-content: center;
    align-items: center;
    padding: 25px 35px;
    border-radius: 10px;
    user-select: none;
}

#Display-area {
    width: 100%;
    margin: 3vh 0;
    display: grid;
    grid-template-columns: 100%;
    grid-template-rows: repeat(2, minmax(40px, auto));
    word-wrap: break-word;
    padding-bottom: 20px;
    border-bottom: 1px rgba(128, 128, 128, 0.116) solid;
}

#Display-area .currentInput {
    /* display: flex; */
    text-align: right;
    height: 8vh;
    color: white;
    font-size: xx-large;
    line-height: 2;
    word-wrap: break-word;
}

#Display-area .answerScreen {
    text-align: right;
    color: rgba(150, 150, 150, 0.87);
    height: 7px;
    line-height: 3;
    font-size: larger;
}

.keypad-btns {
    display: grid;
    grid: repeat(5, 70px) / repeat(4, 70px);
    grid-row-gap: 20px;
    grid-column-gap: 20px;
}

.keypad-btns button {
    outline: none;
    border: none;
    border-radius: 10px;
    background-color: #131313;
    color: white;
    font-size: x-large;
}

.keypad-btns .fun_btn {
    color: #ff8800;
}

.num_btn:hover,.fun_btn:hover {
    background-color: rgba(29, 29, 29, 0.979);
}
Output -

6. Make it responsive
To make our calculator responsive, we have to use media queries.
@media only screen and (max-width: 600px) {
    body {
        background-color: #131313;
        align-items: flex-start;
    }
}
This code is saying that, When maximum width of body is 600px, then change the background color and align the items.
7. JavaScript Functionality
Before we start any JS code, first we have to plan the working of the calculator, like what should happen whenever user press a button.
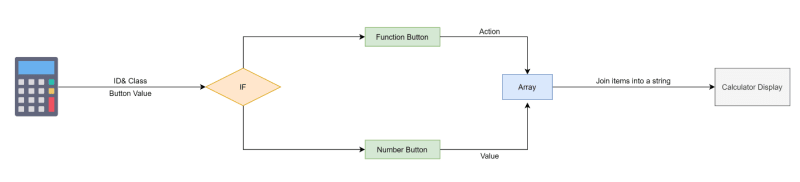
When a button is pressed, Our function is going to check that what kind of button is clicked, If it’s a number or operator button then we have to insert value into the array. But if it is a function (erase, clear or evaluate) button then we have to perform the action according to the type of button.
First we have to link our script.js file with index.html file
<head>
        <script src="script.js" defer></script>
</head>
Here defer means, we are telling the browser to first parse all the files and then start executing scripts.
Now open the script .js file and add write this code in your script file.
// Variables
let currentInput = document.querySelector('.currentInput');
let answerScreen = document.querySelector('.answerScreen');
let buttons = document.querySelectorAll('button');
let erasebtn = document.querySelector('#erase');
let clearbtn = document.querySelector('#clear');
let evaluate = document.querySelector('#evaluate');


// Calculator Display
let realTimeScreenValue = []

// To Clear

clearbtn.addEventListener("click", () => {

    realTimeScreenValue = [''];
    answerScreen.innerHTML = 0;
    currentInput.className = 'currentInput'
    answerScreen.className = 'answerScreen';
    answerScreen.style.color = " rgba(150, 150, 150, 0.87)";
})

// Get value of any button clicked and display to the screen

buttons.forEach((btn) => {


    btn.addEventListener("click", () => {
        // when clicked button is not erased button
        if (!btn.id.match('erase')) {
            // To display value on btn press
            realTimeScreenValue.push(btn.value)
            currentInput.innerHTML = realTimeScreenValue.join('');

            // To evaluate answer in real time
            if (btn.classList.contains('num_btn')) {

                answerScreen.innerHTML = eval(realTimeScreenValue.join(''));

            }

        }

        // When erase button is clicked
        if (btn.id.match('erase')) {
            realTimeScreenValue.pop();
            currentInput.innerHTML = realTimeScreenValue.join('');
            answerScreen.innerHTML = eval(realTimeScreenValue.join(''));
        }

        // When clicked button is evaluate button
        if (btn.id.match('evaluate')) {
            currentInput.className = 'answerScreen';
            answerScreen.className = 'currentInput';
            answerScreen.style.color = "white";
        }

        // To prevent undefined error in screen
        if (typeof eval(realTimeScreenValue.join('')) == 'undefined') {
            answerScreen.innerHTML = 0
        }

    })
})
Our work is now finished, This is how our calculator looks like when we add JavaScript functionality to it.
View Demo

![]()


Top comments (5)
The design is beautiful! Planning always pays off in the long run.
Thankyou!
Yes, Planning makes the process so easy and we can enjoy the journey without taking so much stress.
nice guys
Thankyou ! You can also checkout my other works on My Instagram page.
Would have been better had there been handled keyboard events