The challenge is to digitize a traditional school calendar that we used in school and use the google calendar API as a backing API. In my understanding, this means having lessons fetched from google calendar and displayed on the web app.
For this, I decided to take 2 approaches.
Approach 1. Build the whole timetable structure from scratch and then write some functions to get the data and display it.
Approach 2. Find a prebuilt package component that can handle the google calendar data with its unstructured nature and display the events/lessons.
Approach 1.
The workflow.
Use styled-components to build a reusable TableColumn component that will take in props and inside it, use those props to fetch data dynamically from a json file.
In the src folder, I created a folder called data and within it, a file called subjectData.json and this is where my data lives.
For the TableColumns component, this was the build. I chose styled-components because I needed control over the elements which meant I did not need to write a lot of code because I could pass props as I wished.
import React from "react";
import styled from "styled-components";
const data = require("../data/subjectData.json");

const MainDiv = styled.div`
  height: 30em;
  width: 11.6em;
  border-right: 1px solid black;
  border-bottom: 1px solid black;
`;

const ItemDiv = styled.div`
  height: ${(props) => (props.subject ? "5em" : "2.5em")};
  width: ${(props) => (props.half ? "50%" : "100%")};
  display: flex;
  align-items: center;
  justify-content: center;
  border-bottom: 1px solid black;
`;

const ClassTitleDiv = styled.div`
  display: flex;
  flex-flow: row nowrap;
`;

const MainClassColumnDiv = styled.div`
  display: flex;
  flex-flow: row nowrap;
  height: 25em;
  width: 100%;
`;

const ClassColumnDiv = styled.div`
  height: 100%;
  width: 50%;
  background-color: ${(props) => (props.col ? "#f1f3f8" : "#d6e0f0")};
  display: flex;
  flex-flow: column nowrap;
  align-items: center;
  justify-content: center;
`;

function TableColumn({ title, lesson }) {
  return (
    <MainDiv>
      <ItemDiv>{title}</ItemDiv>
      <ClassTitleDiv>
        <ItemDiv half>3N</ItemDiv>
        <ItemDiv half>3S</ItemDiv>
      </ClassTitleDiv>
      <MainClassColumnDiv>
        <ClassColumnDiv col>
          {data.subject[lesson]["3N"].map((sub) => {
            return (
              <ItemDiv half subject>
                {sub.subject}
              </ItemDiv>
            );
          })}
        </ClassColumnDiv>
        <ClassColumnDiv>
          {data.subject[lesson]["3S"].map((sub) => {
            return (
              <ItemDiv half subject>
                {sub.subject}
              </ItemDiv>
            );
          })}
        </ClassColumnDiv>
      </MainClassColumnDiv>
    </MainDiv>
  );
}

export default TableColumn;
This TableColumn component is mapping out every lesson for both class 3N and class 3S. Each component represents a single lesson for both classes.
For the main page where I was rendering the full timetable, I set up the outer timetable structure (the days) and then I passed the TableColumn as child components.
import React from "react";
import styled from "styled-components";
import TableColumn from "../components/TableColumn";

const MainDiv = styled.div`
  height: 100vh;
  display: flex;
  flex-flow: column;
  align-items: center;
`;

const Title = styled.h3`
  font-size: 2em;
  font-weight: 800;
  margin-top: 0.2em;
`;

const MainTableDiv = styled.div`
  height: auto;
  width: auto;
  display: flex;
  flex-flow: row nowrap;
`;

const DayOfWeekDiv = styled.div`
  height: 25em;
  width: 8em;
  padding-top: 5em;
  border-right: 1px solid black;
  border-bottom: 1px solid black;
`;

const Day = styled.div`
  height: 5em;
  width: 100%;
  display: flex;
  align-items: center;
  justify-content: center;
  font-weight: 500;
`;

function HomePage() {
  const days = ["Mon", "Tue", "Wed", "Thur", "Fri"];
  return (
    <MainDiv>
      <Title>
        <u>School TimeTable</u>
      </Title>
      <MainTableDiv>
        <DayOfWeekDiv>
          {days.map((day) => {
            return <Day>{day}</Day>;
          })}
        </DayOfWeekDiv>
        <TableColumn title={"8am - 9am"} lesson={"lesson1"} />
        <TableColumn title={"10am - 11am"} lesson={"lesson2"} />
        <TableColumn title={"11:30am - 12:45pm"} lesson={"lesson3"} />
        <TableColumn title={"1:30pm - 2:30pm"} lesson={"lesson4"} />
        <TableColumn title={"3pm - 4pm"} lesson={"lesson5"} />
      </MainTableDiv>
    </MainDiv>
  );
}

export default HomePage;
in order to use JSON-loader, I set up some webpack configurations
Testing
For the tests, I did not have much to test but I had to ensure that the TableColumn component's structure remains intact and so I set up snapshot test.
import React from "react";
import renderer from "react-test-renderer";
import TableColumn from "./components/TableColumn";

test("renders correctly the table columns", () => {
  const title = "Titles";
  const tree = renderer
    .create(<TableColumn title={title} lesson={"lesson5"} />)
    .toJSON();
  expect(tree).toMatchSnapshot();
});
CI/CD
This part excites me every time. For this webapp, I wanted to keep things simple and so I kept the structure for both the Continuous Integration and Deployment very simple.
I created a .github folder and within it, I added a workflow folder that contains 2 files: integrate.yml that handles CI and deploy.yml that handles CD.
integrate.yml
name: React Continuous Integration

on:
  pull_request:
    branches: [master]

jobs:
  test_pull_request:
    runs-on: ubuntu-latest
    steps:
      - uses: actions/checkout@v2
      - run: yarn install
      - run: yarn test -u
      - run: yarn test
      - run: yarn build
This just runs the tests when a pull request is created.
deploy.yml
name: Firebase Continuous Deployment

on:
  push:
    branches: [master]

jobs:
    deploy:
      runs-on: ubuntu-latest
      steps:
        - uses: actions/checkout@master
        - run: yarn install
        - run: yarn build
        - uses: w9jds/firebase-action@master
          with:
            args: deploy --only hosting
          env:
            FIREBASE_TOKEN: ${{ secrets.FIREBASE_TOKEN }}
This checks out to master when changes are detected. Runs all necessary commands to create the optimised build. After that, it utilises a Github action app called firebase-action that handles all firebase commands. The web app is then successfully hosted on firebase.
This approach did not utilise the Google Calendar API. The main reason was that I realised it would take some time for me to structure the calendar data into data that can actually be used appropriately within my component structure. I thought It would make much more sense to have a working prototype out there before I figure out how to build my own fully custom scheduler.
That said, below is the outcome.
The Outcome

View Live
The Github Repository
Approach 2
The Workflow.
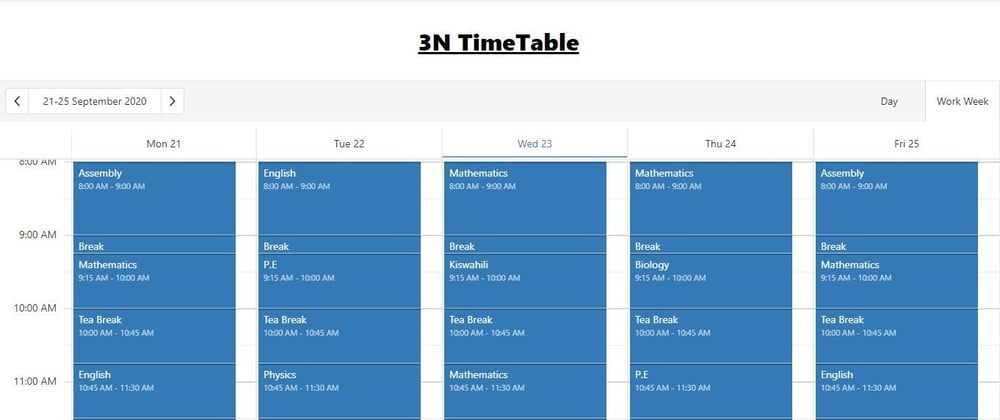
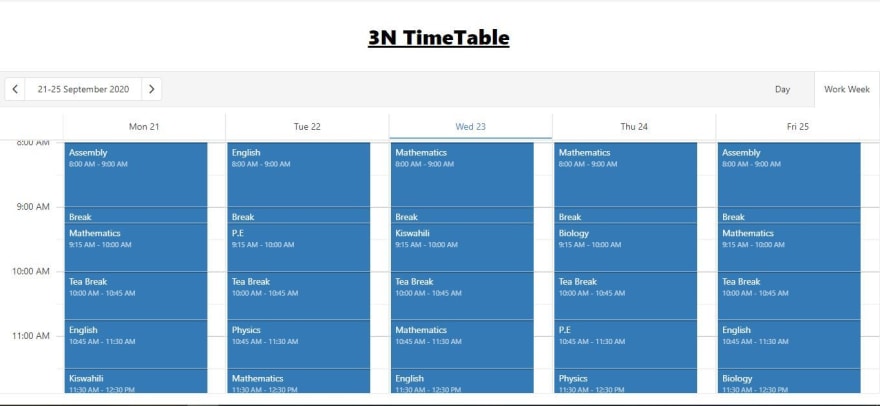
In this approach, I decided to look for an already prebuild scheduler component. After a long while, I found DevExtreme Scheduler.
It allowed me to pass the data into a prebuilt data store that made sense of all the data and then passed that data into the scheduler component.
Now I just had to fetch my events data from google calendar. For this, I needed a google product key from a GCP project and my calendar ID. Google Calendar API reference
This meant that one component would be enough to get the whole web app running.
import React, { Component } from "react";
// prebuilt table component
import Scheduler from "devextreme-react/scheduler";
// data handler
import CustomStore from "devextreme/data/custom_store";
import "whatwg-fetch";

// function to fetch the events from the calendar
function getLessons(_, requestOptions) {
  const PUBLIC_KEY = process.env.REACT_APP_GOOGLE_PUBLIC_KEY,
    CALENDAR_ID = process.env.REACT_APP_CALENDAR_ID;
  const lessonsUrl = [
    "https://www.googleapis.com/calendar/v3/calendars/",
    CALENDAR_ID,
    "/events?key=",
    PUBLIC_KEY,
  ].join("");

  return fetch(lessonsUrl, requestOptions)
    .then((response) => response.json())
    .then((data) => data.items);
}

// data handler
const dataSource = new CustomStore({
  load: (options) => getLessons(options, { showDeleted: false }),
});

// scheduler preferences
const currentDate = new Date(2020, 8, 21);
const views = ["day", "workWeek"];

class App extends Component {
  render() {
    return (
      <>
        <div className="title">
          <h3>
            <u>3N TimeTable</u>
          </h3>
        </div>
        <Scheduler
          dataSource={dataSource}
          views={views}
          defaultCurrentView="workWeek"
          defaultCurrentDate={currentDate}
          height={500}
          startDayHour={7}
          endDayHour={16}
          editing={false}
          showAllDayPanel={false}
          startDateExpr="start.dateTime"
          endDateExpr="end.dateTime"
          textExpr="summary"
          timeZone="Africa/Nairobi"
        />
      </>
    );
  }
}

export default App;
Notice how in the scheduler component, editing is set to false, if I were to have an admin page, it would just utilise the same scheduler structure and have that editing property set to true to allow for event editing through the web app.
for the tests, I did not have any for this approach. Though I would have tested the function to make sure that I get a result code of 200.
for this approach, I added a 404 page that shows up in case the rouse is non-existent.
CI/CD
Since I did not have any tests, I did not set up the CI.
For the CD, I went for the same simplified structure as that of the 1st approach. However, for this one, I had to pass in some secret keys (the google key and the calendar ID), since I had put them in the environment variables.
name: Firebase Continuous Deployment.

on:
  push:
    branches: [master]

jobs:
  deploy:
    runs-on: ubuntu-latest
    steps:
      - uses: actions/checkout@master
      - run: yarn install
      - run: yarn build
        env:
          REACT_APP_GOOGLE_PUBLIC_KEY: ${{ secrets.REACT_APP_GOOGLE_PUBLIC_KEY }}
          REACT_APP_CALENDAR_ID: ${{ secrets.REACT_APP_CALENDAR_ID}}
      - uses: w9jds/firebase-action@master
        with:
          args: deploy --only hosting
        env:
          FIREBASE_TOKEN: ${{ secrets.FIREBASE_TOKEN }}
These secrets are added in the GitHub repo under settings then secrets and create a new secret.
The Outcome
View Live
The Github Repository
That is it. That is how I went about the challenge.
Muchas gracias!


Oldest comments (0)