
My picoCTF 2022 writeups are broken up into the following sections,
1. Forensics (Solved 13/13)
2. Cryptography (Solved 11/15)
3. Binary Exploitation (Solved 5/14)
4. Reverse Engineering (Solved 2/12)
5. Web Exploitation (Solved 2/12)
All my writeups can also be found on my GitHub's CTFwriteups repository
Total points earned:

The Forensics challenges I solved in picoCTF 2022 are the following,
Table of Contents
100 points
Enhance!
The challenge is the following,

We are also given the file drawing.flag.svg.

I decided to view the contents of the file using,
$ strings drawing.flag.svg
This showed the following,
<?xml version="1.0" encoding="UTF-8" standalone="no"?>
<!-- Created with Inkscape (http://www.inkscape.org/) -->
<svg
   xmlns:dc="http://purl.org/dc/elements/1.1/"
   xmlns:cc="http://creativecommons.org/ns#"
   xmlns:rdf="http://www.w3.org/1999/02/22-rdf-syntax-ns#"
   xmlns:svg="http://www.w3.org/2000/svg"
   xmlns="http://www.w3.org/2000/svg"
   xmlns:sodipodi="http://sodipodi.sourceforge.net/DTD/sodipodi-0.dtd"
   xmlns:inkscape="http://www.inkscape.org/namespaces/inkscape"
   width="210mm"
   height="297mm"
   viewBox="0 0 210 297"
   version="1.1"
   id="svg8"
   inkscape:version="0.92.5 (2060ec1f9f, 2020-04-08)"
   sodipodi:docname="drawing.svg">
  <defs
     id="defs2" />
...
...

         style="font-size:0.00352781px;line-height:1.25;fill:#ffffff;stroke-width:0.26458332;"
         id="tspan3756">c </tspan><tspan
         sodipodi:role="line"
         x="107.43014"
         y="132.09824"
         style="font-size:0.00352781px;line-height:1.25;fill:#ffffff;stroke-width:0.26458332;"
         id="tspan3758">o </tspan><tspan
         sodipodi:role="line"
         x="107.43014"
         y="132.10265"
         style="font-size:0.00352781px;line-height:1.25;fill:#ffffff;stroke-width:0.26458332;"
         id="tspan3760">C </tspan><tspan
         sodipodi:role="line"
         x="107.43014"
         y="132.10706"
         style="font-size:0.00352781px;line-height:1.25;fill:#ffffff;stroke-width:0.26458332;"
         id="tspan3762">T </tspan><tspan
         sodipodi:role="line"
         x="107.43014"
         y="132.11147"
         style="font-size:0.00352781px;line-height:1.25;fill:#ffffff;stroke-width:0.26458332;"
         id="tspan3764">F { 3 n h 4 n </tspan><tspan
         sodipodi:role="line"
         x="107.43014"
         y="132.11588"
         style="font-size:0.00352781px;line-height:1.25;fill:#ffffff;stroke-width:0.26458332;"
         id="tspan3752">c 3 d _ 6 7 8 3 c c 4 6 }</tspan></text>
  </g>
</svg>
In the last few rows, I saw { 3 n h 4 n and c 3 d _ 6 7 8 3 c c 4 6 }, which looked like the flag, so I concatenated this to form {3nh4nc3d_6783cc46}. I assumed that this was the flag, and I just needed to add the picoCTF wrapper.
Therefore, the flag is,
picoCTF{3nh4nc3d_6783cc46}
File types
The challenge is the following,

We are also given the file Flag.pdf. I tried to open this up in my PDF reader, but it said that it cannot be opened.

So I checked the file type using,
$ file Flag.pdf
And this revealed that it was a shell archive text

So I copied this file into a file with a .sh extension,
$ cp Flag.pdf Flag.sh
And added the execution permission,
$ chmod +x Flag.sh
And executed this script,
$ ./Flag.sh

After executing, a file called flag was generated, and checking the file type revealed that it was a current ar archive.

Then I used the binwalk to extract the ar archive,
$ binwalk -e flag
Which created a new folder called _flag.extracted, and inside was a file called 64.

I checked the file type of 64, and revealed that it was a gzip compressed data

I used binwalk to extract the gzip,
$ binwalk -e 64
The extracted folder contained a file called flag,

I checked the file type of flag, and revealed that it was a lzip compressed data. Using binwalk did not extract it, so I extracted this using,
$ lzip -d -k flag

This created a file called flag.out, and revealed that it was a LZ4 compressed data. So I extracted it using,
$ lz4 -d flag.out flag2.out

This created a file called flag2.out, and revealed that it was a LZMA compressed data. So I extracted it using,
$ lzma -d -k flag2.out
However, this returned Filename has an unknown suffix, skipping, so I renamed it to flag2.lzma and I extracted it using,
$ lzma -d -k flag2.lzma
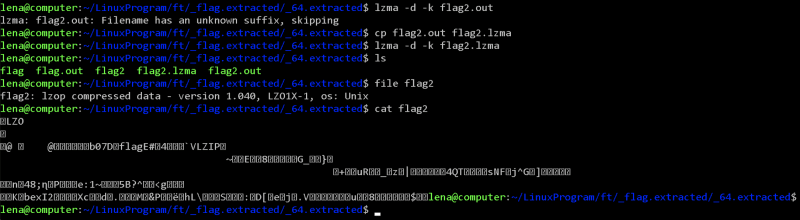
This created a file called flag2, and revealed that it was a LZOP compressed data. Like last time, it gave unknown suffix, so I renamed it to flag2.lzop, and I extracted it using,
$ lzop -d -k flag2.lzop -o flag3
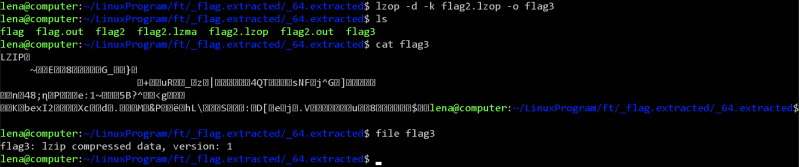
This created a file called flag3, and revealed that it was a LZIP compressed data. So I extracted it using,
$ lzip -d -k flag3

This created a file called flag3.out, and revealed that it was a XZ compressed data. I renamed it to flag4.xz and I extracted it using,
$ xz -d -k flag4.xz

This created a file called flag4, and revealed that it was a ASCII text and contained the following,
7069636f4354467b66316c656e406d335f6d406e3170756c407431306e5f
6630725f3062326375723137795f33343765616536357d0a
I went ahead to CyberChef and converted this from hex,

Therefore, the flag is,
picoCTF{f1len@m3_m@n1pul@t10n_f0r_0b2cur17y_347eae65}
Lookey here
The challenge is the following,

We are also given the file anthem.flag.txt.
I viewed the contents of the file, which contained a very long text.

I counted the words using,
$ wc -w anthem.flag.txt
Which showed that there was 19139 words.

I know the flag format is picoCTF{xxx}, so I decided to grep it using,
$ cat anthem.flag.txt | grep "picoCTF"
Which revealed the flag.

Therefore, the flag is,
picoCTF{gr3p_15_@w3s0m3_4554f5f5}
Packets Primer
The challenge is the following,

We are also given the file network-dump.flag.pcap. Opening this up on Wireshark showed the following,

I decided to Follow TCP stream, which revealed the flag

Therefore, the flag is,
picoCTF{p4ck37_5h4rk_d0565941}
Redaction gone wrong
The challenge is the following,

We are also given the file Financial_Report_for_ABC_Labs.pdf.
I opened it up in a PDF viewer,

I saw that some texts were covered in black highlight, so I opened it up on Word and changed the text color of the highlighted words to red, which revealed the flag.

Therefore, the flag is,
picoCTF{C4n_Y0u_S33_m3_fully}
Sleuthkit Intro
The challenge is the following,

We are also given the file disk.img.gz
I downloaded the file, extracted it, and used the following command,
$ mmls disk.img
Which showed the partitions and their size.

The challenge asks for the Linux partition size, which is 0000202752.
I inputted this Linux partition size to the remote access checker program, which gave me the flag.

Therefore, the flag is,
picoCTF{mm15_f7w!}
200 points
Sleuthkit Apprentice
The challenge is the following,

We are also given the file disk.flag.img.gz. I downloaded the file, extracted it, and checked the partitions using
$ mmls disk.flag.img.

I also checked the file system information for the Linux partition starting at 0000360448 using,
$ fsstat -o 0000360448 disk.flag.img

This showed that the Linux partition was using a Ext4 partition with a block size of 1024 bytes.
I wanted to check if there were any strings that could hint to a flag file, so I checked for the string flag using,
$ strings -t d disk.flag.img | grep -iE "flag".

However, there were too many entries with the string flag, so I decided to narrow the string search down. Since the flag format is picoCTF{xxx}, I decided to search for the string pico using,
$ strings -t d disk.flag.img | grep -iE "pico".

However, nothing useful came up. I assumed that the flag might be contained in a .txt file as that is the most common means of storing the flag in a disk forensics challenge. Therefore, I assumed that the flag might be contained in a file named flag.txt,
$ strings -t d disk.flag.img | grep -iE "flag.txt".

This outputted some interesting entries, and the following caught my eye.
nano flag.txt
iconv -f ascii -t utf16 flag.txt > flag.uni.txt
shred -zu flag.txt
I decided to look further into this, so I took the offset for nano flag.txt, which is 204193835, and subtracted 184549376 (which is 360448 * 512) using,
$ expr 204193835 - 184549376
and divided 19644459 by the block size 1024 bytes using,
$ expr 19644459 / 1024
Then I used that result, 19184 to find the inode number of the file containing the string file.txt using,
$ ifind -f ext4 -o 360448 -d 19184 disk.flag.img
This returned 2363, so I printed the contents of that file using,
$ icat -f ext4 -o 360448 disk.flag.img 2363

This showed the full command. I saw that a directory called my_folder was created, moved into the my_folder directory, flag was written into flag.txt, flag.txt was copied into flag.uni.txt, and the original flag.txt was deleted securely using shred, which would make it extremely difficult to recover. From this, I assumed that the flag is contained in flag.uni.txt in the my_folder directory, so I decided to search for that using,
$ strings -t d disk.flag.img | grep -iE "flag.uni.txt".

Now I know what file I am supposed to look for and what directory and partition it was in. I opened up Autopsy and searched for the directory that contained flag.txt and flag.uni.txt in the fourth partition of the disk, which is Linux (0x83) 360448-614399.

So I went to /root/my_folder directory, and I saw that flag.txt did not contain any relevant information because it was shredded. So I looked into flag.uni.txt, which contained the flag.

Therefore, the flag is,
picoCTF{by73_5urf3r_152f373f}
300 points
Eavesdrop
The challenge is the following,

We are also given the file capture.flag.pcap. Opening this up on Wireshark showed the following,

I did Follow TCP stream, which revealed a conversation between two people.

It seemed like these two people had been exchanging files, and one person forgot how to decrypt it, so the other person tells them to decrypt it using,
openssl des3 -d -salt -in file.des3 -out file.txt -k supersecretpassword123
I looked through the packets, and found the file that started with Salted in packet 57. I knew this was the file I was looking for, because OpenSSL with des3 salt will generate an encrypted file that starts with Salted.

So I exported the packet as saltedfile.bin using File > Export Packet Bytes

I decrypted it using what was mentioned in the conversation,
openssl des3 -d -salt -in saltedfile.bin -out file.txt -k supersecretpassword123
After decryption succeeded, I was left with file.txt that contained the flag.

Therefore, the flag is,
picoCTF{nc_73115_411_445e5629}
Operation Oni
The challenge is the following,

We are also given the file disk.img.gz. I downloaded the file, extracted it. The challenge says to use a key_file to ssh to the remote machine, so I assumed that I need to look for a file that contained the key. I tried to find the partition information using,
$ mmls disk.img
As most private keys contain the string OPENSSH PRIVATE KEY, I string searched that using,
$ strings -t d disk.img | grep -iE "OPENSSH PRIVATE KEY"
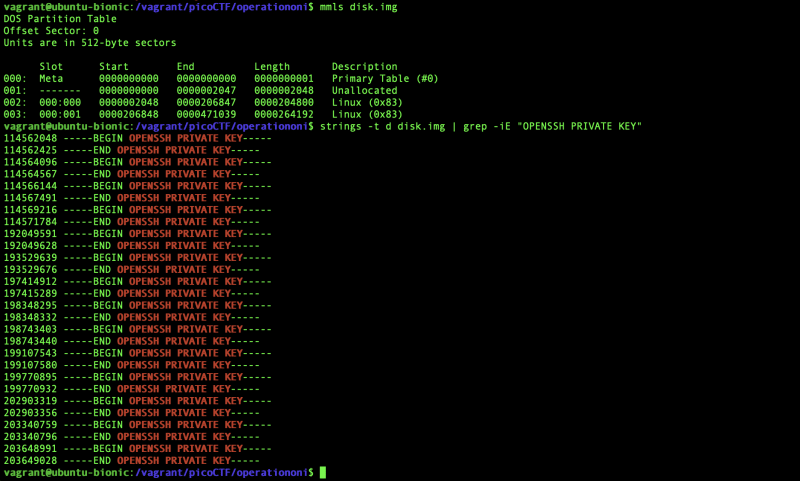
There were files that contained OPENSSH PRIVATE KEY, so now I have to find the actual contents of the private key file. I used the offset 114562048 and did the operations similar to Sleuthkit Apprentice to find the file contents using the commands,
$ expr 114562048 - 105906176
$ expr 8655872 / 1024
$ ifind -f ext4 -o 206848 -d 8453 disk.img
$ icat -f ext4 -o 206848 disk.img 15

This showed the private key,
-----BEGIN OPENSSH PRIVATE KEY-----
b3BlbnNzaC1rZXktdjEAAAAABG5vbmUAAAAEbm9uZQAAAAAAAAABAAAAMwAAAAtzc2gtZW
QyNTUxOQAAACCCLR0HD7N0U/aOCIfE8hu37rqZXPVlAw2nZTCsXzW5iwAAAJhPAhe3TwIX
twAAAAtzc2gtZWQyNTUxOQAAACCCLR0HD7N0U/aOCIfE8hu37rqZXPVlAw2nZTCsXzW5iw
AAAEC64hkpckRMk5Jy2dRmcBTSoQvavri0nLhU6aqeGBT1OIItHQcPs3RT9o4Ih8TyG7fu
uplc9WUDDadlMKxfNbmLAAAADnJvb3RAbG9jYWxob3N0AQIDBAUGBw==
-----END OPENSSH PRIVATE KEY-----
I also confirmed using Autopsy, and saw that this private key file was in /root/.ssh/id_ed25519 in the Linux partition that starts at 0000206848.

So I went into the webshell, and put the private key into key_file, and tried to ssh to the remote server using,
ssh -i key_file -p 64039

However, it had the permissions 0664 which was too open so the private key was unusable. Therefore, I changed the permissions to 400 using,
$ chmod 400 key_file
And I did ssh again to the remote server, which contained a file called flag.txt which contained the flag,

Therefore, the flag is,
picoCTF{k3y_5l3u7h_dc01cec5}
St3g0
The challenge is the following,

We are also given the file pico.flag.png

I went to Steganography Online to decode the image, but decoding the image did not reveal anything.

I decided to use zsteg instead, with the -a option to try all known methods, and the -v option to run verbosely,
zsteg -a -v pico.flag.png
This revealed the flag at b1,rgb,lsb,xy, where rgb means it uses RGB channel, lsb means least significant bit comes first, and xy means the pixel iteration order is from left to right.

Therefore, the flag is,
picoCTF{7h3r3_15_n0_5p00n_1b8d71db}
400 points
Operation Orchid
The challenge is the following,

We are also given the file disk.flag.img.gz. I downloaded the file, extracted it. I did the operations in Sleuthkit Apprentice to find the partition informations, and I decided to string search flag.txt using,
$ strings -t d disk.flag.img | grep -iE "flag.txt"

From this, I assumed that the flag was first written into flag.txt, encrypted and put into flag.txt.enc using OpenSSL aes256 with the salt option and a password with unbreakablepassword1234567, and flag.txt was shredded.
I double checked with Autopsy, and saw that the commands used were contained in .ash_history.

As the OpenSSL with the salt option generates encrypted text that starts with Salted, I decided to string search that using,
strings -t d disk.flag.img | grep -iE "Salted"
I also decided to find the full contents of the file that contained Salted using,
$ expr 221247488 - 210763776
$ expr 10483712 / 1024
$ ifind -f ext4 -o 411648 -d 10238 disk.flag.img
$ icat -f ext4 -o 411648 disk.flag.img 1782

It contained the encrypted file with the contents,
Salted__???3[u
              :dmޠ
D-Z{z?+g?p?=?N???\??B?Ȥ7? ???؎$?'%
I double checked with Autopsy, and confirmed that the Salted file was there.

So I redirected the output to flag.txt.enc using,
$ icat -f ext4 -o 411648 disk.flag.img 1782 > flag.txt.enc
As it was encrypted using openssl aes256 -salt -in flag.txt -out flag.txt.enc -k unbreakablepassword1234567, I decrypted it using,
$ openssl aes256 -d -salt -in flag.txt.enc -out flag.txt -k unbreakablepassword1234567

Therefore, the flag is,
picoCTF{h4un71ng_p457_c512004e}
SideChannel
The challenge is the following,

We are also given the file pin_checker
The following shows the example execution, where Incorrect Length is outputted when a PIN that's not 8-digits is entered, Checking PIN... is outputted if a 8-digit PIN is entered, and Access denied. is outputted if the 8-digit PIN is incorrect.

There is a noticeable time delay during the Checking PIN... and Access denied., so we can use a time-based side channel attack here.
From the program behaviour, I saw that the length is first checked, and if the length is 8, the program proceeds to check the digits of the 8-digit PIN code (otherwise, it immediately returns Incorrect length).
I made the following Python script side.py to measure the time before Access denied. is outputted
from pwn import *
import time
import sys

io = process(['./pin_checker'])

context.arch = 'amd64'
gs = '''
continue
'''

#allow pin number to be inputted as argument, eg: python3 side.py 12345678
pin = str(sys.argv[1])

#send the pin as the input to the pin_checker
io.sendline(pin)
#skip first output, which is 'Please enter your 8-digit PIN code:'
io.recvline()
#skip second output, which is PIN length
io.recvline()
#skip third output, which is 'Checking PIN...'
io.recvline()
#start the timer
start = time.time()
#fourth output is 'Access denied.', we are measuring time until this is outputted
recevied4 = io.recvline()
#stop the timer
stop = time.time()
#calculate time difference
time_taken = stop - start

log.info(f"Time taken: {time_taken}")
log.info(f"Received4: {recevied4}")
log.info(f"Guess: {pin}")


sys.exit()
I made the script so that the PIN could be inputted like the following,
$ python3 side.py 12345678
The following shows the example execution, where the Time taken is outputted in seconds.

I assumed that the PIN is checked from left to right, where Access denied. is outputted as soon as the leftmost digit does not match. Therefore, the PIN with the correct leftmost digit should take the longest time because it will move onto the next digit comparison. For the first test batch, I decided to use 00000000, 10000000, 20000000, 30000000, 40000000, 50000000, 60000000, 70000000, 80000000, 90000000 for the PINs. To automate this process, I made the following shell script auto.sh,
#!/bin/bash

python3 side.py 00000000
python3 side.py 10000000
python3 side.py 20000000
python3 side.py 30000000
python3 side.py 40000000
python3 side.py 50000000
python3 side.py 60000000
python3 side.py 70000000
python3 side.py 80000000
python3 side.py 90000000
Before I executed this script, I closed all programs that I wasn't using to reduce variations in time due to background processes. I then executed this script,

Here, I saw that the pin 40000000 took the longest, with a significant time difference from the other PINs. I executed this script again to confirm,

Therefore, 40000000 is what I will be using for the second test batch, thus I used the following shell script.
#!/bin/bash

python3 side.py 40000000
python3 side.py 41000000
python3 side.py 42000000
python3 side.py 43000000
python3 side.py 44000000
python3 side.py 45000000
python3 side.py 46000000
python3 side.py 47000000
python3 side.py 48000000
python3 side.py 49000000
I executed the script twice,

This shows that 48000000 takes the longest, therefore I will be using this for the third test batch,
 #!/bin/bash

 python3 side.py 48000000
 python3 side.py 48100000
 python3 side.py 48200000
 python3 side.py 48300000
 python3 side.py 48400000
 python3 side.py 48500000
 python3 side.py 48600000
 python3 side.py 48700000
 python3 side.py 48800000
 python3 side.py 48900000
I executed the script twice,

This shows that 48300000 takes the longest, therefore I will be using this for the fourth test batch,
 #!/bin/bash

 python3 side.py 48300000
 python3 side.py 48310000
 python3 side.py 48320000
 python3 side.py 48330000
 python3 side.py 48340000
 python3 side.py 48350000
 python3 side.py 48360000
 python3 side.py 48370000
 python3 side.py 48380000
 python3 side.py 48390000
I executed the script twice,

This shows that 48390000 takes the longest, therefore I will be using this for the fifth test batch,
#!/bin/bash

python3 side.py 48390000
python3 side.py 48391000
python3 side.py 48392000
python3 side.py 48393000
python3 side.py 48394000
python3 side.py 48395000
python3 side.py 48396000
python3 side.py 48397000
python3 side.py 48398000
python3 side.py 48399000
I executed the script twice,

This shows that 48390000 takes the longest, therefore I will be using this for the sixth test batch,
  #!/bin/bash

  python3 side.py 48390000
  python3 side.py 48390100
  python3 side.py 48390200
  python3 side.py 48390300
  python3 side.py 48390400
  python3 side.py 48390500
  python3 side.py 48390600
  python3 side.py 48390700
  python3 side.py 48390800
  python3 side.py 48390900
I executed the script twice,

This shows that 48390500 takes the longest, therefore I will be using this for the seventh test batch,
#!/bin/bash

python3 side.py 48390500
python3 side.py 48390510
python3 side.py 48390520
python3 side.py 48390530
python3 side.py 48390540
python3 side.py 48390550
python3 side.py 48390560
python3 side.py 48390570
python3 side.py 48390580
python3 side.py 48390590
I executed the script twice,

This shows that 48390510 takes the longest, therefore I will be using this for the eighth test batch,
#!/bin/bash

python3 side.py 48390510
python3 side.py 48390511
python3 side.py 48390512
python3 side.py 48390513
python3 side.py 48390514
python3 side.py 48390515
python3 side.py 48390516
python3 side.py 48390517
python3 side.py 48390518
python3 side.py 48390519
Executing this showed that 48390513 is the correct PIN.

I logged into the master server using this PIN, which gave me the flag,
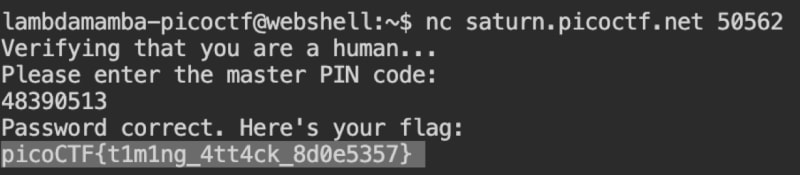
Therefore, the flag is,
picoCTF{t1m1ng_4tt4ck_8d0e5357}
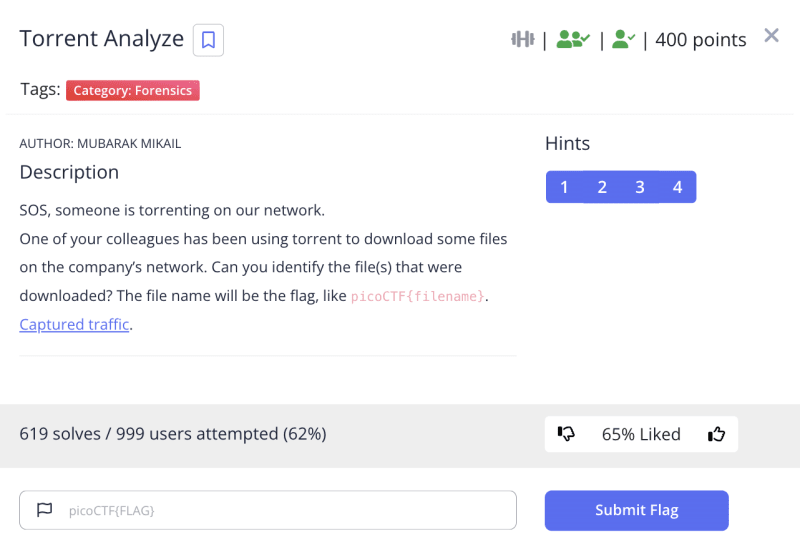
Torrent Analyze
The challenge is the following,
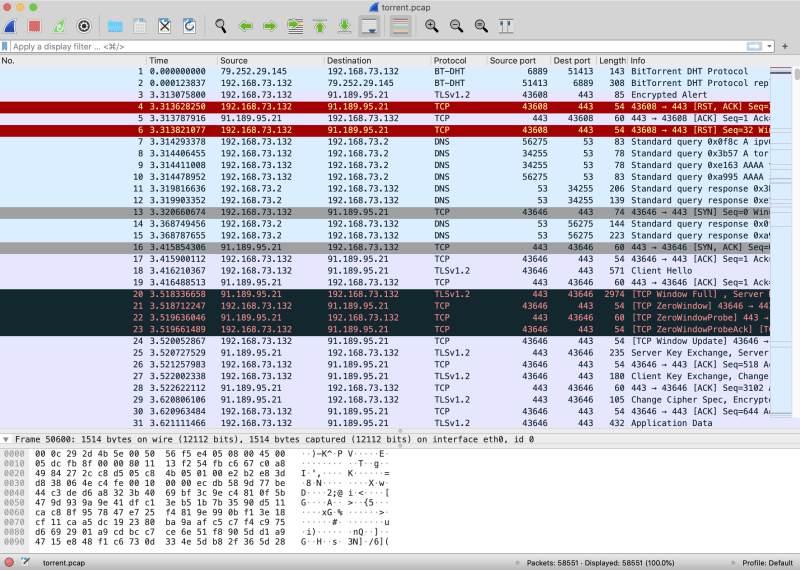
We are also given the file torrent.pcap. As this is a torrent challenge, I went to Wireshark and enabled the BitTorrent DHT Protocol (BT-DHT) by going to Analyze -> Enabled Protocol.

The overall packet capture looks like the following,
I applied the bt-dht filter, and looked through the packets, and saw that some contained info_hash.

The challenge only wants us to find the file name, and not reconstruct the file, so I knew that this info_hash information will be very important because it tells us the hash of the file. As hash is 68 61 73 68 in hex, I inputted this hex value into the Wireshark search to look for all packets that contained this hash information.
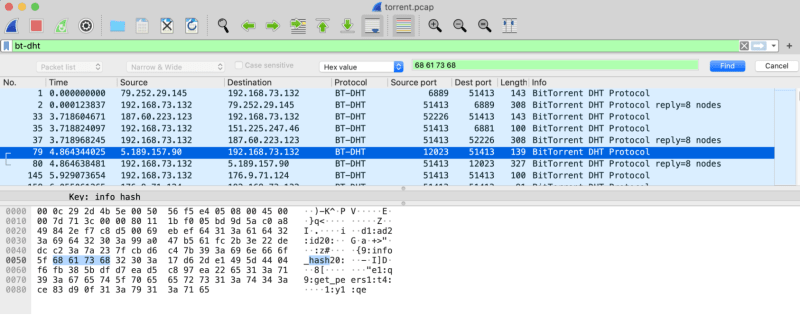
The first packet that contained info_hash was packet 79 with a hash value of 17d62de1495d4404f6fb385bdfd7ead5c897ea22

So I looked up 17d62de1495d4404f6fb385bdfd7ead5c897ea22 on Google, and saw that it corresponded to Awakened.2013.1080p.BluRay.X264-iNVANDRAREN.

The first packet that contained info_hash was packet 332 with a hash value of 17c1e42e811a83f12c697c21bed9c72b5cb3000d

This file corresponded to name: Zoo (2017) 720p WEB-DL x264 ESubs - MkvHub.Com.

I looked through a few more, and I was at packet 51080 which had a hash value of e2467cbf021192c241367b892230dc1e05c0580e.

I Googled this, and saw that it corresponded to ubuntu-19.10-desktop-amd64.iso from LinuxTracker.org.


Therefore, the flag is,
picoCTF{ubuntu-19.10-desktop-amd64.iso}


Latest comments (0)