
🚀 As we know Java is a widely used language by enterprises because of its Community support, Security and Its object oriented behaviour. Java is popular so its frameworks. Spring/Spring boot is one of the Java's widely used framework when it comes to building Industry level applications.

🫡 Don't worry If you haven't got the meme. We got you covered.
📍 Starting Spring Boot Project
To start with Spring Boot application, Go to start.spring.io and generate the project to work on. See the below image for reference:-
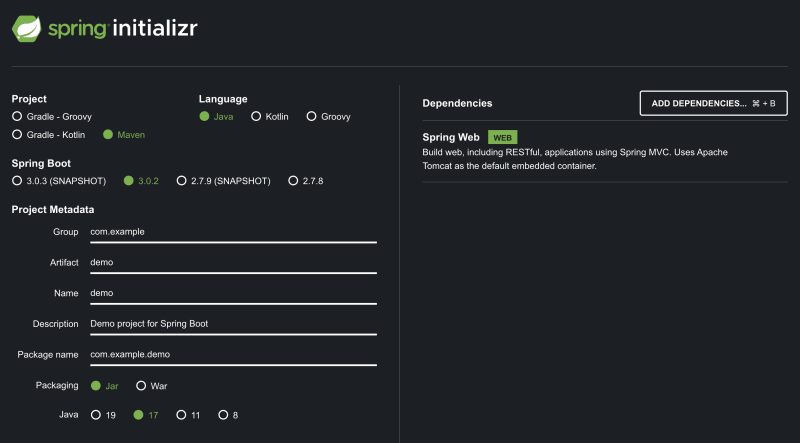
Note:- Add Spring Boot Web as Dependency before generating the project. Select Maven (Dependency Manager) and Generate the Project.
😊 Now, Open your project in IntelliJ IDE or any IDE of your choice. Note:- It will take some time to download the dependencies from the internet when you'll open the project first time.
😈 Running Demo Program
Before testing/running a demo program some of you might come across annotations. Annotations in java or spring boot is nothing but meta data (information) that doesn't change the action of compiled program but tells the compiler how to treat the program. For example:- @PutMapping annotation tells the compiler to treat a particular method as the RESTApi Put endpoint.
- We made some changes in DemoAppication.java file as:-
package com.example.demo;

import org.springframework.boot.SpringApplication;
import org.springframework.boot.autoconfigure.SpringBootApplication;
import org.springframework.web.bind.annotation.GetMapping;
import org.springframework.web.bind.annotation.RequestParam;
import org.springframework.web.bind.annotation.RestController;

@SpringBootApplication
@RestController
public class DemoApplication {

    public static void main(String[] args) {
        SpringApplication.run(DemoApplication.class, args);
    }

    @GetMapping("/hello")
    public String hello(@RequestParam(value = "name", defaultValue = "world") String name){
        return String.format("Hello %s!", name);
    }
}
👉 Here, GetMapping and RestController are the two annotations used which tells the compiler that treat these as REST Controller and Get Endpoint.
Start the Server, in terminal of current project directory run ./mvnw spring-boot:run to start the server/app.
🚀 Now, type http://localhost:8080/hello?name=Lovepreet in the URL and "Hello Lovepreet!" will show. Here, 8080 is the port on which our App is running and name=Lovepreet is the Request Param passed into the Get Mapping.


🚀 Reload Server on Save
Now, every time you have to refresh(Running the ./mvnw command again) the server whenever you make a change in the code. To enable hot reload, Go to dependencies and add spring-boot-devtools as your dependency and refresh/rebuild the project to get all dependencies resolved.
🫣 Now follow the steps to configure the hot reload:-

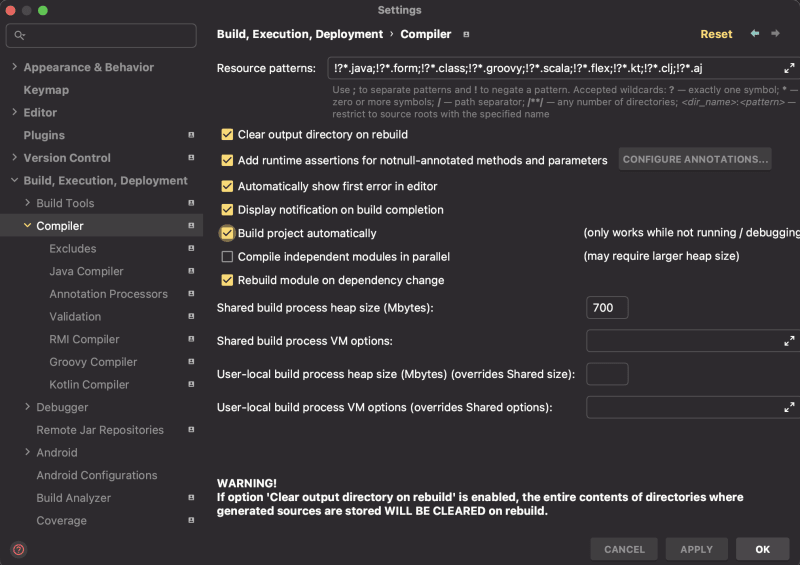
- Check Allow auto-make to start even if developed application is currently running and Build project automatically
👾 Build Spring Boot Project from Scratch
- Install Maven on your PC (run brew install maven if on macos)
- Start fresh project and create pom.xml file. Follow 4.1 Section from here and paste the content in the pom file
- If IDE ask in pop-up to build the project then click on it
- Run mvn package in the terminal to build the project
- Now to add Dependency, Paste the content as:-
<?xml version="1.0" encoding="UTF-8"?>
<project xmlns="http://maven.apache.org/POM/4.0.0" xmlns:xsi="http://www.w3.org/2001/XMLSchema-instance"
         xsi:schemaLocation="http://maven.apache.org/POM/4.0.0 https://maven.apache.org/xsd/maven-4.0.0.xsd">
    <modelVersion>4.0.0</modelVersion>

    <groupId>com.example</groupId>
    <artifactId>myproject</artifactId>
    <version>0.0.1-SNAPSHOT</version>

    <parent>
        <groupId>org.springframework.boot</groupId>
        <artifactId>spring-boot-starter-parent</artifactId>
        <version>3.0.2</version>
    </parent>

    <dependencies>
        <dependency>
            <groupId>org.springframework.boot</groupId>
            <artifactId>spring-boot-starter-web</artifactId>
        </dependency>
    </dependencies>

</project>
🥳 After pasting the dependency, Pom file looks like the above. Now, again reload or run mvn package
You can run mvn dependency:tree to see all the dependency installed
Now create MyApplication class inside the Directory structure as shown below:-

- MyApplication class looks like this:-
import org.springframework.boot.SpringApplication;
import org.springframework.boot.autoconfigure.EnableAutoConfiguration;
import org.springframework.web.bind.annotation.RequestMapping;
import org.springframework.web.bind.annotation.RestController;

@EnableAutoConfiguration
// EnableAutoConf annotation do configure tomcat server etc automatically
@RestController
public class MyApplication {
    public static void main(String []args){
        SpringApplication.run(MyApplication.class, args);
    }

    @RequestMapping("/")
    public String hello(){
        return "Lovepreet Singh here";
    }
}
🥳 Finally we are done with Creating Project from scratch
🤩 Creating an Executable JAR
Jar is a format of archiving source files and directories into a file and also it is an executable.
- Pom file updated:-
<?xml version="1.0" encoding="UTF-8"?>
<project xmlns="http://maven.apache.org/POM/4.0.0" xmlns:xsi="http://www.w3.org/2001/XMLSchema-instance"
         xsi:schemaLocation="http://maven.apache.org/POM/4.0.0 https://maven.apache.org/xsd/maven-4.0.0.xsd">
    <modelVersion>4.0.0</modelVersion>

    <groupId>com.example</groupId>
    <artifactId>myproject</artifactId>
    <version>0.0.1-SNAPSHOT</version>

    <parent>
        <groupId>org.springframework.boot</groupId>
        <artifactId>spring-boot-starter-parent</artifactId>
        <version>3.0.2</version>
    </parent>

    <dependencies>
        <dependency>
            <groupId>org.springframework.boot</groupId>
            <artifactId>spring-boot-starter-web</artifactId>
        </dependency>
    </dependencies>

    <build>
        <plugins>
            <plugin>
                <groupId>org.springframework.boot</groupId>
                <artifactId>spring-boot-maven-plugin</artifactId>
            </plugin>
        </plugins>
    </build>

</project>
- Run mvn package again in the CLI
- Now in the target directory you can find myproject-0.0.1-SNAPSHOT.jar and you can run jar directly using command:- java -jar myproject-0.0.1-SNAPSHOT.jar
🥳 Finally, Creating REST API
In software development, we do follow three layer architecture. Which is CRS i.e. Controller (This layer handles the client's requests), Services (This layer has all the business logic) and Repository (This layer is like doing database stuff i.e. Save, Delete, Find etc)
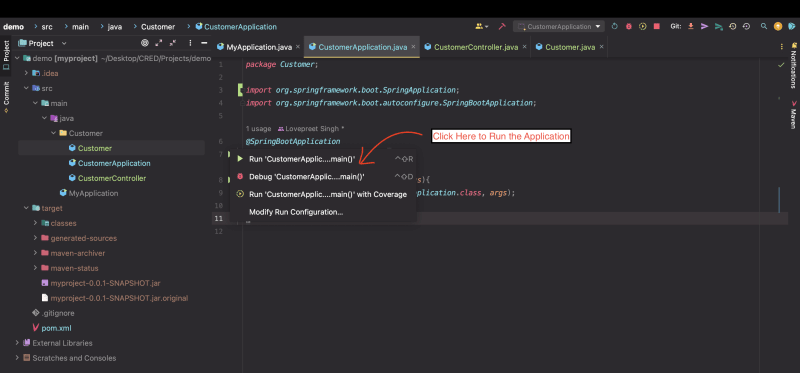
As of now, our simple application looks like this. Follow this Repo
Run the application and make sure it runs on localhost:8080/customer
🤗 This was it for Part 1. In next blog (Part 2) We will see how to use JPA Repository and set POST, PUT endpoints to make it a fully fledged REST API.
If you got some value, Do share and save the blog. See you soon 😎


Latest comments (9)
Impressive Lovepreet
Thanks Aslam ☺️
nice work Mate
Thanks Bruh
V nice
Thanks Buddy ☺️
Good
Thanks Vaibhav bro
Impressive