
Once upon a time, I added "write a book" to my professional bucket list. After a few false starts over the years, I finally self-published a book called Advanced GraphQL with Apollo & React.
As I am sure is the case for many first-time authors, I didn't have any frame of reference for how the writing/publishing process would work. I also didn't have anything resembling a realistic timeline in mind when I started. But I had an idea I finally thought was worth pursuing and that was enough to get going.
In this post, I'll give you some insight into exactly how exactly this process played out for me, what tools I used, and how I kept myself motivated to reach the finish line. It's a long one, so you may find this table of contents handy:
- The Big Idea
- Tools of the Trade
- Getting Syntax Highlighting (Mostly) Right
- Drafts, Drafts, and More Drafts
- The Business End (Plus More Dev!)
- Key Takeaways
- Final Thoughts
The Big Idea
About a year ago, I was at a professional crossroads. I was winding down a job managing the web and app development programs for tech and design school as my partner and I prepared for the arrival of our first child. I knew I was ready to shift gears to something new professionally, but I wasn't sure what.
After working on a few GraphQL-based software projects while at the school, it was clear to me that there was a sizeable gap between much of the "get up and running with GraphQL" educational content out there and what it often takes to get even a moderately complex GraphQL API into production. Over the years, I mostly learned how to do this through trial and error, reading a lot of documentation, and the occasional insight from other companies' engineering blogs.
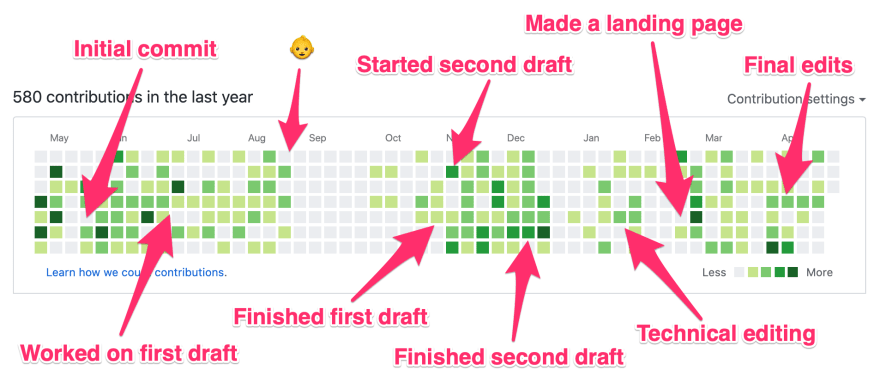
I can't remember exactly when lightning struck my brain and I decided I would consolidate all of the advanced GraphQL development practices I had learned into a book, but I do remember it was some time around the long weekend in May. From the beginning, I decided that the book would be structured around taking a single full-stack, GraphQL-powered app from its first line of code to its first deployment to production. I made an initial commit to a repo for the alpha version of that app on May 24, 2019, and I was off to the races.
For the TL;DR version of the sections that follow, my GitHub activity graph does a good job illustrating how the next 11 months played out for me:
Tools of the Trade
Right from the beginning, I planned to self-publish. I wanted the flexibility of being able to add to the book iteratively after its initial publication to keep it current, and it seemed like that would be easier if I didn't go down a traditional publishing route. Additionally, I just wanted to focus on writing the book and didn't want to take time out to shop it around to potential publishers at the time.
As I did some initial brainstorming for the book's content, I decided I would try Notion out. I had halfheartedly experimented with this app in the past and I thought that the board and calendar views could help manage my writing process.
When it came time to start the first draft, I didn't waste much time on tool selection and just started writing the book in Notion too. You can export content from Notion as markdown documents and I knew that this was the format I ultimately wanted the book's raw content to be in.
Notion ended being a great tool for outlining the book, managing lists of links to reference material, taking rough notes, and keeping track of to-do lists and expenses. However, I seemed to stretch it to its performance limits drafting 10,000+ word chapters in a single workspace page.
As I finished the first draft, it was obvious that it was time to export the chapters as markdown files and find a different text editor. I looked around and eventually settled on Typora. It has a nice, minimalistic interface and is free to try out while in beta. This app has since become my writing tool of choice on my MacBook. I occasionally had to open the folder of markdown files in VS Code to do some global finding and replacing throughout the entire book, but for the most part, I've stuck with Typora ever since.
Getting my book draft out of Notion also allowed me to version-control the content with Git, which is something I wish I had done sooner (Notion does have a "page history" feature, but I'm a developer, so what can I say? My brain is wired for Git 🤷♀️).
Getting the book content into a Git repository made it easy to hand the book off to my technical editor as well in early 2020. We ended up using pull requests on GitHub to manage his proposed edits to the book content, and I'm really happy with how smoothly that process worked between us.
After the second draft was complete, I started to look into what it was going to take to convert all of my markdown files and image assets into something resembling a real book. I was aware that tools like Leanpub and Gitbook existed, but I decided I would take a more hands-on approach and use Pandoc instead.
Pandoc is a powerful Haskell-based command-line tool for converting documents from one format to another (including markdown). I knew that I wanted to make the book available in DRM-free PDF, HTML, and EPUB formats, and Pandoc had all of these bases covered.
Sorting out the book-rendering process with Pandoc ended up taking much (much!) longer than I initially thought it would. I ended up needing to write a handful of Pandoc filters in Python using Panflute to tailor the formatting to what I had envisioned, especially for the PDF version.
I initially attempted to convert the book directly from markdown to a PDF using Pandoc (using a LaTeX PDF engine under the hood), but eventually realized that for the level of customization I wanted to apply, I would need to add an intermediary step of explicitly generating the LaTeX, and then using lualatex with the LaTex files to create the PDF afterward (this largely had to do with adding syntax highlighting to the code snippets in the book—I'll do a deep-dive on that in the next section). This process required a steadily increasing number of steps to complete, so I created a Makefile to automate the workflows for building the PDF and responsive HTML versions of the book.
If you know some Python, then Panflute is reasonably approachable and quite powerful when it comes to customizing the various output formats of your document from Pandoc. I ended up needing to take things a bit further though, and finally had to learn some LaTeX to tailor the output of the PDF even further.
I'm not going to sugar-coat it—LaTeX can be intense. Doing basic document mark-up with it is OK, but as soon as you start adding third-party packages to do super-custom formatting, you're in for a fun ride. The experience reminded me of learning how to code for the first time—there was so much copying and pasting of somewhat opaque examples from the internet and hoping for the best without a clear idea of what exactly the code does. The Overleaf documentation and tex.stackexchange.com became my go-to resources for cobbling my LaTeX code together.
To provide some helpful visual enhancements throughout the book, I drew a number of diagrams on my iPad Pro using the GoodNotes app. Out of all of the note-taking and drawing apps I've tried on my iPad, this is by far my favorite (it's very intuitive and only requires a one-time purchase to use, rather than an ongoing subscription).
Finally, as the all-important finishing touch for the book, I put on my amateur designer hat and DIYed a cover design using Illustrator, including a lunar lander icon I purchased from the Noun Project.
Getting Syntax Highlighting (Mostly) Right
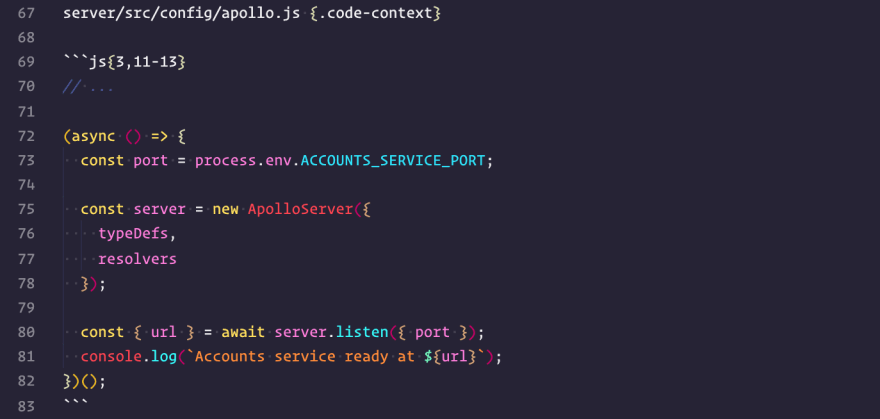
One of the biggest challenges I faced when formatting both the PDF and HTML versions of the book was getting the syntax highlighting right for the code snippets. When I started writing the book last May I knew that I wanted to specify highlight lines in my markdown code fences, so I used the same syntax you may be familiar with if you've ever used this feature with Pygments.
Above every code fence, I also added a line to indicate the name of the file that the code belonged to, and I created a class called code-context that I could later use to apply some formatting to these lines to distinguish them from the rest of the text.
The fenced code blocks in my markdown files ended up looking like this:
To be honest, before I wrote the first draft I did virtually no research into how easy it would be to parse the highlight line numbers for the code snippets using Pandoc, but I held onto my blind faith that I would figure out how to make this work the way I wanted it to when the time came.
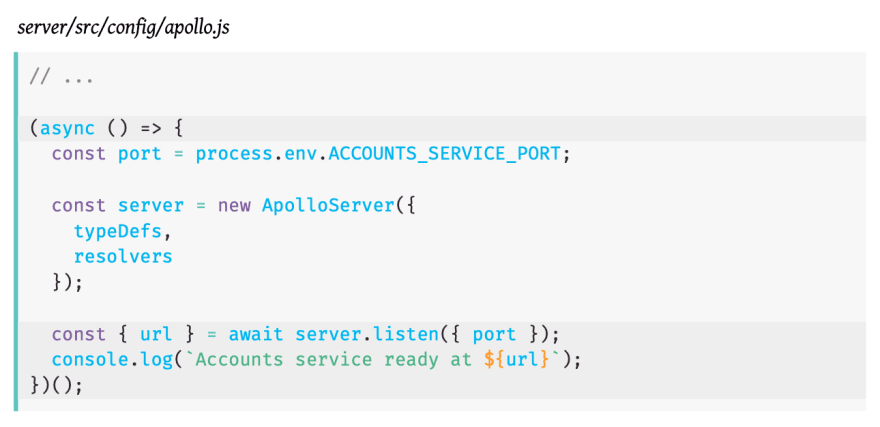
I later discovered that Pandoc has some out-of-the-box support for doing syntax highlighting, but it didn't offer the degree of customization I wanted for either the HTML or PDF version of the book (a recurring theme at this point!). Using Panflute, I was able to write a filter that intercepted all of the code block elements in my markdown files and then rendered them using Pygments instead.
Pygments plus a bit of CSS was enough to render the code blocks with their filenames in the HTML format of the book as follows:

The PDF version of the book required some additional work to make the syntax highlighting to look (mostly) like it did in the HTML version. I had to use the minted package to get the highlight lines to work and I had to use the tcolorbox package to format the file names and make sure that the names would stay attached to the code blocks and wouldn't become widowed at the bottom of the page.
The PDF code blocks ended up looking like this:
As you can see, it's pretty darn close to what I created for the HTML version. I haven't been able to figure out how to apply the left border selectively to the highlight lines only using LaTeX yet, but I may keep playing around with this to see if I get it working for a later release of the book.
In addition to the highlight line borders, I have two other not-quite-but-nearly resolved issues with the code block rendering. The first is only an issue with the PDF and had to do with rendering an emoji with zero width joiners and a skin tone modifier directly inside of a code block. I did get it to work eventually, but it required an ugly hack and I'm convinced that there has to be a better way to do this.
The other issue unresolved issue has to do with the JSX syntax highlighting. Pygments doesn't have built-in support for JSX highlighting, so I had to add a custom lexer to highlight the React code blocks in the book. I used a JSX lexer that I found on GitHub, but quickly realized that the lexer needed a bit of work because the highlighting when haywire when switching back and forth between JSX tags and regular JavaScript inside components.
I was able to resolve many of the highlighting bugs by modifying that JSX lexer, but there are still a handful of misclassified tokens in the React code blocks. After two straight days of endlessly tweaking regexes to try to account for all the edges cases where this happens, I finally accepted that I may just start from scratch and write my own JSX lexer when I have a chance to get this 100% right.
Drafts, Drafts, and More Drafts
I wrote the first draft of the book as I wrote the code for the alpha version of the project app, starting both in late May 2019. After some initial brainstorming, I was able to create a high-level outline for the book and then fleshed out more detail in the outline as I built the project app chapter by chapter.
The source code UI in VS Code was essential for helping me plan out each section within a given chapter. My workflow for writing a chapter went something like this:
- Write and test out the code in the alpha project app that must be explained in the current section
- Use the Git diff interface in VS Code to see exactly what changed from the last section
- Create fenced code blocks through the section to step through the code changes
- Calculate what lines needed to be highlighted in the code blocks
- Write explanations in between the code blocks walking through what the code does (as well as other supporting content)
- Add supporting screenshots and diagrams as needed
- Make a commit to the project app repo
- Repeat steps 1-7 for the next section
I dedicated just about every moment of free time that I had last summer to work on the book and I managed to finish about 75% of the first draft before my son arrived in late August. I took about four weeks off of writing after that to focus on learning how to keep a newborn happy/alive but slowly managed to start sneaking in some work again while he napped.
Trying to write code while simultaneously trying to string together complete sentences that explain that code while only sleeping in two to three hours stretches wasn't the easiest project I've ever undertaken. Luckily, I had managed to get enough work done on the book during the summer that it would have been disappointing to abandon the project at that point. I was determined to see it through, even though my brain would have been so, so much happier to just binge-watch Netflix or mindlessly scroll through Twitter when I had any downtime back then.
By the beginning of November, I somehow managed to finish what qualified as a first draft, and I promptly started working on the second. As I wrote the second draft, I also completely rebuilt the project app from scratch to make sure everything contained within the book was reproducible before handing it off to the technical editor I had just recruited.
After five weeks of intense editing, I finished the second draft within hours of my self-imposed deadline. I was traveling to see family over the holidays and I was determined to wrap up the second draft before setting foot on the plane. When I arrived home in the new year, I met with my technical editor to discuss the editing workflow and I gave him access to the book and project repos.
As he worked his way through the book, I used that time to figure out how to get what I wanted out of Pandoc and LaTeX and began putting the pieces in place to start and run a publishing business (more on that to come in the next section...).
At the same time, as the technical edits for each chapter of the book rolled in as PRs, I went through each chapter again to do my final edits and formatting adjustments. I also rebuilt all of the React code from scratch (for a third time!) because it had gone through substantial refactors over the months and I knew I would sleep better at night if I did one last round of QA on it.
Finally, at the end of April (just over 11 months since my first commit) I tagged a v1.0.0 release on my book repo and packaged up the built book files for distribution.
The Business End (Plus More Dev!)
In tandem with the writing and editing work, I had to figure out how I was actually going to sell this book once it was done. As I mentioned in the last section, I began sorting out the administrative and marketing details of self-publishing a book at the beginning of the year.
My first step was to incorporate a business. I live in Canada, so I was able to use a service called Founded to do this. Using Founded was worth every penny for me because I was able to complete the full process of incorporating a business in under 20 minutes (I'm convinced it would have taken me days to work through all of the steps on my own).
Next, I needed a domain name for my newly incorporated publishing company, which I called 8-Bit Press Inc. I purchased 8bit.press and set up a company email using Fastmail.
Then for the fun part—it was time to design a logo. Aseprite is my go-to tool when the mood strikes me to make some pixel art, so I used it to quickly mock-up some pixelated book icons for the logo. When I settled on my favorite version, I redrew the winning icon in Illustrator and added the logo text to it. This was what I ultimately landed on:

My next step was to sign up for Convertkit so I could start building an email list and distribute a sample chapter of the book. I then built a basic landing page for the book using React and set up a tiny Express server to interface with the Convertkit API when someone signed up to receive the sample chapter. I wrapped the landing page's client and server code in Docker containers and deployed it on Digital Ocean, using Let's Encrypt for the TLS certificate.
(As a side note, I know that creating a full-blown React app and using Docker to manage a basic landing page seems like insane overkill, but I have much bigger plans for the site so it made sense for me to lay this foundation from the beginning.)
Since I launched the landing page, I've been doing what I can to get the word out about the book. Admittedly, self-promotion has never been my forte, but I'm trying to view it as a personal growth experience. Nonetheless, as I continue to grow my little publishing company over the months to come, I am 100% committed to making my first hire a marketing person. 🙃
To handle book sales, I decided to use Gumroad. As far as setting up basic digital product sales goes, I don't think Gumroad could make the process any faster or easier. There are always trade-offs for plug-and-play products like these when it comes to customizability though, and I think I may need to move to a different e-commerce solution in the future (for reasons mostly related to Canadian sales tax).
Once Gumroad was set up, I was finally ready to flip the switch late on April 29th. I made my first sale by 10 a.m. the next morning and the sales have been steadily racking up throughout May. It's been simultaneously exhilarating, slightly terrifying, and incredibly rewarding to know that something I invested so much time and care into has been set free in the world and that over developers are finding it useful.
Key Takeaways
Reflecting on the entire experience, if I had to distill my top three learnings to share with any other aspiring authors, then these would be the highlights:
Stop thinking about writing and just start writing
I'm not what you would describe a "quick start." I like doing a lot of research and internal deliberation before making decisions. I feel most comfortable when I have my ducks in very nice rows. But I consciously chose to keep those tendencies in check to get some momentum going for this book.
Fixating on meta-work up-front can turn into a distraction at best or "analysis paralysis" at worst. It's a form of the resistance. By intentionally focusing on doing the "real" work, I managed to churn out the majority of the first draft before the little bundle of joy arrived and my day-to-day (and night-to-night) life turned upside-down. And that was enough to help me refocus on the finish line when I was ready and make effective use of the significantly reduced amount of free time and headspace I had afterward.
Did I acquire some technical debt along the way with this approach? Without a doubt. But I'm much happier having a done book than a perfect book right now.
Writing project estimates work just like dev project estimates
In other words, make your best guess about how long you think it will reasonably take you, then multiply that number by two (at a minimum). When I started this project last May I thought I would easily have the book done and ready to sell by the end of November. LOL! My initial estimate was off by about five months.
All things considered, it's probably a minor miracle that I wrote and published a ~750-page book in just under a year. Once I got into a better flow with the project and had a more concrete sense of how long certain things would actually take, I found setting self-imposed deadlines to be quite effective.
I'm typically a goal-directed, person so to-do lists with due dates attached to each item work well for me. For a huge project like this, the key is to create smaller deadlines for manageable chunks of work so you can feel like you're accomplishing things as you regularly check-off boxes. It's easier to stay motivated when you have a visual reminder of your momentum.
Eventually it's "up-to-date enough"
This takeaway is especially applicable if your writing a book about software, and I'd say that goes double if the software requires any assortment of front-end JavaScript libraries.
The second part of my book contains five chapters that explain how to build a React application that uses the GraphQL API built throughout the first part of the book. At this point, I've lost count of how many times I had to re-work massive sections of Part 2 in an attempt to keep things up-to-date with new releases of all of the essential packages I was using.
For example, a couple of weeks after I started working on the React content, Apollo Client released a new hooks-based API for making queries and mutations. Hooks are the way we do things in React now, so I refactored all of the code I had written using the old context-based API. After that, React Router decided to introduce hooks to its API too, so I tore out and rewrote more code once again.
Trying to keep the refactored source code for the project app in sync with code snippets in the book was very tedious at times. I occasionally had to stop and remind myself that I was self-publishing largely so I could easily distribute updates to its content as needed. Eventually, you just need to cut yourself off and say that it's up-to-date enough.
Final Thoughts
I used to do a lot of recreational writing years ago because I really enjoyed the process. Over the years though, other professional obligations and personal priorities crowded out any space I had for that. Writing this book helped me rediscover my passion for writing motivated me to get back into blogging over the last six months too. I'm going to do my best to keep up that habit for the foreseeable future.
And now that I have the first book out the door, I have ideas for at least two more books percolating. In fact, I already started outlining one of them as I was wrapping up this one. I also plan on making some upgrades to the landing page I created for the book and turning 8bit.press into a proper website over the coming months.
If you've been thinking about writing a book about programming yourself, then I hope you've found some of the insights I shared above helpful. If you have any questions about writing or would like to share your own experiences, I encourage you to leave a comment below. You can also send me an email.
Photo credit: Lauren Mancke


Top comments (8)
Really great article - makes me want to write! Also makes me sadly aware I'd never be able to finish lol
Thanks! You may be surprised at what you can finish if you break it down into smaller steps. Every box that checked off on my outline gave me the little bit of motivation I needed to get started on the next section 🙂
Amazing journey, thanks for sharing!
Hi, got there because of syntax highlighting. I've been self-publishing 3 books in the past (see here) first using Leanpub then going full LaTeX (crazy me).
After having pulled almost all my hair I was moderately satisfied, then for the next book I need React.js syntax highlighting and hell is breaking loose. I'm currently working with
minted(I was alistingsuser before), andtcolorboxas well. "Working" means that I mostly have a disappointed stare and I mumble Italian curses.For the love of god, there's no simple way out here: I'm trying to add zebra lines and it looks like I'm re-programming the Hubble telescope. Anyway... Could you please share the better-jsx-lexer you've tweaked? I guess I'm using the one you've taken as a start point.
Thanks!!
Hi Davide,
Big disclaimer: this does not work 100% yet (there are some instances where the highlighting falls apart, particularly when things get deeply nested). But this is what I managed to adapt from the fcurella/jsx-lexer:
gist.github.com/mandiwise/452b23fd...
It's on my long-term to-do list to completely rewrite this lexer from the ground-up, but I don't have the bandwidth for it at the moment.
Hi Mandi,
so nice of you to share this. I've touched it just ever slightly to allow the use of dashes in the component name (e.g.
<sp-button>), I've forked your gist here: gist.github.com/undavide/a225bd6fb...Thanks again!
Wow! Writing Code - Books seems way more difficult than I thought it would be!
Keep up the good work, mate!
Inspirational!