This article assumes you already know what GraphQL and Apollo client are and you're able to build Vue applications with Vue CLI
🤔 Why do we need Apollo local state management?
Imagine a Vue application fetching some data from a REST API. Where do you usually store this data? Probably, the answer would be 'in the local component state' or, if application is big enough, 'in the Vuex store with the rest of data'. This answer makes sense, because we can have the single source of truth for our application.
Now imagine an application fetching data from a GraphQL endpoint with Apollo client. By default, Apollo will store this data to Apollo cache. But what if we have some local application state, stored in Vuex? If we copy data from Apollo cache to Vuex, we're doubling our data. If we leave data from the API in Apollo and local data in Vuex, there will be two sources of truth. What would be a good way to store local data?
Previously there was a library named apollo-link-state to manage local data. But since Apollo 2.5 release, we don't need it anymore because this functionality is now a part of Apollo core. So, we can simply manage our local state without adding any new dependencies 🎉
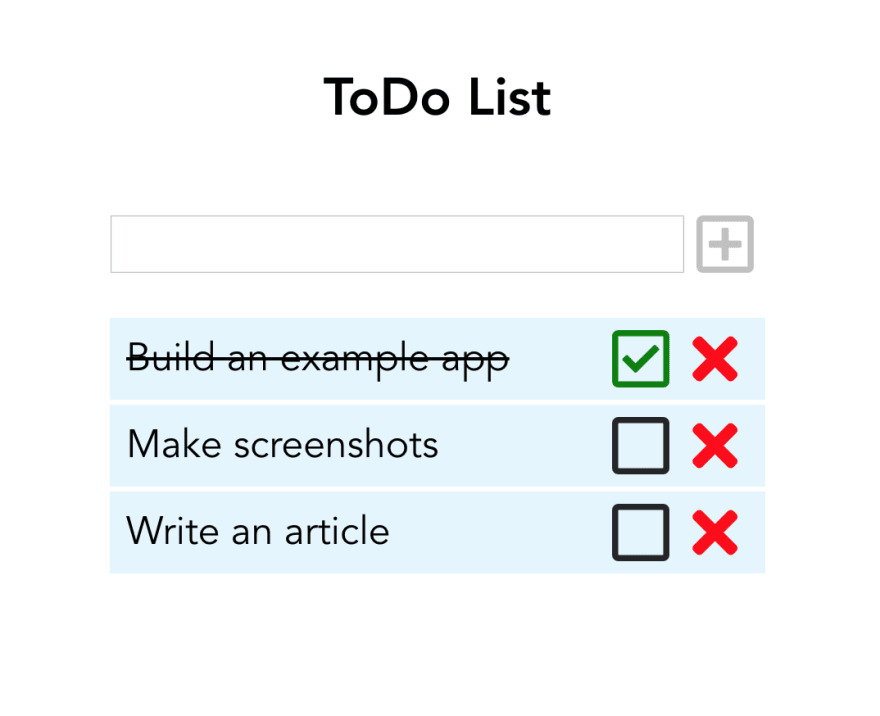
🏗️ What are we going to build
Let's try to create a simple to-do application with Vue and Apollo client.
I've started with a Vue CLI-powered to-do application with some custom styles. You can find its source code here.
🔧 Add Apollo to Vue application
First thing we need is to install Apollo client and integrate it to our Vue app. For integration, we will use vue-apollo plugin.
To install everything we need, type the following command in the terminal:
npm install --save vue-apollo graphql apollo-boost
or
yarn add vue-apollo graphql apollo-boost
Then open main.js file and add
// main.js

Vue.use(VueApollo);
This way we're adding the vue-apollo plugin to our Vue application.
Now we need to configure our Apollo client. First, let's add an import on the top of main.js file:
// main.js

import ApolloClient from 'apollo-boost';
// rest of imports

Vue.use(VueApollo);
Then, let's create a client:
// main.js

import ApolloClient from 'apollo-boost';
// rest of imports

Vue.use(VueApollo);

const apolloClient = new ApolloClient({});
Add a provider based on this newly created client and inject it to Vue application instance:
// main.js

const apolloProvider = new VueApollo({
  defaultClient: apolloClient,
});

new Vue({
  render: h => h(App),
  apolloProvider, //here goes your Apollo provider
}).$mount('#app');
Now we're ready to create an Apollo-powered store.
🗃️ Initializing an Apollo cache
We're going to initialize an Apollo cache where we will store our to-do items. Apollo has an InMemoryCache constructor to do this:
// main.js

import ApolloClient from 'apollo-boost';
import { InMemoryCache } from 'apollo-cache-inmemory';

// rest of imports

const cache = new InMemoryCache();
Now we need to add it to our client:
// main.js

const apolloClient = new ApolloClient({
  cache,
});
So far our cache is empty and we're going to add some data to it. But first let's create a local schema. This step could be optional, but just like how a schema is the first step toward defining our data model on the server, writing a local schema is the first step we take on the client.
📃 Creating a local schema
Let's think for a minute: what should our to-do item look like? It definitely needs to have some text but what else? Probably we need some property to define if it's already done or not and also an ID to distinguish one todo-item from another. So, it should be an object with three properties:
{
  id: 'uniqueId',
  text: 'some text',
  done: false
}
Now we're ready to add item type to GraphQL local schema.
Let's create a new file resolvers.js in the src folder and add the following code to it
import gql from 'graphql-tag';

export const typeDefs = gql`
  type Item {
    id: ID!
    text: String!
    done: Boolean!
  }
`;
gql here stands for the JavaScript template literal tag that parses GraphQL query strings.
Awesome! Let's import typeDefs and add them to our Apollo client:
// main.js

import ApolloClient from 'apollo-boost';
import { InMemoryCache } from 'apollo-cache-inmemory';
import { typeDefs } from './resolvers';
// rest of imports

const apolloClient = new ApolloClient({
  cache,
  typeDefs,
  resolvers: {},
});
Please note the empty resolvers object here: if we don't assign it to the Apollo client options, it won't recognize the queries to local state and will try to send a request to remote URL instead
Now we need to add some initial data to our cache. To directly write it here, we will use the writeData method:
// main.js

// apollo client code

cache.writeData({
  data: {
    todoItems: [
      {
        __typename: 'Item',
        id: 'dqdBHJGgjgjg',
        text: 'test',
        done: true,
      },
    ],
  },
});

// apollo provider code
We've just added an array of todoItems to our cache data and we are saying that every item has a type name of Item (specified in our local schema).
Now we're ready to query our local data from our Vue component!
🔦 Query local data
First, we need to build a GraphQL query to retrieve the data. Let's create a graphql folder, add a queries.js file to it and import graphql-tag there.
// queries.js

import gql from 'graphql-tag';
Now let's write a query:
// queries.js

import gql from 'graphql-tag';

export const todoItemsQuery = gql`
  {
    todoItems @client {
      id
      text
      done
    }
  }
`;
So, we defined the name of the query here (todoItems) and we specified that this query should not be executed against remote GraqhQL API. @client directive here tells Apollo client it should fetch results in the local data store.
Finally, we're ready to send the query from the Vue component. To do so, let's open our App.vue, import the query constant there:
<script>
import {
  todoItemsQuery,
} from "./graphql/queries.js";

export default {
// rest of App.vue
and create an Apollo query in the component:
// App.vue

export default {
  ...
  apollo: {
    todoItems: {
      query: todoItemsQuery
    }
  },
  ...
Can you believe it's enough to get everything we need? In fact, yes! This query will effectively fetch our local data and store it to App.vue's todoItems property.
✏️ Change local data
Now we need to find a way to change the data in store: add new item, delete item or toggle item's done property.
We already did change the local data when we were setting initial todoItems to the cache. This way is named direct cache write and is useful for initial setup or doing some very simple changes.
For more complicated changes in GraphQL we use mutations. So let's go back to our schema and define some mutations there!
// resolvers.js

export const typeDefs = gql`
  type Item {
    id: ID!
    text: String!
    done: Boolean!
  }

  type Mutation {
    changeItem(id: ID!): Boolean
    deleteItem(id: ID!): Boolean
    addItem(text: String!): Item
  }
`;
We've just added three mutations to perform different operations with our todoItems. Two of them (changeItem and deleteItem) take the item ID; addItem requires a text to create a new item and we're going to generate a unique ID for it.
Checking/unchecking a todo-item
We will start with changeItem mutation. First of all, let's add it to our queries.js file:
// queries.js
...
export const checkItemMutation = gql`
  mutation($id: ID!) {
    checkItem(id: $id) @client
  }
`;
We defined a local mutation (because we have a @client directive here) that will accept an ID. Now, we need a resolver: a function that resolves a value for a type or field in a schema.
In our case, resolver will define what changes do we want to make to our local Apollo cache when we have a certain mutation. Local resolvers have the same function signature as remote resolvers ((parent, args, context, info) => data). In fact, we will need only args (arguments passed to the mutation) and context (we will need its cache property to read and write data)
Let's start with adding resolvers const to our resolvers.js file.
// resolvers.js

export const resolvers = {
  Mutation: {
    checkItem: (_, { id }, { cache }) => {},
};
So, we created a resolver for checkItem and so far it doesn't do anything. We passed an id from mutation arguments and cache from context to it using ES6 object destructuring. Let's read our cache to retrieve current todoItems:
// resolvers.js

import { todoItemsQuery } from './graphql/queries';

export const resolvers = {
  Mutation: {
    checkItem: (_, { id }, { cache }) => {
      const data = cache.readQuery({ query: todoItemsQuery });
    },
};
As you can see, we imported our todoItemsQuery to tell our resolver what exactly we're reading from Apollo cache. Now let's add a logic to change done property value to an opposite:
// resolvers.js

import { todoItemsQuery } from './graphql/queries';

export const resolvers = {
  Mutation: {
    checkItem: (_, { id }, { cache }) => {
      const data = cache.readQuery({ query: todoItemsQuery });
      const currentItem = data.todoItems.find(item => item.id === id);
      currentItem.done = !currentItem.done;
    },
};
Finally, we need to write our changed data back to the cache and return the value of currentItem.done:
// resolvers.js

import { todoItemsQuery } from './graphql/queries';

export const resolvers = {
  Mutation: {
    checkItem: (_, { id }, { cache }) => {
      const data = cache.readQuery({ query: todoItemsQuery });
      const currentItem = data.todoItems.find(item => item.id === id);
      currentItem.done = !currentItem.done;
      cache.writeQuery({ query: todoItemsQuery, data });
      return currentItem.done;
    },
};
Now our resolver is ready and we're going to call our mutation from the Vue component. Let's go back to the App.vue, import the mutation there and change the checkItem method:
<script>
  import {
    todoItemsQuery,
    checkItemMutation,
  } from "./graphql/queries.js";

  export default {
    ...
    methods: {
      checkItem(id) {
        this.$apollo.mutate({
          mutation: checkItemMutation,
          variables: { id }
        });
      },
    }
  };
</script>
What's going on here? We call the $apollo.mutate method (provided with vue-apollo plugin) and we pass the mutation we created earlier in queries.js and an id variable (ID is passed from the template where we're checking the item):
<ListItem
  v-for="(item, index) in todoItems"
  :key="index"
  :content="item"
  @toggleDone="checkItem(item.id)"
  @delete="deleteItem(item.id)"
/>
Now when we're clicking on the checkbox, we will send a mutation that changes our local state. We can see immediately that our todoItems array is changed with this mutation so checkbox becomes checked/unchecked.
Deleting an item
Now we need the way to delete an item. Let's start again with creating a deleteItem mutation:
// queries.js

export const deleteItemMutation = gql`
  mutation($id: ID!) {
    deleteItem(id: $id) @client
  }
`;
As you can see, it's very similar to the previous one: again, we're passing an ID as a parameter. Now let's add a resolver for it:
// resolvers.js

deleteItem: (_, { id }, { cache }) => {
  const data = cache.readQuery({ query: todoItemsQuery });
  const currentItem = data.todoItems.find(item => item.id === id);
  data.todoItems.splice(data.todoItems.indexOf(currentItem), 1);
  cache.writeQuery({ query: todoItemsQuery, data });
  return true;
},
Again, we're reading the todoItemsQuery from the cache as a first step and writing it back later (and we're simply returning true to show the request was successful). But instead of changing currentItem we're just removing it from the todoItems array.
Now let's add this mutation to the App.vue.
<script>
  import {
    todoItemsQuery,
    checkItemMutation,
    deleteItemMutation
  } from "./graphql/queries.js";

  export default {
    ...
    methods: {
      deleteItem(id) {
        this.$apollo.mutate({
          mutation: deleteItemMutation,
          variables: { id }
        });
      }
    }
  };
</script>
Very similar to checkItem, isn't it?
Adding new item
While the two previous mutations were really similar to each other, addItem will be different. First of all, we will pass a text, not an ID, and we want to be able to see what is actually added:
// queries.js

export const addItemMutation = gql`
  mutation($text: String!) {
    addItem(text: $text) @client {
      id
      text
      done
    }
  }
`;
You can assume the resolver will be more complex as well: we need to generate a unique ID somehow. For this project we're going to use shortid library:
npm install shortid
or
yarn add shortid
Now let's start building our resolver:
// resolvers.js
import shortid from 'shortid';

export const resolvers = {
  Mutation: {
    ...
    addItem: (_, { text }, { cache }) => {
      const data = cache.readQuery({ query: todoItemsQuery });
      const newItem = {
        __typename: 'Item',
        id: shortid.generate(),
        text,
        done: false,
      };
    },
  }
}
As you can see, now we're taking a text from our mutation arguments and set a newItem text property equal to it. For id we're generating a new unique ID with shortid.generate method. As for done property, we always set it to false when creating a new todo-item (because obviously it's not done yet!).
Now we need only to push this newly created item to the todoItems array, write the data back to the cache and return a newItem as a mutation result.
// resolvers.js

addItem: (_, { text }, { cache }) => {
  const data = cache.readQuery({ query: todoItemsQuery });
  const newItem = {
    __typename: 'Item',
    id: shortid.generate(),
    text,
    done: false,
  };
  data.todoItems.push(newItem);
  cache.writeQuery({ query: todoItemsQuery, data });
  return newItem;
},
We're ready to call our addItem mutation from the component! Let's import it to App.vue...
<script>
  import {
    todoItemsQuery,
    checkItemMutation,
    addItemMutation,
    deleteItemMutation
  } from "./graphql/queries.js";
  ...
</script>
...and add it to the addItem method:
  addItem() {
    if (this.newItem) {
      this.$apollo.mutate({
        mutation: addItemMutation,
        variables: { text: this.newItem }
      });
      this.newItem = "";
    }
  },
newItem here represents a string from the input field and we're going to call a mutation only when we have some actual text to send. Also, after we've added a new item, we want to clear an input.
Yay, our application is ready! 🎉
You can find the full application source code here.


Top comments (25)
Definitely a useful post for devs wanting to give this kind of local state management a try!
But I still don't get the point of using GraphQL for local state management.
If your app doesn't neccessarily need caching you could still rely on low-level graphql fetching using apollo-link-http and wire it up with a traditional vuex store.
Then you have a lightweight setup and the vuex advantages (like time travelling) and no need to utilize functions with weird/unused arguments (like "_") and you don't have any doubled code because you store the response data inside your store.
Anyway a great to follow and really detailed article... But yet I wish those contemporary tech articles would have a more "debated view" ;-)
Hi Natalia!
Great article! Thanks!
But what about large applications where Vuex is unobtainable?
How to build a structure there?
If we get data (graphql) and work with them in the application?
Use graphql + Vuex only?
Or is it more optimal Apollo-Vue + Vuex?
Thank you! Right now I would go with Apollo Client (cache disabled)+ Vuex without vue-apollo. If you wonder, how to make it all work together, I've created a small proof of concept when researching Vuex -> Apollo migration for GitLab: gitlab.com/ntepluhina/vuex-to-apollo
The repo has a detailed descriptive readme and one of the branches addresses this approach :)
Please let me know if you have any questions
Hi,
Can you please elaborate on the reasoning for this and not using Apollo's client state? Wouldn't it just be a question of modularizing local state queries and mutations, similar to what would be necessary with Vuex too?
Scott
Unfortunately this gitlab repro is also out of date. When trying to install it with npm install, there are several errors comming up because of not existing and no longer maintained packages.
Natalya, thanks!
This is probably the best practice ffor this moment.
Hello Natalia, I followed your tut to get familiar with Apollo cache. Thx for that!
Maybe I missed it, but you are never adding the exported resolver to the options object when instantiating the ApolloClient object. So my resolver didn't work. After some debugging and research I found that
resolvers: {}was still there and had to replaced with the resolvers we made further on.For others:
In main.js
change
to
and
to
Hi Peter! I do this in
Creating a local schemapart. There is a note there:Please note the empty resolvers object here: if we don't assign it to the Apollo client options, it won't recognize the queries to local state and will try to send a request to remote URL instead
I was reading that as for now we assign an empty object, else we get in trouble :P
Is it correct to use
cache.writeQueryandcache.readQuery? I found that this currently doesn't work for me (state doesn't get updated) and the documentation of Apollo notes:apollographql.com/docs/react/advan...
I fixed it in the article: we use writeData, not writeQuery ;)
I rather meant in the mutations inside the resolver. With client.writeQuery you can make sure, the data reactivity is triggered for sure while cache.writeQuery will possible not fire a data refresh in your UI if you change nested items. At least that's what I currently can reproduce.
I cannot reproduce this behavior and very own Apollo tutorials are also relying on
cache.writeDataandcache.writeQueryapollographql.com/docs/react/essen...
I love this post! one thing I would love to do is abstract away the fact that we have a Apollo Mutation from the components.
I'm not sure if it's realistic but I was thinking of the situation where you have a snackbar or toasts. You could have local state with Vue-Apollo but I want to create an interface to my AlertService that doesn't expose VueApollo.
I feel like I am rambling like a madman, but, have you ever tried to hideaway any of your Apollo logic?
You can do it outside of the components and without VueApollo :) In fact, VueApollo works as a Vue wrapper for Apollo Client, but it doesn't mean you can't use the client directly:
First, you will need to export your client when creating it:
Then, you can import it anywhere in the service/util/helper and use it:
Such an awesome response - I just did something similar but I needed to be able to mock in test so I have a service that looks like this
Then I inject the real client on
Vue.jsstartupThen in a test I can inject a mock.
Awesome mock! I'm happy the reply was useful :)
How does it work with reactivity? Is the data still reactive if I use it with legacy ApolloClient e.x. for updating local state?
You hit the nail on it's head: If one is gonna create an app or website coupled to GraphQL, this question will ultimately come up as soon as the discovery of Apollo Local State happens. And there is not much about best practices of integrating Apollo Local State into web apps other than the rather difficult to understand documentation. So your post is quite important. Thank you for that.
Thank you so much! I am really thrilled this post is useful 🤗
The GitHub Rep is not working anymore. When running npm install there are several errors comming up because of outdated packages. Would be really nice to have an up to date version of this little project with Vue3 and the composition API. Or Maybe someone can point me to another example project. So far I could not find anything useful.
Thanks , but i still don't understand how to also update my remote graphql server x) i need to sent two queries ?
Thanks, lovely article. Vuex has perfect devtools. Vuex has getters. Vue Apollo sounds like twice less code and less memory usage.
What about Laravel - vuex - vue-apollo #vuex #laravel #vue-apollo
Good post. Thanks.