
In this article, I’ll show you the easiest way possible to create a chat
application using React.js. It’ll be done entirely without server-side code, as
we’ll let the Chatkit API handle the back-end.
I’m assuming that you know basic JavaScript and that you’ve encountered a little bit of React.js before. Other than that, there are no prerequisites.
Note: I’ve also created a free full-length course on how to create a React.js chat app here:

If you follow along with this tutorial you’ll end up with your very own chat application at the end, which you then can build further upon if you’d like to.
Let’s get started!
Step 1: Breaking the UI into components
React is built around components, so the first thing you want to do when creating an app is to break its UI into components.
Let’s start by drawing a rectangle around the entire app. This is your root component and the common ancestor for all other components. Let’s call it App:

Once you’ve defined your root component, you need to ask yourself the following question:
Which direct children does this component have?
In our case, it makes sense to give it three child components, which we’ll call the following:
TitleMessagesListSendMessageForm
Let’s draw a rectangle for each of these:

This gives us a nice overview of the different components and the architecture behind our app.
We could have continued asking ourselves which children these components again have. Thus we could have broken the UI into even more components, for example through turning each of the messages into their own components. However, we’ll stop here for the sake of simplicity.
Step 2: Setting up the codebase
Now we’ll need to setup our repository. We’ll use the simplest structure possible: an *index.html *file with links to a JavaScript file and a stylesheet. We’re also importing the Chatkit SDK and Babel, which is used to transform our JSX:

Here’s a Scrimba playground with the final code for the tutorial. I’d recommend you to open it up in a new tab and play around with it whenever you feel confused.

Alternatively, you can download the Scrimba project as a .zip file and run a simple server to get it up and running locally.
Step 3: Creating the root component
With the repository in place, we’re able to start writing some React code, which we’ll do inside the *index.js *file.
Let’s start with the main component, App. This will be our only “smart” component, as it’ll handle the data and the connection with the API. Here’s the basic setup for it (before we’ve added any logic):
    class App extends React.Component {

      render() {
        return (
          <div className="app">
            <Title />
            <MessageList />
            <SendMessageForm />
         </div>
        )
      }
    }
As you can see, it simply renders out three children: the <Title>,<MessageList>, and the <SendMessageForm> components.
We’re going to make it a bit more complex though, as the chat messages will need to be stored inside the state of this App component. This will enable us to access the messages through this.state.messages, and thus pass them around to other components.
We’ll begin with using dummy data so that we can understand the data flow of the app. Then we’ll swap this out with real data from the Chatkit API later on.
Let’s create a DUMMY_DATA variable:
    const DUMMY_DATA = [
      {
        senderId: "perborgen",
        text: "who'll win?"
      },
      {
        senderId: "janedoe",
        text: "who'll win?"
      }
    ]
Then we’ll add this data to the state of App and pass it down to the MessageList component as a prop.
    class App extends React.Component {

      constructor() {
        super()
        this.state = {
           messages: DUMMY_DATA
        }
      }

      render() {
        return (
          <div className="app">
            <MessageList messages={this.state.messages}/>
            <SendMessageForm />
         </div>
        )
      }
    }
Here, we’re initializing the state in the constructor and we’re also passing this.state.messages down to MessageList.
Note that we’re calling
super()in the constructor. You must do that if you want to create a stateful component.
Step 4: Rendering dummy messages
Let’s see how we can render these messages out in the MessageList component. Here’s how it looks:
    class MessageList extends React.Component {
      render() {
        return (
          <ul className="message-list">
            {this.props.messages.map(message => {
              return (
               <li key={message.id}>
                 <div>
                   {message.senderId}
                 </div>
                 <div>
                   {message.text}
                 </div>
               </li>
             )
           })}
         </ul>
        )
      }
    }
This is a so-called stupid component. It takes one prop, messages, which contains an array of objects. And then we’re simply rendering out the text and senderId properties from the objects.
With our dummy data flowing into this component, it will render the following:

So now we have the basic structure for our app, and we’re also able to render out messages. Great job!
Now let’s replace our dummy data with actual messages from a chat room!
Step 5: Fetching API-keys from Chatkit
In order to get fetch messages, we’ll need to connect with the Chatkit API. And to do so, we need to obtain API keys.
At this point, I want to encourage you to follow my steps so that you can get your own chat application up and running. You can use my Scrimba playground in order to test your own API keys.
Start by creating a free account here. Once you’ve done that you’ll see your dashboard. This is where you create new Chatkit instances. Create one and give it whatever name you want:

Then you’ll be navigated to your newly created instance. Here you’ll need to copy four values:
- Instance Locator
- Test Token Provider
- Room id
- Username
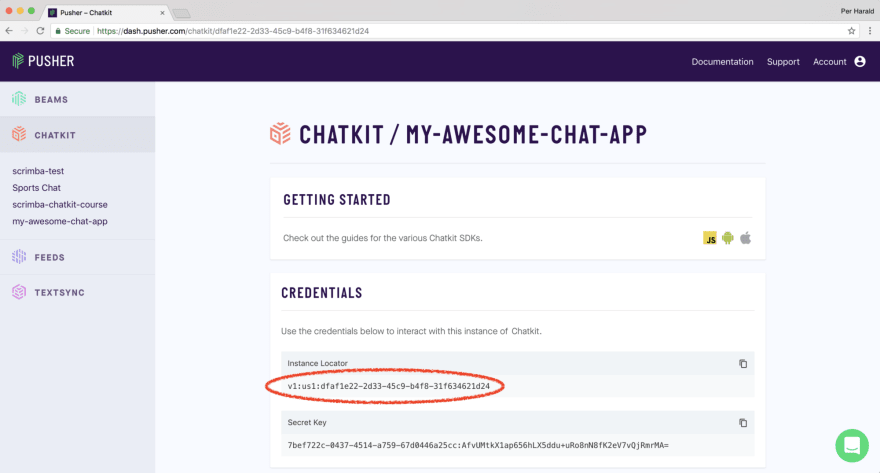
We’ll start with the Instance Locator:
And if you scroll a bit down you’ll find the Test Token Provider:

The next step is to create a User* and a **Room, which is done on the same page. Note that you’ll have to create a user *first, and then you’ll be able to create a room, which again gives you access to the room identifier.

So now you’ve found your four identifiers. Well done!
However, before we head back to the codebase, I want you to manually send a message from the Chatkit dashboard as well, as this will help us in the next chapter.
Here’s how to do that:

This is so that we actually have a message to render out in the next step.
Step 6: Rendering real chat messages
Now let’s head back to our index.js file and store these four identifiers as variables at the top of our file.
Here are mine, but I’d encourage you to create your own:
    const instanceLocator = "v1:us1:dfaf1e22-2d33-45c9-b4f8-31f634621d24"

    const testToken = "https://us1.pusherplatform.io/services/chatkit_token_provider/v1/dfaf1e22-2d33-45c9-b4f8-31f634621d24/token"

    const username = "perborgen"

    const roomId = 9796712
And with that in place, we’re finally ready to connect with Chatkit. This will happen in the App component, and more specifically in the componentDidMount method. That’s the method you should use when connecting React.js components to API’s.
First we’ll create a chatManager:
    componentDidMount() {
      const chatManager = new Chatkit.ChatManager({
        instanceLocator: instanceLocator,
        userId: userId,
        tokenProvider: new Chatkit.TokenProvider({
          url: testToken
        })
     })
… and then we’ll dochatManager.connect() to connect with the API:
      chatManager.connect().then(currentUser => {
          currentUser.subscribeToRoom({
          roomId: roomId,
          hooks: {
            onNewMessage: message => {
              this.setState({
                messages: [...this.state.messages, message]
              })
            }
          }
        })
      })
    }
This gives us access to the currentUser object, which is the interface for interacting with the API.
Note: As we’ll need to use
currentUserlater on, well store it on the instance by doingthis.currentUser =currentUser.
Then, we’re calling currentUser.subscribeToRoom() and pass it our roomId and an onNewMessage hook.
The onNewMessage hook is triggered every time a new message is broadcast to the chat room. So every time it happens, we’ll simply add the new message at the end of this.state.messages.
This results in the app fetching data from the API and then rendering it out on the page.

This is awesome, as we now have the skeleton for our client-server connection.
Woohoo!
Step 7: Handling user input
The next thing we’ll need to create is the SendMessageForm component. This will be a so-called controlled component, meaning the component controls what’s being rendered in the input field via its state.
Take a look at the render() method, and pay special attention to the lines I’ve highlighted:
    class SendMessageForm extends React.Component {
      render() {
        return (
          <form
            className="send-message-form">
            <input
              onChange={this.handleChange}
              value={this.state.message}
              placeholder="Type your message and hit ENTER"
              type="text" />
          </form>
        )
      }
    }
We’re doing two things:
- Listening for user inputs with the
onChangeevent listener, so that we can trigger thehandleChangemethod - Setting the
valueof the input field explicitly usingthis.state.message
The connection between these two steps is found inside the handleChange method. It simply updates the state to whatever the user types into the input field:
    handleChange(e) {
      this.setState({
        message: e.target.value
      })
    }
This triggers a re-render, and since the input field is set explicitly from the state using value={this.state.message}, the input field will be updated.
So even though the app feels instant for the user when they type something into the input field, the data actually goes via the state before React updates the UI.
To wrap up this feature, we need to give the component a constructor. In it, we’ll both initialize the state and bind this in the handleChange method:
    constructor() {
        super()
        this.state = {
           message: ''
        }
        this.handleChange = this.handleChange.bind(this)
    }
We need to bind the handleChangemethod so that we’ll have access to the this keyword inside of it. That’s how JavaScript works: the this keyword is by default undefined inside the body of a function.
Step 8: Sending messages
Our SendMessageForm component is almost finished, but we also need to take care of the form submission. We need fetch the messages and send them off!
To do this we’ll hook a handleSubmit even handler up with the onSubmit event listener in the <form>.
    render() {
        return (
          <form
            onSubmit={this.handleSubmit}
            className="send-message-form">
            <input
              onChange={this.handleChange}
              value={this.state.message}
              placeholder="Type your message and hit ENTER"
              type="text" />
        </form>
        )
      }
As we have the value of the input field stored in this.state.message, it’s actually pretty easy to pass the correct data along with the submission. We’ll
simply do:
    handleSubmit(e) {
      e.preventDefault()
      this.props.sendMessage(this.state.message)
      this.setState({
        message: ''
      })
    }
Here, we’re calling the sendMessage prop and passing in this.state.message as a parameter. You might be a little confused by this, as we haven’t created the sendMessage method yet. However, we’ll do that in the next section, as that method lives inside the App component. So don’t worry!
Secondly, we’re clearing out the input field by setting this.state.message to an empty string.
Here’s the entire SendMessageForm component. Notice that we’ve also bound this to the handleSubmit method:
    class SendMessageForm extends React.Component {
      constructor() {
        super()
        this.state = {
          message: ''
        }
        this.handleChange = this.handleChange.bind(this)
        this.handleSubmit = this.handleSubmit.bind(this)
      }

      handleChange(e) {
        this.setState({
          message: e.target.value
        })
      }

      handleSubmit(e) {
        e.preventDefault()
        this.props.sendMessage(this.state.message)
        this.setState({
          message: ''
        })
      }

      render() {
        return (
          <form
            onSubmit={this.handleSubmit}
            className="send-message-form">
            <input
              onChange={this.handleChange}
              value={this.state.message}
              placeholder="Type your message and hit ENTER"
              type="text" />
          </form>
        )
      }
    }
Step 9: Sending the messages to Chatkit
We’re now ready so send the messages off to Chatkit. That’s done up in the App component, where we’ll create a method called this.sendMessage:
    sendMessage(text) {
      this.currentUser.sendMessage({
        text: text,
        roomId: roomId
      })
    }
It takes one parameter (the text) and it simply calls this.currentUser.sendMessage().
The final step is to pass this down to the <SendMessageForm> component as a prop:
    /* App component */

    render() {
      return (
        <div className="app">
          <Title />
          <MessageList messages={this.state.messages} />
          <SendMessageForm sendMessage={this.sendMessage} />
      )
    }
And with that, we’ve passed down the handler so that SendMessageForm can invoke it when the form is submitted.
Step 10: Creating the Title component
To finish up, let’s also create the Title component. It’s just a simple functional component, meaning a function which returns a JSX expression.
    function Title() {
      return <p class="title">My awesome chat app</p>
    }
It’s a good practice to use functional components, as they have more constraints than class components, which makes them less prone to bugs.
The result
And with that in place you have your own chat application which you can use to chat with your friends!

Give yourself a pat on the back if you’ve coded along until the very end.
If you want to learn how to build further upon this example, then check out my free course on how to create a chat app with React here.
Thanks for reading and happy coding :)


Top comments (4)
Hey Per
I just finished the course this past weekend and it was amazing!
I even presented the full chat app at a demo day I had for a bootcamp
I'm tinkering around with the styles to see how I can further modify it but so far everythings works perfectly. Thanks for making this! :D
Just curious, since all the token/credentials reside in react on frontend, how is security taken care of?
Now code doesn't work chatkit is not defined
If you know solution for this problem plz help me
Chatkit is officially dead now, try using pusher channel for further use.