
This is the first post in the More than "Hello World" in Docker series. The series will help you ready your app: from setting it up locally to deploying it as a production-grade workload in AWS.
- Build Rails + Sidekiq web apps in Docker - we are here
- Deploy Rails in Amazon ECS
- Automate Deploys with AWS CodeDeploy
- Advanced ECS Concepts:
- Service Discovery and Auto Scaling - coming soon
- Fargate - coming soon
There is no shortage of web tutorials on how to display "Hello World" in Docker. The problem is that the path from getting your app to say "Hello World" in Docker, to running production-grade applications in AWS, is often not as straightforward. Even if your app isn't Rails / Ruby, reading through this series will help you know the challenges that lie ahead of you after you decide to use Docker in production.
I've used Docker in production for 7 months and have studied it for 4 months before that. In simple setups, doing Docker is very straightforward. Using it in production, however, increases the complexity as there would be a lot of other things to think about. This post will help you manage that complexity.
For this post, we would:
- Learn about basic Docker concepts and why Docker is used.
- Connect a Rails app to a PostgreSQL Server.
- Have a Sidekiq server running to get jobs from a Redis database.
- Feed simple tasks to the Sidekiq server by adding jobs in Redis.
- Run the Rails app using Docker compose
This is a foundational post. The Rails app we will build here will be the sample app that we will be using in later posts. If you're just starting in Docker, I recommend following along this post.
If you had some prior experience working with Docker, I recommend going to the next post in the series. The source code for this tutorial is available on GitHub, under release v0.0.1.
0 | Concepts
In this section, I will do a quick run-through on the basic concepts behind Docker. For a deeper conceptual understanding of Docker, I recommend Chris Noring's introduction.
In essence, Docker allows us to spawn containers on top of a Host OS (like Ubuntu, Mac, or Windows). We can run multiple containers inside a single Host OS.
Container - This is a process running on top of the Linux kernel. It is allocated its own resources: CPU, memory, and filesystem. By having its own resources, a container becomes isolated from other containers running inside your instance. When a container fails for whatever reason, it does not affect other containers/processes running inside the same Host OS.
Image - This is a file containing everything you need to execute your code: dependencies, binaries, source code, etc. They are built by executing commands in a script-like file called Dockerfile. Images are used to spawn multiple, identical containers. The containers are an "instantiation" of these images - and are the ones serving your customer traffic.
Dockerfile - This is a file containing instructions required to build an image. The commands you put in here should specify how you can put everything your application needs into an image.
If all this seems unclear, the hands-on in this post will illustrate the concepts in practice.
1 | Why Docker?
Lower Cost
Traditionally, you provision one instance and have just one application server running there. If you need to scale your application, you add more instances with one application server running on each. You don't usually scale by adding more application servers in one instance - because it's hard to manage. But this also results in most of your instances having unused capacity.
In Docker, you can run multiple containers in one instance. Since you can allocate an instance's resources to a container, you can add as many containers in the instance as long as there are enough resources on the instance. For example, if you have an instance with 8GB in memory and your containers only require 1GB each, you can have as much as 8 containers in that single instance.
Another famous problem in a production environment is memory bloat. Memory bloat happens when your application consumes a lot more memory than it's supposed to. The common fix is just to increase the size of the instance, which of course, increases cost.
In Ruby, the memory bloat problem is notorious in heavily multi-threaded applications such as Sidekiq. In Docker, you can set a hard memory allocation to a container. If the application consumes more than the hard allocation (say, 1GB), Docker kills the container and starts a new one. This prevents memory bloat and helps you use your resources more efficiently.
With this, you get to make the most out of your instance's resources. You don't have to provision as many instances as you would traditionally.
Standardization
The environment that your app runs in your local will be exactly the same as it is in production. No more "it works in my machine but not in prod."
Onboarding new developers also become easy: all you have to do is make them install Docker and have them run your Docker image in their local machine. No more 7-page document on how to install your app and all its dependencies in their machine.
Faster Deployments
Deployments pre-Docker look like this: AWS detects a spike in your traffic, it provisions a new instance, installs all the dependencies, tests your instance if it displays traffic, then the new instance takes in traffic. That process can take a few minutes because it loads an entire OS every time.
Deployments in Docker are much faster. Since containers are just processes, starting it is much lightweight that loading an entire OS.
Others
Still not convinced? You can read about the other benefits here.
2 | Installation
For this tutorial, I used Rails 5.2.3 and Ruby 2.5.1. You can install Ruby and Rails from this tutorial. Make sure to select Ruby 2.5.x and Rails 5.2.x in the dropdown, and choose the OS you'd be using.
We're also going to use Docker. If you're a Mac user like me, use this tutorial. For Windows users, you can use this.
3 | Creating a Rails app
(3.0) Go to a folder you want to make your Rails app on and execute:
rails new rails_docker_app
cd rails_docker_app
git init && git add .
git commit -m "Initialize Rails project"
Then, let's create the routes, controller and view necessary to display a message on the homepage.
(3.1) Open the config/routes.rb and make a route to the homepage. We will create the homepage in the next steps.
root to: "home#index"
(3.2) Create the file home_controller.rb in the app/controllers folder. Put a basic message inside the variable @message. Since the variable name is prepended with the @ symbol, it is going to be accessible from the view.
class HomeController < ApplicationController
  def index
    @message = "static page"
  end
end
(3.3) Create the app/views/home folder. In that folder, create a file called index.html.erb. Notice that we referenced the @message variable we created in the previous step. This should display the message "static page".
Home Page:

<%= @message %>
(3.4) Now, start the rails server and you should see the simple homepage we just created.
rails server -p 3000
You should see a simple page like the one below:

(3.5) When you're satisfied, commit your progress
git add .
git commit -m "Add basic routes, views, controller"
4 | Setting up Docker for Rails
(4.1) Create the Dockerfile in the app root directory with the touch Dockerfile command.
# gets the docker image of ruby 2.5 and lets us build on top of that
FROM ruby:2.5.1-slim

# install rails dependencies
RUN apt-get update -qq && apt-get install -y build-essential libpq-dev nodejs libsqlite3-dev

# create a folder /myapp in the docker container and go into that folder
RUN mkdir /myapp
WORKDIR /myapp

# Copy the Gemfile and Gemfile.lock from app root directory into the /myapp/ folder in the docker container
COPY Gemfile /myapp/Gemfile
COPY Gemfile.lock /myapp/Gemfile.lock

# Run bundle install to install gems inside the gemfile
RUN bundle install

# Copy the whole app
COPY . /myapp
Essentially, the Dockerfile is just a bunch of human-readable shell commands put together in a file. The first line fetches a Docker image called "ruby:2.5.1-slim" from Docker Hub. This image is called the base image. It has a lightweight operating system called "slim", with ruby 2.5.1 pre-installed. We will build upon this base image with the next commands.
The next command installs dependencies for Rails.
Images have their own "folder structure" inside. With the next commands, we create the /myapp folder and make that the 'default' folder.
We copy the Gemfile and Gemfile.lock, and then run bundle install. This installs all the required gems inside the image. We then proceed with copying the entire application into the image.
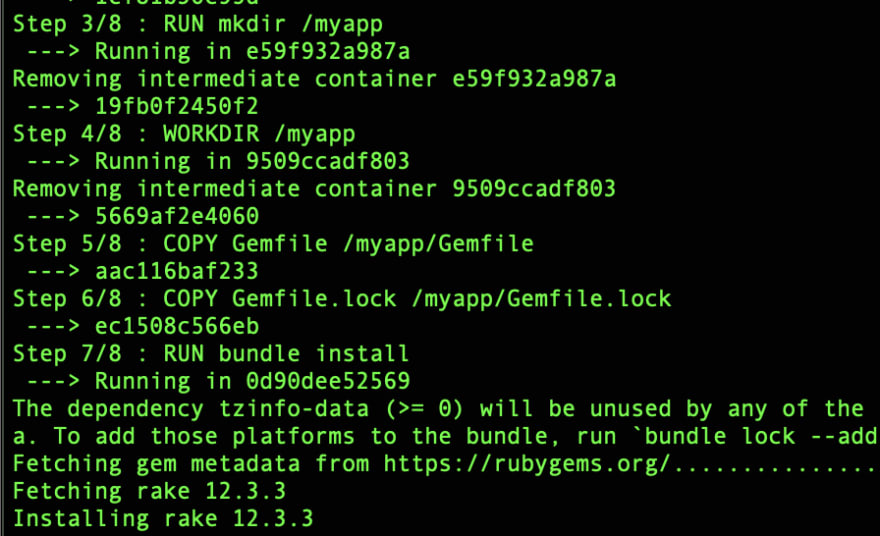
(4.2) Now that we understand what it does, let's execute docker build . for Docker to go through the instructions and create a Docker image for us.
You should see Docker run the commands in your Dockerfile:
(4.3) Once the execution is finished, run docker images to see the docker image you just built:

You can see that it's a pretty huge file (~641MB). That's because it literally has everything it needs to run the application.
(4.4) From the docker images, look for the image_id of your newly created image. Mine looks like this: "2f1a0fabe8c6". Let's tag our image so it would have a pretty name we can remember easily.
# for me
docker tag 2f1a0fabe8c6 rails-docker-app:v0.0.1

# for you: replace --chash-- with your image_id
docker tag --chash-- rails-docker-app:v0.0.1
Running a docker images again, you'd see your image with the proper name.

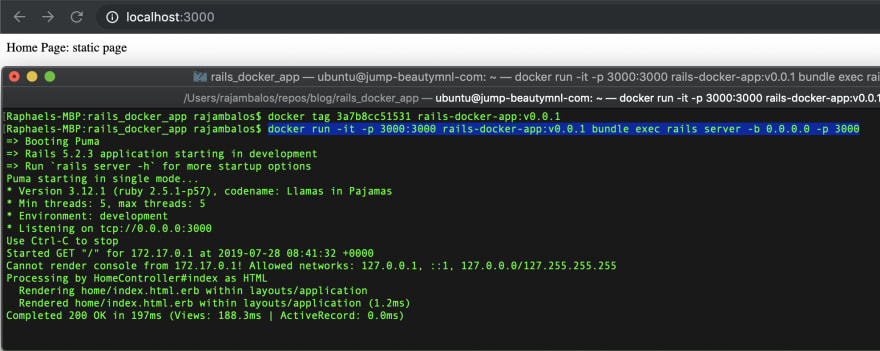
(4.5) Now that we have a Docker image, let's run it.
docker run -it -p 3000:3000 rails-docker-app:v0.0.1 bundle exec rails server -b 0.0.0.0 -p 3000
The -it flags allow you to have a terminal where you can see logs from your Rails server. The -p 3000:3000 flag exposes the port 3000 of the container to the port 3000 of your local machine. Then, I specified the Docker image we just tagged earlier and the command to run the Rails server.
You should see the simple page again, this time running on top of Docker:
(4.6) If you're satisfied with the output, commit your progress.
git add .
git commit -m "Add Dockerfile and run via docker run"
5 | Make running Docker easy with docker-compose
We now have a functioning Ruby on Rails application on top of Docker 🎉 🎉 🎉 .
Usual production workloads aren't this simple though. We usually have other services we run in conjunction with the Rails app: databases, Redis, Sidekiq, etc. So a local setup would typically have 5 different terminal windows with 5 separate docker run commands. Now that's a lot to keep track. Docker thought of that and introduced docker-compose.
The service docker-compose allows you to declare all these services neatly in one YAML file. It also gives you the power to start all these services in one window.
Let's dive in:
(5.1) Create a docker folder in your app's root directory, and a development folder inside it: mkdir docker && mkdir docker/development. Then, create a file called docker-compose.yml and enter the following:
version: '3'
services:
  db:
    image: postgres
    volumes:
      - ../../tmp/db:/var/lib/postgresql/data
  web:
    build: ../../
    command: bundle exec rails s -p 3000 -b '0.0.0.0'
    volumes:
      - ../../:/myapp
    ports:
      - "3000:3000"
    depends_on:
      - db
This docker-compose folder defines 2 services: db and web. The "db" service is a PostgreSQL container that will serve as our database service. The "web" service is the application server for our Rails app.
The content inside the "web" service is what we would typically put inside the docker run command - but it's much easier to read this way! 📖
(5.2) Now, we use docker-compose build command to build the docker images necessary to run this setup. Then, we use docker-compose up to simultaneously run these services.
cd docker/development
docker-compose build
docker-compose up
You will see logs coming from these two services:

(5.3) If you're satisfied with the output, commit your progress.
git add .
git commit -m "Add docker-compose.yml for easier docker runs"
6 | Going Further: Integrating PostgreSQL
Now, most web tutorials stop at section 5 and call it a day. This post aims to help with your production needs as much as possible. Connecting a PostgreSQL database and integrating Sidekiq via Redis are two common production tasks that aren't given much coverage in blog posts around.
(6.1) It's time to create our models. Run the 2 commands below to generate the models and migrations for Author and Post.
rails generate model Author name:string kind:string
rails generate model Post title:string body:text author:references likes_count:integer
(6.2) Open your Gemfile and replace gem 'sqlite3' with the line below. We would be using PostgreSQL as our database, and delete references to SQLite3.
gem 'pg', '>= 0.18', '< 2.0'
Then do bundle install.
(6.3) To be able to connect to our database, replace the contents of the config/database.yml with the contents below (if the file isnt there, create it yourself).
development:
  adapter: postgresql
  encoding: unicode
  host: db
  username: postgres
  password:
  pool: 5
  database: sample_app_docker_development
Then, add seeds to the db/seeds.rb file so we can have sample data in the database.
author = Author.create(name: "Raphael Jambalos", kind: "Programmer")
post = Post.create(title: "Redis", body: "This is a in-memory database often used for caching.", author_id: author.id)
post = Post.create(title: "PostgreSQL", body: "This is a transactional database used for transactions", author_id: author.id)
post = Post.create(title: "DynamoDB", body: "This is a NoSQL database used for concurrent workloads.", author_id: author.id)
(6.4) We want to display the sample data to the view. To do that, let's change the contents of the app/controllers/home_controller.rb file to:
class HomeController < ApplicationController
  def index
    @message = "Dynamic"

    @posts = Post.all
  end
end
Then, let's change the contents of the app/views/home/index.html.erb so we can render the posts neatly to the view.
Home Page:

<%= @message %>

<% @posts.each do |post| %>
  <h1> <%= post.title %> </h1>
  <h2> <%= post.author.name %> </h2>
  <p> <%= post.body %>
<% end %>
(6.5) Now, let's run docker-compose again.
cd docker/development/
docker-compose build
docker-compose up
On a separate window, run these commands sequentially
docker-compose run web rake db:create
docker-compose run web rake db:migrate
docker-compose run web rake db:seed
(6.6) If you're satisfied with your progress, commit it:
git add .
git commit -m "Add models, migration, seeds; Modify views to show seeded data."
7 | Going Further: Integrating Sidekiq
(7.1) Add gem 'sidekiq' to the Gemfile and run bundle.
Sidekiq is used for background processing. Imagine a website with a form in it. After filling up all the information required in the form, you press Submit. The browser sends all the info you wrote to the web server. By default, the web server has 60 seconds to process the request; otherwise, it results in a request timeout. This type of processing is foreground processing.
Now, we wouldn't want to make our customers wait as the info gets processed (much less show them a timeout page). So we throw the job of processing the information to a background processor ("Sidekiq"). Once we assign the job to Sidekiq, the customer will see a page with the text "Please wait a few moments". Sidekiq does the request and in a few minutes, the customer can see the results on refresh.
(7.2) Run rails g sidekiq:worker IncrementCount to create a worker file. We go to the file Sidekiq just created app/workers/increment_count_worker.rb and replace its contents with the snippet below.
Essentially, we take a post and add 1 to its like_count property.
class IncrementCountWorker
  include Sidekiq::Worker

  def perform(post_id)
    post = Post.find(post_id)

    post.likes_count ||= 0
    post.likes_count += 1
    post.save
  end
end
(7.3) By default, the files in the app/workers/ folder aren't read by Rails. You have to go to the config/application.rb and insert this line inside the class Application block.
config.autoload_paths += %W(#{config.root}/app/workers)
(7.4) To show the likes of each post and add a like button for each post, let's change the contents of the app/views/home/index.html.erb
Home Page:

<%= @message %>

<% @posts.each do |post| %>
  <h1> <%= post.title %> </h1>
  <h2> <%= post.author.name %> </h2>
  <p> <%= post.body %>

  <br>

  <p>
    <%= link_to "Like", increment_async_path(post_id: post.id), method: :post %>

    Likes:
    <%= post.likes_count %>
  </p>
<% end %>
(7.5) Then, we add a route in config/routes.rb and a controller method in app/controllers/home_controller.rb to accommodate this request.
post "/increment_async", to: "home#increment_async"
The controller method calls our Sidekiq service and invokes the worker "IncrementCountWorker".
class HomeController < ApplicationController
  def index
    @message = "Dynamic"

    @posts = Post.all
  end

  def increment_async
    ::IncrementCountWorker.perform_async(params[:post_id])
    redirect_to root_path
  end
end
(7.6) Our new setup requires a Sidekiq service and a Redis service.
Redis is an in-memory database. Every time a customer presses the button we made in 7.4, an entry in the Redis database is added. The Sidekiq service polls the Redis service for new entries in its database. If there is one, it executes it.
version: '3'
services:
  db:
    image: postgres
    volumes:
      - ../../tmp/db:/var/lib/postgresql/data
  web:
    build: ../../
    command: bundle exec rails s -p 3000 -b '0.0.0.0'
    volumes:
      - ../../:/myapp
    environment:
      RAILS_ENV: "development"
      REDIS_URL: "redis://redis:6379/12"
    ports:
      - "3000:3000"
    depends_on:
      - db
  redis:
    image: redis
    volumes:
      - ../../tmp/db:/var/lib/redis/data
  sidekiq:
    build: ../../
    command: 'bundle exec sidekiq'
    volumes:
      - ../../:/myapp
    environment:
      RAILS_ENV: "development"
      REDIS_URL: "redis://redis:6379/12"
    depends_on:
      - redis
(7.7) Now, let's run docker-compose again.
cd docker/development/
docker-compose build
docker-compose up
Going back to localhost:3000 on your browser, you should be able to see this:

Pressing on the link button, you would be able to increment the like count of each post. When Rails receives the request, it puts a task on Redis and Sidekiq fetches it, adds '1' to the specified post and saves it.
8 | What's next?
Now, you have a fully-fledged Rails 5 application running on Docker. It ain't much, but having Sidekiq and PostgreSQL is a good foundation for you to build on top of. You can even use this template to migrate existing Rails applications to Docker.
After developing your Rails application, the next step is deploying it with a cloud provider so your customers can see your app. For the next post, we will deploy this project to AWS Elastic Container Service. Stay tuned!
Acknowledgments
Special thanks to Allen, my editor, for helping this post become more coherent.
Credits to Patrick Brinksma for the cover photo.
I'm happy to take your comments/feedback on this post. Just comment below, or message me!


Top comments (22)
Thank you for sharing, Raphael. One point - you don't need to set autoload_paths because of all the directories under
appare loaded by Rails by default. See guides.rubyonrails.org/v5.2/autolo....Thanks for the tip Serguei! :D I'll try that out in my Rails 5.2 setup
Hi Raphael, thanks for writing this up! I made it all the way to the end but when I click any of the links on the page the number doesn't increment and I get the following message on the server. However when I reload the page the number does appear to be incremented.
web_1 | Started POST "/increment_async?post_id=3" for 172.19.0.1 at 2019-11-14 16:13:27 +0000web_1 | Cannot render console from 172.19.0.1! Allowed networks: 127.0.0.1, ::1, 127.0.0.0/127.255.255.255
web_1 | Processing by HomeController#increment_async as HTML
web_1 | Parameters: {"authenticity_token"=>"nJyVPYC66u05NEifhJpSU8j45OihvALWatPZded9kBbveo8I463AVM9+XjHiOABKtnh9FvjxAfOkcbdC1oEhiA==", "post_id"=>"3"}
sidekiq_1 | 2019-11-14T16:13:27.719Z pid=1 tid=gs60ykwsh class=IncrementCountWorker jid=ff410d219f7e7968abf5a765 INFO: start
sidekiq_1 | 2019-11-14T16:13:28.145Z pid=1 tid=gs60ykwsh class=IncrementCountWorker jid=ff410d219f7e7968abf5a765 elapsed=0.424 INFO: done
web_1 | No template found for HomeController#increment_async, rendering head :no_content
web_1 | Completed 204 No Content in 1241ms (ActiveRecord: 0.0ms)
Hi Tom,
Thank you for reading through the article, and providing me with this feedback. I have update the article with the answer to your question. I also included the answer below for easier reference
In step 7.5, copy-paste this snippet instead. This adds the line
redirect_to root_pathin the controller function increment_async so it goes to the homepage once the link is pressed.Excellent, thanks Raphael!
Adding
sidekiqandwebat docker-compose.yml will build twice when you rundocker-compose buildThe building process is slow. Is there anything can we improve here?
Hi Allen, that's an interesting observation.
Indeed, the build process will be slow especially on the 1st run. This is because our Dockerfile uses the base image "ruby:2.5.1-slim". This base image itself consists of many other images that include individual parts of the system (like its slim OS).
Docker is smart in that it creates a "reusable layer" for each line in your Dockerfile. It is also intelligent enough to detect if you made changes in your system with respect to those commands. If no change has been made with respect to that line in your Dockerfile, it just reuses that layer as part of your image.
Also, ran for the 1st time, it also runs the 2nd command in the Dockerfile:
RUN apt-get update -qq && apt-get install -y build-essential libpq-dev nodejs libsqlite3-dev. This updates apt and install critical dependencies. This indeed takes awhile. In one of the demoes I did, it downloaded 250MB worth of packages from the internet.After the 1st run, all you change is your code (and maybe adding Gems in your Gemfile here and there). Your
docker buildwill hopefully be much faster (unless you changed a big part of your app).As per Sidekiq and Web having separate images, it might be that they are just tagged under different names. You can check if their image hash (it looks like this: c12dasd21c) are the same. If they are, they are using the same image. And even if they are using different images, you can check that they use command Docker image layers via
docker history <chash>and they have at least some common docker image layers.Hi Raphael, how you're doing?
I have a problem for execute sidekiq in my app, I hope you can help me.
I created a container for execute sidekiq from sidekiq-entrypoint.sh. After executing the docker-compose up rails command, I check the created containers and I get:
CONTAINER ID--------- IMAGE
282afcb874ef-------------legacy_sidekiq
COMMAND-------------------CREATED-----------STATUS
"./sidekiq-entrypoin…"-----6 minutes ago-------Up 6 minutes
PORTS--------------------------NAMES
0.0.0.0:8081->8080/tcp-----legacy_sidekiq_1
Also, I try to access the sidekiq dashboard through 0.0.0.0:8081/sidekiq or 0.0.0.0:8080/sidekiq, but I get 'Not found'.
My routes:
require 'sidekiq/web'
mount Sidekiq::Web => '/sidekiq'
If you need other data, I will be attentive.
Such a thorough explanation about Docker. Looking forward to the next posts in this series, particularly the automatic deploys!
Raphael, what is
RAILS_ENV: "docker_development"defined in the docker-compose.yml file?Hi Serguei, I made a mistake there. You must change it to "development" for it to work. I revised my article. Thank you for the feedback :D
Yeah, thank you, that's what I believed it to be.
Hey man, this is great! I have been struggling to even get a task executing and this was exactly what I neded. Just one question: what is in docker_puma.rb? I have a puma.rb and I think it should be sufficient, trying to understand what we would want in a docker_puma.rb
Hi Daniel, yup there shouldn't be any difference. I just copied
docker_puma.rbfrompuma.rb. It just lets me specify a different configuration for (a) when puma is running in my local, (b) and for when puma is running on ECS. But there shouldn't be any problem if you decide to justpuma.rbfor both (for now).Hello Raphael, great tutorial thanks so much. I don't have a lot of experience with docker, Sidekiq and Redis. Following the tutorial I ran into this error (Error connecting to Redis on 127.0.0.1:6379 (Errno::ECONNREFUSED) ) when clicking the "Like" link in the Rails app. It seems that the Redis URL is incorrect, it is looking for Redis in the "web" container. Any help would be greatly appreciated!!
This needs way more post reactions. Great content, my dude.
Thank you Henry! :D
Wonderful work Raphael, great detail that is so helpful!
Thank you Rory! :D
This is one of the best tech articles I have ever read. I was able to get AWS setup on ECS stack because of this series of articles.
Thanks for writing such detailed series mate.
Good write. And - IS fargate coming soon? :)
Excellent article and I would like know the approximate cost for this setup so this would help me