In this walkthrough, we will learn to perform sentiment analysis on user feedback with Step Functions and API Gateway created with CDK (TypeScript).
The example is taken from the docs in which a user submits a feedback form to an endpoint created by API Gateway and we fire a Synchronous Step function that performs the following steps:
- Detect the sentiment of user feedback using Amazon Comprehend.
- Generate a unique reference ID for the feedback.
- Saves the feedback form data to DynamoDB.
- Checks if the sentiment is positive or negative and if negative, sends an email to the desired email address with the feedback and sentiment.
We will walk through all the resources created with the CDK and finally see the API in action! We will skip the actual frontend feedback form and interact directly with the API.
Here's the repo that you can clone for this walkthrough:
 ryands17
/
step-function-sync-workflow
ryands17
/
step-function-sync-workflow
Synchronous Express Workflows for AWS Step Functions via API Gateway
Step Function Resources
Let's look at the resources created for the step function that performs sentiment analysis on text provided as input. Our final step function workflow will look something like this:
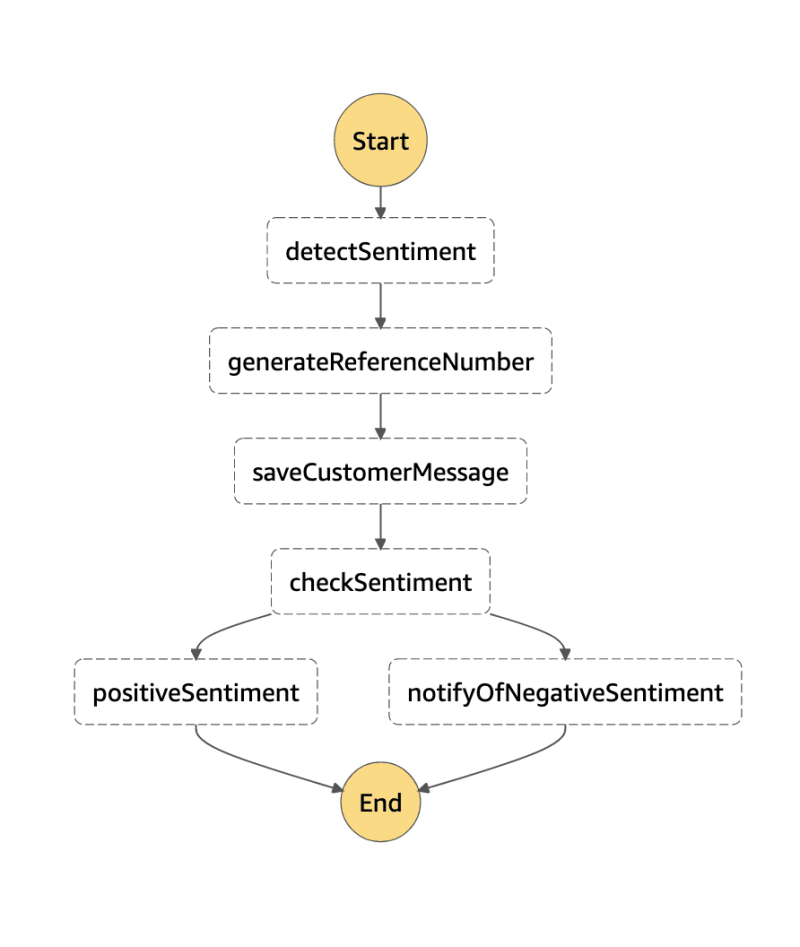
The first part in our step function is detectSentiment where we use Comprehend in a Lambda to detect if the feedback was positive or negative.
// lib/sync-sf-stack.ts

const detectSentimentFn = createFn(this, 'detectSentimentFn')
detectSentimentFn.addToRolePolicy(
  new iam.PolicyStatement({
    effect: iam.Effect.ALLOW,
    actions: ['comprehend:DetectSentiment'],
    resources: ['*'],
  })
)

const detectSentiment = new tasks.LambdaInvoke(this, 'detectSentiment', {
  lambdaFunction: detectSentimentFn,
  resultPath: '$.sentimentResult',
})
Here, we create an aws-lambda-nodejs function via a helper named createFn. We then add a role stating that it has permissions to detect sentiment using Comprehend. Finally, we create a new LambdaInvoke task that accepts this function and stores the result in a key named sentimentResult.
We use resultPath to store each step's results on the final result object which makes it easier to pass between steps and perform custom processing.
Note: Step functions automatically stores the result of each step in a key named Payload under the key that we specify. For e.g. If we set the result path as $.data, then the output of that step will be available under:
{
  "data": {
    "Payload": "result-here"
  }
}
Here's the function for detecting sentiment:
// functions/detectSentimentFn.ts

import { Comprehend } from 'aws-sdk'

const cp = new Comprehend({ apiVersion: '2017-11-27' })

type Event = {
  message: string
}

export const handler = async (event: Event) => {
  const data = await cp
    .detectSentiment({
      LanguageCode: 'en',
      Text: event.message,
    })
    .promise()

  return data
}
This uses Comprehend's detectSentiment on the feedback that we receive from our endpoint. We will be looking at how to send feedback from the created API in the final section.
The next step is to generate a unique reference ID for the feedback message. This will then be stored as a record along with the message.
// lib/sync-sf-stack.ts

const generateReferenceNumber = new tasks.LambdaInvoke(
  this,
  'generateReferenceNumber',
  {
    lambdaFunction: createFn(this, 'generateReferenceNumberFn'),
    resultPath: '$.ticketId',
  }
)
Here we create a LambdaInvoke task that will generate a reference ID for the feedback and store it in a key named ticketId. The function simply does this:
// functions/generateReferenceNumberFn.ts
import { ulid } from 'ulid'

export const handler = async () => {
  return ulid()
}
This function returns a unique identifier using ulid that will be used as the feedback reference ID.
Moving to the next step, we save the feedback data along with the reference ID to a DynamoDB table.
// lib/sync-sf-stack.ts

const formData = new ddb.Table(this, 'formData', {
  partitionKey: { name: 'formId', type: ddb.AttributeType.STRING },
  billingMode: ddb.BillingMode.PAY_PER_REQUEST,
  removalPolicy: cdk.RemovalPolicy.DESTROY,
})

const saveCustomerMessage = new tasks.DynamoPutItem(
  this,
  'saveCustomerMessage',
  {
    table: formData,
    item: {
      formId: tasks.DynamoAttributeValue.fromString(
        sfn.JsonPath.stringAt('$.ticketId.Payload')
      ),
      customerMessage: tasks.DynamoAttributeValue.fromString(
        sfn.JsonPath.stringAt('$.message')
      ),
      sentiment: tasks.DynamoAttributeValue.fromString(
        sfn.JsonPath.stringAt('$.sentimentResult.Payload.Sentiment')
      ),
    },
    resultPath: '$.formDataRecord',
  }
)
First, we create a DynamoDB table with our ticket ID being the partition key.
Then we use a DynamoPutItem task as Step functions can directly interact with DynamoDB without a need for a Lambda. This will save a record in the table we specify with the following values:
- The
formIdwhich is taken from the output path stored inticketId. - The
customerMessagethat directly comes from the frontend. - The
sentimentresult obtained from the very first step.
Note: The sfn.JsonPath extracts the value present currently in the output of our Step Function workflow.
Our next step is to check for the feedback's sentiment. If the sentiment is negative, we would like to send an email for analytics stating the message and sentiment.
// lib/sync-sf-stack.ts

const notifyOfNegativeSentimentFn = createFn(
  this,
  'notifyOfNegativeSentimentFn'
)
  .addEnvironment('SENDER', process.env.SENDER)
  .addEnvironment('RECEIVER', process.env.RECEIVER)

notifyOfNegativeSentimentFn.addToRolePolicy(
  new iam.PolicyStatement({
    effect: iam.Effect.ALLOW,
    actions: ['ses:SendEmail'],
    resources: ['*'],
  })
)

const checkSentiment = new sfn.Choice(this, 'checkSentiment')
.when(
  sfn.Condition.stringEquals(
    '$.sentimentResult.Payload.Sentiment',
    'NEGATIVE'
  ),
  new tasks.LambdaInvoke(this, 'notifyOfNegativeSentiment', {
    lambdaFunction: notifyOfNegativeSentimentFn,
    resultPath: '$.notifyViaEmail',
  })
)
.otherwise(new sfn.Succeed(this, 'positiveSentiment'))
What we did here is use a Choice state that checks for a specific condition and performs operations when that condition matches. Think of this as a branching (if/else) statement.
Here we check if the sentiment that we calculated in the very first step is NEGATIVE. If so, we initiate a Lambda function that sends an email via AWS SES to the intended recipient. If the sentiment is not NEGATIVE, do nothing and succeed.
This is where the CDK shines as we get to develop our workflow using simple methods like when and otherwise.
The lambda function created above adds two environment variables SENDER and RECEIVER. These need to be verified in SES for now so that you can send/receive messages.

We have also allowed Lambda access to send an email using SES and it uses SESV2 from aws-sdk to send an email.
// functions/notifyOfNegativeSentimentFn.ts

import { SESV2 } from 'aws-sdk'

const ses = new SESV2({ region: process.env.AWS_REGION })

export const handler = async (event: any) => {
  const Data = `Sentiment analysis: ${event.sentimentResult.Payload.Sentiment}
Feedback from customer: ${event.message}`

  await ses
    .sendEmail({
      FromEmailAddress: process.env.SENDER,
      Destination: {
        ToAddresses: [process.env.RECEIVER],
      },
      Content: {
        Simple: {
          Subject: { Charset: 'UTF-8', Data: 'Feedback form submission' },
          Body: { Text: { Charset: 'UTF-8', Data } },
        },
      },
    })
    .promise()

  return {
    body: 'Feedback submitted successfully!',
  }
}
This uses the values calculated from previous steps and constructs an email to send to the configured RECEIVER.
Finally, we draft the Step Function workflow definition:
// lib/sync-sf-stack.ts

const definition = detectSentiment
  .next(generateReferenceNumber)
  .next(saveCustomerMessage)
  .next(checkSentiment)

this.sentimentAnalysis = new sfn.StateMachine(this, 'sentimentAnalysis', {
definition,
stateMachineType: sfn.StateMachineType.EXPRESS,
timeout: cdk.Duration.seconds(30),
logs: {
  destination: new logs.LogGroup(this, 'sentimentAnalysisLogs', {
    retention: logs.RetentionDays.ONE_WEEK,
  }),
},
})

formData.grantWriteData(this.sentimentAnalysis)
The definition here maps the entire workflow of the step function and will look like this as we saw before.
Then we pass this definition to a StateMachine we named sentimentAnalysis and defined the type of the State Machine to be EXPRESS.
Note: The reason we chose EXPRESS is that Synchronous workflows can only be performed on Express workflows and not Standard.
Lastly, we grant write permissions to our State Machine on our DynamoDB table to insert our feedback message along with the sentiment.
This concludes our Step Function setup. Let's move on to creating an API that we can interact with using a client like Insomnia.
API Gateway Resources
Before we start with the resources in the API Gateway CDK stack, we shall see how to reference the State Machine created above in this stack.
// bin/sync-sf.ts

const app = new cdk.App()
const env = { region: process.env.CDK_REGION || 'us-east-1' }

const sfn = new SyncSfStack(app, 'SyncSfStack', { env })
new ApiStack(app, 'ApiGwStack', { env, sfn: sfn.sentimentAnalysis })
We create the SyncSfStack that includes the State Machine and pass it as props to the ApiStack which contains the API Gateway resource.
Moving on to the resources for the API, let's start with creating the API itself.
// lib/api-gw-stack.ts

const apiLogs = new logs.LogGroup(this, 'myApiLogs', {
  removalPolicy: cdk.RemovalPolicy.DESTROY,
  retention: logs.RetentionDays.ONE_WEEK,
})

const api = new apiGw.RestApi(this, 'myApi', {
  endpointTypes: [apiGw.EndpointType.REGIONAL],
  deployOptions: {
    stageName: 'dev',
    loggingLevel: apiGw.MethodLoggingLevel.ERROR,
    accessLogDestination: new apiGw.LogGroupLogDestination(apiLogs),
  },
  defaultCorsPreflightOptions: {
    allowOrigins: ['*'],
  },
})
Here we configure a REST API that we set as a REGIONAL endpoint for this example, but you can use EDGE as well. We also configured CORS to enable access from anywhere and Logging so that we can view the access logs via CloudWatch.
Next, let's create a POST method that accepts a feedback message from the customer.
// lib/api-gw-stack.ts

api.root.addMethod('POST', sfIntegration, {
  operationName: 'Submit Feedback Form',
  requestValidatorOptions: { validateRequestBody: true },
  requestModels: {
    'application/json': new apiGw.Model(this, 'feedbackFormPayload', {
      restApi: api,
      schema: {
        schema: apiGw.JsonSchemaVersion.DRAFT4,
        title: 'Feedback Form Payload',
        type: apiGw.JsonSchemaType.OBJECT,
        required: ['message'],
        properties: {
          message: {
            type: apiGw.JsonSchemaType.STRING,
            minLength: 1,
          },
        },
      },
    }),
  },
  methodResponses: [{ statusCode: '200' }],
})
The above snippet adds a POST method that accepts message in the body. This will be validated as we have specified the requestModels for what our method accepts. This makes sure the data is sanitised before reaching our Step Function.
Note: API Gateway is extremely powerful and request validation is one of its most useful features.
Notice we have added something called sfIntegration to our method. This would be the direct integration from API Gateway to Step Functions.
// lib/api-gw-stack.ts

const sfIntegrationRole = new iam.Role(this, 'asyncApiApigRole', {
  assumedBy: new iam.ServicePrincipal('apigateway.amazonaws.com'),
})
sfIntegrationRole.addToPolicy(
  new iam.PolicyStatement({
    resources: [props.sfn.stateMachineArn],
    actions: ['states:StartSyncExecution'],
  })
)

// Step Functions integration
const sfIntegration = new apiGw.AwsIntegration({
  service: 'states',
  action: 'StartSyncExecution',
  options: {
    credentialsRole: sfIntegrationRole,
    passthroughBehavior: apiGw.PassthroughBehavior.NEVER,
    requestParameters: {
      'integration.request.header.Content-Type': `'application/json'`,
    },
    requestTemplates: {
      'application/json': JSON.stringify({
        input: `$util.escapeJavaScript($input.json('$'))`,
        stateMachineArn: props.sfn.stateMachineArn,
      }),
    },
    integrationResponses: [
      {
        statusCode: '200',
        responseTemplates: {
          'application/json': `
          #set($output = $input.path('$.output'))
          #set($root = $util.parseJson($output))
          {
            "ticketId": "$root.ticketId.Payload",
            "message": "Feedback submitted successfully!"
          }`,
        },
      },
    ],
  },
})
Let's break this snippet down.
First of all, we assign a role to this integration where we allow it to perform a synchronous execution of our State Machine. We passed this resource via props to our ApiStack and we assign the resource's arn specifically to this role.
Next, we configure an AWSIntegration where we specify the service name. states is the service for Step Functions just like sqs is for Simple Queue Service. Then we configure the action to be StartSyncExecution, similar to what we gave it permission for.
Let's now go through the options one by one.
We pass the above created role in credentialsRole to allow this integration access to executing the Step Function. The passthroughBehaviour makes sure that any request that doesn't match the header's Content-Type gets discarded. The requestParameters are parameters we would like to send when we make the API call to our Step Function. The only thing we set here is the Content-Type as Step Functions accepts JSON.
Next, we configure the parameters need to be sent in requestTemplates. We need to send two values in our JSON body.
- The input obtained from the frontend with the message. The entire input is escaped properly and sent. This is done using VTL that has utilities to perform such operations.
$here means the entire request body. - The
stateMachineArnwhich we obtain via props from the State Machine stack.
Finally, we set our response to be sent to the frontend using integrationResponses. This also uses VTL to parse the response returned by the Step Function where we return the ticketId along with a success message.
That's all we needed to configure our entire app. Now let's deploy this to see it in action!
Deploying the app
To deploy this entire app, run:
yarn cdk deploy --all
This will deploy the two stacks we created and return the API Gateway endpoint as the output:

Now we'll test this API in Insomnia with a positive feedback and check the output:
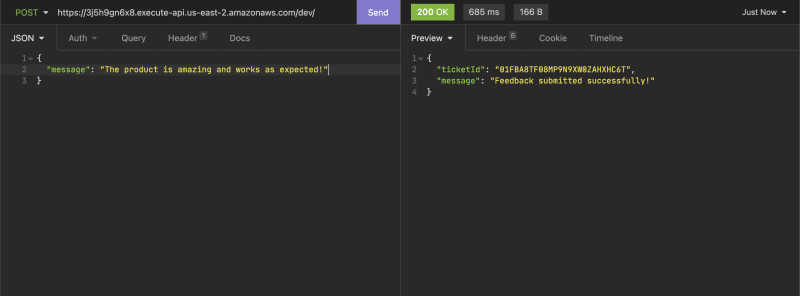
It ran successfully and I didn't receive an email as expected.
Let's test this API again but now with a negative feedback:

After the API is completed, I receive an email:

Conclusion
So this was the entire application where the endpoint created by API Gateway directly invokes a Synchronous Step function that checks the sentiment of the review, generates a ticket id, saves it to the database and informs the business in case of a negative review.
Here's the repo again for those who would like to experiment:
ryands17
/
step-function-sync-workflow
Synchronous Express Workflows for AWS Step Functions via API Gateway
Also don't forget to destroy this stack so that you do not incur unnecessary charges using the following command:
yarn cdk destroy --all
Thanks for reading this and I would love to hear your thoughts on this in the comments! If you liked this post, do give it a share and follow me on Twitter :)


Top comments (2)
Thanks for the great write up. I used this as a jumping-off point for my own example project. It uses AppSync to create an EventBridge event, which triggers the Step Function workflow. Let me know what you think!
github.com/djheru/reviews-api-sent...
Looks great! AppSync + EvenBridge integration creates a lot of nice workflows :)