A SplitPane is a collection of 2 elements whose heights can be changed by dragging a line that separates them. Based on its layout, a SplitPane can be horizontal or vertical.
If you've ever used the Chrome dev tools, you probably came across both versions of the SplitPane.
For example, the Elements section of the dev tools contains a horizontal SplitPane:
You can also find a vertical SplitPane in the Sources section of the dev tools:

In this article, we'll create our own SplitPane component without any dependencies. Although we'll only build a vertical version, you can apply the same logic and slightly change it to build the horizontal one.
This is how our final result will look like:
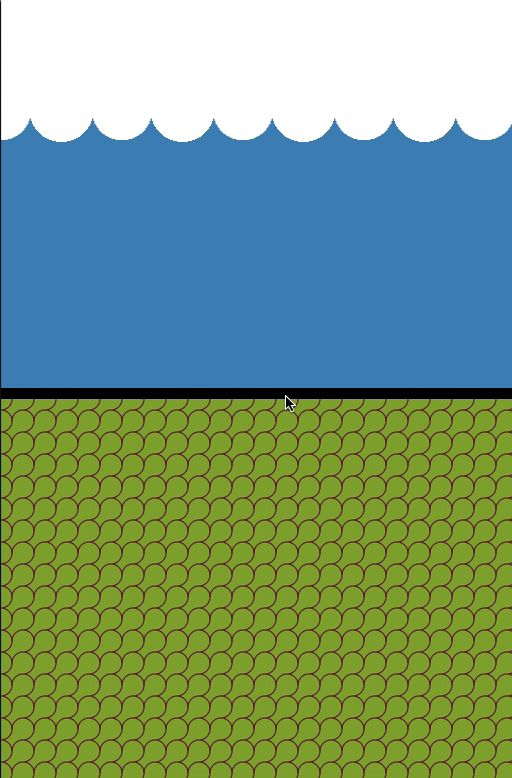 alt="Final result">
The final source code can be found here.
This article will touch the following React concepts:
- Handling state using the React useState hook.
- React refs with React.createRef() and React.useRef() . We will their applications to reference DOM elements but also to handle mutating values.
- Creating a React Context and subscribing to it using the useContext() React hook.
If you're not familiar with these concepts, this is a good pragmatic guide to get yourself familiar with them.
💡 The trick (spoiler alert)
Our vertical SplitPane has 1 requirement: whenever the separator is dragged, the sizes of the top and bottom panes should be altered accordingly.
Although that's true, there is another way to look at it and that will make our implementation simpler.
If we think about it, dragging the separator is modifying the size of 1 element only. The other element is only taking the remaining space.
When we move separator up, we are only decreasing the size of the top pane. The bottom pane will take whatever remaining space.
Note: It's very important that we take some time to understand this since it's the core of our logic later.
Step 1: basic setup
Let's first have a very basic setup that we can build on top of.
To start with, our SplitPane component is merely a flex container div. It renders its first child, a separator div, and a second child.
SplitPane has 2 sub-components: Top and Bottom. The sub-components are simple divs that accept children so that we can populate them as we like.
Initially, Top & Bottom split equally the height of SplitPane. To make that happen, they both have a flex: 1 in their styling (c.f. /style.css ).
// SplitPlane.js
export default function SplitPane({ children, ...props }) {
  return (
    <div {...props} className="split-pane">
      {children[0]}
      <div className="separator" />
      {children[1]}
    </div>
  );
}

SplitPane.Top = function SplitPaneTop(props) {
  return <div {...props} className="split-pane-top" />;
};

SplitPane.Bottom = function SplitPaneBottom(props) {
  return <div {...props} className="split-pane-bottom" />;
};
/* styles.css */
.split-pane {
  display: flex;
  flex-direction: column;
}

.split-pane-top,
.split-pane-bottom {
  flex: 1;
  overflow: hidden;
}

.split-pane-top {
  background: ...
}
.split-pane-bottom {
  background: ...
}

.separator {
  border: 5px solid black;
  cursor: row-resize;
}
// index.js
function App() {
  return (
    <div className="App">
      <SplitPane>
        <SplitPane.Top />
        <SplitPane.Bottom />
      </SplitPane>
    </div>
  );
}
Step 2: getting the Top pane height
Our logic is based on the Top pane height. Without it, we can't do any calculation.
We have 2 options:
- Enforce on the user to pass an absolute height value.
- Calculate the height ourselves once the Top pane renders the first time.
If you chose the first option, you can skip the rest of this step.
The height of the Top pane should be in SplitPane
Our logic will be based in the SplitPane component. Thus, the height of Top needs to be available in the state of SplitPane. We can then create a context for the Splitpane component to hold:
- The height of the Top pane.
- A function to update that height.
// SplitPlane.js
const splitPaneContext = React.createContext();

export default function SplitPane({ children, ...props }) {
  const [topHeight, setTopHeight] = React.useState(null);

  return (
    <div {...props} className="split-pane">
      <splitPaneContext.Provider value={{ topHeight, setTopHeight }}>
        {children[0]}
        <div className="separator" />
        {children[1]}
      </splitPaneContext.Provider>
    </div>
  );
}

SplitPane.Top = function SplitPaneTop(props) {
  return <div {...props} className="split-pane-top" />;
};

SplitPane.Bottom = function SplitPaneBottom(props) {
  return <div {...props} className="split-pane-bottom" />;
};
So, how do we get that height then?
We can obtain the height of the top pane in the component. To do so, we create a reference to the DOM element and get its clientHeight after the first render using React.useEffect .
To detect the first render, we can just see if our height variable has its initial null value.
We can consume both the height of the Top pane and its setter function using the React.useContext method. Using the setter function, we can set the height of the Top pane in the state of the SplitPane component.
// SplitPlane.js
const splitPaneContext = React.createContext();

export default function SplitPane({ children, ...props }) {
  const [topHeight, setTopHeight] = React.useState(null);

  return (
    <div {...props} className="split-pane">
      <splitPaneContext.Provider value={{ topHeight, setTopHeight }}>
        {children[0]}
        <div className="separator" />
        {children[1]}
      </splitPaneContext.Provider>
    </div>
  );
}

SplitPane.Top = function SplitPaneTop(props) {
  const topRef = React.createRef();
  const { topHeight, setTopHeight } = React.useContext(splitPaneContext);

  React.useEffect(() => {
    if (!topHeight) {
      setTopHeight(topRef.current.clientHeight);
      topRef.current.style.flex = "none";
      return;
    }
  });

  return <div {...props} className="split-pane-top" ref={topRef} />;
};

SplitPane.Bottom = function SplitPaneBottom(props) {
  return <div {...props} className="split-pane-bottom" />;
};
Updating the Top pane height
So far, we managed to calculate the height of the Top pane DOM element and store it in the state of SplitPane. Now, we need to handle the opposite case. Whenever the topHeight state value changes, we need to change the height of the Top pane DOM element. We can do that in our previously created effect:
// SplitPlane.js
SplitPane.Top = function SplitPaneTop(props) {
  const topRef = React.createRef();
  const { topHeight, setTopHeight } = React.useContext(splitPaneContext);

  React.useEffect(() => {
    if (!topHeight) {
      setTopHeight(topRef.current.clientHeight);
      topRef.current.style.flex = "none";
      return;
    }

    topRef.current.style.height = `${topHeight}px`;
  });

  return <div {...props} className="split-pane-top" ref={topRef} />;
};
The effect we created runs every time the component renders. We don't want to unnecessarily update the height of the Top pane DOM element at every render. To avoid this, we can pass [topHeight] as a second argument to React.useEffect. By doing so, this effet will only run if the topHeight state value changes:
// SplitPlane.js
SplitPane.Top = function SplitPaneTop(props) {
  const topRef = React.createRef();
  const { topHeight, setTopHeight } = React.useContext(splitPaneContext);

  React.useEffect(() => {
    if (!topHeight) {
      setTopHeight(topRef.current.clientHeight);
      topRef.current.style.flex = "none";
      return;
    }

    topRef.current.style.height = `${topHeight}px`;
  }, [topHeight]);

  return <div {...props} className="split-pane-top" ref={topRef} />;
};
Now that we are detecting the height of the Top pane and updating its DOM element accordingly, it's time to implement the necessary changes that should occur when the user drags the separator element.
Step 3: detecting the drag difference
Whenever the user drags the separator, we want to detect the vertical distance by which the separator has been dragged.
To do so, we need to track 3 mouse events:
- MouseDown on the separator: once the user presses on the separator, we want to set that position as the initial vertical position of the drag.
- MouseMove on the document: how do we detect the user dragging the separator? If the initial drag position exists and there is a mouse move, then the user is dragging the separator. The drag distance is the difference between the current mouse vertical position and the initial vertical drag position. The new Top pane height is then simply its initial height + the drag difference.
- MouseUp on the document: this means that the user released the separator. At this point, we can reset the drag initial value.
Our component function is run every time it renders.
So how do we maintain across renders and mutate the initial drag position? For that, we can use React.useRef() . Yes, React refs are not only used to refer to DOM elements. They can be used to maintain mutable values across renders (pretty cool, hein?):
// SplitPane.js

const splitPaneContext = React.createContext();

export default function SplitPane({ children, ...props }) {
  const [topHeight, setTopHeight] = React.useState(null);
  const separatorYPosition = React.useRef(null);

  const splitPaneRef = React.createRef();

  const onMouseDown = e => {
    separatorYPosition.current = e.clientY;
  };

  const onMouseMove = e => {
    if (!separatorYPosition.current) {
      return;
    }

    const newTopHeight = topHeight + e.clientY - separatorYPosition.current;
    separatorYPosition.current = e.clientY;

    setTopHeight(newTopHeight);
  };

  const onMouseUp = () => {
    separatorYPosition.current = null;
  };

  React.useEffect(() => {
    document.addEventListener("mousemove", onMouseMove);
    document.addEventListener("mouseup", onMouseUp);

    return () => {
      document.removeEventListener("mousemove", onMouseMove);
      document.removeEventListener("mouseup", onMouseUp);
    };
  });

  return (
    <div {...props} className="split-pane" ref={splitPaneRef}>
      <splitPaneContext.Provider value={{ topHeight, setTopHeight }}>
        {children[0]}
        <div className="separator" onMouseDown={onMouseDown} />
        {children[1]}
      </splitPaneContext.Provider>
    </div>
  );
}
👆 One more tiny improvement
The SplitPane has a top and bottom limit. Once the user drags beyond those two borders, it's not necessary anymore to update the Top pane height. Thus, one improvement we can do is to avoid making any state changes when:
The new height of the top pane is equal to the height of the entire SplitPane component.
The new height of the top pane is less than 0.
We can get the height of the SplitPane DOM element using a reference to it that we can create using React.createRef . Then, before making any state update to the top height, we check for our previous 2 conditions:
// SplitPane.js

const splitPaneContext = React.createContext();

export default function SplitPane({ children, ...props }) {
  const [topHeight, setTopHeight] = React.useState(null);
  const separatorYPosition = React.useRef(null);

  const splitPaneRef = React.createRef();

  const onMouseDown = e => {
    separatorYPosition.current = e.clientY;
  };

  const onMouseMove = e => {
    if (!separatorYPosition.current) {
      return;
    }

    const newTopHeight = topHeight + e.clientY - separatorYPosition.current;
    separatorYPosition.current = e.clientY;

    if (newTopHeight <= 0) {
      return topHeight !== 0 && setTopHeight(0);
    }

    const splitPaneHeight = splitPaneRef.current.clientHeight;

    if (newTopHeight >= splitPaneHeight) {
      return topHeight !== splitPaneHeight && setTopHeight(splitPaneHeight);
    }

    setTopHeight(newTopHeight);
  };

  const onMouseUp = () => {
    separatorYPosition.current = null;
  };

  React.useEffect(() => {
    document.addEventListener("mousemove", onMouseMove);
    document.addEventListener("mouseup", onMouseUp);

    return () => {
      document.removeEventListener("mousemove", onMouseMove);
      document.removeEventListener("mouseup", onMouseUp);
    };
  });

  return (
    <div {...props} className="split-pane" ref={splitPaneRef}>
      <splitPaneContext.Provider value={{ topHeight, setTopHeight }}>
        {children[0]}
        <div className="separator" onMouseDown={onMouseDown} />
        {children[1]}
      </splitPaneContext.Provider>
    </div>
  );
}


Top comments (4)
Hi! I was following your awesome tutorial but tried to modify it to be either a vertical or horizontal split pane and to use styled components but I have a small issue. Everything seems to work fine except that the value for the topHeight (which I renamed to _splitterDistance) seems to jump back to the initial value after the second resize. I opened a question on stack overflow here (stackoverflow.com/questions/607020...) and also made a code pen (codesandbox.io/s/intelligent-ediso...). Do you think you could offer any help? It would be greatly appreciated!
Very clever! Thanks for sharing.
Thanks :)
Nice one! Thx a lot!
Two questions:
1.) How to fix this warning?
React Hook React.useEffect has missing dependencies: 'setTopHeight' and 'topRef'. Either include them or remove the dependency array. (react-hooks/exhaustive-deps)
2.) Why this fails in Safari(Webkit)?
const splitPaneHeight = splitPaneRef.current.clientHeight;