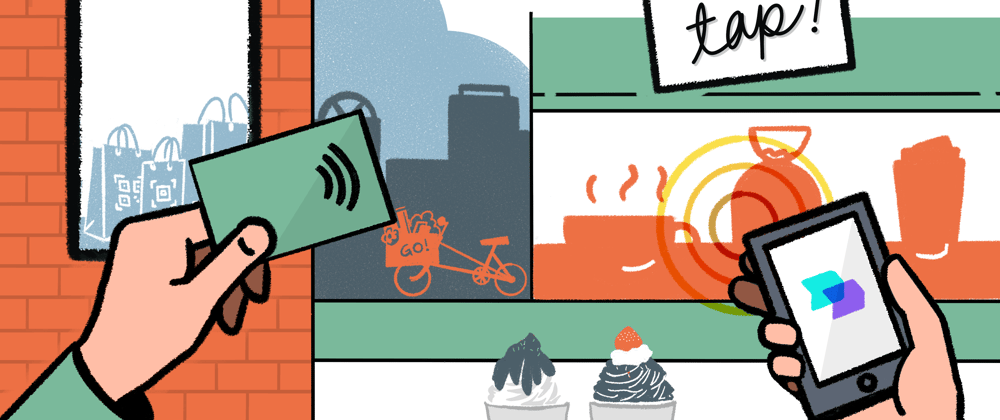
Payment Links are just that: links! Anywhere you can share a URL, you can create an opportunity to connect to paying customers. This blog post shares some ideas for in-person payments with NFC tags or QR codes.
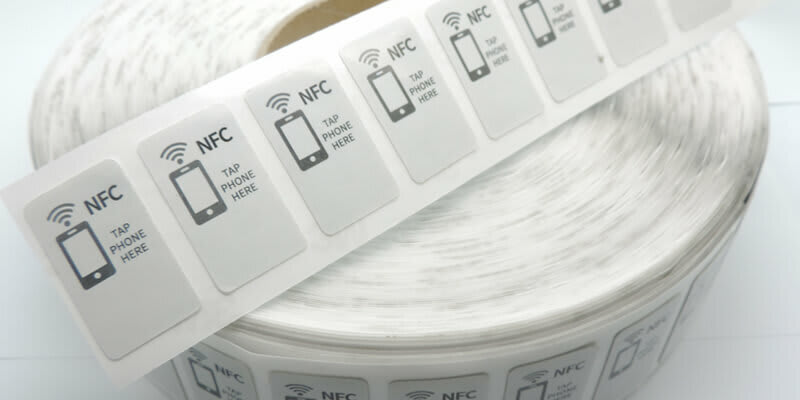
NFC (Near-Field Communication) Tags are small, inexpensive circuits which can be used to store a small amount of information that can be scanned by any device with a compatible reader. Virtually every smartphone device available on the market today is NFC compatible.
Steps We'll Cover
- Create (or select) a product in the Stripe Dashboard
- Create a payment link for that product
- Copy the URL for that payment link, and write it to a QR code and NFC tag
- When someone bumps the tag with a smartphone, the payment workflow starts!
Background
A few weeks ago, I was visiting Key West on vacation. While walking around the quiet downtown area one afternoon, I happened upon a little kiosk in front of a house. At first glance, it looked a bit like a little free library - it was a simple little cabinet with a plexiglass window and a few small shelves in it. On each shelf was a beautifully designed postcard, designed and printed by a local artist.

The postcards were priced simply - $5 each, or 5 for $20. It was a trust-based system: the postcards were in an unlocked display, and to pay, I was asked to submit a payment with Venmo. I grabbed a stack of postcards, pulled out my phone, and followed the instructions displayed on the front of the kiosk to send $20 to the artist.
Very cool! I’m happy, and I’m sure the artist is happy, too! But – this experience got my entrepreneurial gears turning… I can’t help but feel like there’s lots of opportunities for the seller to do better here:
- I had to follow a series of steps to pay, using a specific mobile payment app to send them payment. If I had never used that app before, this would create a moment of friction. It’s a lot of work to download an app, set up an account, put in my credit card number, etc
- After I walked away with my purchase, the artist lost their opportunity to sell to me again, unless I happen to walk by the same kiosk and they’ve changed stock. Now that I’ve bought something from them once, I’m far more likely to do it again. What if the seller had a way to connect with me after the sale?
We can improve on this buying process using some tools from Stripe, without writing a single line of code! For this, we’ll use Payment Links - a handy way to create a URL which directs visitors to Stripe’s payment workflow for any of your products. This means our buyers don’t need to manually enter a phone number, username, or price to submit payment, leaving less room for error.
Prerequisites - Set up your Stripe account & Create a product
This tutorial assumes you’ve got a (free!) account set up with Stripe. If you don’t have one for your business already, you can register here in just a couple minutes. Once you’ve done that, you’ll want to head over to the Products Page, and create a new product for any items you’re looking to sell.
Create a Payment Link
Payment Links allow you to create a unique URL to send to buyers, for the purchase of specific products on your dashboard. This is what we’ll use to collect payments from interested buyers at our kiosk.
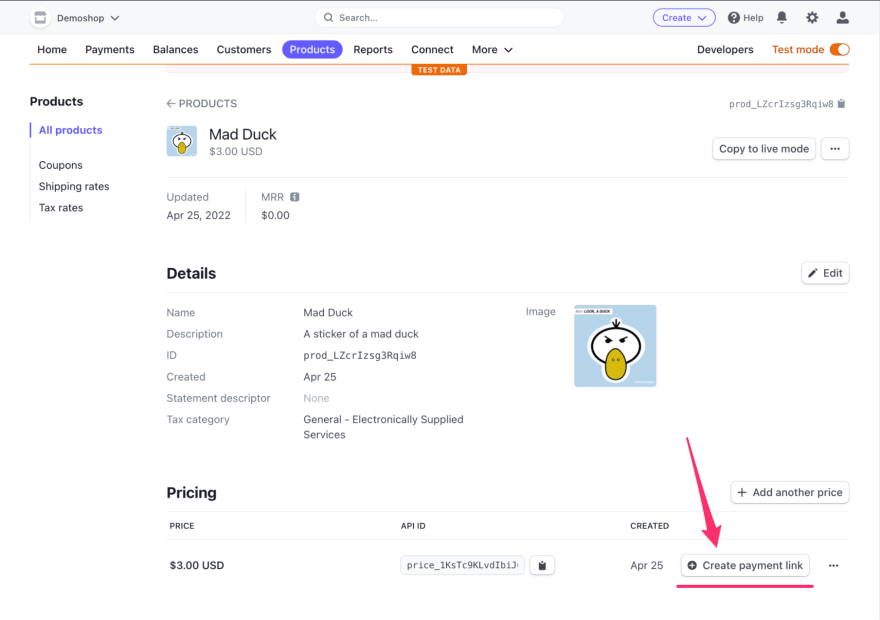
To create a payment link, navigate to the Products page in your Stripe Dashboard, and select the product you want to make a payment link for.
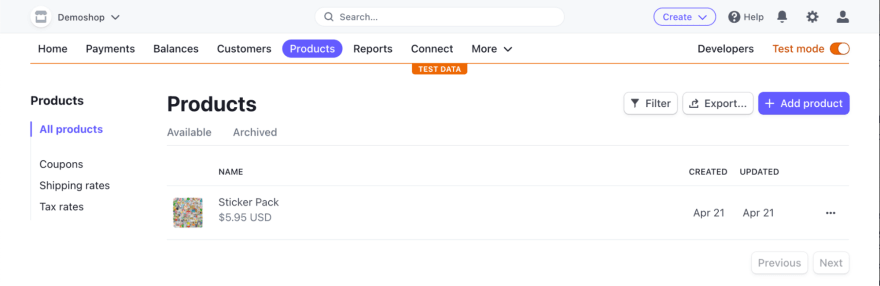
On your Products page, you’ll see a list of all products associated with your account.
On the product page, under the Pricing section, look for a button that says Create Payment Link.
Follow the steps in this wizard to create a URL to pay for the product. You can click on the mobile phone icon on the preview pane to see what your customers will see when they load this URL from their mobile device.
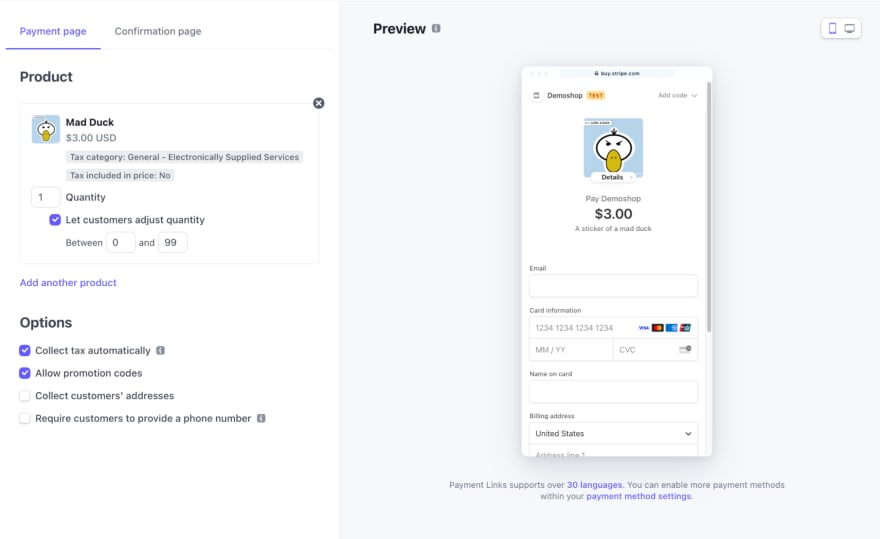
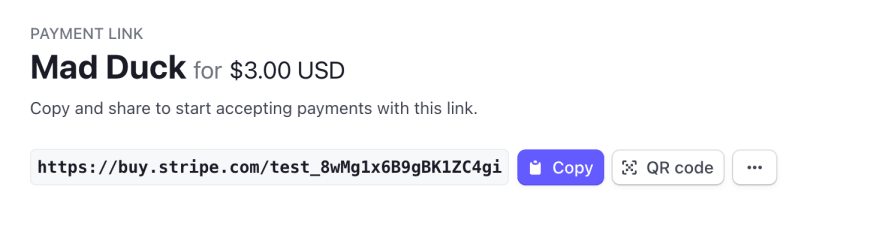
Once you’ve filled out the details of your payment link, click “Create Payment Link”. That’s all there is to it! On the next page is a UI which lets you copy a unique URL to pay for that product.
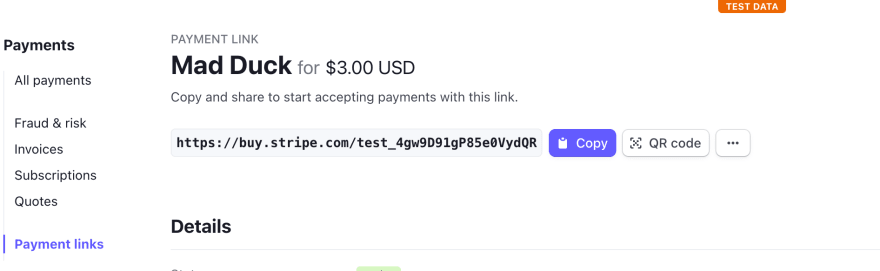
Keep this tab open for now - we’ll use the URL on this page in the next step.
Save the Payment Link URL to an NFC tag
If you’ve used an iPhone with Apple Pay or an Android Device with Google Pay, you’ve used NFC before. It’s the same functionality that allows you to tap-to-pay at a cash register.
I purchased a pack of 50 NFC tags for about $15 USD - they’re readily available from a variety of suppliers, and in loads of different form factors. The ones I purchased are thin, circular plastic discs, and are about an inch in diameter. I’ve also seen NFCs available for sale as stickers, or embedded in printed media like business cards or posters.
For this use case, we’re going to write a URL to the NFC tag, so when a customer taps their phone against it, their phone’s native browser will navigate to the web address on the tag. If you’re working with a new, blank tag, the process is fairly simple: you’ll download a mobile app, and use it to write a URL to your tag. I used a free app from the Play Store called NFC Tools (also available for IOS on the Apple App Store) to write to my NFC chip. At the moment, I use a Pixel 5 as my main phone - I chose NFC tools because it was highly rated in the Play Store, and it worked perfectly for this job!
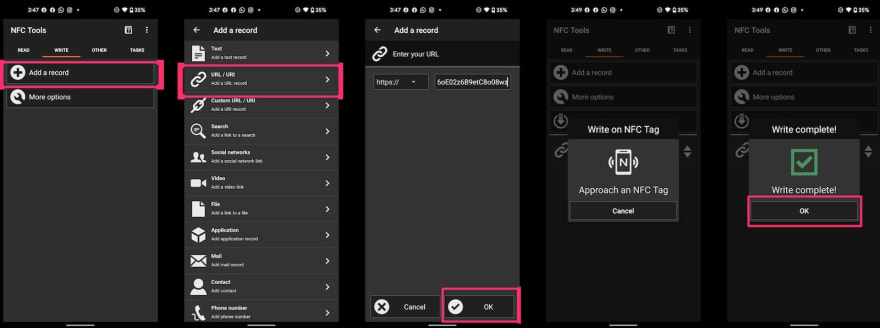
Steps to write a URL to your NFC chip using the NFC tools app:
- On the Write tab, tap “Add a record”
- Tap the URL / URI button
- Paste the URL for your payment link in the input box, and hit OK
- The app will prompt you to bump your NFC tag - now is the time!
- Hold the tag against your phone - when you see the green check, you’re all done! Hit OK
🚨 WARNING: Set your chip to read only! 🚨
Don’t forget to set the READ ONLY value on the NFC tag to true. This will prevent it from being written to again. If you don’t do this, anyone with a phone can reprogram your tag to point to any URL on the web.
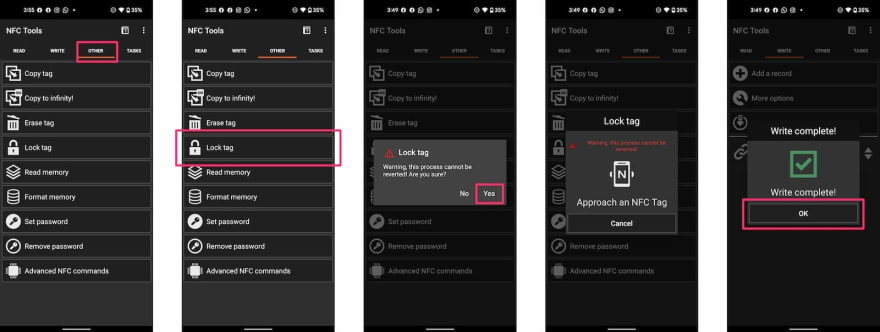
Steps to make your NFC chip read-only using the NFC tools app, after you’ve written a URL to it:
- Navigate to the Other tab
- Tap Lock tag
- Acknowledge the warning by hitting Yes
- When prompted, bump your NFC chip with your phone
- When you see the green check, your tag is now read only! Hit OK
Adding it all up
Once you've programmed a Payment Link into your NFC chip, you're ready to accept in-person purchases! Now, instead of a series of convoluted instructions to accept payments, all our buyers need to do is tap their phone against an NFC chip on the kiosk, and pay on their phone using a familiar checkout flow. Any payment methods that are enabled in your Stripe Dashboard will work. If you have more than one product type, you can set up an NFC for each type of purchase, too.
The payoff: follow-up on purchases
Not only is this payment process a bit more straightforward than the alternative, it also gives you the opportunity to connect with your customers after they complete their purchase. This is a super valuable thing to be able to do - people who have bought from you before are far more likely to do it again, and with the information you’ll have about your customers in your Stripe Dashboard, you can re-engage with them when you have got new products to sell. This can be a text or email the next day thanking them for their purchase, asking them to follow you on social media, or perhaps signing up for your mailing list. You can also use the dashboard with CRM tools to track their purchase history and see if they’re repeat customers.
Alternately, Do it with a QR code
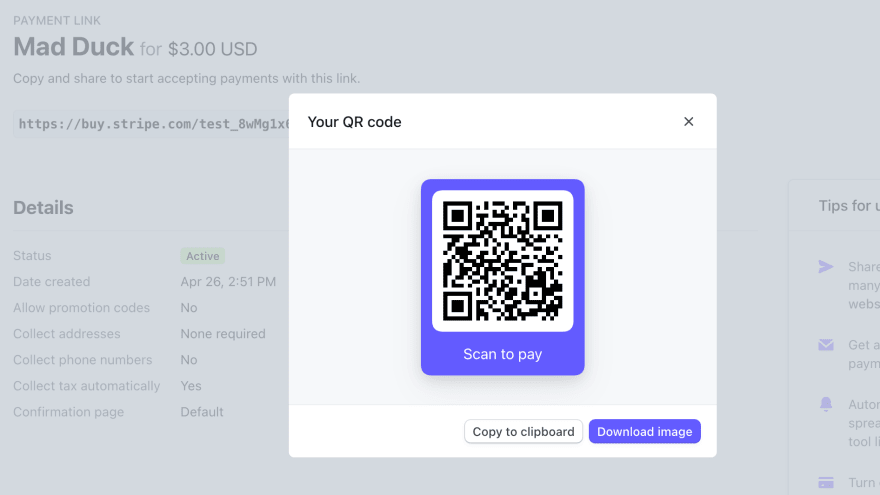
If you’re selling things in a place where it isn’t practical to set up an NFC chip, or if you have some hesitation about your potential customers’ comfort tapping their phone to pay, you can achieve this same effect with a QR code. If for some reason NFC tags don’t fit your use case, you can generate a QR Code from the Stripe Dashboard. To do this, visit the detail page for any Payment Link. There, you’ll see a handy QR Code button:
Clicking that button will generate a QR code for your product’s payment link, which can be downloaded and printed for the same purpose. When buyers scan your QR code, they’ll be brought to the payment flow, just as above.
Some caveats
- Payment Links are great for simple purchases like this, but not ideal in cases where customers may be purchasing combinations of products at the same time. This can be mitigated somewhat using the optional Cross-sells feature on Paument Links. Otherwise, if your customer wanted to buy more than one type of product when they stopped at your kiosk, they’d need to complete the purchase workflow for each product. Additionally, during checkout customers can tick a box to save their purchase information for quicker future purchases, which can make subsequent transactions easier.
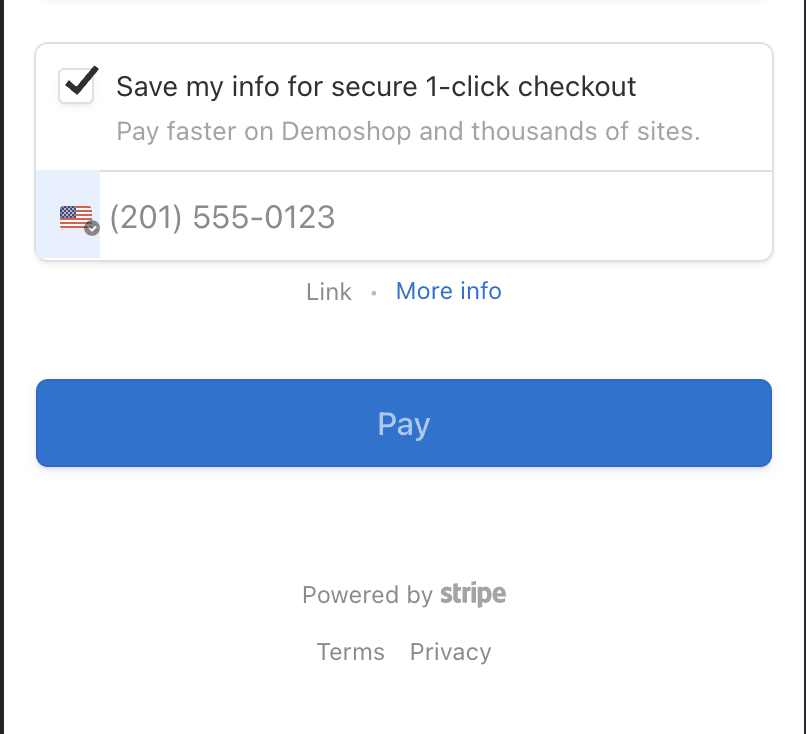
Ticking the “Save my info” box makes subsequent transactions much faster for your customers
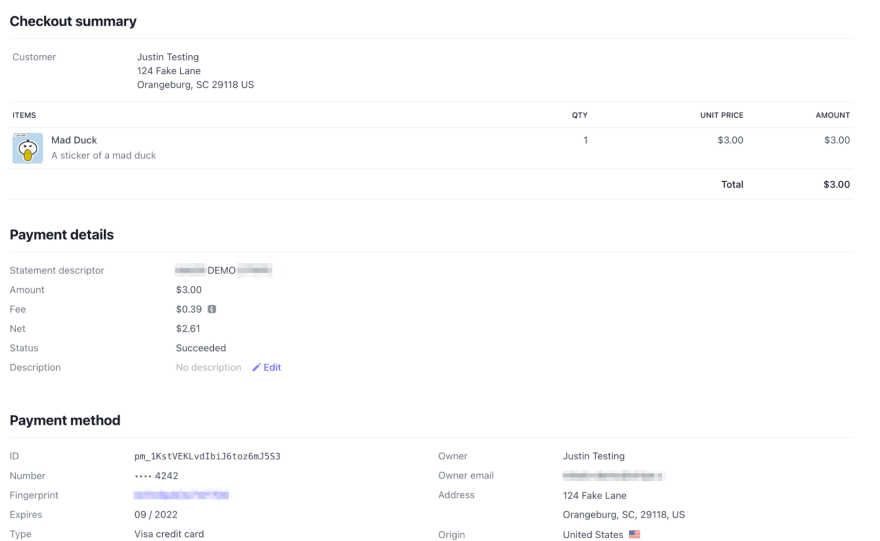
- A note about using Test mode: When a purchase is completed with payment links, a Guest Customer will be created alongside that purchase. Only one guest will be created per test credit card - which means that in test mode, you may see fewer customers than you expect if you’re testing with the same card over and over.
Summary
In this post, we took a look at a creative way to use Payment Links with NFC chips for in-person purchases. It’s a straightforward, no-code solution that business owners can take advantage of to provide a quick, familiar checkout experience . If you enjoyed this, you may also want to check out:
- No-code options to accept payments on Stripe
- Docs for Payment Links
- NFC tools on the Google Play Store and the Apple App Store
- Making sense of Stripe Checkout, Payment Links, and the Payment Element
What do you think? Is this something you’d be able to use for your business? I’d love to hear how you might use Payment Links, NFC tags, or QR Codes to make sales a bit easier. Tag me on twitter @irreverentmike with any thoughts or questions!


Oldest comments (1)
Thanks so much, I'm glad you enjoyed it!