
I’m going to show you how to build your own custom newsletter in a few easy steps. All the tools in this tutorial are free to use, and the entire process can be completed without spending anything.
I’ll be building an email newsletter template from scratch using an email framework, testing my emails from inside VS Code, creating a basic signup page with Mailchimp, and sending out my email to my subscribers through Mailchimp.

Along the way there will be plenty of opportunities to take shortcuts or expand further—don’t feel constrained to follow my steps exactly.
Why you should custom build your newsletter
You can always build an email using a drag-and-drop tool or a pre-built template—Mailchimp and Sengrid both offer an easy way to design an email without any coding.
Building your own email from scratch, however, is worthwhile for two reasons.
First, building your own email is a great way to sharpen your web development skill set. You’ll learn more about how you can use HTML and CSS to create engaging experiences for your readers.
Second, a custom email helps you differentiate yourself from other newsletters.
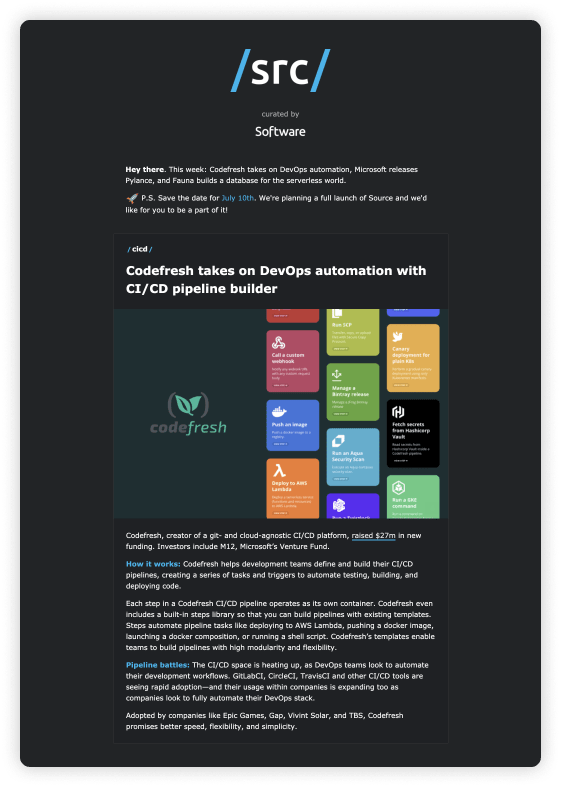
In designing my newsletter, Source, I really wanted to focus on saving developers time by putting content in the most digestible format. I customized the newsletter using a dark theme with blue text highlighting each new idea or item for you to scan.
Here’s a small sample:
Having greater control over the design of your email lets you tailor it to your audience and deliver the most value to your readers.
Let’s dive in!
Building your newsletter with HTML, CSS, and MJML
All email templates are built with HTML and CSS, the building blocks of the web. Building emails, however, is complicated by the fact that email clients, like Gmail and Outlook, can render the same emails differently. And similar to building a website, there can be a lot of boilerplate code to handle basic requirements.

Many frameworks exist to make the email-building process easier by automatically handling some of the most common email requirements, like responsiveness across different email clients and devices. MJML is one framework that I’ve found to be particularly easy to learn and quite powerful for rapidly prototyping email templates.
Some of the benefits of using MJML include:
- Write less code, save time and code more efficiently with MJML’s semantic syntax
- Build emails that are responsive by design on most-popular email clients, even Outlook
- Save time with reusable and extensible components
There are a few ways to get started with MJML.
If you don’t want to deal with the hassle of installing dependencies, you can use the online editor for free. It’s a quick and powerful way to get started. You can find the editor here.
If you’d like to use MJML locally, you can use your code editor of choice (i.e. VS Code, Sublime, and Atom). To install MJML, you’ll also need to install Node. After that, installing MJML is straightforward. Simply open your terminal and run:
npm install mjml
Next, install the MJML plugin for you code editor: VS Code, Sublime, or Atom.
Now you’re ready to start building your email. MJML has great documentation that will guide you through the basic principles. Stylistically, MJML works like HTML and CSS on steroids by adding new elements that can be used in tandem with typical HTML/CSS syntax you may already be familiar with.
MJML offers a few preconfigured elements that will replace standard HTML elements, like <mj-body>, <mj-section>, <mj-column>, and <mj-text>. These work in a similar way to their HTML counterparts but will work better with email clients.
There are a handful of templates for you to pick from to get started. I’d recommend making tweaks to an existing project so you can jump to a final product more quickly. One of my favorite templates is Recast, which you can preview and edit online here.

If you’re using VS Code, type the command MJML: Template to pull up a list of templates, and select Recast.
As you build your email, you can toggle preview mode by clicking the MJML icon at the top of the editor near your tabs or typing the command MJML: Open Preview to the Side. The preview will refresh in real-time.
Testing your email: send emails from inside VS Code
The real-time preview pane is a great way to quickly see how your email might look, but it’s best to formally check your email template by sending yourself and some friends a test email.
To send the emails right from VS Code, install the Node package nodemailer. Nodemailer lets you easily send emails from your computer on behalf of your email accounts. You will also need a Gmail account. Just run:
npm install nodemailer
Next, open your VS Code settings by opening settings.json via the command palette. Change or add the following values to the json file:
“mjml.mailer”: “nodemailer”,
“mjml.nodemailer” : {
    “service”: “Gmail”,
    “auth”: {
        “user”: “your Gmail address”,
        “pass”: “your Gmail password”
    }
}
Now you’re ready to test your email! Open up the command palette and type MJML: Send Email. The extension will prompt you to enter a subject line for your email and a list of recipients.
Once you’ve completed the necessary steps, go check your inbox and you should see an email from yourself with your newly created email!
Lastly, use the command MJML: Export HTML to generate an HTML file from your MJML file. Keep track of the HTML file that you create, as we'll later need to upload it to Mailchimp.
Creating a landing page: get started with Mailchimp
Once you have your email ready to go, head over to Mailchimp and make a free account.
Mailchimp offers a generous free tier for their service that includes 2,000 subscribers and 12,000 emails per month. You’ll also get a free landing page to collect sign ups.
The one small downside of the free tier is that all of your emails will have Mailchimp footers, but they are fairly unobtrusive.
Let’s start by building a free Landing Page. To do so, click the “Create” button from your dashboard and select “Landing Page.” Mailchimp has a handful of awesome templates, and you can make small adjustments to these to add your newsletter name and description.
Once you’ve customized the landing page template, you’ll have the opportunity to either link your own URL or create a free one through Mailchimp. Part of the Mailchimp URL will be randomly generated, but you can add custom text at the very end—it will look something like https://mailchi.mp/[randomly-generated]/[your-text].
You can share and publicize this link to your friends and across your favorite communities.
Sending your email
Finally, let’s send your first email.
On your Mailchimp dashboard, click the “Create a Campaign” button. Next, click “Email” and follow the steps to create a new email. You’ll have the chance to upload the HTML file you generated when you built your newsletter.
After you’ve followed these steps, you can either send out the newsletter immediately, or schedule it for a future release.
That’s all! Now it’s time to grow your subscriber list!
Thanks for reading. Check out Source, our weekly newsletter. No spam, no fluff. Getting developers what they need to know, fast.


Top comments (4)
Will it be reliable to avoid finding emails in a spam folder?
Thanks man, I'm starting my blog and this is helpful and inspiring.
Thanks for this post!
Makes me create a newsletter right away :)
Awesome!