
If you're anything like me, you spend a lot of time in your terminal. I went an embarrassingly long time without customizing anything because I'm fundamentally lazy and didn't want to learn how. However! Improving your terminal experience through configuration is the much more efficient and lazy long term solution. A few minutes now saves you headaches later. Don't be like me and wait a couple years before getting with the program.
I use the MacOS default Terminal app. I don't use zsh or iTerm or Upterm or anything else. I am not fancy. Getting fancy seems like a lot of work. We've already established that I'm lazy. If you disagree, change my mind in the comments!
The Basics
What is ~/.bash_profile?
/.bash_profile and ~/.bashrc are scripts that are executed when bash is invoked.
-
~/.bash_profilescripts are executed for login shells -
~/.bashrcscripts are executed for non-login interactive shells
What does that mean?
Login shells are run with the user logged into the system. It's still an interactive session, because you input commands and the shell reads them from its standard-input. You use login shells for anything where you need user permissions or where you would like the shell to start up with consistent configuration every time.
Non-login interactive shells do not have a user attached to its session. These are good for running automated processes that don't depend on being logged in to run.
By default, new OSX terminal sessions are login shells. I don't run on a Linux machine day to day, but as far as I understand, Linux terminal emulators start up using non-login interactive shells by default.
This post demonstrates a few quality of life improvements that will make your terminal experience smoother and more #aesthetic. These changes are largely in ~/.bash_profile which means that they'll be executed in your login shells, but not in your non-login interactive shells.
What if I already have ~/.bashrc?
You might already have been putting config stuff in ~/.bashrc and just source it in your shell. Also, many people want to keep functionality like usability scripts strictly separate from cosmetic and/or fun improvements. No problem! You don't have to get rid of it. Just include this line in ~/.bash_profile:
source ~/.bashrc
Other files we'll be touching on today
~/.gitconfig
~/.config/neofetch/config.conf
~/.hushlogin
~/.git-completion.bash
Usability Improvements
git completion
One of my biggest pain points was lack of tab completion for git branch names.
Luckily, there's an open source solution available for this.
To take advantage of this you'll need to copy the raw contents of the link above into a local file
curl https://raw.githubusercontent.com/git/git/master/contrib/completion/git-completion.bash -o ~/.git-completion.bash
Now you can just run git-completion.bash in your ~/.bash_profile by including the following command. Get in on that tab completion goodness.
source ~/.git-completion.bash
git commit attribution
Make sure you set user level information in your ~/.gitconfig file. It'll make sure commits are attributed properly, and you can set it and forget it.
[user]
name = mygithubusername
email = my.github.email@example.com
Useful aliases
Sometimes typing all of the characters in a command is just too much. Here are some easy aliases that can make your life a bit better.
Of course, as with any alias, change the name of the alias to whatever will be most useful to you.
# list files
alias la="ls -oa" # show hidden files and format nicely

# change directories
alias ..="cd .."
alias roj="cd ~/projects" # or wherever you store your main project files

# git aliases
alias gdf="git diff"
alias gap="git add -p"
alias gc="git commit -m"
alias gs="git status"
alias gco="git checkout"
alias gul="git pull"
alias gush="git push"
alias gbra="git branch"
alias glog="git log --pretty=format:'%h - %an: %s' --graph" # print out log with hash, author name, status, and include graph info
Oh No Something Broke!
Remember that nice git autocompletion stuff we set up a little bit ago? It's broken with these aliases, which is a huge bummer!
The fix for this is to amend ~/.git-completion.bash. Now, according to a comment in the ~/.git-completion.bash file itself:
This is NOT a public function; use at your own risk.
So, I recommend having a window open where you do NOT source your new ~/.bash_profile and can revert your changes safely if you test them and they don't work.
With that warning out of the way, you can add the following to the bottom of ~/.git-completion.bash to have it play nice with your aliases.
# git complete aliases
__git_complete gdf _git_diff
__git_complete gbra _git_branch
__git_complete gco _git_checkout
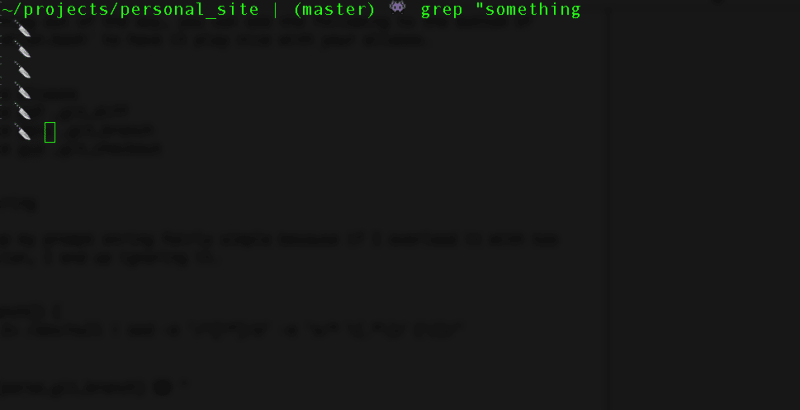
Prompt String
I like to keep my prompt string fairly simple because if I overload it with too much information, I end up ignoring it.
parse_git_branch() {
  git branch 2> /dev/null | sed -e '/^[^*]/d' -e 's/* \(.*\)/ (\1)/'
}

PS1="\w | \$(parse_git_branch) 👾 "

PS2=" 🔪 "
There are a couple things going on here. My two favorite things to have in my primary prompt string are my current location, and the active git branch. There's not a builtin function to find the active git branch, so I've defined a function above that will do it.
Here are the components of the actual prompt string (PS1)
- Current directory (
\w) - a delimiter character to make it easier to read (
|) - the git branch (in parentheses for even more visual context)
$(parse_git_branch) - alien emoji because I think it's cute (👾).
PS1 is the string that you'll generally see in your command prompt. PS2 is the string that will show if you press enter and trigger a secondary line in the command prompt. The default value for PS2 is >.
Here's an example with both my PS1 and PS2 values.
Cosmetic Improvements
last login
I don't like new terminal windows to start with a last login statement. The last login is whenever I last opened a new terminal window, which is not useful information for me. You can get rid of this line by creating this empty file:
touch ~/.hushlogin
This should work immediately. You don't need to source anything. Next time you open up a new terminal session, you shouldn't see login information. If you ever decide you want login information again, just delete this file.
prompt string colors
The only thing better than a clean and informative prompt string is a clean and informative prompt string with FUN COLORS.
I didn't show you this above because adding color to anything in bash is a pain, so I wanted you to be able to set up your functional PS1 values before tearing your hair out trying to get the colors right.
Here's what my PS1 value actually looks like:
PS1="\e[0;35m\w\e[m \e[0;33m|\e[m \e[0;36m\$(parse_git_branch)\e[m 👾 "

When you want to assign a color to a part of a string, use the following pattern:
\e[X;Ym text you want to be in a color \e[m
-
\e[is where the color coding starts -
X;Yis the color code you're using, which in most cases will be two numbers separated by a semicolon -
mlets bash know that's the end of the color code and to start processing your stirng -
\e[msignals the end of the section you want color coded
It's a mess to read, and I know I'm never going to commit this to memory. Check out this comprehensive guide that lists several color codes.
Neofetch
neofetch is a nifty tool that displays information about your system in an aesthetically pleasing and easily accessible way. Want to know which version of your OS you're using, your uptime, or what font you happen to be using in your login shell session? neofetch has all this and more, plus customizable ascii art.
This is really part cosmetic improvement and part usability improvement, but I've put it in the cosmetic section since it will have a big impact on the look and feel of your terminal.
For MacOS you can brew install neofetch. For other operating systems, follow their installation guide. They support tons of operating systems, even obscure ones.
You can set your own ascii art to appear whenever you run neofetch. When it installs, it creates a ~/.config/neofetch directory containing a config.conf file. Go into the file and edit the image_source location to the absolute path of the ascii art you'd like to use. Follow the guide on how to format and color your art.
Here's a picture of my neofetch setup. (Please ignore my borderline absurd uptime I should restart more often).

I have it set so that neofetch runs every time I open a new terminal window. You can do this simply by calling neofetch at the bottom of your ~/.bash_profile.
git colors!
I like a lot of the default colors set by git. git status has red for changes not staged to commit, green for changes to be committed. That sort of thing. But there are other color settings I'm not wild about. I don't love that git status untracked files and unstaged but tracked files are the same color. I don't like that git diff meta information and new lines are both green.
Here's how I've changed my settings. I really like cyan for dark or black backgrounds. bold helps me separate meta information from changes in diff. And I really like reverse and bold for the current branch so that I can identify it quickly in a long list of branches.
[color]
  ui = auto
[color "diff"]
  meta = cyan bold
  frag = magenta bold
[color "status"]
  untracked = cyan
[color "branch"]
  current = cyan reverse bold
  local = green
  remote = yellow
Here are some examples of what these options look like


End result
Here's pretty much what my ~/.bash_profile looks like, all together in one place for anyone who wants to copy it. I recommend you do. These are some awesome settings. Let me know if you have any questions!
. ~/.git-completion.bash

parse_git_branch() {
  git branch 2> /dev/null | sed -e '/^[^*]/d' -e 's/* \(.*\)/ (\1)/'
}


PS1="\e[0;35m\w\e[m \e[0;33m|\e[m \e[0;36m\$(parse_git_branch)\e[m 👾 "

PS2=" 🔪 "

# list files
alias la="ls -oa" # show hidden files and format nicely

# change directories
alias ..="cd .."
alias roj="cd ~/projects" # or wherever you store your main project files

# git aliases
alias gdf="git diff"
alias gap="git add -p"
alias gc="git commit -m"
alias gs="git status"
alias gco="git checkout"
alias gul="git pull"
alias gush="git push"
alias glog="git log --pretty=format:'%h - %an: %s' --graph" # print out log with hash, author name, status, and include graph info

neofetch
Here's my ~/.gitconfig
[user]
name = mygithubname
email = my.github.email@example.com

[color]
  ui = auto
[color "diff"]
  meta = cyan bold
  frag = magenta bold
[color "status"]
  untracked = cyan
[color "branch"]
  current = cyan reverse bold
  local = green
  remote = yellow
Additional Fun Things
Take a look at terminal screenshots that DEV community members have shared in the past.

Do you need more Ryan Gosling on your terminal? I'm fairly certain you do.
Gosleap
Only works on OSX
Usage

Installation
Add this line to your application's Gemfile:
gem 'gosleap'
And then execute:
$ bundle
Or install it yourself:
$ gem install gosleap
Contributing
- Fork it ( http://github.com//gosleap/fork )
- Create your feature branch (
git checkout -b my-new-feature) - Commit your changes (
git commit -am 'Add some feature') - Push to the branch (
git push origin my-new-feature) - Create new Pull Request
Happy Friday! Share your favorite terminal enhancement in the comments below!


Top comments (18)
I notice your
..="cd .."alias. Tryautocd=true. You'll never need to type cd again.That one doesn't work for me! Does it not work in stock Terminal?
My bad. The command is actually
shopt -s autocd. I should have checked my bashrc first.Just so anyone trying this knows, I had to update my bash to @4+ to get this working!
Here's a handy guide on getting it working:
clubmate.fi/upgrade-to-bash-4-in-m...
!!!!!! OMG This is so great!!!!!!! (thanks for sharing this awesome tip!)
Ooh. That one is new to me and I’m very excited to try it out. Thanks!
If ur really that lazy u should just install oh-my-zsh. It does all the cool stuff out of thr box, plugins r auto updated and u can even sync ur zshrc.
Its has autocomplete for everything, is case insensitive etc. Give it a try!
I was like u for way to longtime until a colleague showed my omz😊
I am just so reluctant to learn a whole new thing. I'm busy learning other things and there are only so many things I can focus on! But zsh is definitely on my list of things to check out....at some point.
Here for your spare time :)
Jorge use ZSH with Oh My Zsh
I know you probably don't need the setup parts... but a quick parse through the first one and some looks in the second and you'll be off to the races
dev.to/jorge_rockr/my-development-...
dev.to/jorge_rockr/my-development-...
There‘s really nothing much to learn, oh my zsh does all for u!
It configures zsh to a point where u might only want to join the theme and nothing else
Nuh-huh. Take pride in your uptime! If you don't need to reboot, why reboot?
These are my aliases if its of interest:
#2spoopy4me
The art I use on my other workstation is much friendlier :P
Ohohoho this is so much fun!
Can I write a Japanese translation article on my own blog and dev.to?
Go for it! Just link it back to the original please. I’m really glad you liked it!
My terminal is default and sad...