If you are looking for a guide on how to deploy Ruby on Rails on your own server - you came to the right place.
I wrote this guide to describe the process of deploying Ruby on Rails for postgresql, nginx, passenger, and capistrano, step by step.
The entire deployment will be shown on the example of deploying it for http://programming.network :)
1. Ruby on Rails application
In the project catalogue on a local machine, let's create a catalogue for our project
$ Projects: mkdir programming.network
Let's enter our project
$ Projects: cd programming.network
I hope that you use rbenv to manage ruby versions, as I do.
If so, let's change the version to the latest one.
$ programming.network: rbenv local 3.1.1
Let's check the ruby version.
$ programming.network: ruby -v
ruby 3.1.1p18 (2022-02-18 revision 53f5fc4236) [x86_64-darwin21]
Let's install the latest version of Ruby on Rails
$ programming.network: gem install rails -v 7.0.2.3
Now let’s generate the Ruby on Rails project
$ programming.network: rails new . --database=postgresql --javascript=esbuild --css=bootstrap
As indicated by the generator, let's update package.json and add
  "scripts": {
    "build": "esbuild app/javascript/*.* --bundle --sourcemap --outdir=app/assets/builds",
    "build:css": "sass ./app/assets/stylesheets/application.bootstrap.scss ./app/assets/builds/application.css --no-source-map --load-path=node_modules"
  }
So your package.json file should look like this:
{
  "name": "app",
  "private": "true",
  "dependencies": {
    "@hotwired/stimulus": "^3.0.1",
    "@hotwired/turbo-rails": "^7.1.1",
    "@popperjs/core": "^2.11.4",
    "bootstrap": "^5.1.3",
    "bootstrap-icons": "^1.8.1",
    "esbuild": "^0.14.27",
    "sass": "^1.49.9"
  },
  "scripts": {
    "build": "esbuild app/javascript/*.* --bundle --sourcemap --outdir=app/assets/builds",
    "build:css": "sass ./app/assets/stylesheets/application.bootstrap.scss ./app/assets/builds/application.css --no-source-map --load-path=node_modules"
  }
}
Save the generated project to the version control system (git)
$ programming.network: git add .
$ programming.network: git commit -m "Initial commit"
Now, let's create a project with github

Add a local source from github to our repository
$ programming.network main: git remote add origin git@github.com:tkowalewski/programming.network.git
and send the latest changes
$ programming.network main: git push -u origin main
2. Development environment (postgresql)
In the development environment, I will use docker and docker-compose to provide our project with a postgresql database.
Let's create a docker-compose.yml file including
version: "3.7"
services:
  db:
    image: postgres:12.10
    environment:
      POSTGRES_USER: postgres
      POSTGRES_PASSWORD: ""
      POSTGRES_HOST_AUTH_METHOD: trust
    ports:
      - "5432:5432"
and let's turn on our database
$ programming.network main: docker-compose up -d
and let's save our most recent changes
$ programming.network: git add .
$ programming.network: git commit -m "Add and configure docker-compose"
3. Managing and configuring apps using environment variables
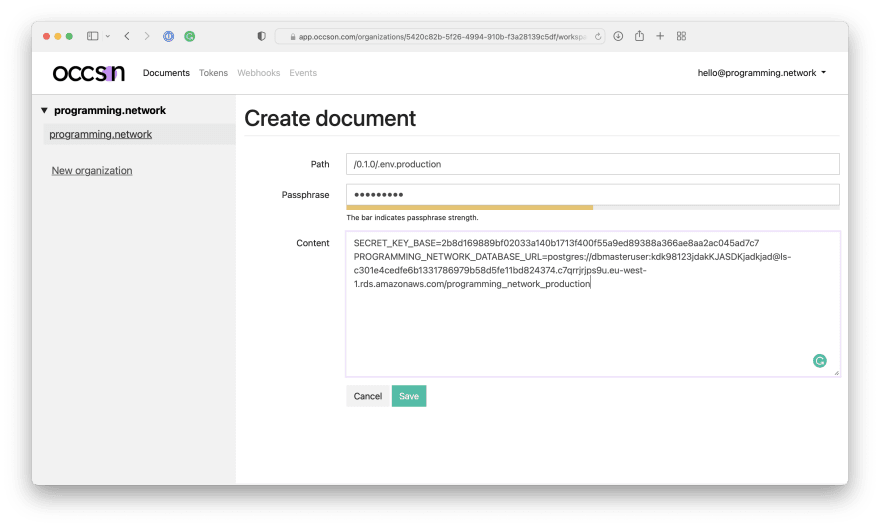
We'll use https://occson.com which is going to help us deliver the configuration for our Ruby on Rails app.
Let's add the Gemfile gem to occson-rails
gem "occson-rails"
and install it
$ programming.network main: bundle install
Now, let's save our most recent changes
$ programming.network: git add .
$ programming.network: git commit -m "Add occson-rails"
Now let's generate an occson access token

and prepare a configuration document for the development environment

The following step consists in defining our app's version in config/application.rb
require_relative "boot"

require "rails/all"

# Require the gems listed in Gemfile, including any gems
# you've limited to :test, :development, or :production.
Bundler.require(*Rails.groups)

module ProgrammingNetwork
  VERSION = '0.1.0'

  class Application < Rails::Application
    # Initialize configuration defaults for originally generated Rails version.
    config.load_defaults 7.0

    # Configuration for the application, engines, and railties goes here.
    #
    # These settings can be overridden in specific environments using the files
    # in config/environments, which are processed later.
    #
    # config.time_zone = "Central Time (US & Canada)"
    # config.eager_load_paths << Rails.root.join("extras")
  end
end
Let's save our changes
$ programming.network main: git add .
$ programming.network main: git commit -m "Define application version"
Now, we will configure occson with the use of two environment variables.
Let's create a local .env file including
OCCSON_ACCESS_TOKEN=ca94af35ab75b1b6f3bd
OCCSON_PASSPHRASE=0ksym0r0n
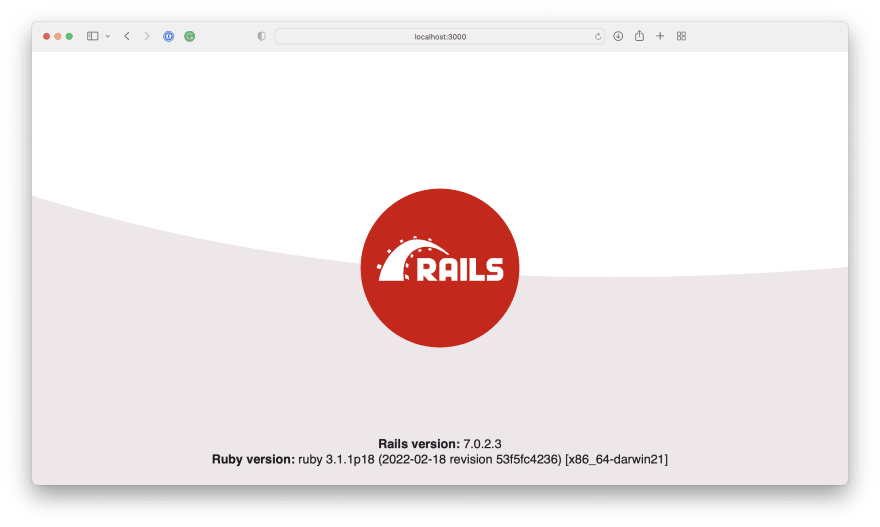
Now we can easily turn on our server and enjoy a working Ruby on Rails app :)
$ programming.network main: bin/dev
And let's not forget to ignore .env in the version control system.
Let's add the following entry to .gitignore
# See https://help.github.com/articles/ignoring-files for more about ignoring files.
#
# If you find yourself ignoring temporary files generated by your text editor
# or operating system, you probably want to add a global ignore instead:
#   git config --global core.excludesfile '~/.gitignore_global'

# Ignore bundler config.
/.bundle

# Ignore all logfiles and tempfiles.
/log/*
/tmp/*
!/log/.keep
!/tmp/.keep

# Ignore pidfiles, but keep the directory.
/tmp/pids/*
!/tmp/pids/
!/tmp/pids/.keep

# Ignore uploaded files in development.
/storage/*
!/storage/.keep
/tmp/storage/*
!/tmp/storage/
!/tmp/storage/.keep

/public/assets

# Ignore master key for decrypting credentials and more.
/config/master.key

/app/assets/builds/*
!/app/assets/builds/.keep

/node_modules

.env
and once again, let's save the changes
$ programming.network main: git add .gitignore
$ programming.network main: git commit -m "Ignore .env file"
4. Database schema
Let's locally create our database and generate a database schema
$ programming.network main: bin/rails db:create db:migrate
now save the created schema
$ programming.network main: git add .
$ programming.network main: git commit -m "Generate database schema"
5. AWS Lightsail (server)
Now we are going to create a VPS instance on AWS Lightsail
In your AWS account, select Lightsail from the services and then select Create instance from the Instances tab.
In the form, select a region, platform, operating system, plan, and specify the name of the instance.

After launching the instance, download a default ssh key - you will find it in the instance's details.

After downloading the ssh key, move it to the .ssh catalogue and assign specific access rights to it.
$ programming.network main: mv ~/Downloads/LightsailDefaultKey-eu-west-1.pem ~/.ssh/programming.network.pem
$ programming.network main: chmod 400 ~/.ssh/programming.network.pem
Add the key to an ssh agent
$ programming.network main: ssh-add ~/.ssh/programming.network.pem
6. AWS Lightsail (postgresql)
Now we are going to create an RDS instance with AWS Lightsail
Select Create database in the Lightsail Databases tab.
In the form, select a region, database type (postgresql), plan, and specify a name for the instance.

Wait while AWS launches your database instance.
7. Server configuration
Log in to the server via ssh (you can find the IP address on the instance preview)
$ programming.network main: ssh ubuntu@52.215.161.216
Install nodejs, yarn, and other needed libraries
ubuntu@ip-172-26-6-43:~$ curl -sL https://deb.nodesource.com/setup_12.x | sudo -E bash -
ubuntu@ip-172-26-6-43:~$ curl -sS https://dl.yarnpkg.com/debian/pubkey.gpg | sudo apt-key add -
ubuntu@ip-172-26-6-43:~$ echo "deb https://dl.yarnpkg.com/debian/ stable main" | sudo tee /etc/apt/sources.list.d/yarn.list
ubuntu@ip-172-26-6-43:~$ sudo apt-get update
ubuntu@ip-172-26-6-43:~$ sudo apt-get install postgresql-client-12 libpq-dev git-core curl zlib1g-dev build-essential libssl-dev libreadline-dev libyaml-dev libsqlite3-dev sqlite3 libxml2-dev libxslt1-dev libcurl4-openssl-dev software-properties-common libffi-dev dirmngr gnupg apt-transport-https ca-certificates nodejs yarn
Install ruby (via rbenv)
ubuntu@ip-172-26-6-43:~$ git clone https://github.com/rbenv/rbenv.git ~/.rbenv
ubuntu@ip-172-26-6-43:~$ echo 'export PATH="$HOME/.rbenv/bin:$PATH"' >> ~/.bashrc
ubuntu@ip-172-26-6-43:~$ echo 'eval "$(rbenv init -)"' >> ~/.bashrc
ubuntu@ip-172-26-6-43:~$ git clone https://github.com/rbenv/ruby-build.git ~/.rbenv/plugins/ruby-build
ubuntu@ip-172-26-6-43:~$ echo 'export PATH="$HOME/.rbenv/plugins/ruby-build/bin:$PATH"' >> ~/.bashrc
ubuntu@ip-172-26-6-43:~$ source .bashrc
ubuntu@ip-172-26-6-43:~$ rbenv install 3.1.1
ubuntu@ip-172-26-6-43:~$ rbenv global 3.1.1
Install bundler
ubuntu@ip-172-26-6-43:~$ gem install bundler
Install nginx and passenger
ubuntu@ip-172-26-6-43:~$ sudo apt-key adv --keyserver hkp://keyserver.ubuntu.com:80 --recv-keys 561F9B9CAC40B2F7
ubuntu@ip-172-26-6-43:~$ sudo sh -c 'echo deb https://oss-binaries.phusionpassenger.com/apt/passenger focal main > /etc/apt/sources.list.d/passenger.list'
ubuntu@ip-172-26-6-43:~$ sudo apt-get update
ubuntu@ip-172-26-6-43:~$ sudo apt-get install -y nginx-extras libnginx-mod-http-passenger
ubuntu@ip-172-26-6-43:~$ if [ ! -f /etc/nginx/modules-enabled/50-mod-http-passenger.conf ]; then sudo ln -s /usr/share/nginx/modules-available/mod-http-passenger.load /etc/nginx/modules-enabled/50-mod-http-passenger.conf ; fi
Now configure the passenger, and more specifically in the file /etc/nginx/conf.d/mod-http-passenger.conf change the path to ruby
ubuntu@ip-172-26-6-43:~$ sudo vim /etc/nginx/conf.d/mod-http-passenger.conf
Your file should look like this
passenger_root /usr/lib/ruby/vendor_ruby/phusion_passenger/locations.ini;
passenger_ruby /home/ubuntu/.rbenv/shims/ruby;
Let's remove the default page from nginx
ubuntu@ip-172-26-6-43:~$ sudo rm /etc/nginx/sites-enabled/default
and configure the server for http://programming.network in the file /etc/nginx/sites-enabled/programming.network
ubuntu@ip-172-26-6-43:~$ sudo vim /etc/nginx/sites-enabled/programming.network
Your server file should look like this
server {
  listen 80;
  listen [::]:80;

  server_name _;
  root /home/ubuntu/programming.network/current/public;

  passenger_enabled on;
  passenger_app_env production;
  passenger_env_var OCCSON_ACCESS_TOKEN ca94af35ab75b1b6f3bd;
  passenger_env_var OCCSON_PASSPHRASE 0ksym0r0n;

  location ~ ^/(assets|packs) {
    expires max;
    gzip_static on;
  }
}
Restart nginx
ubuntu@ip-172-26-6-43:~$ sudo service nginx restart
8. Organizing a Ruby on Rails app on a server
First, let's create a production database.
To do this, let's connect to the postgresql server (access data and database server host can be found in the AWS Lightsail instance preview)
ubuntu@ip-172-26-6-43:~$ psql -h ls-c301e4cedfe6b1331786979b58d5fe11bd824374.c7qrrjrjps9u.eu-west-1.rds.amazonaws.com -U dbmasteruser postgres
and
postgres=> CREATE DATABASE programming_network_production;
postgres=> \q
Now we're going to organize configuration for occson.
ubuntu@ip-172-26-6-43:~$ echo 'OCCSON_ACCESS_TOKEN="ca94af35ab75b1b6f3bd"' | sudo tee -a /etc/environment
ubuntu@ip-172-26-6-43:~$ echo 'OCCSON_PASSPHRASE="0ksym0r0n"' | sudo tee -a /etc/environment
9. Deployment organization (capistrano)
Let's go back to our project (local)
Seeing how I work on the MacOS operating system, I will first add the linux platform to Gemfile
$ programming.network main: bundle lock --add-platform x86_64-linux
$ programming.network main: bundle install
and saves the changes
$ programming.network main: git add Gemfile.lock
$ programming.network main: git commit -m "Add linux platform"
Now I will update the database configuration.
Your config/database.yml file should look like this
default: &default
  adapter: postgresql
  encoding: unicode
  pool: <%= ENV.fetch("RAILS_MAX_THREADS") { 5 } %>

development:
  <<: *default
  database: programming_network_development

test:
  <<: *default
  database: programming_network_test

production:
  <<: *default
  url: <%= ENV["PROGRAMMING_NETWORK_DATABASE_URL"] %>
so, in the production environment we will configure the database using the PROGRAMMING_NETWORK_DATABASE_URL environment variable.
and once again, I save and send the changes
$ programming.network main: git add .
$ programming.network main: git commit -m "Update database configuration for production environment"
$ programming.network main: git push origin main
Next we will prepare the app's configuration in occson
Capistrano will be a tool to carry out the deployment. Install it along with a few extensions by adding them to Gemfile in the development group
gem "capistrano", require: false
gem "capistrano-rbenv", require: false
gem "capistrano-rails", require: false
gem "capistrano-bundler", require: false
gem "capistrano-passenger", require: false
Let's install
$ programming.network main: bundle install
and configure
$ programming.network main: bundle exec cap install STAGES=production
The last command generated a capistrano configuration. Now let's update it.
let's enable the installed extensions in the Capfile file by adding
require "capistrano/rbenv"
require "capistrano/bundler"
require "capistrano/rails"
require "capistrano/passenger"
Now let's make a few changes in the config/deploy.rb file
Change the app's name
set :application, "programming.network"
Change the url to the repository
set :repo_url, "git@github.com:tkowalewski/programming.network.git"
Add a path to the project on the server
set :deploy_to, "/home/ubuntu/#{fetch :application}"
Let's uncomment linked_dirs
append :linked_dirs, "log", "tmp/pids", "tmp/cache", "tmp/sockets", "tmp/webpacker", "public/system", "vendor", "storage"
and change the default branch of the version control system
set :branch, :main
and add a rbenv configuration
set :rbenv_type, :user
set :rbenv_ruby, '3.1.1'
Define the target server in the config/deploy/production.rb file by adding
server '52.215.161.216', user: 'ubuntu', roles: %w{app db web}
Now let's check and prepare the server for deployment
$ programming.network main: bundle exec cap production deploy:check
10. Deployment
The time has come for the first deployment. We are going to carry it out using the following command
$ programming.network main: bundle exec cap production deploy
Our app has been deployed :)


Top comments (0)