[UPDATE] The Fission team released fission-suite/webnative-elm version 7.0.0 since the original publish date of this article. This update includes a sign out function. The following sections of the article have been changed to reflect this update: Walkthrough/Authentication/'Prep work'and Walkthrough/Authentication/'Signing out'. This article no longer makes any changes to the js/index.js file as defined in Fission with Elm - Part 2.
Make sure the npm and elm-module packages for webnative-elm are at 6.1.0 and 7.0.0, respectively. To update them, run the following from the root of the project:
npm install --save-dev webnative-elm
npx elm-json install fission-suite/webnative-elm
Prelude
This is a three-part series. In part one, I showed you how to use Vite to manage an Elm application. In part two, I showed you how to integrate the basics of Fission via the Webnative SDK into the project. In part three (this article), I will show how to add authentication and storage via the Webnative SDK to the application. This article is written assuming the developer already has a Fission account and has completed parts 1 and 2.
It should be noted that the last two articles were fairly short. Both have set the stage for this article, the pinnacle of the series. There will be much to add to our growing application, some of these additions are due to Elm being a strongly typed language.
It should also be noted that if you are using a browser that using something similar to Brave Shields in the Brave browser, you will need to disable the feature so Fission can communicate with the application.
This article will also require the use of a Fission account. If you do not yet have one, take a moment to create one now. Check Appendix A at the end of this article for steps on how to do so.
The Github repository associated with this article can be found here:
https://github.com/xeticode/fission-with-elm-demos/tree/Part-3
Intro
Welcome to the final article. Here you will be tested beyond anything you have ever experienced… Nah, this is not some epic set of trials. That being said, it is my hope that by the end of this article, you have been exposed enough to Fission to continue on in your own Fission-based applications.
It is time to add some usefulness to this application. Right now, it is like a wallpaper: good to look at and not much else. The first feature we will add is user authentication. After authentication, we will add code that will interact with the Fission Drive to write a file to storage. There are no introductions to be made this go-around, so we will review important concepts for what I am about to show you.
Things to review
elm ports are the medium by which an Elm application communicates with JavaScript. For more information, see Elm Ports .
IPFS "is a distributed system for storing and accessing files, websites, applications, and data". For more information, see IPFS .
Wnfs stands for
Webnative File Systemand "is a file system built on top of the (IPFS)". For more information, see Webnative File System .Fission Drive is a military-grade encrypted file system located within a distributed network. For more information, see Fission Drive .
Let us begin!
Walkthrough
Download an updated Main.elm by running this command in the terminal from the src directory:
curl -o Main.elm https://raw.githubusercontent.com/xeticode/fission-with-elm-demos/interim/part-3/Main.elm
This new Main.elm file lays down some new groundwork for our application. It is also divided into sections, the dividers being noticeable comments. Instead of indicating a line in the file to add or find code, I will indicate a region of the code to look. The differences between the new file versus the old one includes additions to our type alias Model, type Msg, and update function (see section: MODEL/UPDATE); a section for helper functions (see section: HELPER FUNCTIONS); and a new UI (see section: VIEW). Let’s quickly go over the new Msg variants and the Model.
Msg variants
Here are the new variants and their purposes:
-
SignInwill be associated with the login button and will initiate the login process with Fission. -
SignOutwill be associated with the logout button and will initiate the logout process with Fission. -
UpdateNoteis the variant that will update thenotefield in theModel. This is the value that will be written to the Wnfs. -
SaveNoteis associated with theSave Notebutton and will initiate the process of writing and publishing ournoteto the Wnfs.
Model
Here is a breakdown of the new fields in Model:
-
usernamewill store the username of the logged-in Fission user of the current session (if you are not familiar with theMaybetype, or simply need a refresher, see Maybe). -
logsis a list of strings and will store log entries associated with the different stages of interaction with Fission. These will be displayed on the left side of the screen. Consider these as a log that make it easier to see the processes when they occur. -
notethis will store the content that will be sent to the Wnfs.
Before we dive in
Run npm run dev from the root of the project to have the application up and running on the dev server. Once you do this, you should see this:

At this point, you can click on the login button, but it will not take you anywhere. Its associated message, SignIn, is currently a dead end. Not to worry, the first thing we will do is implement authentication.
Authentication
Prep work
One of the reasons my meals are so simple and quick is my hungry stomach will usually override my willingness to spend time on quality meal prep. Lucky for us, this is not a food situation. Before we can sign in, we must add a few things, a metaphorical meal prep, if you will, before we can dig into authentication.
The first thing we must do is expand the GotWebnativeResponse branch in our update function. To begin, replace the current GotWebnativeResponse branch (section: MODEL/UPDATE, function: update) with the following code (be aware, the alignment may change when copying and pasting into your developing environment. You will get the red squiggles if the case statement branches are mis-aligned):
GotWebnativeResponse response ->
    case Webnative.decodeResponse tagFromString response of
        Webnative (Initialisation state) ->
            case state of
                NotAuthorised ->
                    ( { model
                        | username = Nothing
                        , logs = "Auth: NotAuthorised" :: model.logs
                    }
                    , Cmd.none
                    )
                AuthSucceeded { username } ->
                    ( { model
                        | username = Just username
                        , logs =  "Auth: AuthSucceeded" :: model.logs
                    }
                    , Cmd.none
                    )
                AuthCancelled _ ->
                    ( { model
                        | username = Nothing
                        , logs = "Auth: AuthCancelled" :: model.logs
                    }
                    , Cmd.none
                    )
                Continuation { username } ->
                    ( { model
                        | username = Just username
                        , logs = "Auth: Continuation" :: model.logs
                    }
                    , Cmd.none
                    )

        Wnfs _ _ ->
            ( model, Cmd.none )


        Webnative (Webnative.NoArtifact SignedOut) ->
            ( { model
                | logs = "Signed out!" :: model.logs
                , username = Nothing
            }
            , Cmd.none
            )

        Webnative (Webnative.NoArtifact _) ->
            ( model
            , Cmd.none
            )

        WebnativeError err ->
            ( { model
                | logs = Webnative.error err :: model.logs
            }
            , Cmd.none
            )

        WnfsError err ->
            ( { model
                | logs = Wnfs.error err :: model.logs
            }
            , Cmd.none
            )
That is a lot of new code, and some of it is accompanied by our friendly neighborhood red squiggles. This is due to missing proper imports and a definition for tagFromString, which is a helper function. Let's resolve the problem starting with the imports.
Go to the import block at the top of Main.elm. Near the bottom of the import block at the top of the file, we have our Webnative import and it is currently exposing Artifact(..) and all its variants (represented by the (..)). Replace this import with:
import Webnative exposing (Artifact(..), NoArtifact(..), DecodedResponse(..), State(..))
Adding these to the exposing list will allow us access to the DecodedResponse and State types from the Webnative-elm module (see DecodedResponse and State).
Now we will define tagFromString. In the HELPER FUNCTION section, add the following code:
tagFromString : String -> Result String Tag
tagFromString str =
    case str of
         _ ->
            Err <| "Invalid tag: " ++ str
Webnative-elm utilizes tags to differentiate between different requests and connect the appropriate response. For example, if I sent a webnativeRequest tagged with “StudioGhibli”, the associated webnativeResponse will have the same tag. We can then create a branch within our GotWebnativeResponse branch’s case statement and dictate how to handle the response.
Now, both webnativeRequest and webnativeResponse require the tag to be a string not an Elm type. That is why we need such helper functions as tagFromString and its companion tagToString. Extra code on our part, yes. This is a byproduct of Elm, not the webnative-elm wrapper. In fact, this is great design by the people behind the wrapper because it couples the Webnative SDK with the strengths of Elm.
Speaking of an Elm type for our tags, we now have another red squiggle to take care of, this time on Tag. Add the following code between the type Msg and update function:
type Tag
    = ChangeMeLater
This is where we define our different webnativeRequest tags. To reiterate, we will return to this later when it is time to utilize our Tag type. We need to define Tag now so we can proceed with the rest of what the GotWebnativeResponse has to offer.
We are now ready to officially sign in!
Signing in
This is where having a Fission account is crucial. If you have yet to do so, stop and take a moment to create a Fission account (see Appendix A at the end of this article for details).
The application is growing up so fast. To implement sign in, go to the SignIn branch of the update function (section: MODEL/UPDATE) and replace Cmd.none with the following code:
permissions
    |> Webnative.redirectToLobby Webnative.CurrentUrl
    |> webnativeRequest
This will take our permissions (defined in part 2 of this series) and pass it to the Webnative function redirectToLobby.
Time to see it in action! Refresh the app in the browser and click "Login"! This will take us to a Fission authorization lobby. You will see something like this:
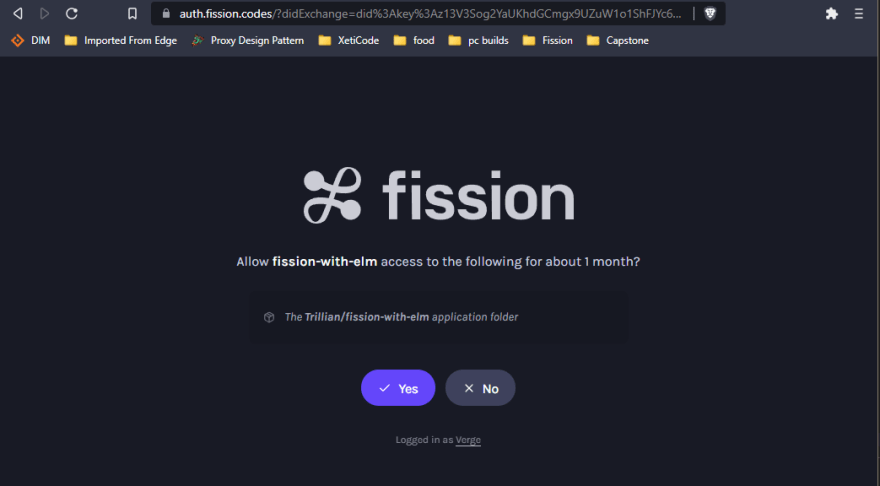
This lobby utilizes the appPermissions and fsPermissions we defined at the beginning of the Main.elm file. If there are no defined fsPermissions (like with this application), the only permission request will be for the file path generated for the application. Once you grant permission, authentication will finish.
Rather than using traditional username and password authentication (such as OAuth), Fission uses cryptographic keys and stores them in a browser you authorize with your Fission account (you can authorize multiple browsers on multiple machines). See Webnative Authentication for more information.
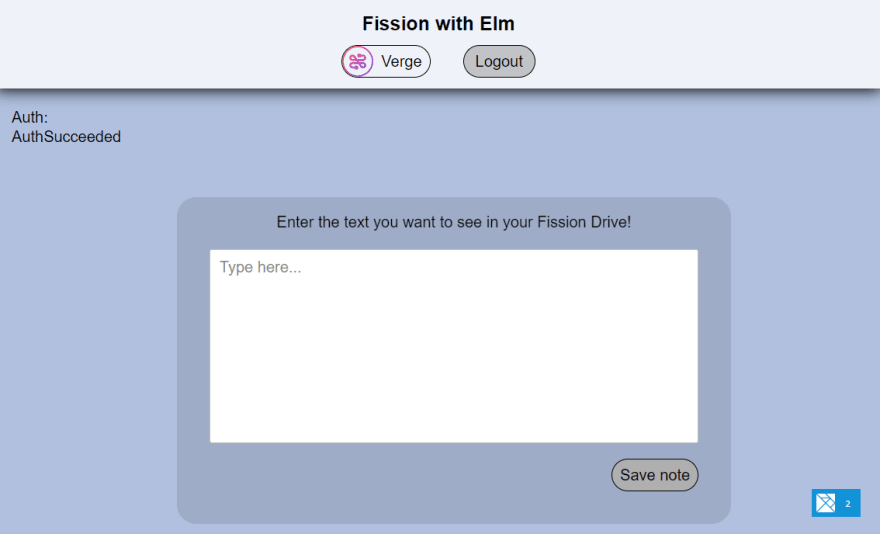
Once you have logged in and granted permission for the app to access Trillian/fission-with-elm (aka creator/name as specified in appPermissions located in the beginning of section: FISSION SETUP) in your Fission Drive, you will see this simple web page:
Before we implement signing out, I want to give a quick walkthrough of this application.
The UI
Under the “Fission with Elm” title, there are two oval-esque elements. The one on the left should display the Fission logo and your Fission username, and the one on the right is a logout button.
On the far-left side of the screen, you will see “Auth: AuthSucceeded”. When you save a note, more logs will appear here, allowing you to see the process of writing to a Fission Drive.
The center of the screen has a textbox where you can write a note and a “Save Note” button below it that will write the note to your Fission Drive. This functionality will be implemented after sign out.
In the bottom right corner, there should be a little blue rectangle which displays the Elm logo and a number. This is a button that will open the Elm debugging window.
Anyways, on to the implementation of signing out!
Signing out
The webnativeRequest port supports two types methods of signing out: Webnative.leave and Webnative.signOut (see Webnative, in the section named "Authentication").
Webnative.leave will redirect the user to a Fission logout lobby, which looks like this:

Webnative.signOut will not redirect the user to a Fission logout lobby.
To add sign out functionality, go to the SignOut branch in the update function and replace the current version of it with:
SignOut ->
    ( { model
        | username = Nothing
        , logs = "SignOut" :: model.logs
    }
    , Webnative.signOut
        |> webnativeRequest
    )
Bah-duh bing, bah-duh boom! We can now sign in and sign out! Time to see it in action. Go ahead and test the app by logging in and logging out! Pretty cool!
Next up on the docket is writing to a Fission Drive, let us dive in!
Data Storage
Writing to the Wnfs is a two-step process:
- Write the data to a file and save it in the Wnfs in the local browser storage
- Once saved locally, replicate and encrypt the data and store it in the Wnfs on the IPFS network
The following diagram depicts the write process within the context of our application:
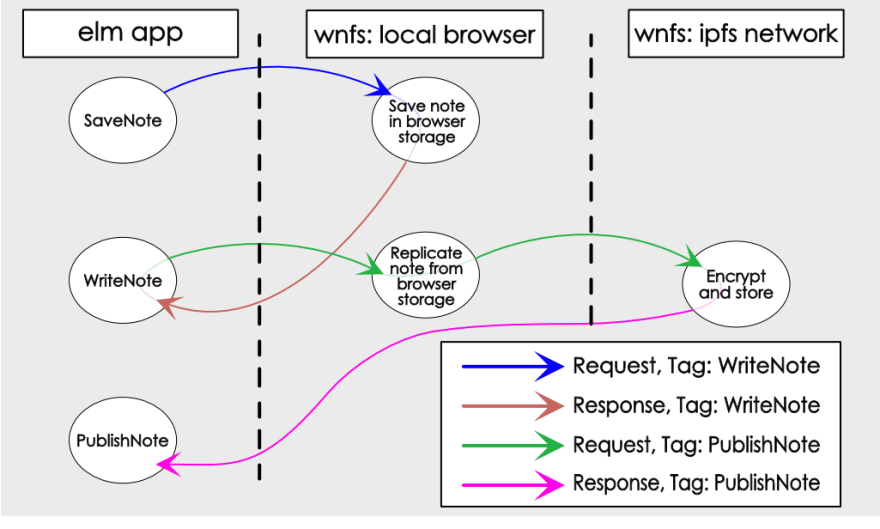
The three circles in the elm app section represent Msg and Tag variants and are milestones in the writing process. We begin by calling the SaveNote Msg variant and end in handling a tagged webnativeResponse with our PublishNote Tag variant.
We need to do the following to replicate this process in our application:
-
type Tag- Finish defining the variants for the Tag type. Once this is done, we can tag requests and appropriately handle the associated responses.
- Helper functions
- Write several helper functions to help with encoding the data and using tags.
-
updatefunction- Update various case statement branches to accommodate saving a note.
Once we get through that, our application will be complete. Let’s get started!
type Tag
This is our current state of our Tag type:
type Tag
    = ChangeMeLater
We need to swap the current variant from ChangeMeLater with two new variants: WriteNote and PublishNote. This will allow us to handle responses to the write and publish requests.
Change the type Tag to look like this:
type Tag
    = WriteNote
    | PublishNote
Helper functions
Two of these helper functions (tagFromString and tagToString) are needed simply because Elm is a strongly typed language and does not have a native way to convert type variants to strings. This gives us extra work to do before we can accomplish our goal. Fortunately for this application, our application is small and will not require much of this kind of code.
The other two helper functions (encode and save) are for encoding our note and preparing it as a Webnative.Request.
tagFromString
We can now properly finish the implementation of this function! This will allow us to convert our Type variants to strings. Replace the half-baked tagFromString with the following full-baked code:
tagFromString : String -> Result String Tag
tagFromString str =
    case str of
        "WriteNote" ->
            Ok WriteNote

        "PublishNote" ->
            Ok PublishNote
        _ ->
            Err <| "Invalid tag: " ++ str
tagToString
As promised, here is the second helper function for the tags. This will convert a Tag into a String so we may add it to the webnativeRequest. Make sure to get the spelling right AND that it matches the spellings used in tagFromString function. Add this code to the HELPERS section of the file:
tagToString : Tag -> String
tagToString tag =
    case tag of
        WriteNote ->
            "WriteNote"
        PublishNote ->
            "PublishNote"
encode
This application will write our note to a JSON file. This next helper function will JSON encode our note. Add the following code to the HELPERS section of the file:
encode : String -> Json.Encode.Value
encode note =
    Json.Encode.object
        [ ("note", Json.Encode.string note)
        ]
save
This function will take the pieces we have made in this portion of the walkthrough and use them to initiate the writing process. It will first take our note and encode it to a JSON value, prettify it, and then write it to a specified file with an associated Tag. Add the following code to the HELPERS section of the file:
save : String -> Webnative.Request
save note =
    note
        |> encode
        |> Json.Encode.encode 0
        |> Wnfs.writeUtf8
            Wnfs.Private
            { path = Path.file [ "Apps", "Trillian", "fission-with-elm", "notes", "note.json"]
            , tag = tagToString WriteNote
            }
update Function
The prep work has been laid, now we need to establish some milestones. The writing process will begin when we click the “Save Note” button, which will send a webnativeRequest tagged with WriteNote. We will then handle the associated response and then send one more webnativeRequest tagged with PublishNote. The final step will be handling the associated response.
SaveNote msg
To begin, we need to change the Cmd.none in our SaveNote update branch to a Cmd that calls our webnativeRequest port. Replace Cmd.none with the following:
webnativeRequest <| save model.note
This will begin our interaction with Webnative by writing our note to a file and then writing it to our Wnfs. The next step is to handle the response.
WriteNote handler
Our WriteNote response will be caught by our subscription to the webnativeResponse port and be redirected to the GotWebnativeResponse Msg variant. Add the following branch to GotWebnativeResponse, just before the Wnfs _ _ branch:
Wnfs WriteNote _ ->
    ( { model
        | logs = "Note Written..." :: model.logs
    }
    , ({ tag = tagToString PublishNote }
        |> Wnfs.publish
        |> webnativeRequest)
    )
This code block will add an entry to our model’s list of logs and then chain a new request to publish our updated Wnfs.
PublishNote handler
Our PublishNote response will again be caught by our subscription to the webnativeResponse port and be redirected to the GotWebnativeResponse Msg variant. In GotWebnativeResponse, replace the Wnfs _ _ branch with the following:
Wnfs PublishNote _ ->
    ( {model
        | logs = "Note Published to Fission Drive!" :: model.logs
        }
    , Cmd.none
    )
This code block will add an entry to our model’s list of logs and then do nothing because the process of writing our note to the Wnfs has reached its end. Your file will then be accessible from your Fission Drive! It may take a few seconds to propagate the data to the Drive, so be aware of that.
The Finished Project
Let’s do a quick walk through of writing to your Fission Drive. Begin by opening a new window or tab, and navigate to your Fission Drive. Once there, navigate to the fission-with-elm directory (Apps > Trillian > fission-with-elm). This directory should be empty (unless you saved a note between finishing the app and now).
Refresh the app page in the browser to make sure your browser has loaded the latest compiled version of the app from the server. Now, navigate to the “Fission with Elm” application and add some text to the input field in the app. It can be as quick as “asdf” or as creative as “test”, it is up to you. Once you have done so, click the “Save Note” button and then navigate back to your Fission Drive. As a reminder, it can take a few seconds for the new note to propagate to your Drive. Once a note has been written, there should appear a new directory within the fission-with-elm directory called notes. Enter that directory and you will see a JSON file entitled note. If you click on it, you will see the contents of the file in a preview window located on the right side of the screen. Like so:

Voilà!
The End of a Trilogy
There is not much reading left now. And I can guarantee this ending is not as satisfying as the end of watching the Lord of the Rings trilogy for the umpteenth time… But hey, we made it. The “Fission with Elm” demonstration app is now fully functioning, and you now have a better grip on the basics of integrating Fission into your code.
In the first part of this series, I showed you how to set up Vite to manage Elm applications. This was the foundation of the application. In the second part, I showed you how to integrate Fission into an Elm project via the webnative-elm module. This highlighted the structure of Fission integration. This third part took what was established in the previous two parts and demonstrated some of the processes of Fission.
I hope you have found this series of articles helpful as you begin to build Fission-based applications in Elm!
Feel free to email any questions you may have to info@xeticode.com and my team and I will answer as promptly as we can :)
Appendix A
Creating a Fission account
- Go to https://fission.codes/
- Click on the "Sign up" button (located in the top portion of the screen)
- Click "Create account"
- Enter an email and desired username into the fields
- Click "Get started"
- Follow the instructions on your screen to link your account to another device!


Top comments (2)
Thanks for pointing this out @improvement_addict !
It's been a while since I checked in on Fission related things
Looks like this guide does not work anymore, as
webnative-elmis abandoned :(