This is a submission for the Pulumi Deploy and Document Challenge: Get Creative with Pulumi and GitHub
What I Built
I built pulstack (pulumi+stack), a CLI tool that lets you deploy static websites either to:
- ☁️ AWS S3 + CloudFront
- 🌐 GitHub Pages
All powered by Pulumi Automation API, GitHub, and AWS.🙌
With one command, you go from a folder of static files to a live website in less than one minute🕛. No need of writing any code or No clicking around GitHub. 100% Automated 🙂
How It Works
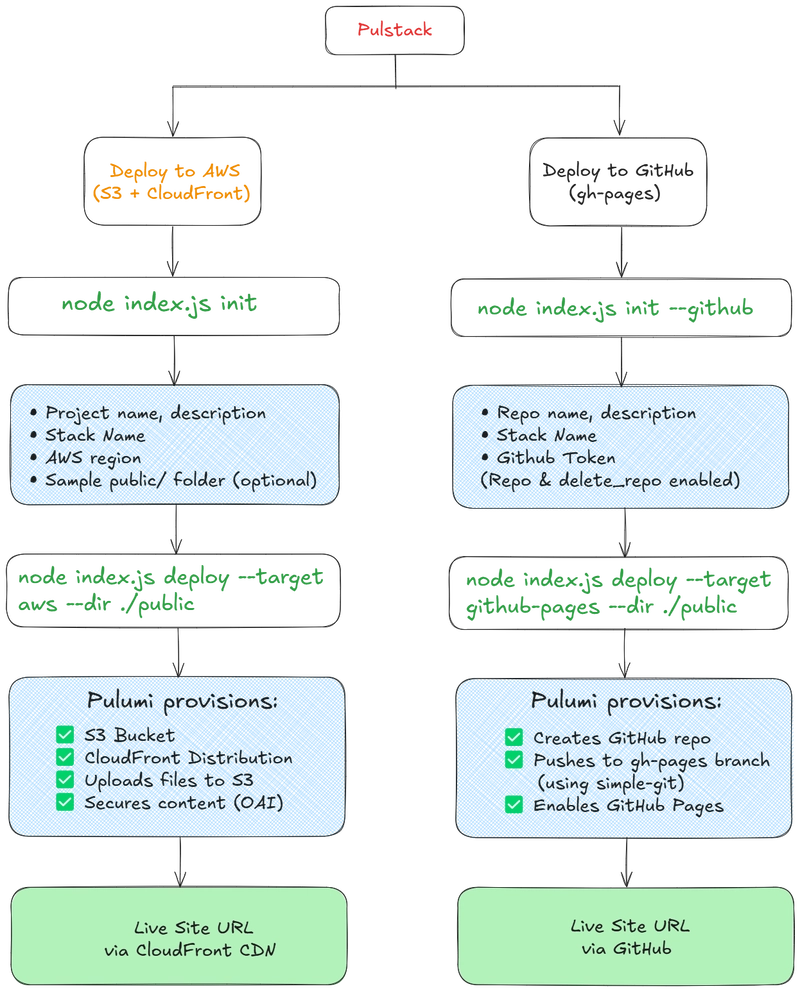
It’s a 2-step flow, depending on what you’re targeting:
For GitHub Pages:
node index.js init --github
# prompts for GitHub token and repo info

node index.js deploy --target github-pages --dir ./public
# creates repo, pushes gh-pages branch, enables github Pages
For AWS (S3 + CloudFront):
node index.js init
# prompts for project name, stack name, and AWS region

node index.js deploy --target aws --dir ./public
# provisions an S3 bucket, uploads files, sets up CloudFront distro
It uses Pulumi’s Automation API under the hood to manage stacks, config, resources, and output all in code — no YAML.
Live Demo Link
AWS (S3 + CloudFront) - https://d2egzle4eseb4p.cloudfront.net/
GitHub Pages - https://kiran1689.github.io/pulumi-testing/
GitHub Repo created by Pulumi Automation - https://github.com/Kiran1689/pulumi-testing
Project Repo
⚡ Pulstack – Instant Static Site Deployment with Pulumi
pulstack is a developer-friendly tool that lets you deploy static websites to AWS (S3 + CloudFront) or GitHub Pages with zero configuraton. It uses Pulumi under the hood to treat infrastructure as code, so your deployments are fully automated and version-controlled.
🧑💻 Who Is This For?
Pulstack is perfect if you:
- Have a static website (HTML/CSS/JS or React/Vite/Next.js build)
- Want to deploy to AWS (S3+CloudFront) or GitHub Pages in 1 command
- Don’t want to write YAML, CloudFormation, or Terraform
- Like simple CLI workflows with guided and simple prompts
✨ Features
-
🚀 Deploy static sites to AWS S3 with CloudFront CDN
-
🌍 Automatically create Repo and publish to GitHub Pages
-
🔒 Secure AWS deployments using best practices (no public buckets!)
-
💡 Clean CLI prompts to guide you through setup
-
🧨 One-command destroy of your whole stack when you're done
📦 Prerequisites
You…
My Journey
This I started as a fun weekend challenge to explore the Pulumi Automation API. Initially, I just wanted to automate AWS S3 site deploys. But then I thought — why stop there? Let’s do GitHub Pages too.
Why Pulstack?🤔
When I ran pulumi new aws-javascript, it generated the default Pulumi YAML files and a basic index.js where I had to manually define the S3 bucket, policy, CloudFront distribution, etc.
So I decided to build Pulstack, a zero-config CLI where you answer a few prompts and boom: it handles stack creation, configuration, deployment, and even GitHub repo setup (if you’re going the Pages route).
Here’s how it went:👇
🛠️ The Setup Before the Fun
Before I could dive into coding Pulstack, I had to make sure all the right tools were in place. If you’ve ever worked with Pulumi or AWS before, you know there's a bit of prep involved — but once it's done, the automation possibilities are worth it.
🔧 Installing Pulumi
First things first — Isntall Pulumi.
Form here - https://www.pulumi.com/docs/iac/download-install/
This gave me access to Pulumi's commands locally, and I logged in using:
pulumi login
🌐 AWS Setup
Since I was deploying to AWS S3 and CloudFront, I needed the AWS CLI and credentials with the right permissions.
I created a dedicated IAM user with access to S3, CloudFront, and IAM read permissions. That way, Pulumi could provision everything cleanly during stack deployment. Provide AdministratorAccess for the IAM user.
I installed the AWS CLI and ran:
aws configure
Then configured the AccessKey ID, Secret and Default origin.
🔑 GitHub Token (For Pages Deployments)
When I added support for GitHub Pages deploys, I realized I’d need to interact with the GitHub API — so a Personal Access Token was essential.
I generated one with repo and delete_repo scope from my GitHub account settings and stored it safely. Pulstack later prompts for this when initializing a GitHub-based stack.
At this point, I had all the things ready: Pulumi CLI installed, AWS CLI configured, GitHub token on hand. Time to start building.
👷♂️ Building Pulstack
📁 index.js
I started off by setting up the CLI with commander.js. Its simple, lightweight, and does exactly what I need.
#!/usr/bin/env node
const { Command } = require("commander");
const { deploy } = require("./deploy");
const { destroy } = require("./destroy");
const { initProject } = require("./init");
const { deployGithub  } = require("./deployGithub");
const program = new Command();

program
  .name("pulstack")
  .description("Deploy static site to AWS S3  or GitHub using Pulumi instantly")
  .version("0.1.0");

  program
  .command("deploy")
  .description("Deploy static site to AWS or GitHub Pages")
  .requiredOption("-d, --dir <path>", "Path to static site files")
  .option("-e, --env <name>", "Environment/stack name", "dev")
  .option("-t, --target <provider>", "Target platform: aws | github-pages", "aws")
  .action(async (opts) => {
    const target = opts.target;

    if (target === "github-pages") {
      await deployGithub(opts.dir);
    } else if (target === "aws") {
      await deploy(opts.dir, opts.env);
    } else {
      console.error(`❌ Unsupported target: ${target}`);
      process.exit(1);
    }
  });

program
.command("init")
.description("Initialize project and config")
.option("--github", "Initialize for GitHub Pages")
.action(async (opts) => {
await initProject({ github: opts.github });
});

program
.command("destroy")
.description("Destroy project")
.action(async () => {
await destroy();
});

program.parse();
The CLI has three main commands:
init– sets up the Pulumi project configdeploy– handles deployments to AWS or GitHub Pagesdestroy– To destroy the stack you created
Depending on the target platform passed via --target, it routes to either AWS (deploy.js) or GitHub Pages (deployGithub.js). I also made the static folder path a required option so users don’t forget it.
init.js
Before anything gets deployed, we need to gather some info — and that’s what init.js handles. It sets up the project depending on whether you want to deploy to AWS or GitHub Pages.
const fs = require("fs");
const path = require("path");
const prompts = require("prompts");
const { LocalWorkspace } = require("@pulumi/pulumi/automation");
const { execSync } = require("child_process");

function checkCLI(command, name) {
  try {
    execSync(command, { stdio: "ignore" });
    console.log(`✅ ${name} CLI is installed`);
    return true;
  } catch {
    console.error(`❌ ${name} CLI is not installed. Please install it first.`);
    return false;
  }
}

function checkPulumiLogin() {
  try {
    const user = execSync("pulumi whoami", { stdio: "pipe" }).toString().trim();
    console.log(`🔐 Logged in as ${user}`);
    return true;
  } catch {
    console.error("⚠️  Pulumi CLI is not logged in. Run `pulumi login` and try again.");
    return false;
  }
}

function checkAwsConfigured() {
  try {
    const identity = execSync("aws sts get-caller-identity", { stdio: "pipe" }).toString();
    const parsed = JSON.parse(identity);
    console.log(`🧾 AWS Configured for Account: ${parsed.Account}, ARN: ${parsed.Arn}`);
    return true;
  } catch {
    console.error("❌ AWS CLI is not configured. Run `aws configure` with your IAM credentials first.");
    return false;
  }
}

async function initProject(options = {}) {
  const useGitHub = options.github || false;

  console.log("🔍 Checking environment...");
  const PulumiCheck = checkCLI("pulumi version", "Pulumi");
  if (!PulumiCheck) process.exit(1);

  if (useGitHub) {
    const { repoName, description, deployDir, stackName, githubToken } = await prompts([
      {
        type: "text",
        name: "repoName",
        message: "GitHub repo name:",
        initial: path.basename(process.cwd()),
      },
      {
        type: "text",
        name: "description",
        message: "Repo description:",
      },
      {
        type: "text",
        name: "deployDir",
        message: "Directory to deploy (e.g., ./build):",
        initial: "./build",
      },
      {
        type: "text",
        name: "stackName",
        message: "Stack name:",
        initial: "github-pages",
      },
      {
        type: "password",
        name: "githubToken",
        message: "Enter your github token",
      },
    ]);

    const githubConfig = {
      projectName: repoName,
      description,
      deployDir,
      stackName,
      githubToken,
      target: "github",
    };

    fs.writeFileSync("config.json", JSON.stringify(githubConfig, null, 2));
    console.log("✅ GitHub Pages project initialized and saved to config.json");
    return;
  }

  // For AWS S3 setup
  const hasAws = checkCLI("aws --version", "AWS");
  const isPulumiLoggedIn = checkPulumiLogin();
  const isAwsConfigured = checkAwsConfigured();

  if (!hasAws || !isPulumiLoggedIn || !isAwsConfigured) {
    process.exit(1);
  }

  const response = await prompts([
    {
      type: "text",
      name: "projectName",
      message: "Project name:",
      initial: "Pulumi",
    },
    {
      type: "text",
      name: "stackName",
      message: "Stack name:",
      initial: "dev",
    },
    {
      type: "text",
      name: "projectDescription",
      message: "Project Description:",
      initial: "This is a cool project",
    },
    {
      type: "text",
      name: "region",
      message: "AWS region:",
      initial: "us-east-1",
    },
    {
      type: "confirm",
      name: "generateSite",
      message: "Create a sample index.html?",
      initial: true,
    },
  ]);

  const config = {
    projectName: response.projectName,
    stackName: response.stackName,
    projectDescription: response.projectDescription,
    region: response.region,
    target: "aws",
  };

  fs.writeFileSync("config.json", JSON.stringify(config, null, 2));
  console.log("📦 Saved all config → config.json");

  // Create sample static site
  const publicDir = path.join(process.cwd(), "public");
  if (response.generateSite && !fs.existsSync(publicDir)) {
    fs.mkdirSync(publicDir);
    fs.writeFileSync(
      path.join(publicDir, "index.html"),
      `<html><body><h1>Pulumi is awesome broo!🔥</h1></body></html>`
    );
    console.log("🌐 Created sample static site in ./public/");
  }

  // Initialize Pulumi stack for AWS only
  const stack = await LocalWorkspace.createOrSelectStack({
    stackName: response.stackName,
    projectName: response.projectName,
    program: async () => {},
  });

  await stack.setConfig("aws:region", { value: response.region });
  console.log("✅ Pulumi stack initialized!");
}

module.exports = { initProject };
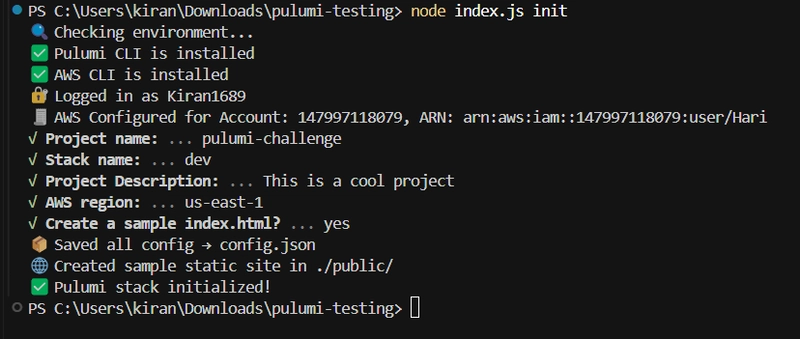
Once you run:
node index.js init
# or
node index.js init --github
It does the following:
✅ Checks for required CLIs (Pulumi, AWS CLI)
🧠 Validates Pulumi login and AWS credentials (for AWS mode)
🗣️ Prompts you for config, like project name, stack name, region, and target(GitHub Access Token if you want to deploy on GitHub)
📝 Saves everything to config.json — so you don’t have to answer again
🌐 (Optional) Creates a sample index.html in a public/ folder, so you can test deployments instantly
Make sure that the IAM user has necessary permissions and also GitHub token has the
repoanddeletepermissions. Visit my GitHub repo to see all the required permissions.

📁 pulumiProgram.js – Infra as Code
Here I am defining all the AWS infra as code.
// pulumiProgram.js
"use strict";

const aws = require("@pulumi/aws");
const pulumi = require("@pulumi/pulumi");
//const mime = require("mime");
const fs = require("fs");
const path = require("path");

function createPulumiProgram(staticDir) {
  return async () => {
    // Create a bucket and expose a website index document

    const config = JSON.parse(fs.readFileSync("config.json", "utf-8"));
    const bucketName = config.projectName;

    let siteBucket = new aws.s3.BucketV2(bucketName, {});

    let siteBucketWebsiteConfig = new aws.s3.BucketWebsiteConfigurationV2("s3-website-bucket-config", {
        bucket: siteBucket.id,
        indexDocument: {
            suffix: "index.html",
        },
    });

    new aws.s3.BucketPublicAccessBlock("public-access-block", {
        bucket: siteBucket.id,
        blockPublicAcls: true,
        blockPublicPolicy: true,
        ignorePublicAcls: true,
        restrictPublicBuckets: true,

    });

    // Create CloudFront Origin Access Identity
    const oai = new aws.cloudfront.OriginAccessIdentity("pulumi-oai", {
        comment: `Access Identity for ${bucketName}`,
      });

    // Upload files from the staticDir
    const files = fs.readdirSync(staticDir);
    for (const file of files) {
      const filePath = path.join(staticDir, file);
      const contentType = getMimeType(file);

      new aws.s3.BucketObject(file, {
        bucket: siteBucket,
        source: new pulumi.asset.FileAsset(filePath),
        contentType,
      });
    }

    const addFolderContents = (staticDir, prefix) => {
        for (let item of fs.readdirSync(staticDir)) {
          let filePath = path.join(staticDir, item);
          let isDir = fs.lstatSync(filePath).isDirectory();

          // This handles adding subfolders and their content
          if (isDir) {
            const newPrefix = prefix ? path.join(prefix, item) : item;
            addFolderContents(filePath, newPrefix);
            continue;
          }

          let itemPath = prefix ? path.join(prefix, item) : item;
          itemPath = itemPath.replace(/\\/g,'/');             // convert Windows paths to something S3 will recognize

          let object = new aws.s3.BucketObject(itemPath, {
            bucket: siteBucket.id,
            source: new pulumi.asset.FileAsset(filePath),     // use FileAsset to point to a file
            contentType: getMimeType(filePath), // set the MIME type of the file
          });
        }
    }


    // Attach bucket policy for OAI
    new aws.s3.BucketPolicy("pulumi-bucket-policy", {
        bucket: siteBucket.bucket,
        policy: pulumi.all([siteBucket.bucket, oai.iamArn]).apply(([bucket, iamArn]) =>
          JSON.stringify({
            Version: "2012-10-17",
            Statement: [
              {
                Effect: "Allow",
                Principal: { AWS: iamArn },
                Action: "s3:GetObject",
                Resource: `arn:aws:s3:::${bucket}/*`,
              },
            ],
          })
        ),
      });

      // Upload static files
      const uploadFiles = (dir, prefix = "") => {
        for (const item of fs.readdirSync(dir)) {
          const filePath = path.join(dir, item);
          const stat = fs.statSync(filePath);

          if (stat.isDirectory()) {
            uploadFiles(filePath, path.join(prefix, item));
          } else {
            const relativePath = path.join(prefix, item).replace(/\\/g, "/");

            new aws.s3.BucketObject(relativePath, {
              bucket: siteBucket.id,
              source: new pulumi.asset.FileAsset(filePath),
              contentType: getMimeType(filePath),
            });
          }
        }
      };

      uploadFiles(staticDir);

      // CloudFront Distribution
      const distribution = new aws.cloudfront.Distribution("pulumi-cdn", {
        enabled: true,
        defaultRootObject: "index.html",
        origins: [
          {
            originId: siteBucket.arn,
            domainName: siteBucket.bucketRegionalDomainName,
            s3OriginConfig: {
              originAccessIdentity: oai.cloudfrontAccessIdentityPath,
            },
          },
        ],
        defaultCacheBehavior: {
          targetOriginId: siteBucket.arn,
          viewerProtocolPolicy: "redirect-to-https",
          allowedMethods: ["GET", "HEAD"],
          cachedMethods: ["GET", "HEAD"],
          forwardedValues: {
            queryString: false,
            cookies: { forward: "none" },
          },
          compress: true,
        },
        priceClass: "PriceClass_100",
        restrictions: {
          geoRestriction: {
            restrictionType: "none",
          },
        },
        viewerCertificate: {
          cloudfrontDefaultCertificate: true,
        },
      });

      return {
        bucketName: siteBucket.bucket,
        cloudfrontUrl: distribution.domainName.apply((domain) => `https://${domain}`),
      };
  };
}
// Simple mime type guesser
function getMimeType(file) {
    if (file.endsWith(".html")) return "text/html";
    if (file.endsWith(".css")) return "text/css";
    if (file.endsWith(".js")) return "application/javascript";
    if (file.endsWith(".json")) return "application/json";
    if (file.endsWith(".png")) return "image/png";
    if (file.endsWith(".jpg") || file.endsWith(".jpeg")) return "image/jpeg";
    return "text/plain";
}

module.exports = { createPulumiProgram };
🪣
S3 Bucket Creation: First, we create an S3 bucket to host the static files.🚫
Blocking Public Access(For Security): To keep it private, we block all public access by default.🕵️
CloudFront OAI (Origin Access Identity): Instead of making the bucket public, we use a CloudFront OAI to access the bucket securely. That means only CloudFront can fetch objects from S3.📂
Upload Static Files: Then it recursively uploads everything from the provided --dir into the S3 bucket, preserving folder structure and setting proper MIME types. I wrote a customuploadFiles()function for this.
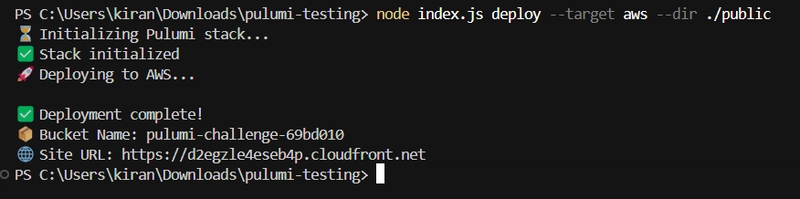
🚀 deploy.js – Deployment to AWS with Just One Command
This file is what gets executed when the user runs:
node index.js deploy --target aws --dir ./public
NOTE: I'm using
./publicdir here but you can pass any directory.
e.g If you have built a react app, you should pass./builddir here.
// deploy.js
const { LocalWorkspace } = require("@pulumi/pulumi/automation");
const path = require("path");
const fs = require("fs");
const { createPulumiProgram } = require("./pulumiProgram");

async function deploy(staticDir) {
  if (!fs.existsSync(staticDir)) {
    console.error(`Directory "${staticDir}" does not exist.`);
    process.exit(1);
  }

  const configPath = path.resolve("config.json");

    if (!fs.existsSync(configPath)) {
      console.error("❌ Missing config.json – have you run `init`?");
      process.exit(1);
    }

    const config = JSON.parse(fs.readFileSync(configPath, "utf8"));

    //const token = process.env.PULUMI_ACCESS_TOKEN || config.pulumiAccessToken;
    const stackName = config.stackName;
    const projectName = config.projectName;

  console.log("⏳ Initializing Pulumi stack...");

  const stack = await LocalWorkspace.createOrSelectStack({
    stackName,
    projectName,
    program: createPulumiProgram(staticDir),
  });

  console.log("✅ Stack initialized");

  await stack.setConfig("aws:region", { value: config.region || "us-east-1" });

  console.log("🚀 Deploying to AWS...");
  const upRes = await stack.up();

  console.log("\n✅ Deployment complete!");
  console.log(`📦 Bucket Name: ${upRes.outputs.bucketName.value}`);
  console.log(`🌐 Site URL: ${upRes.outputs.cloudfrontUrl.value}`);
}

module.exports = { deploy };
TL;DR
✅ Reads static site and config
🛠️ Provisions infra via Pulumi Automation
📡 Uploads all files to s3 bucket
🌐 Returns live site URL – all in one command
🚀 deployGithub.js – Deploy to GitHub Pages in One Shot
This function automates the full lifecycle of a GitHub Pages deployment:
node index.js deploy --target github-pages --dir ./public
NOTE: I'm using
./publicdir here but you can pass any directory.
e.g If you have built a react app, you should pass./builddir here.
const fs = require("fs");
const path = require("path");
const { LocalWorkspace } = require("@pulumi/pulumi/automation");
const simpleGit = require("simple-git");
require("dotenv").config();

async function deployGithub() {
  const configPath = path.resolve("config.json");

  if (!fs.existsSync(configPath)) {
    console.error("❌ Missing config.json – please run `init` first.");
    process.exit(1);
  }

  const config = JSON.parse(fs.readFileSync(configPath, "utf8"));
  const { projectName, description, deployDir, stackName } = config;

  let enablePages = false;
  let fullName = "";
  let repoUrl = "";

  if (!fs.existsSync(deployDir)) {
    console.error(`❌ Deploy directory "${deployDir}" does not exist.`);
    process.exit(1);
  }

  const token = process.env.GITHUB_TOKEN || config.githubToken;
  if (!token) {
    console.error("❌ GitHub token not found. Please set GITHUB_TOKEN as an env variable.");
    process.exit(1);
  }

  const program = async () => {
    const github = require("@pulumi/github");

    const repo = new github.Repository(projectName, {
      name: projectName,
      description,
      visibility: "public",
      ...(enablePages && {
        pages: {
          source: {
            branch: "gh-pages",
            path: "/",
          },
        },
      }),
    });

    return {
      repoUrl: repo.htmlUrl,
      fullName: repo.fullName,
    };
  };

  const stack = await LocalWorkspace.createOrSelectStack({
    stackName,
    projectName,
    program,
  });

  await stack.setAllConfig({
    "github:token": { value: token, secret: true },
  });

  console.log("📦 Creating GitHub repo...");
  const result = await stack.up();
  fullName = result.outputs.fullName.value;
  repoUrl = result.outputs.repoUrl.value;
  console.log("✅ GitHub repo created:", repoUrl);

  // Step 2: Push static site to gh-pages
  console.log("📤 Pushing site content to `gh-pages` branch...");
  const git = simpleGit(deployDir);
  await git.init();
  await git.checkoutLocalBranch("gh-pages"); // ✅ Create gh-pages branch
  await git.add(".");
  await git.commit("Deploy to GitHub Pages from statik");

  const remotes = await git.getRemotes(true);
  if (remotes.find(r => r.name === "origin")) {
    await git.removeRemote("origin");
  }
  await git.addRemote("origin", `https://github.com/${fullName}`).catch(() => {});
  await git.push("origin", "gh-pages", ["--force"]);

  // Step 3: Enable GitHub Pages
  console.log("🌍 Enabling GitHub Pages...");
  enablePages = true;
  const updatedStack = await LocalWorkspace.createOrSelectStack({
    stackName,
    projectName,
    program,
  });

  await updatedStack.setAllConfig({
    "github:token": { value: token, secret: true },
  });

  await updatedStack.up(); // ✅ re-run with updated program


  const [owner, repoName] = fullName.split("/");
  const siteUrl = `https://${owner.toLowerCase()}.github.io/${repoName}/`;
  console.log(`🎉 GitHub Pages deployed at: ${siteUrl}`);
}

module.exports = { deployGithub };
✅ Creates a repo via Pulumi
✅ Pushes static content to gh-pages (used simple-git to manage git pushes programmatically.)
✅ Enables GitHub Pages via Pulumi
✅ Outputs a live site URL

I followed the two-step process to enable GitHub Pages:
First, create the repo
without pagessetPush the static content to the
gh-pagesbranchThen re-run the
Pulumiprogram with pages enabled
Why? Because GitHub Pages requires the branch to exist first before Pulumi can activate it
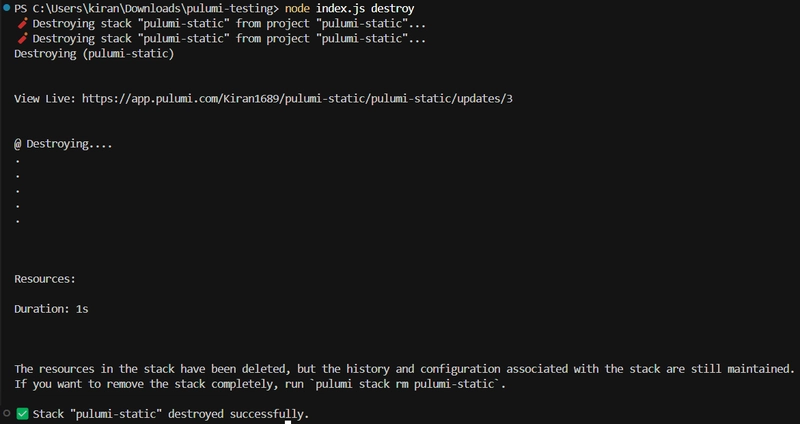
🔥 destroy.js – Destroys the stacks
This function will destroy the stack which is present in the config file.
const fs = require("fs");
const path = require("path");
const { LocalWorkspace } = require("@pulumi/pulumi/automation");

async function destroy() {
  const configPath = path.resolve("config.json");

  if (!fs.existsSync(configPath)) {
    console.error("❌ Missing config.json – have you run ` init`?");
    process.exit(1);
  }

  const config = JSON.parse(fs.readFileSync(configPath, "utf8"));

  //const token = process.env.PULUMI_ACCESS_TOKEN || config.pulumiAccessToken;
  const stackName = config.stackName;
  const projectName = config.projectName;

  console.log(`🧨 Destroying stack "${stackName}" from project "${projectName}"...`);

  const stack = await LocalWorkspace.selectStack({
    stackName,
    projectName,
    program: async () => {}, // noop
  });

  await stack.destroy({ onOutput: console.log });

  console.log(`✅ Stack "${stackName}" destroyed successfully.`);
}

module.exports = { destroy };
By running:
node index.js destroy
The stack name and project name will be fetched from the config.json file.
Challenges Faced
Biggest challenge? GitHub Pages needs the gh-pages branch to exist before you enable it. That was super annoying. I ended up creating the repo first, pushing the site content, and then updating the repo again to enable Pages.
GitHub Access Token Permission for
deletingthe Repo when you rundestroycommandGetting CloudFront to work with private S3 buckets required setting up a (OAI) and properly configuring the S3 bucket policy to allow access via that identity. So, I reviewed the AWS documentation and carefully constructed a Pulumi-based BucketPolicy that grants s3:GetObject permission specifically to the OAI. Once configured properly, it worked correctly..
What I Learned
- Pulumi is powerful tool - being able to define infra as code in JavaScript (supports many languages) and deploy it programmatically made automation feel seamless.
- To be honest, I never defined infra as code before. I always used direct aws GUI but after using pulumi I learned it.
- Also never used simple-git and made commits and push programatically.
I started with a simple idea of automating but ended up with lot of learnings and handy CLI tool 🙌
Currently it supports only AWS cloud but I will be adding Azure and GCP as well so that user can choose on which cloud service they want to deploy.
Using Pulumi with GitHub
In this project, I used Pulumi to automate the creation and management of cloud(AWS) and GitHub infrastructure—making it easy to go from local code to a live site with just a single command.
🛠 What I Used Pulumi For?
AWS Deployment:
Pulumi provisions an S3 bucket (with static website hosting), sets up a CloudFront distribution, and securely connects them using an Origin Access Identity (OAI).
GitHub Repository Management:
Using the Pulumi GitHub provider, I automated:
Creating a public repo from code
Pushing content to the gh-pages branch
Enabling GitHub Pages for instant static hosting
Used Pulumi inlinePrograms for stacks.
Pulumi Copilot
I used the Debug with Copilot feature in Pulumi dashboard whenever stack updates failed. It analyzed the problem and provided me the cause of stack failure 🙂
Thanks for this opportunity🫶


Top comments (18)
Great project. Integration with the gh cli tool would be incredible. You seem to rely on the classic tokens, since fine-grained token will be defined by a repo, so no instant repo unless you using the gh tool. You should update your repo README based on the tutorial. Your instructions in your README in our repo for installing pullstack seem to assume you're running aws, and that pullstack is already installed? Of course would be nice to be able to simply npm i pullstack --template? I guess node install etc will have to do for now. Ps: I also put up a gh-pages pun project this weekend (inspired by the zx posting on Dev) was not aware I could do this for every repo!
Hi
Since this is not a npm package you need to clone the repo & install the dependencies..
If you are going with (Pulumi+AWS) or (Pulumi+Github) in both the cases Pulumi needs to be installed and aws cli only if you want to host on aws s3...
I designed in such way that even for (Pulumi+AWS) or (Pulumi+Github) you just needs to pass you build files(copy-paste your build folder to the cloned repo) so it will upload all your build files and host instantly.
I Totally agree that an easier npm pulstack experience would make it way more approachable..
definitely going to iterate on this!
Thanks for checking!! :)
Awesome Kiran🔥
Thanks Nick🫡
Fun!
🙌
Amazing article, thanks for explaining
Thanks for checking Nadeem!
Thanks for this detailed guide Kiran
Thanks for reading :)
Congrats, this was a cool project and looks very useful for spinning sites up quickly
Thankyou!!
Happy to hear that :)
Nice! This is interesting
Thanks for checking!!!
Not a minute activity but good work...
Thanks Sahil!
Awesome Kiran, You can also add support for existing websites and then we can use Pulstack in CI/CD pipelines as well.
Really appreciate the suggestion🙌
Thanks so much! :)
Some comments may only be visible to logged-in visitors. Sign in to view all comments.