
Tinkering with hardware projects is one of my absolute favorite hobbies. Of course I love to write software, but there is something about being able to interface with the physical world that takes it to another level for me. In this post, we'll take a look at one of my latest personal projects that I've been working on lately and see how I've taken my hardware tinkering to the next level with a custom printed circuit board.
A little over a year ago, I got my hands on some EasyNixe boards and some IN-12 nixie tubes. I've always been fascinated by the warm glow of a nixie tube, but they have high voltage requirements and until I found the EasyNixie boards I hadn't found a decent way to work with them from a simple microcontroller like an Arduino. These boards greatly simplify the process by requiring just a few wires for signaling and a low-voltage (3.3V) input that the board steps up to the 200V needed to run the tubes. They do take a bit of soldering, since the tubes aren't included, but once you've soldered the tubes to the boards you are ready to plug them into a breadboard and get started with some code to set the tubes and use them in whatever project you'd like.
The code library itself was created by the same person who created the hardware boards is really easy to work with. Just include the library, define the hardware pins, set the value and latch it.
#include "EasyNixie.h"    //Nixie library

#define OUT_EN 3   //connect Pin ArduinoUNO 3 to OUT_EN
#define SHCP   2   //connect Pin ArduinoUNO 2 to SHCP
#define STCP   6   //connect Pin ArduinoUNO 6 to STCP
#define DSIN   7   //connect Pin ArduinoUNO 7 to DSIN
EasyNixie en(OUT_EN,SHCP, STCP, DSIN);

void loop(){
  en.SetNixie(0,0,false);
  en.Latch();
}
After the initial excitement of getting the modules and playing around with them a bit, I shoved them aside a bit until I could come up with the motivation to use them in a fun project. Unfortunately, I've sill not come with a great project to use them in. I'm thinking of something like a live stream view counter, or social media follower display. However, I did recently find an excuse to play around with the modules a bit more. The EasyNixie boards are great, but when you've got a few wired in series it tends to become a giant spaghetti cluster of jumper wires which don't look all that great.
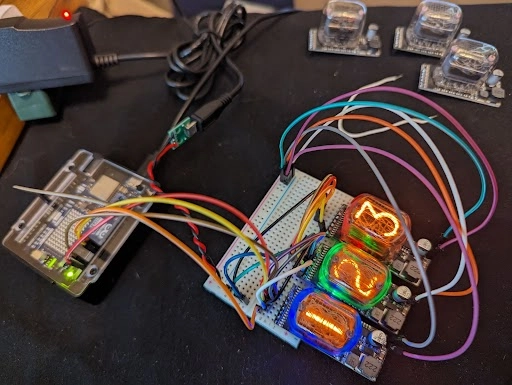
I decided to address this issue and design a carrier board that could be used to simplify the wiring between my 6 EasyNixie modules. I've always been a bit intimidated by custom PCB design, so I figured a simple project like this would be a great way to learn a bit about designing a board. After taking some measurements, I ended up with the following design.
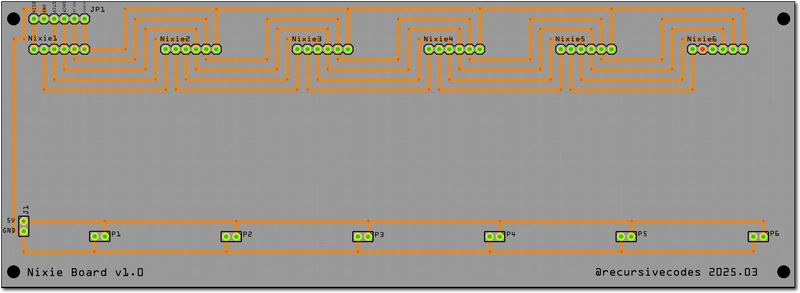
There are 6 pads in the top left that handle the incoming connections from the microcontroller, and 6 slots for the male header pins from the EasyNixie modules. Two more pins at the bottom left accept 3.3V-5V and ground and distribute those to the power and ground for each module. It's a simple design, with just tracks and pins and no on board components, but it helped me to learn the process and the end result is a clean board with no jumper wires for connecting the boards in series.
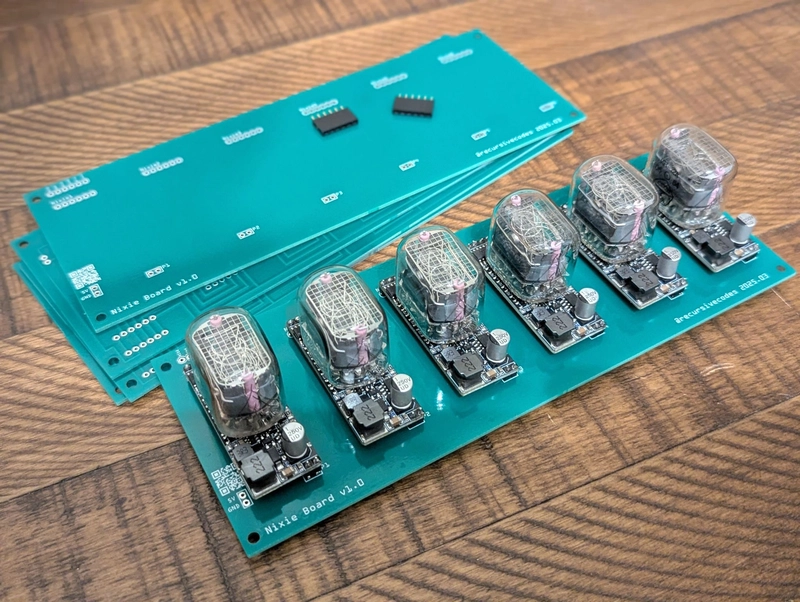
I submitted the Gerber files to a popular PCB manufacturer, paid around $20 for 5 boards, and a week later I had the boards in hand. I slotted the modules into the carrier boards to confirm my measurements and was ready to use the boards.
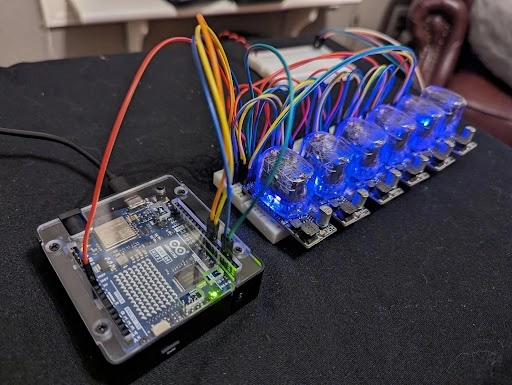
Rather than soldering the modules directly to my carrier boards, I decided to order some pin headers so that the modules could be swapped in and out as needed just in case something went horribly wrong. You never know! Here's how the board looks with the modules slotted into the headers.
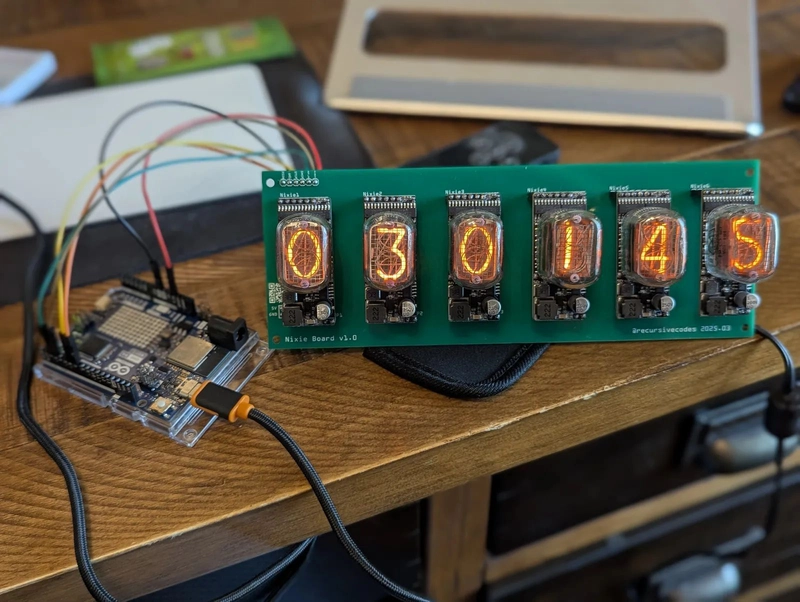
The next step will be to design and build a case to combine the carrier board and the Arduino into a nice final package, but I'm happy with the progress so far. The spaghetti jumpers are gone, and now it's just a few wires from the Arduino to the carrier board.
Programmatically Setting the Nixie Tubes From the Web
As you can see above, it is easy to set the values within the Arduino sketch. Depending on what you want to display, you could poll an HTTP endpoint in the loop() function and use the result to set the tubes. I wanted to test out a different method and build a simple web interface that could be used to set the tube values and the color from a remote application. I know that the typical, trusted (and easiest) way to send remote data to an Arduino is via MQTT, but I wanted to try a different approach.
Gaining Momento...
I've worked with Momento Topics in the past, and I'm a huge fan of how simple they make pub/sub (and other things like caching data really easy too). Typically in your web or mobile projects you'd use their SDKs for pub/sub (which are really great, by the way!), but a few months ago they released an HTTP API for pub/sub - and it's just as easy as using an SDK in environments where the SDK just isn't a possibility - like in an Arduino sketch!
How It Works
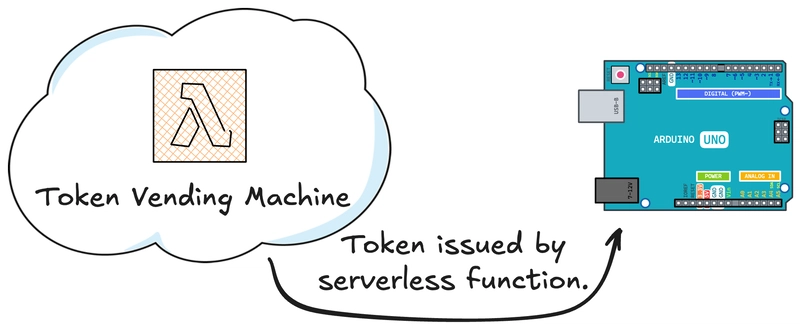
The Arduino connects to WiFi and makes an HTTP request for an authentication token that will be used for the subscription request to Momento.
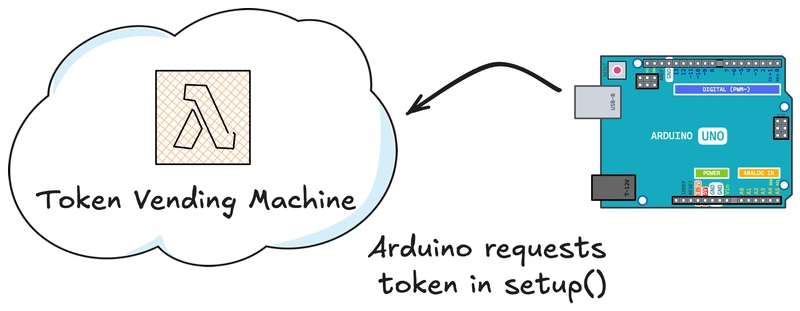
The serverless function returns the auth token to the Arduino
void setup() {
  Serial.begin(115200);
  while (status != WL_CONNECTED) {
    Serial.println("Connecting to WiFi network...");
    status = WiFi.begin(WIFI_SSID, WIFI_PASS);
    delay(100);
  }
  Serial.println("Getting auth token...");
  StaticJsonDocument<550> tokenJson;
  String tokenResult;
  // use blocking request for initial token
  makeRequest(tokenEndpoint, "/prod", &tokenResult);
  deserializeJson(tokenJson, tokenResult);
  token = String((const char*)tokenJson["authToken"]);
}
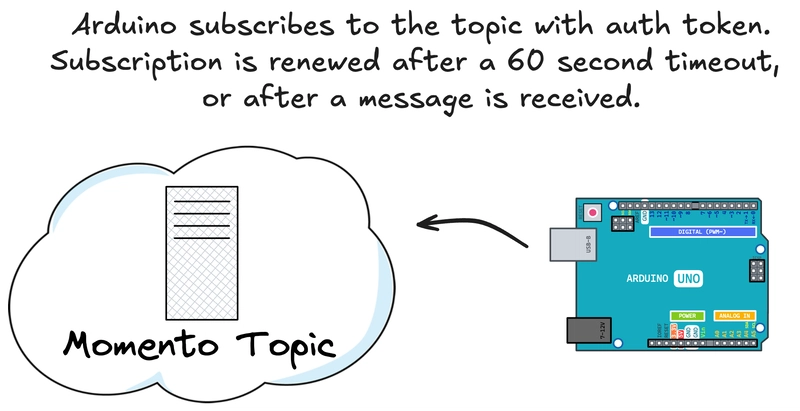
In the Arduino's loop() function, we subscribe to the Momento Topic by making an HTTP request to the topic's subscribe endpoint.
if (token.length() > 0 && !isSubscribed && httpState == HTTP_IDLE) {
  Serial.println("Subscribing to topic...");
  startRequest(
    momentoTopicEndpoint,
    "/topics/demo-cache/arduino-topic",
    &topicResult,
    token.c_str(),
    true
  );
  isSubscribed = true;
}
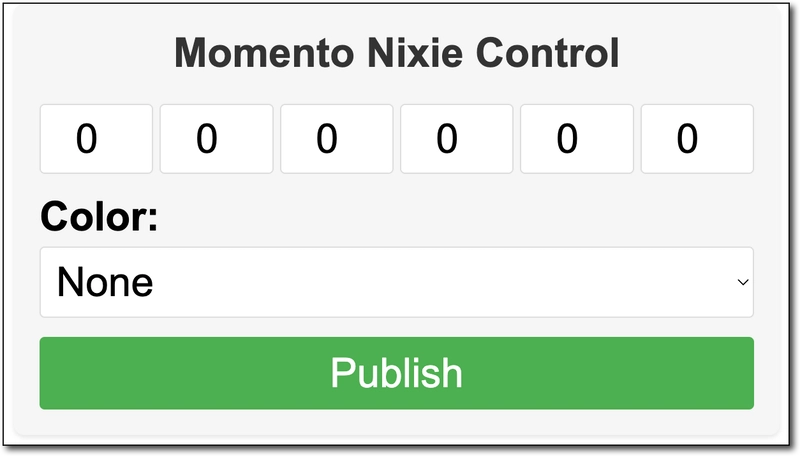
A super simple web based client is used to publish the new value and color for the EasyNixie modules. It has a basic form, and when the button is clicked, it publishes a new message to the topic.
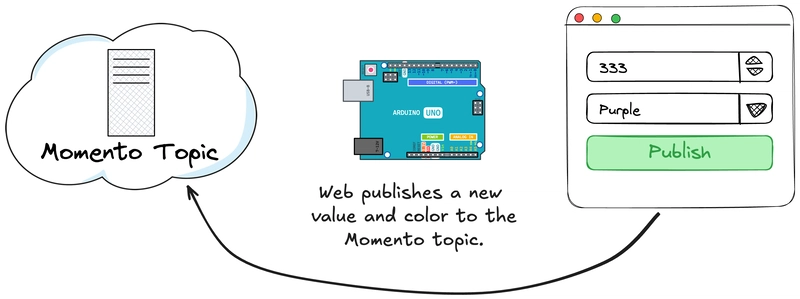
We could use the Momento JavaScript SDK to publish to this topic, but to keep things consistent, we're again using the HTTP API to show how easy it is to work with Topics without external dependencies. It's just a POST to the endpoint with the token as an Authorization header and a string as the body.
async function publishTopic(msg) {
  const response = await fetch(`${momentoPublishEndpoint}/topics/demo-cache/arduino-topic`, {
    method: 'POST',
    headers: {
      'Content-Type': 'text/plain',
      'Authorization': token,
    },
    body: JSON.stringify(msg),
  });
  if (response.ok) {
    return { is_success: true };
  }
  else {
    throw new Error(`HTTP error! Status: ${response.status}`);
  }
};
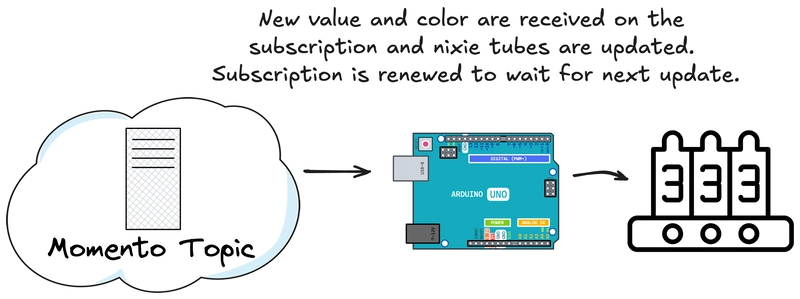
When the new message is received on the Arduino's subscription, we parse the value and update the nixie modules!
if (isSubscribed && isRequestComplete()) {
  if (wasRequestSuccessful() && topicResult.length() > 0) {
    JsonDocument itemsDoc;
    deserializeJson(itemsDoc, topicResult);
    JsonObject item = itemsDoc["items"][itemsDoc["items"].size()-1]["item"];
    const char* message = item["value"]["text"];

    // the item itself is serialized as JSON, so deserialize it too
    JsonDocument messageDoc;
    deserializeJson(messageDoc, message);
    const char* value = messageDoc["value"];
    int color = messageDoc["color"];

    // the incoming value is zero padded to six digits and reversed
    // (since we need to set the nixies from last -> first)
    for (int i = 0; value[i] != '\0'; i++) {
      // Convert the character to an integer
      int digit = value[i] - '0';
      en.SetNixie(digit, color, true, true, 0);
      en.Latch();
    }
    topicResult = "";
  }
  // Reset for next request
  if (client.connected()) client.stop();
  isSubscribed = false;
  resetHttpState();
}
Summary
This was a fun personal project that I used to learn more about hardware and try my hand at custom PCB design. I also got to play with the Momento Topics HTTP API, which is something that I've been meaning to use for a while. If you'd like to see the full code to try it out on your own, check the following repositories:

Top comments (0)