
In this article, you will learn how to implement continuous integration and continuous delivery in your repository using GitHub Actions to automate your development workflow.
To demonstrate this, I will use a simple Node.js app as our software product and deploy it to my personal VPS (Virtual Private Server) as the hosting environment.
But seriously, what is a CI/CD pipeline, and why do we need it?
Great question! Let’s break it down in simple terms.
What is a CI/CD pipeline?
CI/CD pipeline automates the process of building, testing, and deploying code whenever changes are made to a repository.
• Continuous Integration (CI) ensures that new code is automatically tested and merged.
• Continuous Delivery (CD) automates deployment, making sure the latest version of the software is always ready for release.
Why Do We Need It?
Without CI/CD, developers must manually test and deploy code, which is time-consuming, error-prone, and inefficient. A CI/CD pipeline speeds up the development cycle, reduces bugs, and ensures a smooth deployment process.
Imagine you have a project hosted on your VPS.
• With CI, every time you push code to GitHub, it automatically runs tests to check for errors.
• With CD, if all tests pass, your app automatically deploys to your VPS, keeping it up-to-date without manual intervention.
How Does It Work?
This is where GitHub Actions comes into play! As a popular CI/CD platform, GitHub Actions allows developers to automate the process of building, testing, and deploying applications directly within their GitHub repositories.
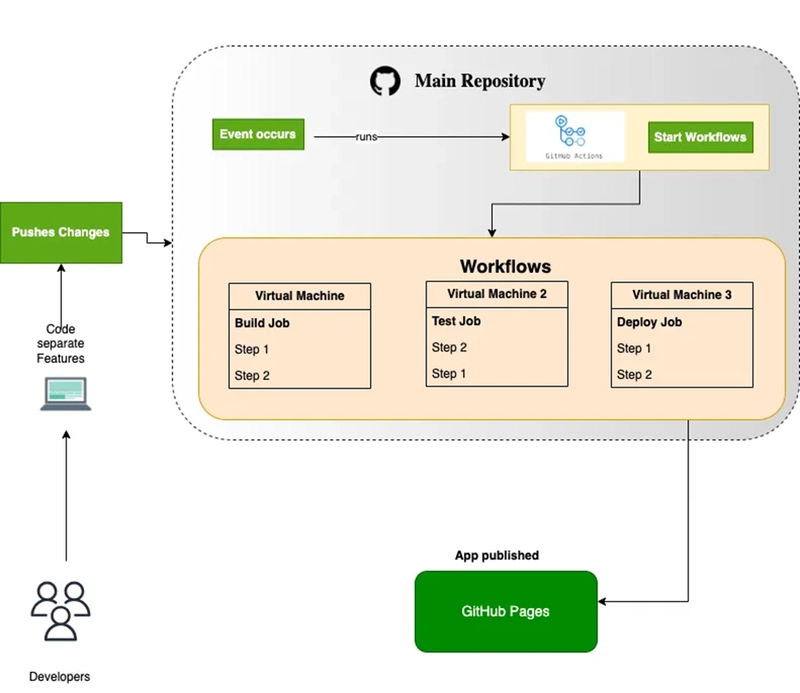
At the core of GitHub Actions are workflows, automated processes that execute one or more predefined tasks.
Workflows can be customized to fit specific needs, such as:
• Running tests for every pull request.
• Automatically deploying merged code to production.
These workflows are defined in a YAML file stored in your repository, ensuring that automation is seamlessly integrated into your development workflow.
Let’s Get Practical! 🚀
Now, let’s walk through the step-by-step process of setting up a CI/CD pipeline using GitHub Actions.
Step 1: Create Your Node js project
For this guide, I have already created a Node js app. You can create one yourself or use an existing project.
Step 2: Create a GitHub Repository
• Initialize a Git repository in your project.
• Push your project to GitHub (if you haven’t already).
Step 3: Set Up Secret Variables in GitHub
Follow these steps:
- Go to your GitHub repository.
- Click on the Settings tab.
- In the left sidebar, navigate to Secrets and variables → Actions.
- Click New repository secret.
- Enter a secret name (e.g., DEPLOY_SSH_KEY, SERVER_IP, DOCKER_USERNAME).
- Paste the secret value (e.g., SSH private key, API token) in the field.
- Click Add secret.
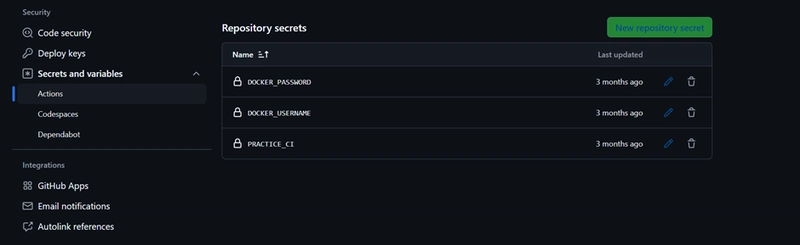
These secrets can now be accessed in your GitHub Actions workflow using ${{ secrets.SECRET_NAME }}.
Step 4: Create the GitHub Actions Workflow
Create a new directory named .github/workflows in the root of your project if it doesn't exist already. Inside that, create a file named deploy.yml.
.github/workflows/
Now, define your CI/CD pipeline in that file:
deploy.yml
name: Deployment pipeline

on:
  push:
    branches:
      - main
    tags:
      - '*'

jobs:
  build:
    runs-on: ubuntu-latest

    steps:
      - name: Checkout Code
        uses: actions/checkout@v3

      - name: Set up Node.js
        uses: actions/setup-node@v3
        with:
          node-version: '20.8.1'

      - name: Install Dependencies
        run: npm install

      - name: Build Node Project
        run: npm run build
If you want to add a step to push the build to Docker Hub, you can create a separate job like the one below. This job handles building the Docker image and pushing it to your Docker Hub repository.
docker:
    name: Docker Build and Push
    runs-on: ubuntu-latest
    needs: build

    steps:
      - name: Checkout Code
        uses: actions/checkout@v3

      - name: Log in to Docker Hub
        uses: docker/login-action@v2
        with:
          username: ${{ secrets.DOCKER_USERNAME }}
          password: ${{ secrets.DOCKER_PASSWORD }}

      - name: Build Docker Image
        run: |
          docker build -t ${{ secrets.DOCKER_USERNAME }}/github-action-test:latest .

      - name: Push Docker Image
        run: |
          docker push ${{ secrets.DOCKER_USERNAME }}/github-action-test:latest
To set up Continuous Delivery (CD), you can use a GitHub Action plugin called appleboy/ssh-action. This plugin allows you to execute commands on your remote server using SSH credentials. By using this plugin, you can stop and remove the existing Docker container, pull the latest image from Docker Hub, and start the updated container, all automatically.
deploy:
    name: Deploy to Remote VPS
    runs-on: ubuntu-latest
    needs: docker

    steps:
     - name: Deploy to Remote Server
        uses: appleboy/ssh-action@v1.2.0
        with:
            host: ${{ secrets.REMOTE_HOST }}
            username: ${{ secrets.REMOTE_USER }}
            password: ${{ secrets.SSH_PRIVATE_KEY }}
            script: |
              echo "Navigating to the Docker Compose file directory"
              cd /path to your repo/
              echo "Stopping and removing any running containers"
              docker stop <container name>
              docker rm <container name>
              echo "Removing the old Docker image"
              docker rmi -f <latest image>|| true
              echo "Logging into Docker Hub on the remote server"
              echo "${{ secrets.DOCKER_PASSWORD }}" | docker login -u "${{ secrets.DOCKER_USERNAME }}" --password-stdin
              echo "Pulling the latest image"
              docker compose up --build -d
Final example code look like this,
name: Build and Deploy to Staging

on:
  push:
    branches:
      - main
    tags:
      - '*'

jobs:
  build:
    name: Build node js project
    runs-on: ubuntu-latest

    steps:
      - name: Checkout Code
        uses: actions/checkout@v3

      - name: Set up Node.js
        uses: actions/setup-node@v3
        with:
          node-version: '20.8.1'

      - name: Install Dependencies
        run: npm install

      - name: Build React App
        run: npm run build

  docker:
    name: Docker Build and Push
    runs-on: ubuntu-latest
    needs: build

    steps:
      - name: Checkout Code
        uses: actions/checkout@v3

      - name: Log in to Docker Hub
        uses: docker/login-action@v2
        with:
          username: ${{ secrets.DOCKER_USERNAME }}
          password: ${{ secrets.DOCKER_PASSWORD }}

      - name: Build Docker Image
        run: |
          docker build -t ${{ secrets.DOCKER_USERNAME }}/github-action-test:latest .

      - name: Push Docker Image
        run: |
          docker push ${{ secrets.DOCKER_USERNAME }}/github-action-test:latest

  deploy:
    name: Deploy to Remote VPS
    runs-on: ubuntu-latest
    needs: docker

    steps:
      - name: Deploy via SSH
        uses: appleboy/ssh-action@v1.2.0
        with:
          host: ${{ secrets.REMOTE_HOST }}
          username: ${{ secrets.REMOTE_USER }}
          password: ${{ secrets.SSH_PRIVATE_KEY }}
          script: |
            echo "Navigating to the Docker Compose file directory"
            cd /path to your repo/
              echo "Stopping and removing any running containers"
              docker stop <container name>
              docker rm <container name>
              echo "Removing the old Docker image"
              docker rmi -f <latest image>|| true
              echo "Logging into Docker Hub on the remote server"
              echo "${{ secrets.DOCKER_PASSWORD }}" | docker login -u "${{ secrets.DOCKER_USERNAME }}" --password-stdin
              echo "Pulling the latest image"
              docker compose up --build -d
Step 5: Set Up runners
When working with GitHub Actions, runners are the environments where your workflows are executed. There are 2 types of runners,
- GitHub-Hosted Runners
- Self-Hosted Runners
GitHub-Hosted Runners
GitHub-hosted runners are virtual machines provided and managed by GitHub. You don’t need to set up or maintain anything, GitHub automatically spins up a fresh, secure, and isolated environment for each job in your workflow. These are great for most CI/CD use cases and are available with minimal effort.
You can choose from environments like:
• ubuntu-latest
• windows-latest
• macos-latest
Since everything is managed for you, they’re perfect for quick setup and standard workflows. However, they offer limited customization and might be slower for resource-intensive builds. Also, there are usage limits, especially for private repositories.
Self-Hosted Runners
Self-hosted runners are machines that you manage like your personal VPS, local server, or a cloud VM and you register them with your GitHub repository or organization. Once configured, GitHub can offload workflow jobs to your own infrastructure.
This gives you full control over the environment, which means you can pre-install dependencies, allocate more memory, and fine-tune it to your exact needs. They're especially useful in private or restricted environments where public GitHub-hosted runners aren't suitable.
They also provide faster execution for repeated builds because the environment is persistent, unlike GitHub-hosted runners that spin up fresh VMs every time. But keep in mind, you’re also responsible for the runner’s security, maintenance, uptime, and scalability all of which require a bit more setup and ongoing management.
Now, we are going to see how to setup self-hosted runner,
Follow these steps:
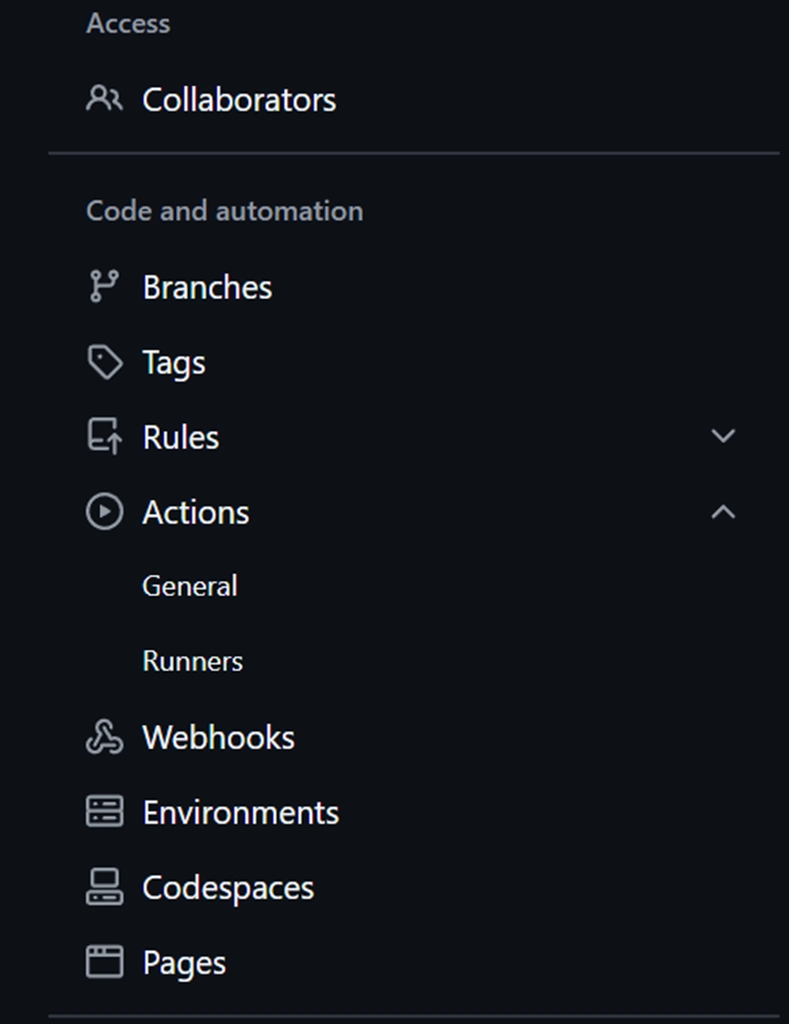
- Go to your GitHub repository.
- Click on the Settings tab.
In the left sidebar choose Actions → Runners.
Click on the
New self-hosted runnerbutton

Choose the runner image
Copy and paste the setup commands provided by GitHub into your server terminal to register the runner with your repository or organization
Step 6: Test Your CI/CD Pipeline
Now that everything is set up:
- Make a change in your Node.js project.
- Push it to the main branch of your GitHub repository.
- Navigate to the Actions tab in your GitHub repo and observe the workflow.
- If everything is set up correctly, GitHub Actions will SSH into your VPS and deploy the latest code automatically.
And that’s it, you’ve just built a fully functional CI/CD pipeline using GitHub Actions! From writing and testing code to building Docker images and deploying them to your VPS, everything is now automated and streamlined.
By setting up this workflow, you’ve taken a major step toward modern DevOps practices. You’ll spend less time on manual deployments, reduce errors, and ship faster with confidence. Plus, with the flexibility of custom runners, your pipeline can grow alongside your project’s infrastructure needs.
CI/CD isn’t just for big companies anymore — thanks to tools like GitHub Actions, it’s accessible to everyone. So go ahead, experiment, and scale your automation to the next level.
Thanks for reading! If you have any feedback, questions, or suggestions to improve this article, feel free to leave a comment — I’d love to hear from you.
Happy coding and don’t forget to spread your smile everywhere you go! 😄
If you’d like to connect or support my work:
📧 Feel free to reach out via email: getintouchwithvishnu@gmail.com
☕ If you found this helpful and want to support my content, you can donate : Buy me a Coffee

Top comments (14)
This guide is really useful and simplifies a complex topic well.
Thanks a lot! 😊
Great article. 👍
Thanks a lot! 😊
Great article.
How would you handle multiple environments with GitHub actions?
Thanks a lot! 😊
Handling multiple environments like staging and production can be achieved by setting up separate workflows. You can create different branches for each environment (e.g., staging and main for production) and configure workflows to trigger based on those branches.
example : -
GrtBrohh
Thanks a lot!😊
Very Helpful
Thanks a lot 😊
Great share man, really helpful ❤️
Thanks a lot! 😊
where can I get your node.js project from?
The Node.js project I mentioned is just a simple boilerplate, mostly for demonstration purposes. So any simple Node.js project would work just fine.
If you'd like, I can also share a minimal version on GitHub for reference.