It's been a while since I wrote a series going back almost 9 months to my Building Serverless Applications. I enjoyed that so much that I have been wanting to write another, but just didn't have a continuous thread of material. But lately, I've been thinking a lot about "full stack" development and where the future of delivery is going. Some of that thinking has led me down a path of what if. What if I was able to use my favorite programming language and my preferred AWS Serverless tools to build full-stack web applications? I'm not 100% sure I'd do this in production at the moment, but again, I'm exploring what if. This series is the expansion of that thought. Let's get started on Serverless Web Assembly (WASM) with Rust.
Series Articles
Since this is article #1 and I'm not exactly sure where this is going to land, let's just call this article:
- Getting started with Serverless WASM with Rust
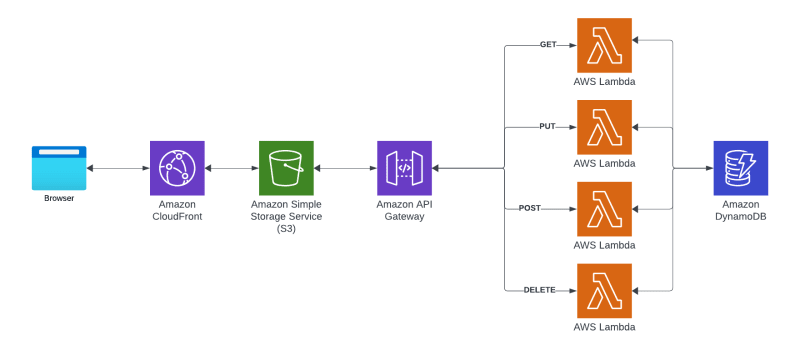
And with that title, here is the architecture diagram that I think I want to work through as we make our way into this series.
Getting Started with Serverless WASM with Rust
Before We Begin
I feel that before we dive too deep into this topic, let's first take a moment to talk about Web Assembly (WASM). The WASM website defines it like this:
WebAssembly (abbreviated Wasm) is a binary instruction format for a stack-based virtual machine. Wasm is designed as a portable compilation target for programming languages, enabling deployment on the web for client and server applications. - https://webassembly.org
Imagine being able to ship a Rust binary that is compiled to target WASM which can then be run natively inside of the browser. That same code could interact with browser APIs just like JavaScript currently does. It can also interop with JavaScript so you could have both running at the same time. What this means for the developer is this. Rust-built code could be web deployable binaries that run in a browser just like normal HTML, CSS, and JavaScript that we've all become used to.
But Why?
I believe that just like JavaScript made its way into the server-side space, compiled languages like Rust can make their way up into the client-side space as well. And that thinking brings choice to engineers and I think when we have a choice, customers win. If I believe that WASM is similar to Lambda, there's still a LONG way to go for there to be parity. But what I want to look at over the next few articles is how close things are to being able to build something that could be shipped.
In addition, and I've written about this a bunch, the developer experience for Rust is something I greatly enjoy. And then pair it with performance boosts, being strongly typed, and just the overall joy of Rust-based development, this feels like something I need to explore.
A Hello World Web Assembly
Let's get started building Serverless WASM with Rust.
Yew
We can't just write native console-based Rust code and expect to be able to deploy. Enter Yew. Thanks to Darko for showing me the light.
Yew is a framework for creating reliable and efficient web applications. Yew
With Yew, I can write Rust code that targets WASM which is exactly where I want to be.
Setting up the Dependencies
Before I can start building Serverless WASM with Rust, I need to configure a few dependencies.
Install Rust
Installing Rust is straightforward. The Install Page will detect your host and present you with an option that is appropriate for you.
Once you've installed Rust, make sure to run:
rustc --version
If your Rust version is greater than 1.64.0 then you are good!
Add WASM Target
Rust can compile source code for different targets or processors. This is called cross-compilation.
Running
rustc --print target-list
from your shell will give you an idea of what you have at your disposal before adding WASM. If you've read my Rust, Lambda, and API Gateway article you'd have seen that I'm building for ARM64 there to take advantage of the AWS Graviton chipset. Building for WASM is sort of similar. Rustc is a cross-compilation build tool.
Add the WASM target like this.
rustup target add wasm32-unknown-unknown
A Serverless WASM with Rust Bundler
I've now installed Rust, and added the WASM target but how do I connect my build into something that we could host on Cloudfront and S3? Let's connect Serverless WASM with Rust by adding a bundler.
Yew recommends using Trunk which is
Trunk is a WASM web application bundler for Rust. Trunk uses a simple, optional-config pattern for building & bundling WASM, JS snippets & other assets (images, css, scss) via a source HTML file. - Trunk
Installing Trunk happens through Cargo. Remember, Cargo is more than a package manager, it also supports sub-commands.
cargo install --locked trunk
I'll get into this in the next article, but Trunk is what will bundle my Serverless WASM with Rust artifacts so that I can ship them to S3 like in the diagram at the top of this article.
Here We Go!
Finally, we are into some code and on our Serverless WASM with Rust journey.
Main
No surprise here, but we are going to start with a main function as all Rust binary projects do.
fn main() {
    yew::Renderer::<App>::new().render();
}
Here I've got a call to the Yew Render which happens to be client-side rendering that is executed by the WASM runtime in the browser.
Simple Table Output
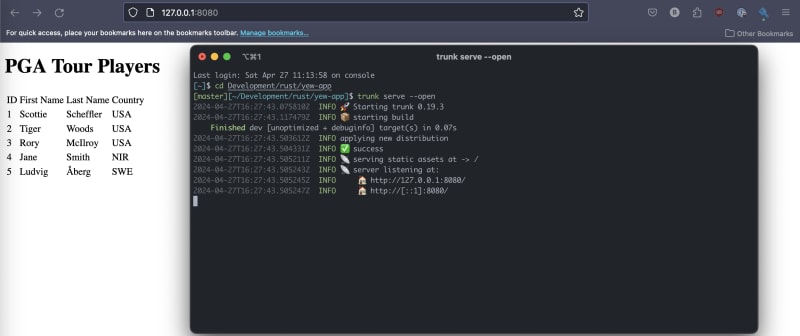
The concept that I want to explore over the next few articles is going to be around Player Data and the PGA Tour. For article number one, that's going to be just a static vector and not something "live".
As you can see from that image, it's a simple HTML table right now. And yes, that's rendered from Yew. How?
Yew is going to look an awful lot like React and JSX. It supports components, states, and a JSX-style syntax.
#[function_component(App)]
fn app() -> Html {
    html! {
        <div>
            <h1>{ "PGA Tour Players" }</h1>
            <table>
                <thead>
                    <tr>
                        <td>{ "ID" }</td>
                        <td>{ "First Name"}</td>
                        <td>{ "Last Name" }</td>
                        <td>{ "Country" }</td>
                    </tr>
                </thead>
                <tbody>
                    {players}
                </tbody>
            </table>
        </div>
    }
}
There's the table that gets outputted. No styles at the moment, just raw HTML. I'm going to explore a host of things as we dive further in future articles.
A couple of things that Yew does for me.
- That
#[function_component(App)]Macro. For now, let's just call that the thing we need at the top of an HTML component. We are going to learn more about that together. - Another Macro
html!that produces HTML. Again, we'll explore more of what that means as we get deeper.
Player Data
As I get into future articles in this series, I'm going to be building off of this central theme of a "Player". That's the core model in our domain. The player will have metadata about them but also stats, scores, and rankings. We'll build a leaderboard and a display page about that player including the ability to have favorites.
The Player right now is bare but it's a start.
#[derive(Serialize, Debug)]
pub struct Player {
    id: u64,
    first_name: String,
    last_name: String,
    country: String
}
Bring Together for the Table
If you noticed in the table, there's this
<tbody>
    {players}
</tbody>
HTML block. The {players} piece comes from this iterator code that gets run through the html! macro.
let players = player::generate_players().iter().map(|p| html! {
    <tr>
        <td>{p.get_id()}</td>
        <td>{p.get_first_name()}</td>
        <td>{p.get_last_name()}</td>
        <td>{p.get_country()}</td>
    </tr>
}).collect::<Html>();
Running the Application
Let's drop back down to our terminal and run.
trunk serve --open
Your browser should pop up and look like this:
Next Steps
OK, so let's pause there for this article. We've built a basic Serverless WASM with Rust package. The Serverless part hasn't quite come to bear yet, but that's where we are heading next.
In article 2 I'm going to tackle using CDK to build the Cloudfront and S3 infrastructure to house the WASM bundle. I'll dive into Trunk and how to accomplish this.
For transparency, I've NEVER done this before, so we'll be learning together. Fun right??!
Wrapping Up
My initial impression of writing Serverless WASM with Rust is that it feels React-ish in a lot of ways but it's Rust and not TypeScript. Those Rust development feelings are strong which leaves me excited to dig into the next steps.
My gut tells me that this isn't going to be my default for every project I build going forward, but that it gives me more options for things that might be more easily and efficiently accomplished with Rust than JavaScript. Things like media processing, super snappy user experiences, and possibly can it compete with a native application? I don't know the answers to those at the moment but I've taken step 1 and am willing to see what's next.
And as always, this series will have source code. I'll be building here.
Thanks for reading and happy building!


Top comments (0)