
Welcome back to my blog post series dedicated to building authorization using Cedar and Amazon Verified Permissions. In a previous blog post we learned about usage of AVP with IaC Cloudformation. Today, we will cover the topic of recently added AVP getting started.
Learning curve
As with any adoption of any technology, there's always a learning curve, in the case of AVP, it's a new service, so, naturally, it's not popularized, and there aren't a lot of materials (but there are more and more every day), as well as a learning curve related to the Cedar language.
The Cedar language is very simple and fun for the developer, but it is a learning curve if you want to implement it in an organization. Let's look at what we need to build authorization with AVP.

To use AVP, we need several elements:
- Policy store, which is a container for our access policies, where all policies are kept, and every authorization request, is checked against a specific policy store.
- Schema, which is the definition of all entities for our authorization system, possible actions, hierarchies, required and optional attributes, and their types. With schema we can check that our access policies are correct against schema, and so is the payload we send to AVP.
- Access policies in Cedar language, which AVP then evaluates for us.
- payload - once we have all of the above, it would be nice to finally test our policy store, but for that we need a payload that we will send to the AVP for authorization decision (i.e. we need to send information about the principal, the action it wants to perform, on what resource, pass the required attributes, hierarchy information, etc.)
When you look at it from the side, it seems like a lot of things, and it can be overwhelming.
Rest assured, it was not clear to me at first either, but over time everything has been clarified, and now I fully understand it. That's why the avp-cli was created, to quickly help others understand what it's all about.
Getting started
The AVP team was aware of a learning curve, so to simplify the use of AVP it added getting started to the service. As we know, most authorization cases are mainly RBAC, on API gateway, so the AVP team wanted to simplify the process (especially if you use Cognito for auth).

Typical flow as shown in the figure, Gateway with various endpoints, Cognito for authentication, in addition, we can have some Cognito authorizer that will check access to the gateway.
What AVP Getting Started does for us:
- Allows for authorization setup through the AVP wizard in the console under API Gateway.
- Based on the actions in the API Gateway, it maps these actions to Cedar actions, eliminating the initial learning curve of Cedar.
- Creates a lambda authorizer that we can easily attach to the API Gateway and use, so we don't have to worry about how to build the payload for AVP and use it properly (and overall knowledge about lambda authorizer at all).
- On our part, deploying the gateway is required once the authorizer is attached.

Let's assume that we would like to streamline basic flow, and add Role Base Access control (RBAC) authorization, based on groups in Cognito. Before, it was not possible to use Cognito groups in AVP, now it is possible.
So that it's not just a theory, we'll try using Getting Started on some simple examples.
What we will build today?
Based on the AWS announcement post, consider the example of a loan application with two key actions:
- Creating a
Loan Request (POST /loan): Users can submit new loan applications. -
Approving a Loan (POST /loan/approve/{loan_id}): Certain users can approve loans that have been submitted.
Suppose we have two Amazon Cognito groups that have user permissions as follows:
loan_creators: Members of this group are allowed to perform the "Creating a Loan Request" action.
loan_officers: Members of this group have permissions for both creating and approve loans.
And based on that we would like to do authorization at the Gateway level.
Starting point Gateway and Cognito
For the purposes of the blog post, I created two Cloudformation so that everyone can play with it themselves, I know how annoying it always is when you do not have an example at hand that you can quickly use in the console, so I prepared:
- a simple Cloudformation with Gateway API, which implements the two endpoints mentioned before.
- both endpoints are mocks (to make it simpler).
- a simple Cloudformation for Cognito (with groups inside).
Feel free to do deployment of the above cloud formation templates in the AWS console (just grab the template, and go via Cloudformation wizard to deploy it).

Gateway

After successful deployment, you can see Gateway with two endpoints.
Cognito
After successful deployment, you can see the Cognito user pool with two groups, and the avp-client user pool client.

At this stage, we don't have any users, so it would be worthwhile to create a user and add them to a group. This is relatively simple; you need to create a new user and add them to the appropriate group.

Now, let's finally have some fun with AVP! We have everything we need—authentication, gateway, groups, users in groups—so we can finally add authorization.
AVP time!
Gateway actions
Currently, there is no support for CloudFormation, so we need to do this manually. Open the AWS console, and then go to Amazon Verified Permissions.
Start by creating a new policy store, and then select the option Set up with Cognito and API Gateway - new.

First, we need to select an API; we choose our Loan API, select the stage (v0), and then press 'Import API'. Our resources from the API will automatically be translated into Cedar policies.

Identity Source
Now, we need to use our Cognito user pool as an identity source. Simply select the newly deployed Cognito user pool, and use all default options untouched.

Assign actions to groups
Now, we need to assign actions to our Cognito groups, do it the same way as in the picture below (based on our requirements).

Deploy policy store

For the last step, you need to hit Create policy store which will trigger the deployment of the Lambda Authorizer.
You will need to wait for the deployment, and then make sure the lambda authorizer is attached to the gateway, and then you need to re-deploy API.

Show me AVP!
We can immediately check in practice how it works, but before we test it, it will be simpler to see exactly what we have generated in AVP.

Let's start from schema:

So we have two actions (our endpoints), principal as User and Resource as Application
As we deal with hierarchy, we also have UserGroup, which our User is a member of. So based on that, we have an access policy for group membership.

Let's check the generated actions:
- Policy defining permissions for loan_officers cognito group
permit(
  principal in loan_api::UserGroup::"eu-west-1_sXVC4jUDf|loan_officers",
  action in [ loan_api::Action::"post /loan/approve/{loan_id}", loan_api::Action::"post /loan" ],
  resource
  );
- Policy defining permissions for loan_creators cognito group
permit (
    principal in loan_api::UserGroup::"eu-west-1_sXVC4jUDf|loan_creators",
    action in [loan_api::Action::"post /loan"],
    resource
);
By specifying loan_api::UserGroup::"eu-west-1_sXVC4jUDf|loan_officers and loan_api::UserGroup::"eu-west-1_sXVC4jUDf|loan_creators, the policies are targeting actions based on the membership of the principal in these particular groups (with usage of in operator). They also explicitly define what actions these principals can perform. In the case of loan_officers, the policy permits actions like post /loan/approve/{loan_id} and post /loan. For loan_creators, the policy permits the action post /loan.
With deny as a default rule, we don't need to create forbid policies.
Lambda
The generated lambda authorizer is a type of request-based authorizer, which also will have in the event data section, the data from the request, including query params etc.
The runtime is Node.
Lambda is quite simple, but for us, the most important part is:
  let bearerToken =
    event.headers?.Authorization || event.headers?.authorization;
  if (bearerToken?.toLowerCase().startsWith("bearer ")) {
    // per https://www.rfc-editor.org/rfc/rfc6750#section-2.1 "Authorization" header should contain:
    //  "Bearer" 1*SP b64token
    // however, match behavior of COGNITO_USER_POOLS authorizer allowing "Bearer" to be optional
    bearerToken = bearerToken.split(" ")[1];
  }
  try {
    const parsedToken = JSON.parse(
      Buffer.from(bearerToken.split(".")[1], "base64").toString()
    );
    const actionId = `${event.requestContext.httpMethod.toLowerCase()} ${
      event.requestContext.resourcePath
    }`;

    const input = {
      [tokenType]: bearerToken,
      policyStoreId: policyStoreId,
      action: {
        actionType: actionType,
        actionId: actionId,
      },
      resource: {
        entityType: resourceType,
        entityId: resourceId,
      },
      context: getContextMap(event),
    };

    const authResponse = await verifiedpermissions.isAuthorizedWithToken(input);
    console.log("Decision from AVP:", authResponse.decision);
We can observe the building of the payload for AVP, which uses the token from Cognito. AVP will decode the token and validate the JWKS for us, so we don't need to do this in Lambda. Then, we use the isAuthorized action which performs the authorization request. Based on the decision, we either grant or deny access to the endpoint.
The full lambda code can be found here. Please keep in mind that Lambda code could change, I am not the author of this code!
You don't need to explicitly create a log group for lambda, they will go to /aws/lambda/yourFunctionName.
Let's test it in practice
Now that we have everything, we can finally test our solution. First, we need an access token from Cognito for our user. I recommend creating two users who are in two different groups.
Remember, when you create a new user, you must generate a new password for them, which can be done in the AWS CLI with:
aws cognito-idp admin-respond-to-auth-challenge
You can generate code via AWS-CLI, SDK, or by doing the HTTP request via POSTMAN or curl like this:
curl --location 'https://cognito-idp.<REGION>.amazonaws.com/<USER_POOL_HERE!!!!!>' \
--header 'Content-Type: application/x-amz-json-1.1' \
--header 'Accept: */*' \
--header 'X-Amz-Target: AWSCognitoIdentityProviderService.InitiateAuth' \
--data-raw '{
  "AuthFlow": "USER_PASSWORD_AUTH",
  "ClientId": "<ID_HERE>",
  "AuthParameters": {
    "USERNAME": "<USERNAME>",
    "PASSWORD": "<PASSWORD>"
  }
}
'
As a response, you will obtain both an access token and an id token, use the access token.
If you decode the token with jwt.io you will see:
{
"sub": "sub",
"cognito:groups": [
"loan_creators"
],
"iss": 'BLABLA",
...
"auth_time": 1713899648,
"exp": 1713903248,
"iat": 1713899648,`
"username": "daniel"
}
```
so you can double check at this point, whether a proper group is within the JWT of a user.
## Testing Gateway
Now we can test our endpoints, starting from the `loan approval endpoint`:
You can use this curl:
```shell
curl --location 'https://<gateway-id>.execute-api.eu-west-1.amazonaws.com/v0/loan/approve/1234' \
--header 'Content-Type: application/json' \
--header 'Authorization: Bearer <TOKEN GOES HERE>' \
--data '{"statusCode": 200}'
```
The `'{"statusCode": 200}'` is needed as is the mock integration type.
The same for `loan creation`:
```shell
curl --location 'https://<gateway-id>.execute-api.eu-west-1.amazonaws.com/v0/loan/' \
--header 'Content-Type: application/json' \
--header 'Authorization: Bearer <JWT here>' \
--data '{"statusCode": 200}'
```
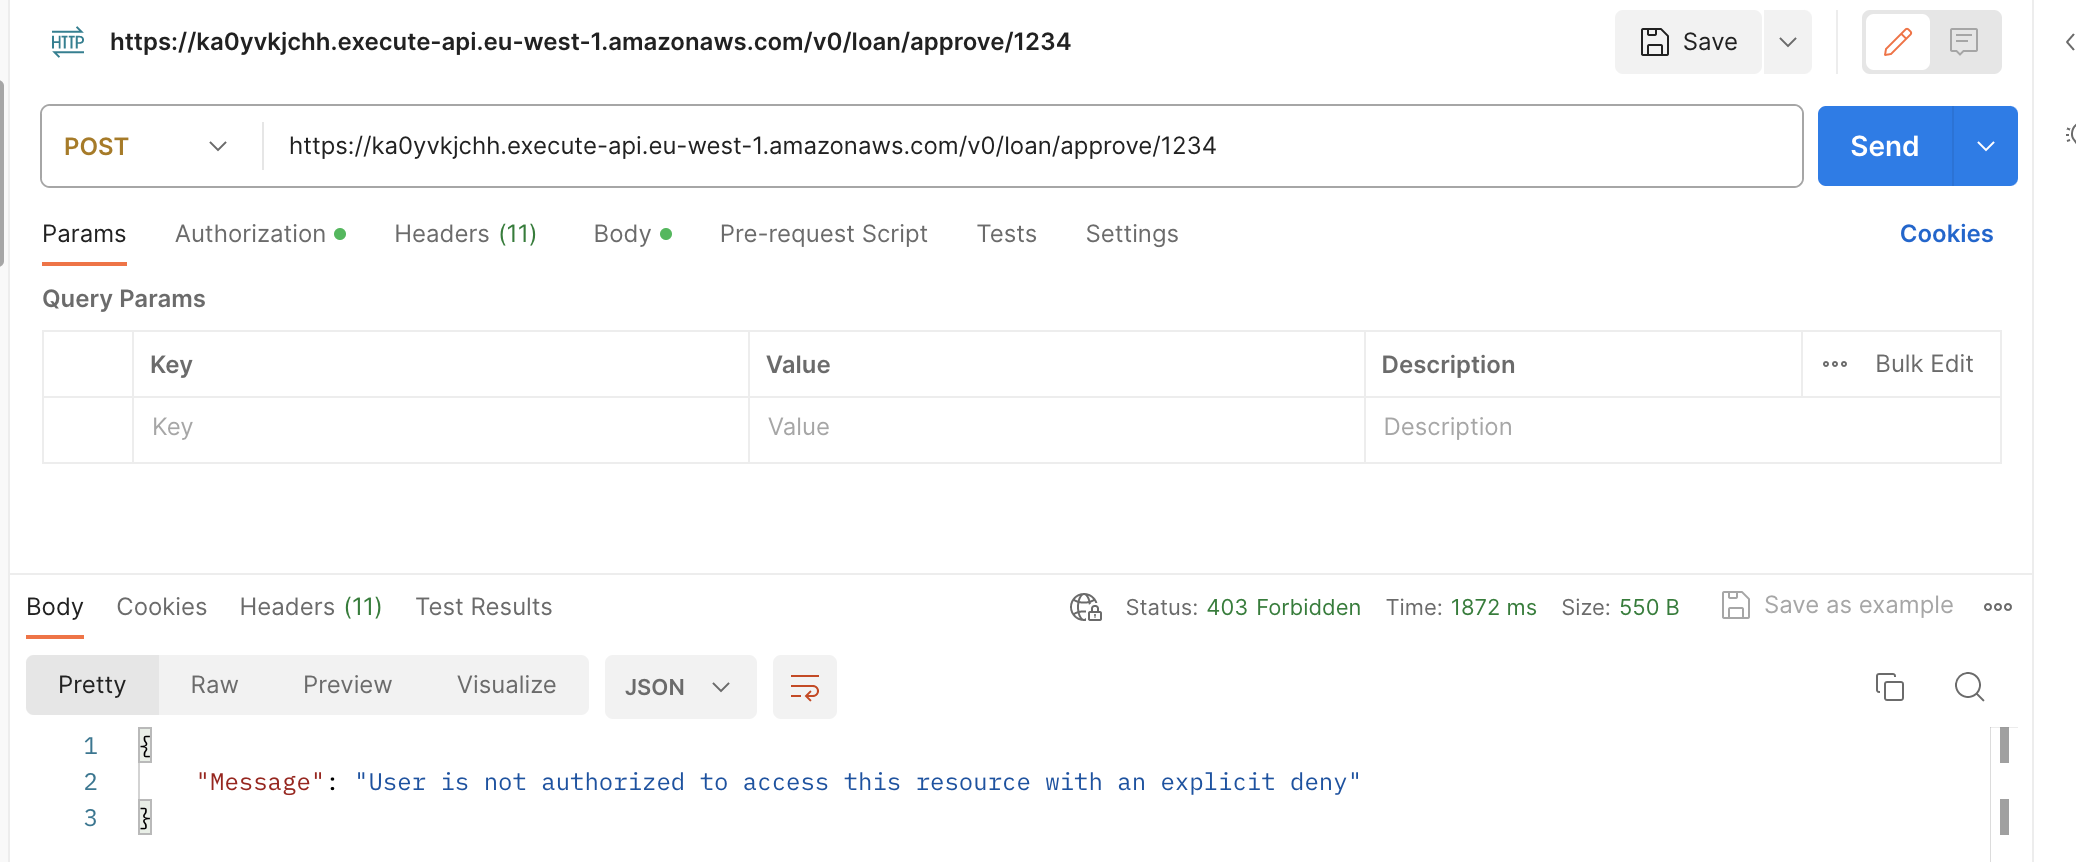
If your user will be with a not allowed group you will obtain the below response:
## Summary, next steps
And that wraps up today's blog post. As you can see, you can quite simply "click through" the authorization setup for the API Gateway, which as a `getting started` seems sufficient for a PoC and taking the first steps.
When I started, such tools weren’t available, so there was a lot to figure out on your own.
It's also important to note that there is no CloudFormation support for this, so you can't just throw this into your CI/CD and expect it to automatically build. However, you do have something to start with, something you can copy, play with, and then start to build authorization flows in your organization.
You might also try expanding this example to better understand how the service works, for example, try validating an additional parameter from the query params, and learn what needs to be changed.
and now... **Go Build!**
In the next blogpost we will cover [AVP with Cognito Groups](https://dev.to/aws-heroes/authorization-and-amazon-verified-permissions-a-new-way-to-manage-permissions-part-xv-avp-with-cognito-groups-4gjm)
## Useful resources
- [Official quick overview and demo video](https://www.youtube.com/watch?v=OBrSrzfuWhQ)
- [Offical Workshop](https://catalog.us-east-1.prod.workshops.aws/workshops/e25284b6-851c-4a89-bee1-ed7571787895/en-US)

Top comments (0)