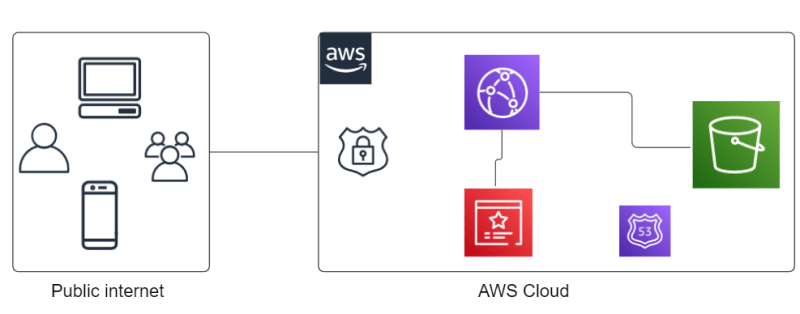
The most common way to deploy any static website today is, through AWS. Specifically, S3 bucket in combination with Certificate Manager and Cloudfront services. The combination of these AWS services works well and it's straightforward to set up. However, this may not be the best and easiest solution to host and serve a static website built with frameworks like React, Svelte, or Angular. The major issues in using this combination are:
- Setup is not easy, configuring the bucket, then the certificate for SSL, and then creating Cloudfront distribution.
- It becomes expensive as you have to pay for a bucket and CDN service and if you activate WAF that costs you extra. If you have a high-traffic website the costs can rise exponentially.
- There are at least 3 network hops before it reaches the user. It may not add a significant delay but it's absolutely unnecessary.
- There’s no DDoS mitigation system available by default unless we set it up by using another AWS service like AWS Shield or WAF.
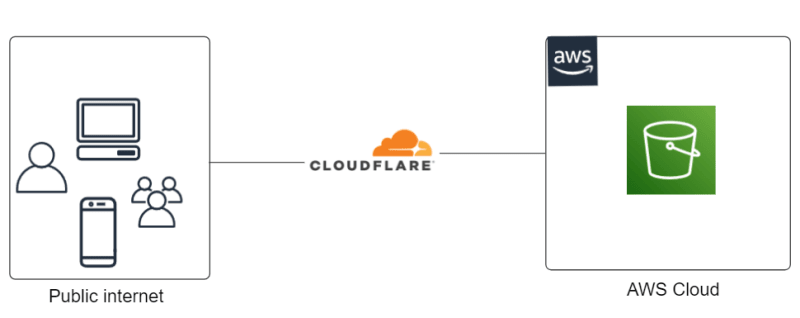
In this article, we will look into an alternate way to serve your website securely with an inbuilt DDoS protection and Bot mitigation system. We will use S3 bucket as our primary storage for static files. We will then leverage Cloudflare infrastructure to proxy all the requests to the S3 bucket. By using Cloudflare we get the following advantages:
- Easy to set up HTTPS with automatic SSL certificate generation and renewal for our website.
- Low latency CDN network with caching enabled across the globe
- Cost-effective when compared to the AWS system.
Implementation
The implementation process can be broken down into three steps.
Step 1: Deploy the static files to a S3 bucket
Assuming you already have a bucket endpoint ready, I will not explain this step in much detail. If you don’t have a bucket ready, follow this article to deploy your app to the bucket and enable static hosting.
Once, you have static hosting enabled in the bucket you’ll get an HTTP endpoint which you use to access your web app. Something like this [http://app.nrj.agency.s3-website.ap-south-1.amazonaws.com](http://app.nrj.agency.s3-website.ap-south-1.amazonaws.com/admin/default).
Step 2: Use CloudFlare name servers
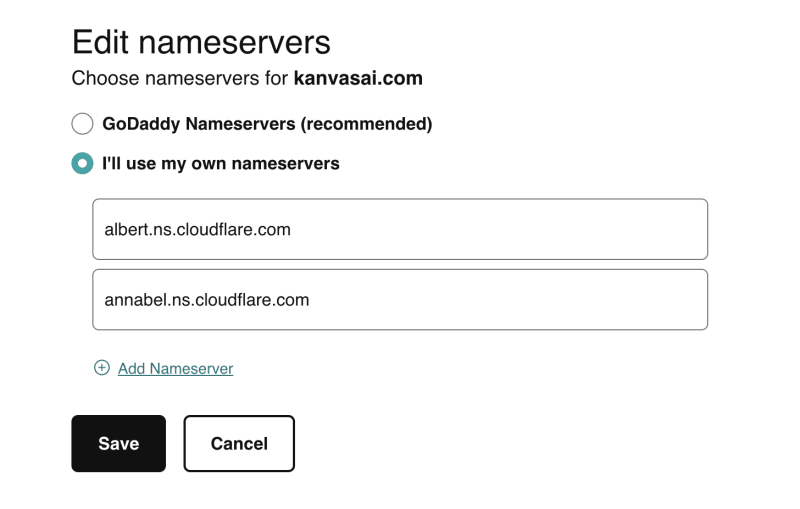
Now, we need to delegate the authority to manage DNS records to Cloudflare. This step is fairly simple. You just need to replace the name server in your registrar dashboard with Cloudflare’s provided nameservers.
- Create a CloudFlare account.
- Click on Add site.
- Copy name servers and paste them into your GoDaddy or whichever DNS provider you use.
Now, you can see all your DNS records in the CloudFlare dashboard. If any of the records are missing please, add them manually.
Step 3: Enable the proxy mode
If you already have a record pointing to your web app, you’ll notice it is also present in the DNS record list. I’m assuming the CNAME record value points to the CloudFront URL. You need to replace this with your bucket's endpoint from step 1. There’s a toggle to switch between a normal DNS record and a proxy. Turn it on, the cloud should become orange. This indicates that all the traffic to this subdomain is routed through the CloudFlare network. Remember to remove the HTTP prefix from the static site URL.
Note: You have to manage all your records through cloudflare now. Not all records need to be proxied through CloudFlare. You can add normal records just like you would in any other DNS provider.
Try visiting app.yourdomin.com, (app.nrj.agency in my case) you should see your React app deployed. Check the URL bar it should have an HTTPS protocol now. This is possible because Cloudflare encrypts the request between the browser and Cloudflare with its own SSL certificate.
Demo:
Conclusion
We were able to set up CDN for our S3 bucket in minimum steps. This method of serving content saves time, effort, and money. It also adds an extra layer of safety against common web attacks with zero configuration.
This method can be used with any similar hosted website be it on Azure or Google Cloud.
If you found this article helpful. Drop a like and stay tuned for more neat articles.
This article was published on Medium, Hashnode, Devto using Buzpen.


Top comments (0)