In this tutorial we will learn how we can generate PDF in an Ionic app, and download it to the device. You might have ordered food or any item from some e-commerce application and after ordering you must have downloaded the invoice/bill for it as a proof. Similarly there are several other scenarios where your app might need a PDF generation and download facility.
We will understand this feature through Enappd’s Grocery Application workflow, where we order some items, then generate an invoice/bill and download it in the form of PDF. You can follow the same steps to create the PDF generation feature in your own Ionic app.
To know more about Grocery Shopping Platform you can read Enappd’s Grocery Shopping Platform Blog or check the feature video. Before moving on, we will understand ordering flow of Grocery Application, so it will be easy for us to implement our Invoice task.
Ionic — Introduction
If you are reading this blog, you are probably already aware of Ionic, Cordova and Capacitor frameworks. While Ionic is the front-end wrapper framework for mobile UI, Cordova is the build framework that converts Ionic code into a device (Android /iOS) compatible code.
Capacitor is another option in place of Cordova to build apps using Ionic. While Capacitor is born couple of years ago, Cordova has been around for a decade. That’s the reason Cordova has more community made plugins for various unique features, but Capacitor is quickly catching up as well.
Item Ordering Flow — Grocery Platform
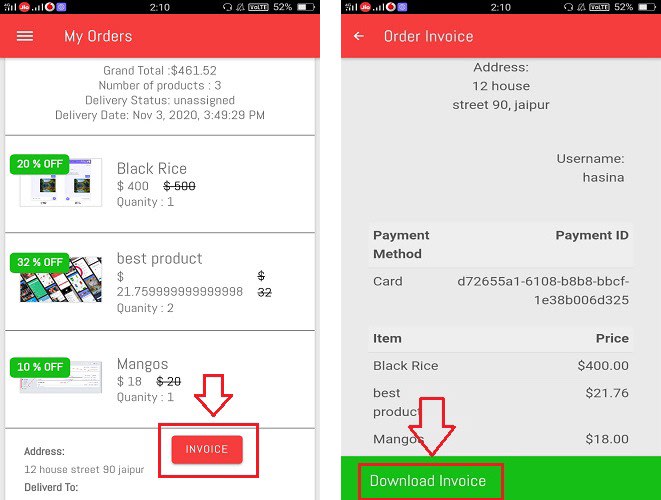
The flow is same as what you might have encountered while ordering items in any other app. We simply add items to the Cart and Checkout with selected Address (Here’s a video of the flow). In the Grocery Platform, the items are then automatically added to the ‘My orders’ tab and from there you can download the Invoice/Bill for our ordered Items, as shown below.

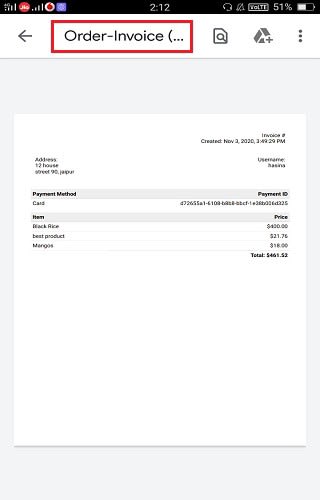
In above screens you can see items in My Order Tab which we have ordered. From this we can generate Invoice and later download it as PDF, as shown below.

You can see the Invoice contains the delivery address, ordered products with price, grand total and many other information. The information in the PDF corresponds to the logged in user, and can be easily changed as you wish.
Now let’s start the flow to implement PDF generation in our Application. We will create a blank Ionic app with dummy item list and related item details, and ‘My Order’ page UI from where we’ll download the invoice.
Structure of the post
We’ll follow these steps to implement the feature
- Create a blank Ionic app
- Create the required UI and dummy data for demo purpose
- Setup PDF generation plugin
- Setup PDF content and styling
- Test on device
Step 1 — Create a blank Ionic app
Generally in all our blogs, we start with creating blank Ionic app, so a new comer or beginner can also try the feature. To create an Ionic Angular Project you just have to run one command and that’s it ! Rest of the things are handled by the Ionic-CLI. Run the below command in you terminal.
$ ionic start pdfgen blank --type=angular --cordova
The --type=angular told the CLI to create an Angular app. And --cordova tells the CLI to integrate Cordova support.
( My environment for this blog is — Node 14.x, Ionic 5.5, Angular 11.x, NPM 7.x, Cordova 10.0 )
This will create an empty ionic project in the working directory of your pc. For more details on creating a new Ionic app from scratch, check out our blog on Ionic Apps here.
Step 2 — Create the required UI and dummy data
You can create the required UI as shown in the images for Enappd’ Grocery Platform, though it’s not mandatory. For demo, you can implement the PDF generation feature just on a simple button, using the dummy data same as a genuine full scale Grocery app.
We’ll use a JSON of dummy order data, which will populate our HTML like the actual app. This JSON can be added and accessed from environment.ts , but in the actual app you’ll have this data coming from server anyway.
With this dummy data populated in our UI, here’s how my UI looks

Here’s the HTML and CSS for the UI if you want
We can see in above html code we have mapped through array of products using *ngFor=”let product of order.products”. Note, the dummy data is coming from environment.ts for this demo, but for your actual app it should come from the server.
Step 3 — Setup PDF generation plugin
Let’s install the PDF generation plugin and the npm packages in our application. We will use Cordova PDFGenerator Plugin to implement this feature
$ ionic cordova plugin add cordova-pdf-generator
$ npm install @ionic-native/pdf-generator
This above command will add the PDFGenerator to the plugins folder. Once the plugins are installed, add the PDFGenerator Module to app.module.ts like below
...
import { PDFGenerator } from '@ionic-native/pdf-generator/ngx';
@NgModule({
... ,
providers: [PDFGenerator, { provide: RouteReuseStrategy, useClass: IonicRouteStrategy }],
...
})
export class AppModule { }
This will provide the PDFGenerator instance available to the complete application and we can use the Plugin in any of the app pages.
Step 4 — Setup PDF content and styling
Generating a PDF starts from a properly styled HTML. You can either
- Have same HTML show in the app’s page, AND be printed as PDF, or
- Use a different HTML to show in app, and different to print in PDF
Here’s how we’ll generate PDF (Method 1) —
Click on INVOICE button in My Orders page → Opens a Modal where the order invoice will show up → If you see the details are correct, you can download the invoice usingDOWNLOAD button
Create PDF Download Modal
To create the Modal Component, you can run the below command :-
$ ionic generate component components/invoice
This above command will add a component in path “components/invoice” like in below folder structure :-

Add the Modal component to app.module.ts
...
import { InvoiceComponent } from './components/invoice/invoice.component';
@NgModule({
declarations: [AppComponent, InvoiceComponent],
...
})
export class AppModule { }
We will open this modal from openInvoice function ofhome.page.ts , here’s how the code will look, including the dummy data inclusion from environment.ts
PDF Download Modal UI
For PDFs, we have to work with traditional table , <tr> , <td> etc elements. So we design our Invoice page with these tags, while using our Angular *ngIf etc.
IMPORTANT: You need to add all CSS inline for PDF styling to work.
Here’s how the HTML code looks for the modal + PDF
In above snippet, we have the id named PrintInvoice from where our PDF content will start (means complete element/div is content for PDF). We will click on Download Invoice button to run the downloadInvoice() method defined in invoice.component.ts
Here’s how the Modal will look like with the order details

Download Logic
In openInvoice method of home.page.ts, we passed the order object through Modal Controller. We receive this value in invoice.component.ts using @Input() order; and we used this order object to show the complete Information in modal. Here’s the logic for invoice.component.ts
The downloadInvoice method will be called once you click on the download Invoice button. The method contains the :-
this.content = document.getElementById('PrintInvoice').innerHTML;
This will capture the whole content of the Invoice/bill which have the Id of PrintInvoice in our html page and save it to the content class variable. And further we can also specify the options for generating PDF like below
let options = {
  documentSize: 'A4',
  type: 'share',
  fileName: 'Order-Invoice.pdf'
};
Here we can specify the file name by which it will be saved in your system/Mobile and specify the file size like ‘A4’ or ‘A3’ etc. After this the main code that generates PDF out of the HTML is :-
this.pdfGenerator.fromData(this.content, options).then((base64) => {
   console.log('OK', base64);
}).catch((error) => {
   console.log('error', error);
});
fromData is the method defined under PDFGenerator Plugin which will convert the HTML => PDF, This method takes the HTML content and options as the argument and returns the base64 URL.
Step 5 — Test on device
If you haven’t added any platform you can run below command to add Android platform and build app
$ ionic cordova platform add android
$ ionic cordova build android
$ ionic cordova run android // device should be attached
This will add the android platform and required plugin in project like below :-

Clicking on DOWNLOAD INVOICEbutton will lead to the following OS PDF handler, where you can download the PDF using that highlighted button.

Here’s the full flow of downloading your invoice in your own Grocery Shopping App in Ionic

Conclusion
In this tutorial we saw how we can generate a PDF for dynamic data, in Ionic apps. Also we learnt how we can design our own PDF and then download it. You can do a lot of designing to make your PDF look cool-er. The limitation being it has to stick to standard HTML tags like <table> , <tr> etc. and the CSS needs to be written inline.
You can now add this amazing PDF generation feature to your Ionic e-commerce or shopping apps, wherever you need to generate invoices.
Stay tuned for more awesome tutorials ! And get complete code for the tutorial by signing up below.
Next Steps
If you liked this blog, you will also find the following blogs interesting and helpful. Feel free to ask any questions in the comment section
Ionic Capacitor
- Basic — Geolocation | Barcode & QR code | Facebook Login (Angular) | Facebook Login (React) | Icon and Splash | Camera & Photo Gallery | Debugging with browser|Theming in Ionic apps
- Advanced — AdMob | Local Notifications | Google Login | Twitter Login | Games using Phaser | Play music | Push Notifications
Ionic Cordova
- Taxi Booking App example with Ionic, Node, Express and MySQL
- Ionic Payment Gateways — Stripe with Firebase | Stripe with NodeJS | PayPal | Apple Pay | RazorPay
- Ionic Charts with — Google Charts | HighCharts | d3.js | Chart.js
- Ionic Authentications — Via Email | Anonymous | Facebook | Google | Twitter | Via Phone
- Ionic Features — Geolocation| QR Code reader | Pedometer| Signature Pad | Background Geolocation
- Media in Ionic — Audio | Video | Image Picker | Image Cropper
- Ionic Essentials — Debugging with browser| Native Storage | Translations | RTL | Sentry Error Monitoring | Social sharing
- Ionic messaging — Firebase Push | Reading SMS | Local Notifications
- Ionic with Firebase — Basics | Hosting and DB | Cloud functions | Deploy App to Firebase | Firebase simulator
- Unit Testing in Ionic — Part 1 | Mocks & Spies| Async Testing
Ionic React Full App with Capacitor
If you need a base to start your next Ionic 5 React Capacitor app, you can make your next awesome app using Ionic 5 React Full App in Capacitor

Ionic Capacitor Full App (Angular)
If you need a base to start your next Angular Capacitor app, you can make your next awesome app using Capacitor Full App

Ionic Full App (Angular and Cordova)
If you need a base to start your next Ionic 5 app, you can make your next awesome app using Ionic 5 Full App


Top comments (0)