React App, Github Repo & AWS Connections
Overview:
For this tutorial we are going to do the following:
- Create a React application
- Create a Github repository
- Connect our Github repository to our AWS account
Initialize a Frontend Application with Create-React-App Using TypeScript Template
Step 1. To start, initiate a frontend application by utilizing the Create-React-App CLI tool with the TypeScript template. Execute the following command in your terminal:
npx create-react-app frontend --template typescript
Alternative Approach: If you prefer to use VITE for your application setup, you can refer to the corresponding documentation here.[Click here for the documentations.]
NOTE: If you are working with an existing application, please proceed directly to Step 4.
Step 2. Install Required Dependencies for UI Components
To facilitate the implementation of tables and forms, we'll employ Ant Design and its corresponding icon library. Execute the following command to install these dependencies:
npm install antd @ant-design/icons
Step 3. Install Axios for API Interactions
Next, install Axios, which is a widely-used library for making HTTP requests. This will enable fetching data from our API:
npm install axios
Step 4. Create Amplify.yml as Entry Point for Backend Integration
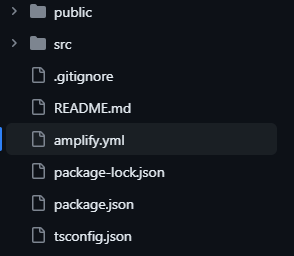
Navigate to the source (src) folder and create a new file named amplify.yml. This file serves as the entry point to connect our AWS SAM backend with our Amplify frontend.

Environment Variable Setup: Observe the line containing the echo command within the file. This line establishes a connection to your SAM backend. For this, we will use
process.env.REACT_APP_ENDPOINT
as the environmental variable corresponding to our API Gateway endpoint.
commands:
        - echo "REACT_APP_ENDPOINT=$ENDPOINT" >> .env
NOTE: If you are using VITE, your echo command should be
commands:
        - echo "VITE_APP_ENDPOINT=$ENDPOINT" >> .env
Please checkout VITE's documentation for accuracy.
amplify.yml
The amplify.yml file serves as a declarative blueprint for directing AWS Amplify on how to orchestrate the build and deployment processes for your application. Below is a breakdown of its various sections and what they signify.
version: 1
frontend:
  phases:
    preBuild:
      commands:
        - npm ci
    build:
      commands:
        - echo "REACT_APP_ENDPOINT=$ENDPOINT" >> .env
        - npm run build
  artifacts:
    baseDirectory: build
    files:
      - "**/*"
  cache:
    paths:
      - node_modules/**/*
Understanding "amplify.yml":
Version Specification
The configuration commences with version: 1, which signifies the version of the YAML file. This is crucial for AWS Amplify to correctly interpret the directives laid out in the configuration.
Frontend Build Settings
The frontend section delineates the instructions specifically related to the frontend build operations. Within this ambit, phases denote the sequential steps in the build process.
Pre-Build Phase:
Executed before the primary build action commences, the command npm ci is triggered to install project dependencies. This command relies on the package-lock.json file to ensure a consistent environment by installing the specified package versions.Build Phase:
This phase focuses on assembling the frontend code. It comprises two main commands:
- echo "REACT_APP_ENDPOINT=$ENDPOINT" >> .env writes the value of the ENDPOINT environment variable to a .env file, associating it with the REACT_APP_ENDPOINT key. This is a standard practice in React-based applications for handling environment-specific configurations.
- npm run build executes the build script specified in the package.json file, typically compiling and bundling the React application for production deployment.
Artifacts Section
The artifacts section outlines which resultant files ('artifacts') from the build process should be preserved and their respective storage locations. The baseDirectory: build directive specifies that these artifacts will reside in the build directory post-build. Furthermore, the files sub-section, featuring a "*/" glob pattern, denotes that every file and its sub-files within the baseDirectory are to be categorized as artifacts.
Cache Strategy
The cache section elaborates on caching mechanisms, aimed at accelerating subsequent build processes by reusing previously generated data. The paths sub-section specifies node_modules/*/, indicating that the complete contents of the node_modules directory should be cached. This optimization is critical, as re-downloading all node modules for each build can be time-consuming; therefore, caching can significantly expedite the overall build process.
Establishing a GitHub Repository for our Amplify-SAM Application
Step 1. Create a New GitHub Repository
- Navigate to GitHub and initiate a new repository. For the purpose of this project, we will name the repository "amplify-sam-app".
- Set the repository's visibility to 'Public'.
NOTE: If you choose to set the repository to 'Private,' you'll need to generate a GitHub token. Refer to Step 3 for guidance on this process.
Step 2. Initialize and Push Repository from Local Environment
Open a terminal and navigate to the root directory.
NOTE: Follow the set of commands below based on your requirements
- To Create a New Repository from the Command Line
echo "# amplify-sam-app" >> README.md
git init
git add README.md
git commit -m "first commit"
git branch -M main
git remote add origin https://github.com/_'your github username_'/amplify-sam-app.git
git push -u origin main
- To Push an Existing Repository from the Command Line:
git remote add origin https://github.com/'your github username'/amplify-sam-app.git
git branch -M main
git push -u origin main
Step 3. (Optional) If the GitHub repository is set to 'Private,' it becomes necessary to generate a GitHub token to grant SAM the required access permissions. This step is not applicable if the repository is configured as 'Public.'
Follow these steps to create a github token:
- On the top right corner, click your photo and go to Settings > Developer Settings > Personal Access Tokens > Tokens (classic)
- On the drop down Generate new token select Generate new token (classic).
- Select the following scopes: repo, admin:org, admin:public_key, admin:repo_hook, admin:org_hook
- Then save
- Copy the token
- Go to your AWS console and search for "Secret Manager"
- Click on Store a new secret
- Select 'other type of secret', then 'Plaintext' and paste the github token, press next
- Create a name, in our case we will name it "github-token" (we will use this name to our SAM build).
The next step is optional (configuration rotation), just press next
Review everything and submit.
Lastly
As the crucial final step, it is imperative to establish a connection between our AWS account and GitHub for seamless integration. For the most current guidelines on accomplishing this, please refer to the AWS official documentation. Simply proceed by following the instructions detailed therein.
Creating GitHub Connections in AWS


Top comments (0)