When working on complex React applications, we frequently encounter the challenge of keeping our routing code clean, scalable, and easy to manage. A common practice is to centralize all routes within the App.tsx component, which can result in an overloaded and hard-to-maintain file, especially as our application grows and evolves. This not only makes the code less readable but also complicates the addition of new functionalities, such as authentication or permission management.
In this post, I want to share an alternative solution to the standard implementation of React-Router v6, designed specifically to address these issues. My approach focuses on a modular structure that separates the route definitions and their associated logic into distinct files, thereby facilitating the scalability and maintenance of the project. Through a series of examples and explanations, I will demonstrate how this methodology not only improves code organization but also eases the integration of advanced features without complicating the existing routing system.

By the end of this post, you'll have a clear understanding of how to implement a routing system in React that is not only robust and scalable but also intuitive to maintain and expand.
Table of Contents
1 Initial State of the App
2 Routing Fundamentals in React
3 Structuring Routes
4 Routes Rendering
5 Dynamic Navigation with NavLink
6 Conclusions
Initial State of the App
Before we start integrating React Router v6 into our application, let's take a look at what it looked like at the beginning. At this initial stage, our application is limited to a simple To-Do list, accompanied by a header that contains only a "Home" section.
In this image, we can observe the functionality of our Todo List, with its simplistic style and without any additional navigation interaction.
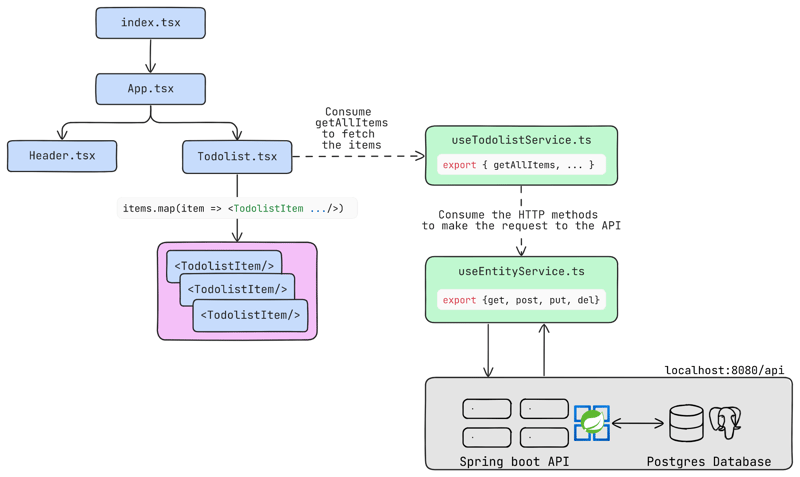
Before the integration of React Router v6, our application doesn't have any routing system, which means our URLs remain simple and static, with no indication of dynamic navigation. Let's take a closer look at the internal structure of our application at this point:
In this image, we see the basic organization of our application. The App, acting as the main component, contains two child components: Header and TodoList. The Header, for now, displays only one inactive tab called "Home", while TodoList handles the task list and consumes useTodolistService to manage backend requests.
Now that we have a clear understanding of where we started, it's time to integrate React Router v6 into our application.
If you want to implement this guide as I explain its various parts, I invite you to clone my repository where you'll find my initial application before integrating react-router.
With that said, let's now move on to refresh the key React Router components that we'll use initially.
Routing Fundamentals in React
Before diving into integrating React Router into our application, it's essential to understand the basics of routing in React. In this section, we'll explore the fundamentals that lay the groundwork for understanding how React Router components work.
BrowserRouter Component:
The BrowserRouter component is the cornerstone of routing in React Router. By wrapping our application with BrowserRouter, we enable routing functionality throughout our application. In addition to providing routing functionalities such as tracking navigation history and updating the URL, BrowserRouter also acts as a context provider, allowing the use of other React Router components in our application.
<BrowserRouter>
  <App />
</BrowserRouter>
Routes and Route Components:
The Routes and Route components are essential in React Router for defining the paths and the components that will be rendered on those paths. Routes acts as the container for our Route components, and each Route defines a path and the component that will be rendered when the path matches the current URL.
import { Routes, Route } from 'react-router-dom';

<Routes>
  <Route path="/about" element={<About />} />
  <Route path="/contact" element={<Contact />} />
</Routes>
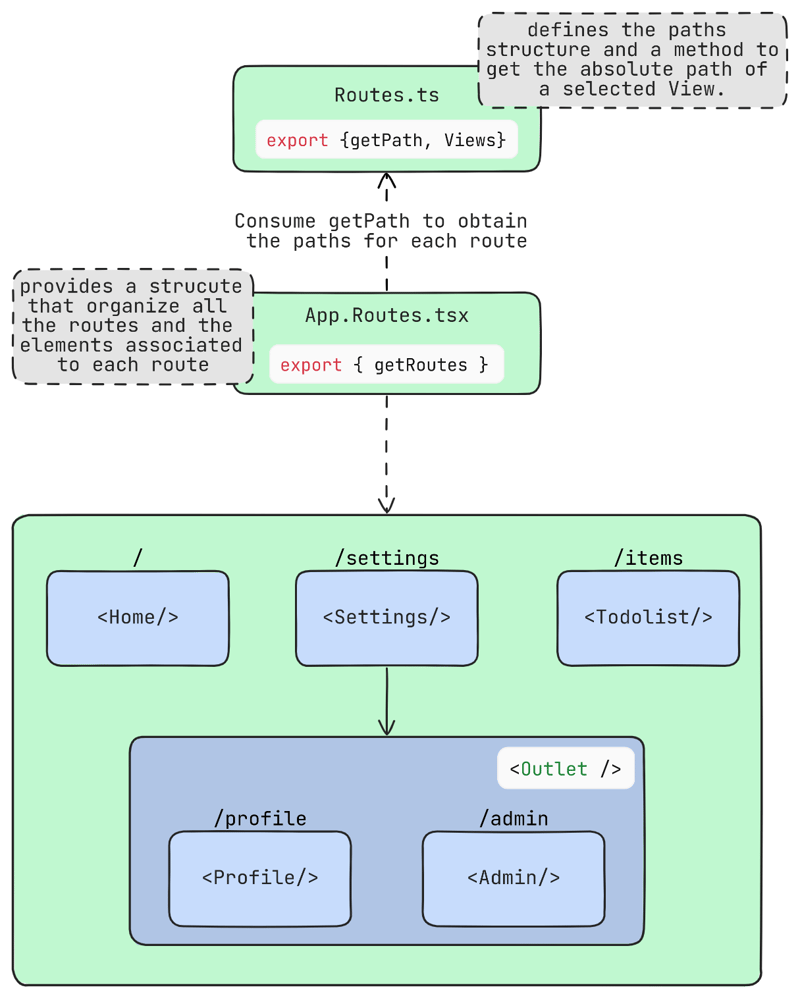
With these fundamentals in mind, we're now ready to dive deeper into the implementation of routing in our application and understand how the Routes.ts and App.routes.tsx components are part of this structure.
I want to highlight that for practical purposes, I've added various components which will be used simply to demonstrate the functionality of react-router but will not have a practical functionality in the final app (at least not in this iteration).
Structuring Routes
After incorporating React Router into our application and wrapping our main component with BrowserRouter, the next essential step is to declare our views and how routing will be structured. This process is crucial not only for navigation within the application but also for its future maintenance and scalability. The decision to separate route definitions into Routes.ts and routing logic into App.Routes.tsx is not trivial; it reflects a thoughtful design aimed at maximizing the clarity and flexibility of the code.
Routes.ts: Fundamentals of Route Structure
The Routes.ts file plays a crucial role by acting as the blueprint for our routes. By defining an enum for our views and a tree structure for the routes, we establish a solid foundation that facilitates referencing different sections of our application in a clear and maintainable way.
export enum Views {
    HOME,
    ITEMS,
    SETTINGS,
    PROFILE,
    NOT_FOUND,
}

interface PathNode {
    id: Views | null,
    path: string,
    children?: PathNode[],
}

const paths: PathNode[] = [
    {
        id: Views.HOME,
        path: "/",
    },
    {
        id: Views.ITEMS,
        path: "/items",
    },
    {
        id: Views.SETTINGS,
        path: "/settings",
        children: [
            {
                id: Views.PROFILE,
                path: "/profile",
            }
        ]
    },
    {
        id: Views.NOT_FOUND,
        path: "/not-found",
    },
];
And the getPath(id: Views) function, by recursively iterating over this route tree, provides a mechanism to efficiently build nested routes. This allows our routes to reflect the structure of the application in a way that is intuitive for both developers and end users.
const paths: PathNode[] = [...];

export const getPath = (id: Views): string => {
    const pathsStack: string[] = [];
    const idFounded = findPath(paths, id, pathsStack);

    if (!idFounded) {
        return "";
    } else {
        return pathsStack.reverse().join("");
    }
}

/**
 * Recursively searches for a specific `PathNode` by its `id` within an array of `PathNode`s.
 * If the target node is found, it constructs the full path to it by utilizing a stack to
 * store path segments found during the search.
 */
const findPath = (nodes: PathNode[], targetId: Views, stack: string[]): boolean => {
    for (const node of nodes) {
        if (node.id === targetId) {
            stack.push(node.path); // It found the node, then add the path into the stack
            return true; // Indicates that founds the node
        }
        if (node.children) {
            if (findPath(node.children, targetId, stack)) {
                // If it finds the node in the childrens, then it also add the path of the parent into the stack
                stack.push(node.path);
                return true;
            }
        }
    }

    return false; // The node was not found
};
App.Routes.tsx: Dynamic Route Implementation
Moving on to App.Routes.tsx, we'll see how the structure defined in Routes.ts is consumed to create a dynamic routing system. By defining RouteDefinition and extending RouteProps with custom properties, this approach allows for a richer and more flexible configuration of our routes. This is particularly useful for advanced use cases such as nested routes, indexed route configurations, and the integration of additional metadata (for example, labels or roles required to access a specific route) into our route definitions.
interface CustomRouteProps {
    routes?: RouteDefinition[];
    isIndex?: boolean;// Defines if the route is index. Is used to indicate when a child route is the default route of a nested routes.
    label?: string;
}

export type RouteDefinition = RouteProps & CustomRouteProps;

export const getRoutes = (): RouteDefinition[] => ([
    {
        path: getPath(Views.HOME),
        element: <Home/>,
        label: "Home"
    },
    {
        path: getPath(Views.ITEMS),
        element: <Todolist/>,
        label: "Items"
    },
    {
        path: getPath(Views.SETTINGS),
        Component: Settings,
        label: "Settings",
        routes: [
            {
                path: getPath(Views.PROFILE),
                element: <Profile/>,
                label: "Profile"
            },
        ]
    }
]);
The function getRoutes() demonstrates how we can assemble our routes in a modular way, leveraging the flexibility provided by getPath(id:Views) to resolve routes based on our Views structure. This facilitates the management of complex routes and their evolution over time.
One noteworthy aspect is the choice of Component for the Settings route. This decision is based on Settings specific need to function as a parent component that manages subroutes. Unlike other routes defined using element, which are suitable for components that are rendered directly without requiring additional props, Settings requires a more dynamic capability. By declaring it as a Component, we can directly pass a set of props to Settings, including the definition of its subroutes. This allows Settings to build a dynamic sidebar, whose links depend on these subroutes, making it easy to create structured and coherent navigation within the settings section.
With this explanation, we now have a better understanding of how Routes.ts and App.routes.tsx interact with each other:

Routes Rendering
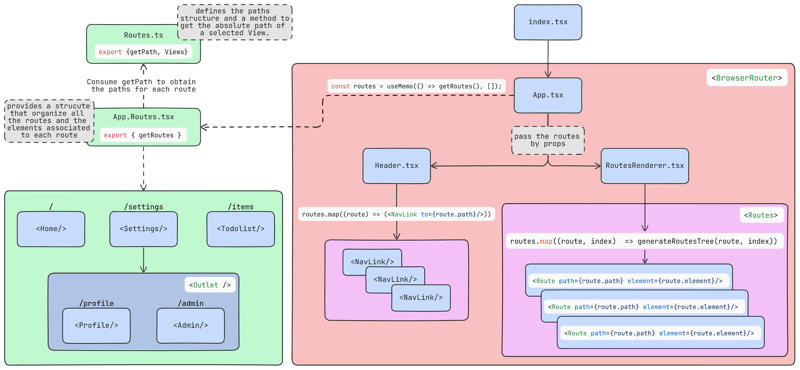
With a solid understanding of how Routes.ts and App.routes.tsx work together to structure the routes of our application, the next step is to explore how these definitions are consumed to effectively render the Route components in our application. For this, it's essential to understand the role played by RoutesRenderer, a component designed to interpret and visualize the previously defined route structure.
The App.tsx component serves as the entry point for our application, where RoutesRenderer is invoked, passing it the list of routes obtained through getRoutes(). This modular approach allows us to maintain a clear separation between the definition of routes and their implementation, facilitating the maintainability and scalability of the routing system:
export const App = () => {

  const routes = useMemo(() => getRoutes(), []);

  return (
    <div className="App">
      <Header routes={routes}/>
      <RoutesRenderer routes={routes}/>
    </div>
  );
}
Understanding RoutesRenderer
RoutesRenderer is a key component for the dynamic rendering of routes. Its main function is to interpret each route definition and convert it into a Route component that React Router can understand and handle. This process involves checking whether a specific route should be rendered as a component with props (Component) or as a static JSX element (element).
export const RoutesRenderer: FunctionComponent<RoutesRendererProps> = ({routes}) => {
    const getElement = (route: RouteDefinition) => {
        if (route.Component) {
            return (<route.Component {...route as any}/>);
        } else {
            return route.element;
        }
    }

    const generateRoutesTree = (route: RouteDefinition, parentKey: number): JSX.Element => {
        ...
    }

    return (
        <Routes>
            {routes.map((route, index) => generateRoutesTree(route, index))}
            <Route key={'not-found'} path={'*'} element={<NotFoundPage/>}/>
        </Routes>
    );
};
The getElement function decides how to render each route, based on whether Component is present. If so, the component is rendered by passing it the necessary props. Otherwise, the defined element is used. This flexibility is crucial to support advanced use cases, such as injecting props into specific routes.
const generateRoutesTree = (route: RouteDefinition, parentKey: number): JSX.Element => {
        // If the route has nested routes, first create a component <Route> for the parent route
        if (route.routes) {
            return (
                <Route key={parentKey} path={route.path} element={getElement(route)}>
                    {route.routes.map((childRoute, childIndex) => generateRoutesTree(childRoute, childIndex))}
                </Route>
            );
        } else {
            const routes = [<Route key={parentKey} path={route.path} element={getElement(route)} />];

            if (route.isIndex) {
                // For index routes, ensure they are rendered at the parent path
                routes.unshift(<Route key={`${parentKey}-index`} index element={route.element} />);
                // Add a catch-all not-found route specific to this nested route's context
                routes.push(<Route key={`${parentKey}-notfound`} path="*" element={<NotFoundPage/>} />);
            }

            return <>{routes}</>;
        }
    }
generateRoutesTree is where RoutesRenderer demonstrates its ability to handle nested routes by creating a tree structure of routes. If a route has child routes, it first creates a Route component for the parent route, within which the child routes are recursively mapped. This functionality ensures that our application can efficiently handle complex route structures.
In conclusion, RoutesRenderer encapsulates the logic necessary to transform our route definition into a structure of Route components that React Router can manage. Its design ensures that the implementation of our routes remains flexible, maintainable, and scalable by clearly separating route definition logic from its rendering. This separation of concerns is crucial for the development of complex and easily updatable applications.
Dynamic Navigation with NavLink
Before delving into how Header leverages routes to create a navigation bar, it's essential to understand what NavLink is and why it's preferable for our use case.
What is NavLink?
NavLink is a specialized component from react-router designed for creating navigation links in web applications. Its main advantage over the basic Link component lies in its ability to apply styles conditionally, making it easier to visually identify the active link. This enhances the user experience by providing clear feedback on which section of the application is currently being viewed.
By clicking on a NavLink, it changes the application's URL to the path specified in its to property, and React Router responds to this change by displaying the component that matches the new route. This functionality is key for smooth and dynamic navigation in single-page applications (SPAs), where component updates are based on the current URL without needing to reload the entire page.
Using NavLink in Header
The Header component is responsible for rendering a top navigation bar that utilizes NavLink to generate links to different sections of the application, based on the provided routes. By passing the routes as props to Header, it can iterate over them and create a NavLink for each one, applying conditional styling to highlight the active link.
export const Header: FC<HeaderProps> = ({routes}) => {

    return (
        <div className="header">
            <ul className="header-ul">
                {
                    routes.map((route, index) => (
                        <li key={index} style={{height: '100%', display: 'flex', alignItems: 'center'}}>
                            <NavLink className={({ isActive }) => isActive ? "header-nav-active" : "header-nav"} to={route.path?.toString() as string}>
                                <TText type={TextType.HEADER2} style={{textAlign: 'center'}}>{route.label}</TText>
                            </NavLink>
                        </li>
                    ))
                }
            </ul>
        </div>
    );
}
This approach ensures that the navigation bar in the Header is dynamic and automatically updates to reflect the route structure of the application. By using NavLink, Header not only provides links to the sections of the application but also enhances the user experience by visually highlighting the link to the active section.
Conclusions
In this article, we have explored an alternative methodology for implementing a routing system in React applications, designed to improve code organization, scalability, and maintainability. Through a modular structure and separation of concerns, we have demonstrated how it is possible to efficiently manage an application's routes, facilitating the incorporation of new features and the handling of complex use cases.

By concentrating our routes in specific files such as Routes.ts and App.routes.tsx, we have managed to maintain clean and readable code, adhering to the SOLID principle of Single Responsibility. This approach has enabled us to build a more robust and easily maintainable application, suited to tackle projects of any size and complexity.
As the next step, we invite you to continue exploring and enhancing your application. Adding new routes is as simple as modifying the Routes.ts and App.routes.tsx files, demonstrating the flexibility and scalability of our routing architecture.
Adding a New Route
To add a new route to your application, let's consider the case of the Admin view, which is contained within Settings. Here are the steps you should follow:
- In Routes.ts, define the new route using the Views and PathNode structure:
export enum Views {
    HOME,
    ...
    ADMIN,
}

const paths: PathNode[] = [
    {
        id: Views.HOME,
        path: "/",
    },
    ...
    {
        id: Views.SETTINGS,
        path: "/settings",
        children: [
            ...
            {
                id: Views.ADMIN,
                path: "/admin",
            }
        ]
    },
];
2.In App.routes.tsx, add the new route:
export const getRoutes = (): RouteDefinition[] => ([
    {
        path: getPath(Views.HOME),
        element: <Home/>,
        label: "Home"
    },
    ...
    {
        path: getPath(Views.SETTINGS),
        Component: Settings,
        label: "Settings",
        routes: [
            ...
            {
                path: getPath(Views.ADMIN),
                element: <Admin/>,
                label: "Admin"
            }
        ]
    }
]);
With this simple modification, your application will expand seamlessly, maintaining the coherence and modular structure we have established. And so, this is what the final application would look like.
I appreciate you all reading the entire article. I hope it has been useful to you and has provided you with new tools or ideas for your projects. To find out when the next post is published, where I will show how I successfully integrated Auth0 into my app using the routing system I explained, I invite you to follow me on my Dev.to profile or LinkedIn. I will announce there when it is available.
See you next time!


Top comments (0)