
Written by David Omotayo✏️
React has revolutionized how developers build user interfaces since its inception, with every iteration providing innovative and powerful ways for creating dynamic, component-based applications.
Despite its many strengths, React has traditionally lacked a dedicated compiler compared to frameworks like Vue and Svelte. This has forced developers to use Hooks like useMemo and useCallback to optimize performance and manage re-renders.
React 19, the latest iteration of the library, addresses this need for simpler performance optimization with the new React Compiler! This innovation promises to streamline frontend development with React by eliminating the need for manual memoization and optimization.
In this article, we will explore what the React Compiler is, how it works, and the benefits it brings to frontend development.
What is a compiler?
Considering some developers might have exclusively used React throughout their frontend development journey, the term "compiler" might be alien. Therefore, it might help to start with a brief introduction to compilers in general.
While I'm not suggesting a general lack of knowledge about compilers among React developers, it's important to differentiate between traditional compilers used in programming languages and those found in web frameworks. Let’s explore how they differ and the specific functionalities of each compiler type.
Traditional compilers
Traditional compilers are designed to translate high-level programming languages like C, Java, or Rust into lower-level machine code that can be executed by a computer's hardware.
The compiler goes through a series of phases, such as analysis, optimization, and code generation. Then, it links the machine code with libraries and other modules to produce the final executable binary that can be run on a specific platform.
Compilers in web frameworks
Web framework compilers, on the other hand, are designed to transform declarative component-based code into optimized JavaScript, HTML, and CSS that can be run in a web browser. Although every framework compiler handles the compilation process differently, they generally go through the same phases:
- Template parsing: The template part of the component (HTML-like syntax) is parsed into a syntax tree
- Script parsing: The script part (JavaScript) is parsed to understand the component logic
- Style parsing: The style part (CSS) is parsed and scoped to the components
- Code transformation: Every framework’s compiler handles the code transformation phases differently. For example, Vue converts the template into render functions, while Svelte compiles the template and script directly into highly optimized JavaScript
- Optimization: Performs optimizations like static analysis, tree shaking, and code splitting
- Code generation: Generates the final JavaScript code that can be executed in the browser
- Output: The output is typically JavaScript code (along with HTML and CSS) that is ready to be included in a web application and run in the browser
The need for a compiler in React
Now, you might be wondering: If React doesn't have a compiler, how does it handle the concepts discussed earlier, since they seem essential to any web framework? The answer lies in React's core mental model, which we need to understand first before we dive into the intricacies of the React Compiler.
At its core, React uses a declarative programming model. This model lets you describe how the UI should look based on the current application state. Instead of detailing the steps to manipulate the DOM and update the UI (imperative programming), you specify the desired outcome, and React takes care of updating the DOM to match that outcome.
Take the following component, for example:
function ReactComponent() {
  return (
    <div>
      <h1>Hello, World!</h1>
    </div>
  );
}
On initial render, this snippet declares that when ReactComponent is rendered, it should produce a div containing an h1 element with the text "Hello, World!".
Now, let's suppose this component has a state and accepts props from a parent component:
function ReactComponent(props) {
const [state, setState] = useState(null);
  return (
    <div>
      <h1>Hello, World!</h1>
    </div>
  );
}
In the case where the state or props of this component change, React undergoes a reactive process to re-render the component. This ensures its declarations are always up to date with the current state.
This process is handled through React's reconciliation, which determines the minimal number of changes needed to update the UI to match the new state.
During reconciliation, React uses an in-memory representation of the UI called the virtual DOM. It marks components needing updates and uses a diffing function to efficiently identify the changes between the old and new virtual DOM before updating the real DOM.
The bottom line is that React is designed to re-render. As the name suggests, components are re-rendered whenever their state changes to keep the application's UI in sync with the underlying state.
Re-rendering problems in React
As explained in the previous section, React was designed to re-render. However, this can become a problem because React not only re-renders a component when its state changes, but also re-renders every component inside it and the component inside that component until it reaches the end of the component tree.
In the following example, when the button is clicked and the message state updates to "Hello, React!", both the childComponent and AnotherChildComponent components will re-render. This happens even though the AnotherChildComponent component doesn’t use the message prop:
import React from 'react';

function AnotherChildComponent() {
  return <p>Another child component</p>;
}

function ChildComponent({ message }) {
  return <p>{message}</p>;
}

export function ParentComponent() {
  const [message, setMessage] = useState('Hello, World!');

  const updateMessage = () => {
    setMessage('Hello, React!'); // This will cause ChildComponent and AnotherChildComponent to re-render.
  };

  return (
    <div>
        <AnotherChildComponent />
      <ChildComponent message={message} />
      <button onClick={updateMessage}>Update Message</button>
    </div>
  );
}
This is not necessarily bad, but but if it happens too often or one of the components downstream is heavy — i.e., has complex computation — it can severely affect the app's performance.
Consider this example:
import React, { useState } from 'react';

// A function to simulate an expensive computation
function expensiveComputation(num) {
  console.log('Running expensive computation...');
  let result = 0;
  for (let i = 0; i < 1000000000; i++) {
    result += num * Math.random();
  }
  return result;
}

function HeavyComponent({ number }) {
  // Performing the expensive computation directly in the render
  const result = expensiveComputation(number);

  return (
    <div>
      <p>Expensive Computation Result: {result}</p>
    </div>
  );
}

export function ParentComponent() {
  const [number, setNumber] = useState(1);
  const [count, setCount] = useState(0);

  const incrementCount = () => {
    setCount(count + 1);
  };

  return (
    <div>
      <HeavyComponent number={number} />
      <button onClick={incrementCount}>Increment Count: {count}</button>
    </div>
  );
}
Every time the count state changes, the HeavyComponent re-renders and calls the expensiveComputation function, which will significantly impact performance.
To prevent this chain of re-renders and optimize rendering, developers had to manually memoize these components. Memoization is an optimization technique first introduced in React 16, it involves caching the results of expensive function calls and reusing them when the same inputs occur again, preventing unnecessary re-renders.
React offers a couple of tools for memoization: React.memo, useMemo, and useCallback. These Hooks are typically used to wrap components and props to tell React that they don’t depend on the parent component. When the parent component re-renders, the wrapped component won't re-render.
Using this knowledge, we can optimize the previous example:
import React, { useState, useMemo } from 'react';

// A function to simulate an expensive computation
function expensiveComputation(num) {
  console.log('Running expensive computation...');
  let result = 0;
  for (let i = 0; i < 1000000000; i++) {
    result += num * Math.random();
  }
  return result;
}

const HeavyComponent = React.memo(({ number }) => {
  // Memoize the result of the expensive computation
  const result = useMemo(() => expensiveComputation(number), [number]);

  return (
    <div>
      <p>Expensive Computation Result: {result}</p>
    </div>
  );
});

export function ParentComponent() {
  const [number, setNumber] = useState(1);
  const [count, setCount] = useState(0);

  const incrementCount = () => {
    setCount(count + 1);
  };

  return (
    <div>
      <HeavyComponent number={number} />
      <button onClick={incrementCount}>Increment Count: {count}</button>
    </div>
  );
}
Here, we use the useMemo Hook to memoize the result of the expensiveComputation function in the HeavyComponent component, so the computation is only recalculated when the number prop changes. We also use React.memo to wrap the HeavyComponent to prevent it from re-rendering unless its properties change.
These memoization Hooks are powerful and work well. However, using them correctly is challenging. It's hard to know when and how to use them, leading developers to clutter their code with many functions and components wrapped with useCallback and useMemo, hoping to improve app speed.
This is where the React Compiler comes in.
What is the React Compiler?
React Compiler, originally known as React Forget, was first introduced at React Conf in 2021. It’s a low-level compiler that automatically grabs your application’s code, and converts it into code where components, their properties, and hook dependencies are automatically optimized.
Essentially, React Compiler performs tasks analogous to Hooks like memo, useMemo, and useCallback where necessary to minimize the cost of re-rendering.
The compiler has evolved since it was first introduced. Its recent architecture does more than just memoize components. It performs complex checks and optimizes advanced code patterns, such as local mutations and reference semantics. Meta apps, such as Instagram, have been using the compiler for some time.
How React Compiler works
During the compilation process, the React Compiler refactors your code and uses a Hook called _c, formerly known as useMemoCache, to create an array of cacheable elements.
It does this by taking parts of each component and saving them to slots in the array. Then, it creates a memoization block, which is basically an if statement that checks if any of the elements in the array have changed the next time the component is invoked. If there aren’t any changes, it returns the cached (original) element.
For example, if we have a simple component like the following:
function SimpleComponent({ message }) {

  return (
    <div>
      <p>{message}</p>
    </div>
  );
}
The compiled output will look like this:
function SimpleComponent(t0) {
  const $ = _c(2);

  const { message } = t0;
  let t1;

  if ($[0] !== message) {
    t1 = (
      <div>
        <p>{message}</p>
      </div>
    );
    $[0] = message;
    $[1] = t1;
  } else {
    t1 = $[1];
  }

  return t1;
}
Let’s break down what’s happening in this code. First, the compiler uses the _c Hook to initialize an array with two slots to cache the component state, Then, it destructures the message prop from the t0 prop object and creates an implicit t1 variable that will hold the JSX element:
const $ = _c(2);

const { message } = t0; // Extract message prop from props object (t0)
let t1; // Variable to hold the JSX element
Next, the compiler creates a memoization block to check if the message prop has changed before creating a new JSX, assigning it to the t1 variable, and updating the array with the new messageand JSX element. If the message hasn’t changed, it uses the cached JSX element:
if ($[0] !== message) { // Checks if `message` prop has changed
  t1 = ( // Creates JSX element if `message` changed
    <div>
      <p>{message}</p>
    </div>
  );
  $[0] = message; // Update cache with new message
  $[1] = t1; // Update cache with new JSX element
} else {
  t1 = $[1]; // Reuse JSX element from cache if message hasn't changed
}
If you want to try out the React Compiler, you can use the React Compiler playground or integrate it with your project. We’ll cover how to do so in the following sections. Additionally, if you’d like a deep dive and a more complex overview of the compiler, watch Sathya Gunasekaran’s "React Compiler deep dive" talk at React Conf.
Code compliance for optimization
To efficiently compile your code and optimize performance, the React Compiler has to understand your code. It does this with its knowledge of JavaScript and the rules of React. These are subtle guidelines designed to help developers write predictable and efficient React applications with fewer bugs.
Here are some of React’s rules:
- Hooks should only be called at the top level: Hooks must be called at the top level of a functional component or custom Hook. They should not be placed inside loops, conditions, or nested functions to ensure the Hooks are called in the same order each time a component renders
- Only call Hooks from React code: Hooks should be called only from functional components or custom Hooks. They should not be used in regular JavaScript functions, class components, or any non-React code
- Side effects must run outside of the render phase: Side effects, such as data fetching, subscriptions, or manual DOM manipulations, should not occur directly in the render phase. Instead, they should be managed using the
useEffectHook or similar Hooks - Props and states are immutable: Props and states should be treated as immutable. Instead of modifying them directly, use state setters (e.g.,
setStateor similar functions provided by Hooks likeuseState)
In the compilation process, if the compiler detects that these rules are being violated, it’ll automatically skip over the components or Hooks where such violations occur and safely move on to other code. Similarly, if your code is already well-optimized, you may not notice any major improvement with the compiler turned on.
Additionally, if the compiler finds that it can’t preserve the optimization in a memoized component, it’ll skip that component and instead let the manual memoization do its thing.
Take the following code, for example:
import React, { useState, useMemo } from 'react';

function ItemList({ items }) {
  const [filter, setFilter] = useState('');
  const [sortOrder, setSortOrder] = useState('asc');

  const filteredAndSortedItems = useMemo(() => {
    const filteredItems = items.filter(item => item.includes(filter));
    const sortedItems = filteredItems.sort((a, b) => {
      if (sortOrder === 'asc') return a.localeCompare(b);
      return b.localeCompare(a);
    });
    return sortedItems;
  }, [filter, sortOrder, items]);

  return (
    <div>
      <input
        type="text"
        value={filter}
        onChange={e => setFilter(e.target.value)}
        placeholder="Filter items"
      />
      <select value={sortOrder} onChange={e => setSortOrder(e.target.value)}>
        <option value="asc">Ascending</option>
        <option value="desc">Descending</option>
      </select>
      <ul>
        {filteredAndSortedItems.map((item, index) => (
          <li key={index}>{item}</li>
        ))}
      </ul>
    </div>
  );
}

export default ItemList;
The React Compiler will skip this code because the value being memoized might be mutated elsewhere in the component or application, which will invalidate the memoization, leading to bugs and performance issues.
If you try the code in the React Compiler playground, you’ll get the following error: 
Trying out the React Compiler
The React Compiler is still experimental and isn't recommended for use in production. However, if you want to try it in smaller projects or integrate it with existing projects, this section will guide you on how to get started with the React Compiler.
Before installing the compiler, there are a few prerequisites that you might want to take care of. This includes checking your project’s compatibility with the compiler and installing an ESLint plugin for the compiler.
Checking compatibility with the React Compiler
To check if your codebase will be compatible with the compiler, run the following command in your project’s directory:
npx react-compiler-healthcheck@latest
This command will check how many components can be optimized, whether strict mode is enabled, and if you have libraries that may be incompatible with the compiler installed. If your code complies with the rules, you'll get a response similar to the following: 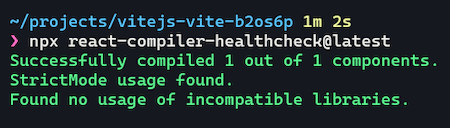
Installing the ESLint plugin for the React Compiler
The React Compiler includes an ESLint plugin that helps ensure your code follows React rules and catches issues. The plugin is independent of the compiler, meaning you can use it without the compiler. Therefore, to use it, you need to install it:
npm install eslint-plugin-react-compiler
Then add it to your ESLint config:
module.exports = {
  plugins: [
    'eslint-plugin-react-compiler',
  ],
  rules: {
    'react-compiler/react-compiler': "error",
  },
}
Using the React Compiler in existing projects
At the time of writing, the React Compiler is only compatible with React 19. To use the compiler, you need to upgrade your project to the latest testing versions of React and React DOM. To do this, run the following command in your project’s directory:
npm install --save-exact react@rc react-dom@rc
You should see something like the following in your terminal window:  Next, install the Babel plugin for the compiler,
 babel-plugin-react-compiler. This plugin lets the compiler run in the build process:
npm install babel-plugin-react-compiler
After installing, add the following to the plugins array in your Babel config file:
// babel.config.js
const ReactCompilerConfig = { /* ... */ };

module.exports = function () {
  return {
    plugins: [
      ['babel-plugin-react-compiler', ReactCompilerConfig], // must run first!
      // ...
    ],
  };
};
If you use Vite, add the plugin to the vite.config file instead:
// vite.config.js
const ReactCompilerConfig = { /* ... */ };

export default defineConfig(() => {
  return {
    plugins: [
      react({
        babel: {
          plugins: [
            ["babel-plugin-react-compiler", ReactCompilerConfig],
          ],
        },
      }),
    ],
    // ...
  };
});
Make sure the compiler runs first in the build pipeline. In other words, if you have other plugins, list them after the compiler. Also, add the ReactCompilerConfig object at the top level of the config file to avoid errors.
Now, if you start the development server and open up React Developer Tools in the browser, you should see a Memo ✨ badge displayed next to components that have been optimized by the compiler: ![]() Et voilà! You’ve successfully integrated the React Compiler into your project.
Et voilà! You’ve successfully integrated the React Compiler into your project.
Using the React Compiler in new projects
The best way to get started with the React Compiler in a new project is to install the canary version of Next.js, which has everything set up for you. To start a project, use the following command:
npm install next@canary babel-plugin-react-compiler
Next, turn on the compiler using the experimental option in the next.config.js file:
// next.config.js
/** @type {import('next').NextConfig} */
const nextConfig = {
  experimental: {
    reactCompiler: true,
  },
};

module.exports = nextConfig;
The experimental option ensures that the compiler is supported in the following environments:
- App Router
- Page Router
- Webpack
Scoped usage of the React Compiler
As we’ve discussed, the compiler is still experimental and isn’t recommended for use in production. This is due to JavaScript’s flexible nature, which makes it impossible for the compiler to catch every possible violation of the rules laid out and may lead to your code compiling with false negatives.
For this reason, you might want to limit the scope of the React Compiler to certain parts of your application rather than the entire project. This way, you can gradually adopt the compiler and experiment with its benefits without affecting your entire codebase.
There are two main ways to achieve this. Let’s take a quick look at both.
Using the React Compiler in a specific directory
You can configure your build setup to use the React Compiler only for files in a specific directory. To do this, add the following code to the ReactCompilerConfig object in your Babel or Vite config file from earlier:
const ReactCompilerConfig = {
  sources: (filename) => {
    return filename.indexOf('src/path/to/dir') !== -1;
  },
};
Then replace 'src/path/to/dir' with the path to the folder you want the compiler to operate on.
Using the directive opt-in option
Alternatively, you can opt-in to the compiler on a per-file basis using a special directive comment at the top of your file. This method lets you enable the compiler for individual files without changing the overall setup. To do this, simply add the following to the ReactCompilerConfig object:
const ReactCompilerConfig = {
  compilationMode: "annotation",
};
Next, add the "use memo" directive to any component you want the compiler to optimize individually:
// src/app.jsx
export default function App() {
  "use memo";
  // ...
}
Conclusion
The React Compiler may not offer much as it is right now, especially when compared to other frameworks’ capabilities. And unfortunately, it currently doesn't have the potential to eliminate dependency arrays in Hooks like useEffect — an improvement that many developers eagerly anticipate.
Nonetheless, the compiler offers a glimpse into what could be possible in the near future. For instance, there’s potential for making dependency arrays in Hooks obsolete. This could simplify state management and side effects in React components, reducing boilerplate code and minimizing the risk of bugs related to incorrect dependencies.
In the meantime, experimenting with the React Compiler and contributing feedback will help shape its development as well. Happy hacking!
Get set up with LogRocket's modern React error tracking in minutes:
- Visit https://logrocket.com/signup/ to get an app ID.
- Install LogRocket via NPM or script tag.
LogRocket.init()must be called client-side, not server-side.
NPM:
$ npm i --save logrocket

// Code:

import LogRocket from 'logrocket';
LogRocket.init('app/id');
Script Tag:
Add to your HTML:

<script src="https://cdn.lr-ingest.com/LogRocket.min.js"></script>
<script>window.LogRocket && window.LogRocket.init('app/id');</script>
3.(Optional) Install plugins for deeper integrations with your stack:
- Redux middleware
- ngrx middleware
- Vuex plugin

Top comments (0)