Written by Rahul Padalkar✏️
Discord is a popular application used for managing online communities. Bots play a huge role in managing these communities. They can entertain members of the Discord server by sending memes, making announcements in public channels, reminding people of upcoming birthdays, and so on.
As web developers, we can use the power of Discord bots to make the development process more efficient. For example, we could build systems for monitoring, data retrieval, and notifications.
Using Discord bots to build such systems can have many advantages:
- No need to invest a lot of time in building such systems — we can use open source libraries to build our bot quickly
- Discord roles make it possible to restrict access to the bot
- Limiting the bot to certain channels in the server helps control data access
- If Discord is used as your team’s primary means of communication, then the team can get all the updates in a single application — for example, a notification when an incident happens, like a build failure or a spike in memory usage
- Using the bot to get relevant information from the database for the team might reduce the risk of leaking database credentials
In this blog post, we will see how we can build a Discord bot using the aoi.js library and use it to retrieve data from the database. We will also see how we can use the bot as a notification system.
Let’s dive in.
Why use aoi.js?
aoi.js is a string-based package for creating Discord bots. This means bot developers can use strings to trigger functions in response to a command. For example:
client.command({
  name: "ping",
  code: `
  $sendMessage[pong]
  `
});
In the above code, when the user gives a ping command, the bot responds with a message pong.
Here, we are using the pre-built $sendMessage function from aoi.js to send the message pong. aoi.js has over 600 pre-built functions that bot developers can use, so you don’t necessarily need to know how to code to develop a simple bot with this package.
For more advanced use cases, aoi.js provides developers with an option to create custom functions. This package also comes with a database and a music extension. Developers can store simple data — like key-value pairs — in the database, while the music extension makes it possible to develop bots with music capabilities.
aoi.js has an active community of over four thousand members on Discord. If you ever need help while developing a bot, they can reach out to folks.
The ability to build bots using just strings, along with its rich library of over 600 pre-built functions, sets aoi.js apart from other libraries in the same space. Using this library greatly reduces the time and effort required to build bots is reduced greatly.
Creating a Discord application
To create a Discord bot, we first need to create a Discord application. The only prerequisite for this step is having a Discord account.
Head over to the Discord developer portal to create a new Discord application. Give your application a name and hit Create. Once the application is successfully created, you will be automatically redirected to the application configuration screen.
On the left sidebar, click on Bot. Here, you should be able to change the bot’s username. For this tutorial, we’ll change it to FeedbackBot.
One more important thing on the Bot page is the TOKEN under the username. We will use this token — referred to as a Bot Token — to connect to Discord servers and make API calls. To get the token, click on Reset Token and copy the token once it’s generated: 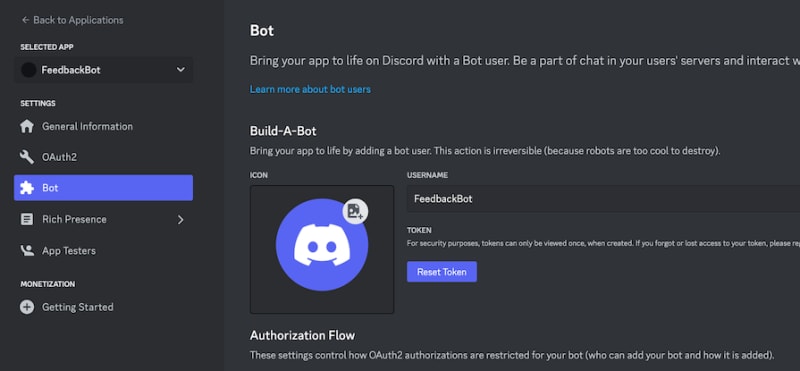
Remember, never share this token with anyone. Also, the token is visible only once, so in case you lose the token, your only option is to reset the token. This action invalidates the older token, so any API calls made using the old token will be invalid.
Additional steps you can take for your own bot include adding a description to the application, adding an icon for the bot, and controlling how it looks via the Rich Presence options.
Adding the Discord bot to our server
Now that we have created a bot, let’s try to add it to our server. To do so, we need to generate a bot invite link. The bot invite link is formatted like so:
https://discord.com/api/oauth2/authorize?client_id=client_id_goes_here&permissions=bot_permission_integer_goes_here&scope=bot
There are two things that we need to make the above URL work:
-
client_id: This can be obtained from the OAuth2 configuration -
permission_integer: This can be obtained by checking the required bot permissions in the Bot configuration screen that we visited earlier. To keep things simple, we’ll use the Administrator option in the permissions list. Remember, giving admin access to a bot can be risky; please only provide permissions that are absolutely necessary for the bot to function
To easily generate a bot invite link, you can use this permission calculator website. Once the invite link is generated, navigate to that link and add the bot to your server. Once added, the bot will join the general channel in your server.
Configuring and pinging the Discord bot
Now that we have added our bot to our server, let’s configure it using the aoi.js library, then ping it and see if it responds.
First, create a Node.js project:
mkdir discrod-bot
cd discord-bot
npm init
Then, let’s install aoi.js:
npm i aoi.js
aoi.js is a simple and fast JavaScript package for developing Discord bots. It’s free and open source, and it provides a simple interface to interact with the Discord API. As discussed, aoi.js has over 600 built-in functions that developers can use to quickly build their bots. It also comes with a built-in database that makes storing data a lot easier.
This library only works with newer versions of Node.js, so make sure you have Node v18.19.0 or above. You can either upgrade to this version or use nvm to manage and install multiple Node versions.
Now that we have everything in place, let’s create a bot.js file in our project root:
const { AoiClient } = require("aoi.js");
require("dotenv").config();

const client = new AoiClient({
  token: process.env.BOT_TOKEN || "",
  prefix: "FeedbackBot",
  intents: ["MessageContent", "Guilds", "GuildMessages"],
  events: ["onMessage", "onInteractionCreate"],
});

client.command({
  name: "ping",
  code: `Pong! $pingms`,
});
Here, we create a AoiClient and pass in the BOT_TOKEN, and prefix, intents, and events arrays. Let’s take a closer look at the intents and events arrays.
Intents are WebSocket events sent by Discord to the bot. There are various types of intents. It’s important to pass only those intents that are absolutely necessary for the bot to function; otherwise, the bot will receive data that is irrelevant to it.
In our example above, we use a privileged intent, MessageContent. For this to work, we need to enable MESSAGE CONTENT INTENT in Privileged Gateway Intents. You can toggle this setting in the Bot section of our app in the Discord developer portal: 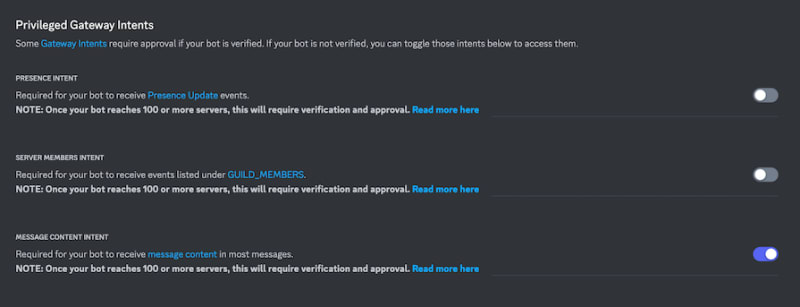
We then define events in the events array. This tells the client to listen for these events. We created a command called ping and told the bot to respond with pong followed by bot latency in ms.
Since aoi.js is a string-based package for developing Discord bots, it offers a lot of string-based functions out of the box for this purpose. $pingms is one such function that we used in the code above. For a full list of string functions, check out the aoi.js docs.
We’re not quite done yet. Create a .env file in the project root and add the bot token that we generated before:
BOT_TOKEN=bot_token_goes_here
To make development a bit easier, let’s install Nodemon:
npm i -g nodemon
Optionally, we can also add a command in the package.json file for running the bot:
{
  "name": "aoijs-bot",
  "version": "1.0.0",
  "description": "Building bot in aoijs",
  "main": "index.js",
  "scripts": {
    "test": "echo \"Error: no test specified\" && exit 1",
    "start-bot": "nodemon ./bot.js",
  },
  "author": "",
  "license": "ISC",
  "dependencies": {
    "aoi.js": "^6.7.1",
    "dotenv": "^16.4.1",
  },
  "devDependencies": {}
}
Now, to start the bot, run the following command:
npm run start-bot
This will start the bot. If you type FeedbackBotping in the general channel, the bot should reply with a message that says Pong! and provides the latency in ms: 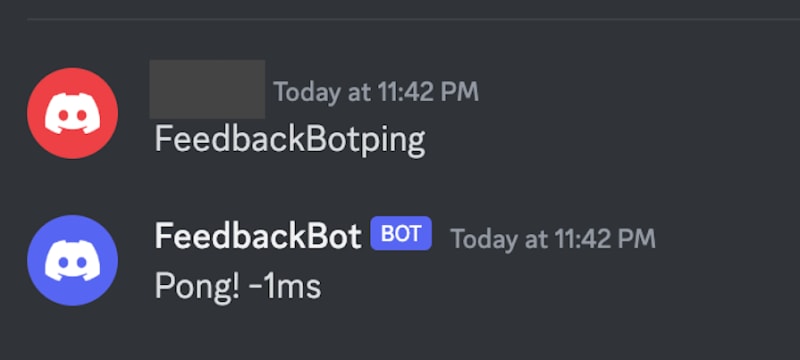 Yes, it works! 🤯
Getting feedback from a user using our bot
This is already cool, but now, let’s make the bot more useful. We’ll start with the first use case for our bot, which is to retrieve useful data on demand.
Let’s say we have a web application where users enter feedback. The feedback may be about the products or services our web app offers, the user’s experience using our application, or some glitches or issues a user experienced while using the web application.
We’ll use a fake example of user feedback regarding glitches or technical issues faced while using our web app. The feedback is stored in a feedback table in a Postgres database. Our bot retrieves that feedback on demand and sends it to a channel.
There are three different systems working together here — the frontend application containing the feedback form, the server (which communicates with our Postgres database), and the Discord bot: 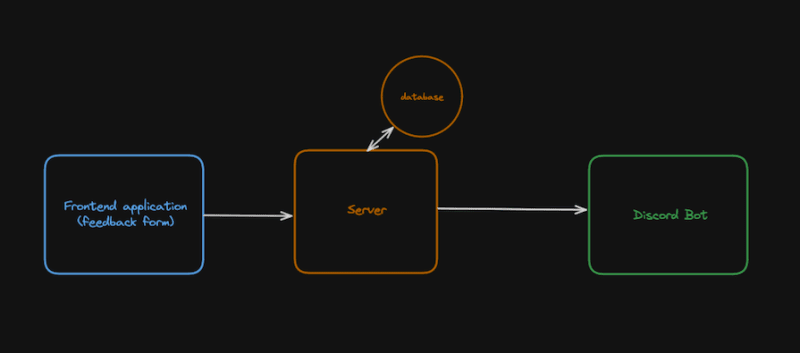
Let’s start with the frontend application part. Let’s quickly create a React application using Vite:
npm create vite@latest
Follow the prompts, and Vite will generate a new React application for you. Let’s use aoijs-feedback-form as the name of application. Now, we’ll create a simple feedback form:
// ./App.jsx
import { useState } from "react";
import "./App.css";
import api from "./api";
function App() {
  const [feedback, setFeedback] = useState("");
  const onSubmit = async () => {
    const res = await api.post("/feedback", {
      feedback,
    });
    if (res.success) {
      console.log("Submitted");
    }
  };
  return (
    <>
      <div>Feedback Form</div>
      <textarea
        rows="20"
        cols="100"
        onChange={(e) => {
          setFeedback(e.target.value);
        }}
      />
      <div>
        <button onClick={onSubmit}>Submit</button>
      </div>
    </>
  );
}
export default App;
We hooked up the feedback form with an API that we will build next:
// ./api.js
import axios from "axios";
const api = axios.create({
  baseURL: import.meta.env.VITE_API_URL,
});
export default api;
To finish creating our simple API, we’ll head back to our bot Node.js project and install Express:
npm i express pg
Now, let’s create a server.js file in the root of our project:
// db.js
const { Client } = require("pg");
require("dotenv").config();
let client;
module.exports = {
  connectToDB: async () => {
    client = new Client({ connectionString: process.env.DB_URL });
    await client.connect();
    console.log(`Connected to DB successfully!`);
  },
  executeQuery: async (query, values) => {
    return await client.query(query, values);
  },
};
Copy and paste the following code into your server.js file:
// server.js
import express from "express";
import { connectToDB, executeQuery } from "./db";
const app = express();
app.use(express.json());

app.post("/feedback", async (req, res) => {
  const { feedback } = req.body;
  await executeQuery("INSERT INTO feedback(feedback) VALUES($1)", [feedback]);
  res.send({ success: true });
});

app.listen(4600, async () => {
  await connectToDB();
  console.log(`API started on port 4600`);
});
Here, we create an endpoint called POST /feedback. When the user clicks on the Submit button in the feedback form, it sends a POST request to our server. We then insert that feedback in our Postgres database.
We will add another command in package.json to run our server:
{
  "name": "aoijs-bot",
  "version": "1.0.0",
  "description": "Building bot in aoijs",
  "main": "index.js",
  "scripts": {
    "test": "echo \"Error: no test specified\" && exit 1",
    "start-bot": "nodemon ./bot.js",
    "start-server": "nodemon ./server.js"
  },
  "author": "",
  "license": "ISC",
  "dependencies": {
    "aoi.js": "^6.7.1",
    "dotenv": "^16.4.1",
    "express": "^4.18.2"
  },
  "devDependencies": {
    "@types/pg": "^8.11.0",
    "pg": "^8.11.3",
  }
}
To run our server, we need to run this command:
npm run start-server
Now, let’s modify our bot code, finish the final piece of our system, and test it out:
const { AoiClient, CustomEvent } = require("aoi.js");
require("dotenv").config();
const { connectToDB, executeQuery } = require("./db");

connectToDB();
const client = new AoiClient({
  token: process.env.BOT_TOKEN || "",
  prefix: "FeedbackBot",
  intents: ["MessageContent", "Guilds", "GuildMessages"],
  events: ["onMessage", "onInteractionCreate"],
});

client.command({
  name: "ping",
  code: `Pong! $pingms`,
});

client.functionManager.createFunction({
  name: "$getFeedback",
  type: "djs",
  code: async (d) => {
    const data = d.util.aoiFunc(d);
    const { rows } = await executeQuery("SELECT * FROM feedback");
    const feedback = rows.map(({ feedback }) => feedback);
    const msg = await d.message.channel.send(`${feedback.join("\n")}`);
    data.result = msg;
    return { code: "" };
  },
});

client.command({
  name: "getFeedback",
  code: "$getFeedback",
  nonPrefixed: true,
});
Here, we use the createFunction utility provided by aoi.js to create a custom function that connects to our Postgres database and returns data stored in the feedback table. We then create a getFeedback command and call the function we created above.
Now to test this, let’s run everything:
npm run dev // to start react app
npm run start-bot // to start bot application
npm run server // to start the api
We’ll submit some dummy feedback in the form: 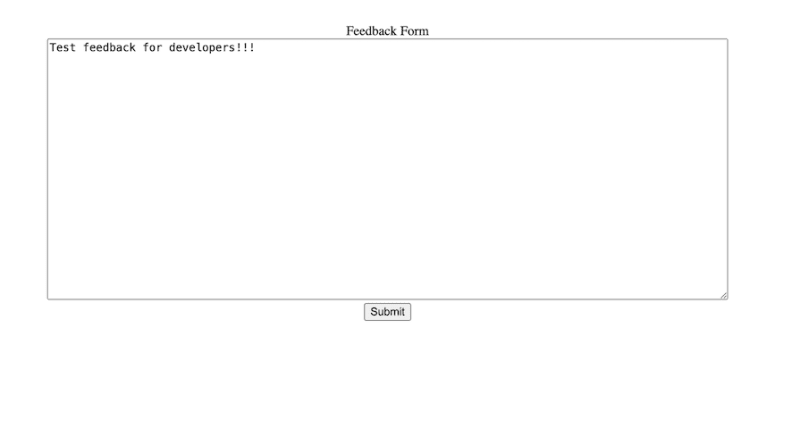 After submitting the feedback form, you should receive a message from the FeedbackBot:
 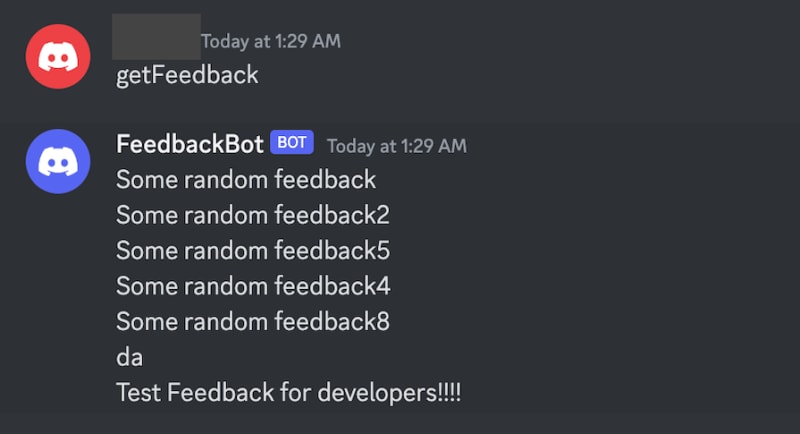 Yeah, it works!!!
Sending a notification in a Discord channel after an incident
In the previous section, we saw how we can use Discord bot to retrieve information on demand from a data source — in our case, a Postgres database. However, Discord bots can also be used for sending out notifications in a channel when an event happens in the system.
For example, you could set up your bot to notify you when a dev on your team opens a new pull request. You could also send notifications if the CI/CD pipeline fails, the memory or CPU usage of an instance spikes, or pretty much any other situation you need.
Let’s see how we can send a message in a Discord channel when such an event occurs. In our bot code, we will create a custom incident event and trigger it using a setInterval function to simulate an incident:
const { AoiClient, CustomEvent } = require("aoi.js");
require("dotenv").config();
const { connectToDB, executeQuery } = require("./db");

connectToDB();

const client = new AoiClient({
  token: process.env.BOT_TOKEN || "",
  prefix: "FeedbackBot",
  intents: ["MessageContent", "Guilds", "GuildMessages"],
  events: ["onMessage", "onInteractionCreate"],
});

client.command({
  name: "ping",
  code: `Pong! $pingms`,
});

client.functionManager.createFunction({
  name: "$getFeedback",
  type: "djs",
  code: async (d) => {
    const data = d.util.aoiFunc(d);
    const { rows } = await executeQuery("SELECT * FROM feedback");
    const feedback = rows.map(({ feedback }) => feedback);
    const msg = await d.message.channel.send(`${feedback.join("\n")}`);
    data.result = msg;
    return { code: "" };
  },
});

client.command({
  name: "getFeedback",
  code: "$getFeedback",
  nonPrefixed: true,
});

client.functionManager.createFunction({
  name: "$notifyDevs",
  type: "djs",
  code: async (d) => {
    const data = d.util.aoiFunc(d);
    const channel = await d.client.channels.fetch("channel_id_goes_here");
    const msg = channel.send("Incident detected!");
    data.result = msg;
    return { code: "" };
  },
});

const event = new CustomEvent(client);
event.command({
  listen: "incident",
  code: `$notifyDevs`,
});

event.listen("incident");

setInterval(() => {
   event.emit("incident");
}, 6000);
In the code above, we created:
- An
incidentevent using aCustomEventfrom aoi.js that we passed to theclientobject we created earlier. Next, we assigned the$notifyDevsfunction to execute when the event occurs. Then, we start the listener for theincidentevent - A custom
$notifyDevsfunction that sends a message that readsIncident detectedin a channel with the given channel ID
Note that to get a channel‘s ID, you simply open the Discord server and the target channel in your web browser. The last number in the URL bar is the channel ID: ![]() As mentioned, to simulate an event, we use a
As mentioned, to simulate an event, we use a setInterval function that periodically emits the event incident every 6 seconds. In the real world, many services — like Circle CI and GitHub — provide webhook events that our bot can listen to and trigger the incident event if necessary.
To run the bot, execute the following command:
npm run start-bot
Every 6 seconds, you should see a message sent by the bot in the channel: 
Conclusion
Discord bots can be very powerful. They are easy to build and run and don’t require a lot of deep knowledge of the Discord API. You can use them in creative ways to work more efficiently.
There are a ton of packages you can use to quickly build a Discord bot. Some examples include discord.js, aoi.js, js-cord, and Eris. You can also read this tutorial on building a Rust Discord bot to see another option in action, step by step.
Among these, aoi.js stands out for its user-friendly, string-based bot development approach and rich, extensive library of pre-built functions. In this tutorial, we explored how to use the aoi.js library to build our bot.
Thank you for reading!
Get set up with LogRocket's modern error tracking in minutes:
- Visit https://logrocket.com/signup/ to get an app ID.
- Install LogRocket via NPM or script tag.
LogRocket.init()must be called client-side, not server-side.
NPM:
$ npm i --save logrocket

// Code:

import LogRocket from 'logrocket';
LogRocket.init('app/id');
Script Tag:
Add to your HTML:

<script src="https://cdn.lr-ingest.com/LogRocket.min.js"></script>
<script>window.LogRocket && window.LogRocket.init('app/id');</script>
3.(Optional) Install plugins for deeper integrations with your stack:
- Redux middleware
- ngrx middleware
- Vuex plugin


Top comments (0)