Greetings to all Cypress enthusiasts!
This article describes the benefits of using Docker in Cypress testing, discusses in detail the current official Cypress images, and outlines the mechanism for building custom Docker images to run Cypress tests in Docker containers deployed based on these images.
Firstly, a few words about Cypress
Cypress is a JavaScript-based end-to-end testing tool designed for modern web test automation. Cypress has become a popular end-to-end web application testing tool due to its powerful features, user-friendly interface, and fast test execution.
There are many pros and cons regarding the strength and weaknesses of the most popular web application testing frameworks today (Cypress, Playwright, Selenium, Puppeteer, etc.), but my own preference is Cypress, which I have been using on a daily basis for several years now.
To my mind, Cypress is a real game changer in end-to-end and component testing and it grows at a rapid pace. Among the many benefits of Cypress, I would like to emphasize the high quality of its documentation, as well as the master classes that the Cypress development team conducts and publishes in the public domain, and also a friendly and responsive community. Honestly, and as you may have noted from my previous articles I’m a big fan of that wonderful tool!
Benefits of using Docker in Cypress testing
In modern automated testing, setting up and maintaining a test environment can often become a tedious task, especially when dealing with multiple dependencies and their configurations, different operating systems, libraries, tools, and their versions. Often in practice, we can encounter dependency conflicts, inconsistencies in environments, limitations in scalability and reproduction of errors that occur, etc., which ultimately leads to unpredictable and unreliable test results. Using Docker goes a long way in preventing most of these problems.
Docker is an open-source service for packaging, deploying, and running applications in an isolated containerized environment.
Today it is difficult to imagine the development of any web application without the participation of Docker. The usage of Docker containerization technologies brings a bunch of serious advantages for testing web applications, such as ensuring a consistent and isolated environment for running tests in each new run; independence from the parameters and settings of the system on which the tests are run; reliability, reproducibility, and predictability of test results when they are run in different environments, etc.
In particular, using Docker in Cypress testing can be very useful for several reasons:
It ensures that Cypress tests run in an isolated test environment because the container in which the tests are run is self-contained from other containers and from the external environment. In this case, the tests are essentially independent of what is outside the container, which ensures the reliability and continuity of the tests in each new run. For example, in the case of deploying containers with tests locally, this means that the absence of Node.js, Cypress, any browser, or certain versions of them on the host computer will not become an obstacle to running Cypress tests.
Allows applications and Cypress tests to be run locally on different host machines, as well as deployed to CI/CD pipelines and cloud infrastructure by providing a stable and consistent test environment. When moving a Docker image from one server to another, containers with the application itself and tests will work the same regardless of the operating system used, the presence of Node.js, Cypress, browsers, etc. This ensures reproducibility and predictability when running Cypress tests across different systems.
Frees us from having to install any dependencies outside of containers — on the servers that run the containers. Docker allows us to quickly deploy the containerized environment to run Cypress tests, so we do not need to install operating system dependencies, necessary browsers, and test frameworks every time.
Significantly simplifies the integration of Cypress tests into the web application development process, embedding and deploying tests in various CI/CD pipelines, cloud services, etc., eliminating the need to troubleshoot compatibility issues during installation, reconfiguration, etc. In addition, Docker allows us to safely move tests between software deployment environments, for example, from a tester’s laptop to a stage or production environment.
Speeds up the testing process by reducing the total time for test runs. This is achieved through scaling, i.e. increasing the number of containers, running Cypress tests in different containers in parallel, parallel cross-browser testing capabilities using Docker Compose, etc.
Briefly about official Cypress images
As of today, there are 4 official Cypress Docker images hosted in the public image repository — Docker Hub, as well as in the corresponding “cypress-docker-images” repository of Cypress.io on GitHub:
The Docker repositories of these images include their various versions and tags. The number of downloads of each image (except cypress/factory) at the time of writing was more than 50 million, which is quite impressive.
Now let’s see how each of these images can be interacted with in order to run Cypress tests in containers created from them. It should be noted that often these containers are not generated directly from the four specified images, but based on custom images, which in turn are built from official images. This is possible because Docker allows us to reuse official images as a base layer and build custom images based on them by adding the necessary additional layers.
A short dive into a test project
To demonstrate running tests in Docker containers, I’ll use “Cypress-Docker” — the simplest project with Cypress tests that I have to test my blog “Testing with Cypress” on Medium.
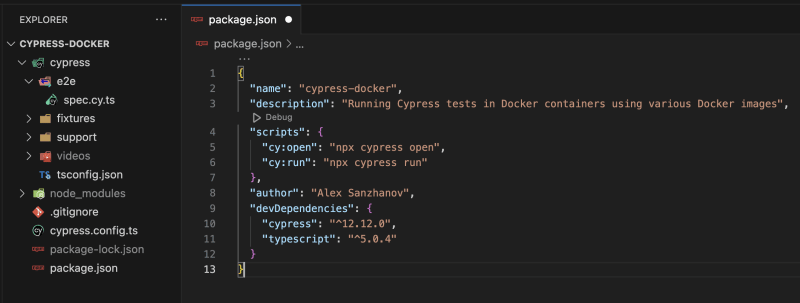
The project already has some dependencies installed — Cypress 12.12.0 and Typescript 5.0.4:
and there is also one spec.cy.ts file with a test suite of three trivial tests for the blog’s homepage:
By running these tests in headless mode, we are convinced of the successful execution of the tests:
Here we should pay attention to the environment settings when running tests locally on the computer — Node.js 19.8.1, Cypress 12.12.0, and browser Electron 106. Next, we will make sure that when running tests inside Docker containers, these settings will change depending on the content of the Docker images used. I also note that Docker Desktop is already installed locally.
Running tests in Docker containers
Now let’s look at how we can run our Cypress tests inside Docker containers using each of the official Cypress Docker images.
CYPRESS/INCLUDED
I would like to start with this image because, unlike the others, it includes all the dependencies of the operating system, pre-installed Cypress, and some browsers. This makes cypress/included available to use out of the box without the need to add additional layers. The image allows us to create containers and run Cypress tests in them using just single command.
To download an image from the Docker Hub, just run the following command in the terminal:
> docker pull cypress/included:12.12.0
It’s important to note here that it’s a good idea to always add a specific image tag rather than relying on the default (latest) tag name because the latest version changes as new versions of the image are released. In the case of cypress/included, the tag name corresponds to the version of Cypress preinstalled inside it, for example, in my case, it is 12.12.0 (stable). Thus, if we do not specify the image version, then there is a chance that the tests will be run in different versions of Cypress since the containers for running the tests will be generated from images with different tags.
The presence of the specified image after it has finished downloading can be checked with a simple command:
> docker images
The downloaded cypress/included image is shown first in the list of downloaded images:
To find out what this image contains, just execute the following command:
> docker run -it --entrypoint=cypress cypress/included:12.12.0 info
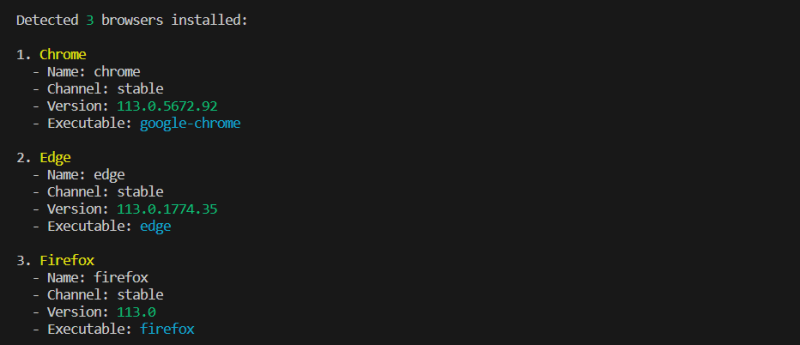
As a result, we get information about the version of Node.js preinstalled in the image, Cypress, three browsers, as well as other characteristics:
Next, to run our Cypress tests in a container, we need to initiate the creation of a new container from the downloaded image with the command below:
> docker run -it -v $PWD:/e2e -w /e2e cypress/included:12.12.0
With this command, we have created a Docker container, which essentially means a writable layer on top of existing image layers. Let’s take a look at the structure of used command:
docker run means to create and run a container based on the specified image
-it — interactive terminal
-v $PWD:/e2e — map the contents of the directory inside the container to the contents of the current project directory, where $PWD is the absolute path to the current directory (root of the project), /e2e is the path to the directory inside the container
-w /e2e — set the working directory inside the container, where /e2e is the path to the specified directory
cypress/included:12.12.0 — an indication of the image on the basis of which the container will be created.
This command will create a Docker container in which Cypress will run tests on the built-in Electron browser. It is important to note that the cypress/included image includes ENTRYPOINT ["cypress" "run"] instruction, which automatically starts Cypress inside the container created from this image.
If desired, it is possible to supplement the command with --name flag to specify a specific name for the created container, as well as --rm flag to automatically delete the container after it is stopped:
> docker run -it -v $PWD:/e2e -w /e2e --name cypress-tests --rm cypress/included:12.12.0
At the same time, any additional arguments can be passed after the image name to control the behavior of Cypress inside Docker container, similar to how we run Cypress in headless mode without using Docker. So, we can specify a specific browser or spec file to run, configure recording parameters, run tests in parallel, etc. For example, to run tests in any of the browsers preinstalled in the image (Chrome, Edge, Firefox), it is enough to add to the command -b flag specifying the name of the browser:
> docker run -it -v $PWD:/e2e -w /e2e cypress/included:12.12.0 -b chrome
Or if we assume that initially, the project has several spec files, then to run a specific file/files, we should pass to the command -s flag specifying the absolute path to the required file/files:
> docker run -it -v $PWD:/e2e -w /e2e cypress/included:12.12.0 -s cypress/e2e/spec.cy.ts
Now that we know all those commands, let’s create a container and run our tests inside it using Chrome browser:
And voila — we can now see that the specified test environment settings (Node.js 18.16.0, Cypress 12.12.0, Chrome 113) match the characteristics of the cypress/included image content while being different from the settings when we initially ran the tests locally. Thus, it took only single command to run the tests inside created Docker container.
Running tests multiple times in the same container
It is important to note that each time we run Cypress tests based on the docker run … command, a new container will be created and run. To avoid this and be able to run tests multiple times inside the same container, we need to connect to a process inside the container to control the running of tests from the container. To do this, it is enough to supplement the used command with --entrypoint flag with /bin/bash argument:
> docker run -it -v $PWD:/e2e -w /e2e --entrypoint=/bin/bash cypress/included:12.12.0
As a result, we have the ability to control the re-running of tests from the container using cypress run command, or to execute any other commands, for example, view files and folders inside the container using the standard ls -la command.
In addition to the above way of running tests using cypress/included image, we can build our own custom image based on it using Dockerfile. However, in the case of cypress/included it often doesn’t make much practical sense (which can’t be said about other images), since this image already includes all the necessary dependencies of the test environment. Moreover, as mentioned earlier, cypress/included already contains ENTRYPOINT ["cypress" "run"] instruction, so there is no need to explicitly define the command to run Cypress tests in Dockerfile.
Next, let’s look at another interesting official Cypress image — cypress/browsers.
CYPRESS/BROWSERS
This image includes all operating system dependencies and some browsers. However, it does not contain preinstalled Cypress, which is similar to cypress/factory, the main difference is that in the latter we can optionally configure certain versions of browsers and operating system dependencies, as well as add Cypress of the desired version.
Each cypress/browsers image is named according to the following general pattern:
cypress/browsers:node-<full Node version>-chrome<Chrome version>-ff-<Firefox version>-edge-<Edge version>
This is a complete template, while in some versions of the image, there may be only one or two browsers from Chrome, Firefox, and Edge in various combinations.
Let’s create a custom image based on cypress/browsers. In doing so, I will deliberately use the current penultimate version of the base image to demonstrate the difference in the version of the browser used.
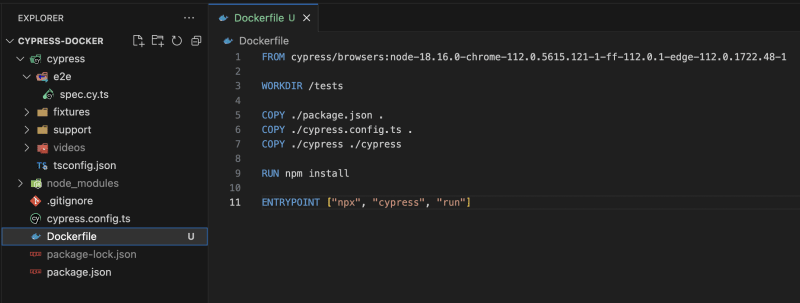
As you know, Docker can build images automatically by reading the instructions given in Dockerfile. In this case, Dockerfile for building the custom image will look like this:
First, FROM instruction defines a base image, all of whose dependencies and configurations will be included in the generated image. In particular, these are Node.js 18.16.0, as well as pre-installed browsers — Chrome 112.0.5615.121–1, Firefox 112.0.1, and Edge 112.0.1722.48–1. The base image will be picked up from Docker Hub.
At the next step, WORKDIR, a working directory /tests is created, in which all subsequent commands will be executed. If such a directory does not exist, this instruction will create it.
Next, the files and folders specified in COPY command will be copied from the current project directory (in which Dockerfile is located) to the working directory inside the resulting image. It’s worth noting that I’m not copying the entire contents of the project, as it’s obviously not necessary. In particular, there is no point in copying the node-modules directory with the dependencies already installed, as they depend on the test environment settings. Also, to avoid copying, we can create a .dockerignore file by explicitly specifying node-modules inside it.
Then RUN instruction executes commands during the image build process. In our case, it’s a command that installs all the necessary dependencies in the working directory, and in particular Cypress will be installed at this stage.
At the last step, the command to run Cypress is specified in ENTRYPOINT, which will be executed inside the containers generated from this image. It is noteworthy that the instruction is written in exec form.
Let’s initiate an image build based on the instructions above by running the command:
> docker build -t my-cypress-browsers:1.0.0 .
where docker build is the custom image build command
-t my-cypress-browsers:1.0.0 — an addition of arbitrary name and tag for the created image
. means that we are referring to the Dockerfile location as the Docker build context.
As we can see, the successful building of the resulting image ended with FINISHED message:
Let’s check the existence of the created image. We can see that the built image is listed first in the list of available images:
Next, from the created image, we will generate a container and invoke Cypress inside it to execute tests in the Chrome browser:
> docker run -it my-cypress-browsers:1.0.0 -b chrome
As we can see, our tests are automatically run in an environment with the Node.js and Chrome versions specified in the base image:
Next, let’s go over one more image — cypress/base.
CYPRESS/BASE
This image contains all the operating system dependencies necessary to run Cypress but does not contain Cypress itself and pre-installed browsers. Due to this, cypress/base is significantly (almost 2 times) smaller than the cypress/included and cypress/browsers images, which looks very attractive if there is no need to use some of the browsers. As stated in the image description, a specific image tag corresponds to the version of Node.js or the operating system it is built on.
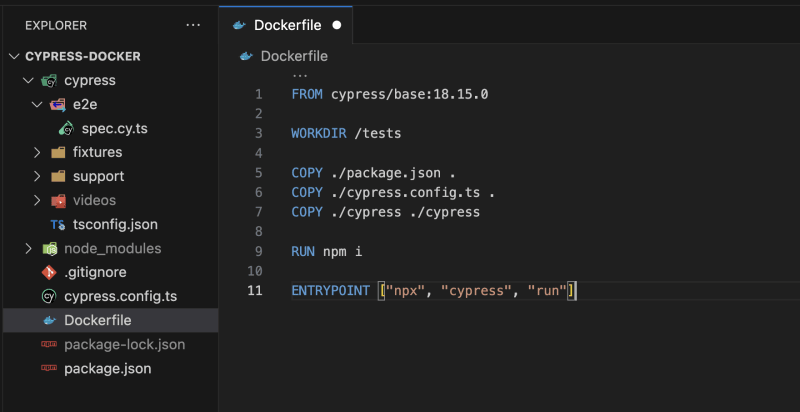
To build our own image based on cypress/base let’s create a new Dockerfile with the following instructions:
Here FROM instruction defines cypress/base:18.15.0 as the base layer, where the 18.15.0 tag name corresponds to the version preinstalled in the Node.js image. In this case, as in the previous case, I specify the penultimate version of the base image to demonstrate the difference in the versions of Node.js used.
At the next step, as before, a working directory is created to run all subsequent commands inside it. The COPY instruction specifies the files and folders to be copied to the working directory within the resulting image. The RUN command installs the necessary dependencies to the working directory. At the final stage, a command is specified to run tests inside containers generated from this image.
Let’s set the name and tag for the resulting image — my-cypress-base:1.0.0 and build it with the already-known command:
> docker build -t my-cypress-base:1.0.0 .
Great, successful build of the image ended with FINISHED message:
As before, let’s check if the built image exists. We can see that the my-cypress-base image is listed first among the available images:
As mentioned earlier, due to the lack of browsers, the created image has a significantly (more than 2 times) smaller size than our previous images.
Next, we will generate a container based on the created image and run Cypress tests inside it:
> docker run -it my-cypress-base:1.0.0
Now we have verified that the tests run in the pre-installed Electron 106 browser. And as expected the specified version of Node.js — 18.15.0 corresponds to the tag name of the base image and differs from the previously used version (18.16.0):
It is important to note that if we try to run the tests in another browser, for example, by adding -b chrome flag to the initial command, then despite the fact that the corresponding container will be generated, the tests will obviously not run due to the absence of the Chrome browser:
As stated in the text of the error, the only available browser is Electron, which is reasonable since the base image cypress/base does not contain any pre-installed browsers.
Well, now let’s dive into the last of the official images — cypress/factory.
CYPRESS/FACTORY
This image appeared relatively recently, the first version of the image with the 1.0.0 tag name was uploaded to Docker Hub about 4 months ago. Cypress/factory allows building custom images with specific versions of:
- node
- yarn
- chrome
- firefox
- edge
- cypress
As stated in the instructions for this image, using cypress/factory provides the following benefits:
- Freedom to choose which versions to test against.
- No need to wait on an official release to test the latest version of a browser.
- Smaller docker sizes especially when not including unused browsers.
- Easily test multiple browser versions.
- Reduced maintenance and pull requests for the cypress-docker repo.
- Ability to offer more variations of docker containers at low cost.
Indeed, one of the main advantages of cypress/factory is the ability to customize the contents of the image, which allows, if necessary, to significantly reduce its size. Required versions of Node.js, Cypress, and browsers can be passed as arguments when building the image.
Suppose we plan to build an image, including the most up-to-date versions of Node.js, as well as Chrome, Edge, and Firefox browsers. At the moment it is:
- Node.js 20.1.0
- Chrome 113.0.5672.92–1
- Edge 113.0.1774.42–1
- Firefox 113.0
In this case, we should pass the specified parameters as arguments to build the custom image. There are different ways to declare them:
- as instructions in Dockerfile
- inside the image build command with
--build-argflag - using Docker Compose and specifying them in the docker-compose.yml file
By the way, if we don’t pass any arguments at all when creating the image, then by default the generated image will contain only Node.js.
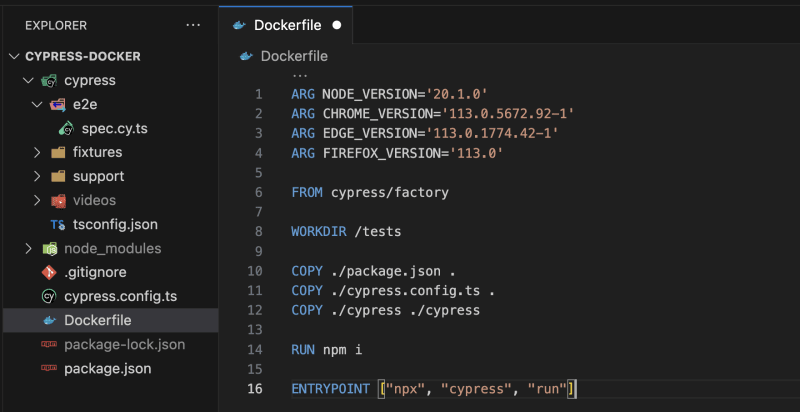
Let’s first look at the option of specifying arguments in Dockerfile. To do this, let’s create Dockerfile at the root of our project with the following content:
As we can see, before FROM instruction, the ARG arguments for building the image are declared. ARG is used to set build-time variables with key and value. In our case, it defines the required versions of Node.js and browsers. It’s important to note that the exact version must be used, no wildcards or shorthands are supported.
Further FROM instruction states that the base image for creating a custom image is cypress/factory.
In the next WORKDIR step, the working directory /tests is created inside the resulting image for executing all subsequent commands.
Then as in previous cases, COPY instruction specifies the files and folders from the current project folder (which contains Dockerfile) to be copied to WORKDIR.
Next, RUN instruction will install the necessary dependencies specified in package.json file.
At the last stage, ENTRYPOINT instruction, as already noted, specifies the command to run Cypress inside the containers that will be generated based on this image.
Now let’s create an image following the instructions above:
> docker build -t my-cypress-factory:1.0.0 .
After the image is built, we make sure that it is available:
Now let’s initiate container creation from our resulting image and run Cypress tests inside it:
> docker run -it my-cypress-factory:1.0.0 -b chrome
As we can see, in the created container, the tests are automatically run in an environment with the versions of Node.js and Chrome browser specified in Dockerfile:
Obviously, to control the behavior of Cypress during test execution, we can also pass additional parameters to the container run command using CLI flags. So, in the above command, the tests are run in the Chrome browser using the -b flag.
To build a custom image without adding arguments to Dockerfile, we can run the following command:
> docker build --build-arg NODE_VERSION='20.1.0' --build-arg CHROME_VERSION='113.0.5672.92-1' --build-arg EDGE_VERSION='113.0.1774.42-1' --build-arg FIREFOX_VERSION='113.0' -t my-cypress-factory:1.0.0 .
By the way, this action overrides the ARG values if they were also set in Dockerfile.
Despite the obvious flexibility in building custom images based on cypress/factory, it is possible to combine versions that are incompatible with each other within an image. For example, certain versions of Cypress may not support certain versions of Node.js. Obviously, this will allow us to build the image, but the containers generated from it will not work correctly. According to the developers, both the image itself and containers generated from it are intended for test use only and are not intended for use hosting services in a production environment.
Final thoughts
The official Cypress Docker images discussed in this article, as well as custom images created on their basis, greatly simplify the integration of Cypress tests into the development of modern web applications and increase the reliability and efficiency of the testing process in general. Providing a stable and consistent test environment and reproducibility across different software deployment environments greatly simplifies the setup and maintenance of automated tests, and makes it easier to detect and troubleshoot issues that arise.
I hope this article was helpful for you to understand the basics of using containerization in Cypress testing. Additionally, it is worth noting that outside the article there were cases of running Cypress tests as part of several containers, parallel and cross-browser testing, which certainly deserves a separate article.
That’s about it. If you found this useful, share it with a friend or community. Maybe there’s someone who will benefit from it as well. To continue your journey with me and get more information about testing with the awesome Cypress tool, you might be interested in subscribing to my blog “Testing with Cypress” and get notified when there’s a new useful article.
Dockerfiles used for this article, as well as the test project itself, can be found in the blog’s repository on GitHub.
Thank you for your attention! Happy testing!











Top comments (5)
Thanks for the comprehensive guide!
You're welcome!
Nice Post
Great post! Very helpful information.
useful info, thanks!