
Podcasts have exploded in popularity, and platforms including Google Podcasts and Spotify offer content creators a way to communicate their thoughts with listeners around the world. If you’d like to join them, you can create your own podcast app using Strapi and Nuxt.js.
Strapi is a headless CMS (content management system) based on Node.js that is used to build APIs. Strapi provides a UI where you can develop your collection types and subsequent APIs to fetch the data, using REST or GraphQL APIs. One of the benefits of Strapi is that it is completely open-source and self-hosted.
Nuxt.js is a framework for building Vue.js apps that are universal in nature. The code written in Nuxt.js can run on both client and server, offering client-side rendering and server-side rendering at the same time.
In this tutorial, you’ll learn to implement audio in a podcast app. You’ll build your app in Nuxt.js and manage your podcast content in the Strapi CMS.
Setting Up the Environment
You’ll just need to install Node.js to get started. The installation includes npm, which you’ll need to use Strapi and Nuxt.js.
This tutorial uses Node v14.18.x, Strapi v4.0.x, and Nuxt.js v2.15.x.
The entire source code for this tutorial is available in this GitHub repository.
Setting Up the Project
You’ll need a master directory that holds the code for both the frontend (Nuxt.js) and backend (Strapi). Open your terminal, navigate to a path of your choice, and create a project directory by running the following command:
mkdir strapi-nuxtjs-podcast-app
In the strapi-nuxtjs-podcast-app directory, you’ll install both Strapi and Nuxt.js projects.
Setting Up Strapi
In your terminal, execute the following command to create the Strapi project:
npx create-strapi-app@latest backend --quickstart
This command will create a Strapi project with quickstart settings in the backend directory.
Once the execution completes for the above command, your Strapi project will start on port 1337 and open up localhost:1337/admin/auth/register-admin in your browser. Set up your administrative user:

Enter your details and click the Let’s Start button. You’ll be taken to the Strapi dashboard.
Creating Podcasts Collection Type
Under the Plugins header in the left sidebar, click the Content-Types Builder tab and then click Create new collection type to create a new Strapi collection.

In the modal that appears, create a new collection type with Display name - Podcast and click Continue.

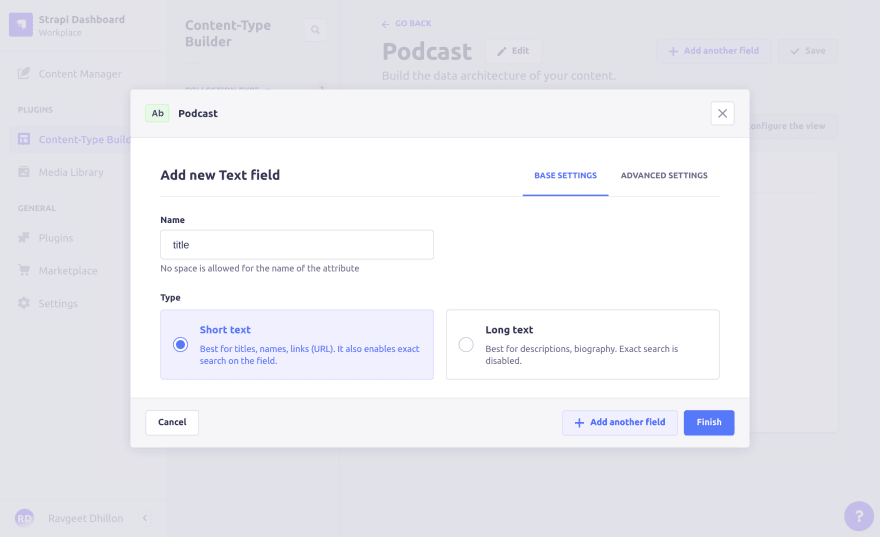
Next, create three fields for your collection type:
-
title - Text field with Short text type
-
description - Text field with Long text type

-
audio - Media field with Single media type

Once you have added all the fields, click the Finish button and save your collection type by clicking the Save button.
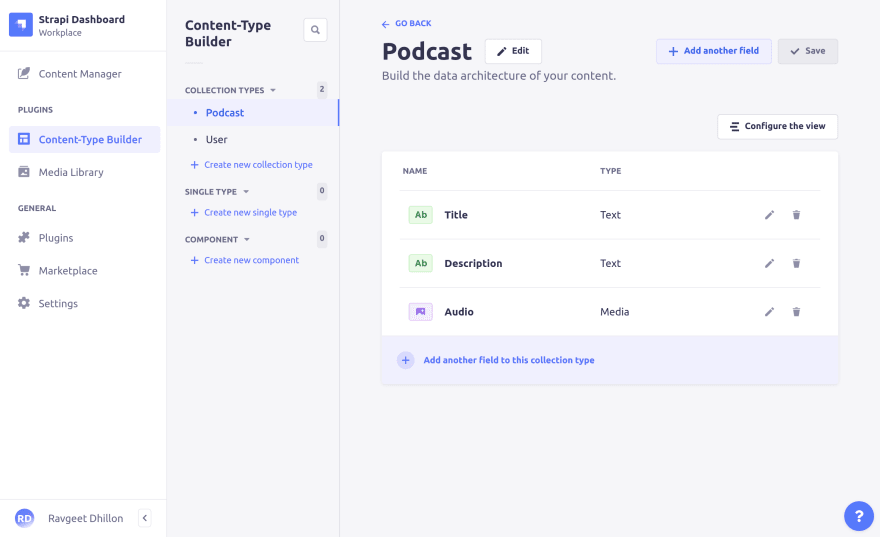
Your collection type is set up, and now you need to add data to it.
Under the Collection Types header in the left sidebar, click the Podcasts tab and then click Add New Podcasts to create a new entry:

Fill in the fields for Title, Description, and Audio and click Save.

This will save your podcast entry as a draft, and it will not be available when you query the podcast’s API. Click Publish to make the podcast entry live.

Add a couple more podcasts in the same way. Check your Podcasts List View to see all the published podcasts.

Setting Up Permissions for Podcasts API
At this point, you have enough data in your Strapi CMS to test the API.
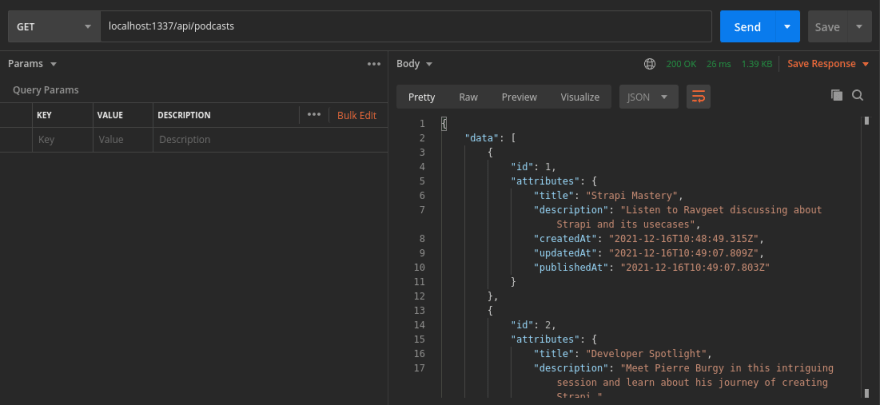
Open Postman and send a GET request to the Podcasts API endpoint, localhost:1337/api/podcasts. You will not be able to access the endpoint because you have not allowed public access to it.

To configure the permissions for your podcast’s endpoint, click on the Settings tab under the General header, then select Roles under the Users & Permissions Plugin. Since you want to allow public access to your podcasts, you need to configure the permissions related to the Public role. Click the Edit icon to the right of the Public role.

Scroll down to find the Permissions tab and check the find and findone routes for the Podcasts collection type. Save the updated permissions by clicking the Save button.

Go back to Postman, send a GET request to localhost:1337/api/podcasts, and you’ll get the list of podcasts from Strapi.
Next, send a GET request to localhost:1337/api/podcasts/2 and you’ll get the individual podcast with ID 2 as a response from Strapi.

Strapi setup is complete. Now you’re ready to fetch podcasts in your Nuxt.js app.
Setting Up Nuxt.js
It’s time to build the Nuxt.js frontend app.
Since your current terminal window is serving the Strapi project, open another terminal window and execute the following command to create a Nuxt.js project:
npx create-nuxt-app frontend
On the terminal, you’ll be asked some questions about your Nuxt.js project. For this tutorial, choose the options highlighted below:

Once you have answered all the questions, it will install all the dependencies.
After the installation is complete, navigate into the frontend directory and start the Nuxt.js development server by running the following commands:
cd frontend
npm run dev
This will start the development server on port 3000 and take you to localhost:3000. The first view of the Nuxt.js website will look like this:

Setting Up @nuxtjs/strapi Module
@nuxt/strapi is the Nuxt module for integrating Strapi with Nuxt.js.
Shut down the Nuxt.js development server by pressing Control-C in your terminal and execute the following command to install the module for your Nuxt.js app:
npm install @nuxtjs/strapi --save
Once the installation is complete, open the nuxt.config.js file and add the following properties to the default object exported by nuxt.config.js:
export default {
  ...
  // 1
  // environment variables used by nuxt
  publicRuntimeConfig: {
    strapiEndpoint: 'http://localhost:1337',
  },

  // 2
  modules: [
    '@nuxtjs/strapi',
  ],

  // 3
  strapi: {
    url: 'http://localhost:1337/api',
    entities: ['podcasts'],
  },
  ...
}
In the above config:
- You added
strapiEndpointto thepublicRuntimeConfigso that you can access it anywhere in the Nuxt.js app by using$config.strapiEndpoint. - You added the
@nuxtjs/strapimodule to themodulesarray so that Nuxt.js loads this package whenever the Nuxt.js app is initialized. - You declare the
strapiconfig variable.urlcorresponds to the URL from which the Strapi serves its API. In theentitiesarray, you can specify the collection types present in your API. This will help you to access them using the$strapiobject; for example,$strapi.$podcasts. For more options, check the official documentation.
Implementing Audio
Now that you have set up the necessary packages for developing your Nuxt.js website, you need to design a podcasts page.
Designing Podcasts Page
This page will fetch your podcasts from Strapi CMS and display them in the UI.
In the pages directory, open the index.vue file and replace all the existing code with the following code:
<template>
  <section class="py-5">
    <b-container>
      <b-row>
        <b-col lg="7" class="mx-lg-auto">
          <!-- 3 -->
          <div v-if="!podcasts">Loading...</div>
          <div v-else>
            <h1 class="mb-5 border-bottom">Podcasts</h1>
            <!-- 4 -->
            <div v-for="(podcast, index) in podcasts.data" :key="index" class="mb-4">
              <h2 class="h4">{{ podcast.attributes.title }}</h2>
              <p class="mb-1">{{ podcast.attributes.description }}</p>
              <nuxt-link :to="`/podcasts/${podcast.id}`">Listen</nuxt-link>
            </div>
          </div>
        </b-col>
      </b-row>
    </b-container>
  </section>
</template>

<script>
export default {
  data() {
    return {
      // 1
      podcasts: null,
    }
  },
  // 2
  async created() {
    const response = await this.$strapi.$podcasts.find()
    this.podcasts = response.data
  },
}
</script>
In the above code:
- You set the
podcastsasnullin thedataobject, which is passed to the<template>. - In the
createdlifecycle hook, you fetch (find()) all the podcasts ($podcasts) from the Strapi ($strapi) and assign the response (response.data) to thepodcastsdata variable. - In the
<template>, you check if thepodcastsvariable is Falsy, then you render aLoading...message. - Once the
podcastsvariable evaluates to a Truthy, you loop (v-for) over it and render the podcasts withtitle,descriptionattributes, and link to the individual route for each podcast usingpodcast.id.
Save your progress and start your Nuxt.js development server by running:
npm run dev
Visit localhost:3000 and you’ll see your podcasts page rendered by Nuxt.js:

Designing a Single Podcast Page
Now that you have created a podcasts page, the next step is to design a single podcast page that needs to be dynamic and provides the user with the option to listen to the podcast. You can fetch your podcast from the endpoint localhost:1337/api/podcasts/:id.
In the pages directory, create a subdirectory, podcasts. Then at pages/podcasts path, create a _id.vue file and add the following code to it:
<template>
  <section class="py-5">
    <b-container>
      <b-row>
        <b-col lg="7" class="mx-lg-auto">
          <!-- 3 -->
          <div v-if="!podcast">Loading...</div>
          <!-- 4 -->
          <div v-else>
            <h1 class="mb-5 border-bottom">{{ podcast.attributes.title }}</h1>
            <!-- 5 -->
            <audio class="mb-4" controls>
              <source
                :src="`${$config.strapiEndpoint}${podcast.attributes.audio.data.attributes.url}`"
                :type="podcast.attributes.audio.data.attributes.mime"
              />
              Your browser does not support the audio.
            </audio>
            <p class="mb-2">{{ podcast.attributes.description }}</p>
            <nuxt-link to="/">Back</nuxt-link>
          </div>
        </b-col>
      </b-row>
    </b-container>
  </section>
</template>

<script>
export default {
  data() {
    return {
      // 1
      podcast: null,
    }
  },
  // 2
  async created() {
    const { id } = this.$route.params
    const response = await this.$strapi.$podcasts.findOne(id, { populate: '*' })
    this.podcast = response.data
  },
}
</script>
In the above code:
- You set the
podcastasnullin thedataobject, which is passed to the<template>. - In the
createdlifecycle hook, first you destructure theidof the dynamic route from thethis.$route.paramsobject. Then you use the$strapiobject to fetch (findOne()) the podcast with id (id) and also pass thepopulate: ‘*’query parameter. This is required because in Strapi v4, relations, media, components, and dynamic zone fields are not sent by default in the response. - In the
<template>, you check if thepodcastvariable is Falsy, then you render aLoading...message. - Once the
podcastvariable evaluates to a Truthy, you use Vue template variables to render the UI for it. - You use the
<audio>tag for rendering the podcast’s audio URL (podcast.audio.url) and set thetypeprop topodcast.attributes.audio.data.attributes.mime. Sincepodcast.attributes.audio.data.attributes.urlis a relative path, you need to prepend it with$config.strapiEndpoint, which refers to the Strapi server URL.
Save your progress and wait for the server to hot reload. Click Listen on any podcast on the index page to open the single podcast page. Test the audio by clicking the play button and verify that everything works as expected:

Conclusion
That's it! Although this tutorial focused on implementing audio in a Nuxt.js app, you can use any frontend framework with Strapi and render your audio. You can also use audio in a blog, so that a user can listen to your blog using an audio file instead of reading.
You have many options for implementing audio in your customer-facing app. As you saw, Strapi can help you set up your podcast easily and quickly. For more information on how Strapi can help you customize your content site, explore its CMS solutions.
The entire source code for this tutorial is available in this GitHub repository.

Top comments (0)