
Originally posted @ https://codeanddeploy.com visit and download the sample code:
https://codeanddeploy.com/blog/laravel/building-secured-php-restful-api-in-laravel-8-with-sanctum
In this post, you will learn how to build a secured PHP RESTful API in Laravel 8 with sanctum auth. If your building a project that is able to access the records via API in Laravel 8 then this post is for you. I will give you a basic example that will help you to create your first API Laravel Application. This is a step-by-step tutorial in Laravel 8 with the Sanctum package by Laravel. And we are using Postman to test our API if working.
Laravel sanctum gives us an easier way to create simple token-based APIs that can be used for our SPAs (single page applications) as authentication systems and mobile applications. Sanctum able us to each user of your application to provide multiple API tokens for their account.
To dig deeper into Laravel sanctum kindly follow my step-by-step Laravel REST API with sanctum below.
Step 1: Laravel Installation
If you don't have a Laravel 8 install in your local just run the following command below:
composer create-project --prefer-dist laravel/laravel laravel-sanctum
Step 2: Database Configuration
If your Laravel project is fresh then you need to update your database credentials. Just open the .env file in your Laravel 8 project.
.env
DB_CONNECTION=mysql
DB_HOST=127.0.0.1
DB_PORT=3306
DB_DATABASE=your_database_name_here
DB_USERNAME=your_database_username_here
DB_PASSWORD=your_database_password_here
Step 3: Install Laravel Sanctum Package
To support Laravel sanctum kindly run the following command:
composer require laravel/sanctum
Setting Up Sanctum
Now let's set up the sanctum package after we installed it. Run the following command to publish the sanctum configuration.
php artisan vendor:publish --provider="Laravel\Sanctum\SanctumServiceProvider"
Once done, register the sanctum middleware into the API key array inside app/Http/Kernel.php file.
protected $middlewareGroups = [
...
...
    'api' => [
        \Laravel\Sanctum\Http\Middleware\EnsureFrontendRequestsAreStateful::class,
        'throttle:api',
        \Illuminate\Routing\Middleware\SubstituteBindings::class,
    ],
...
...
];
Now, let's run the migration command it will also generate the sanctum personal_access_tokens table.
php artisan migrate
Then we will open app/Models/User.php and let's add HasApiTokens class inside User.php model. Here is the complete User.php code below:
<?php

namespace App\Models;

use Illuminate\Contracts\Auth\MustVerifyEmail;
use Illuminate\Database\Eloquent\Factories\HasFactory;
use Illuminate\Foundation\Auth\User as Authenticatable;
use Illuminate\Notifications\Notifiable;
use Laravel\Sanctum\HasApiTokens;

class User extends Authenticatable
{
    use HasApiTokens, HasFactory, Notifiable;

    /**
     * The attributes that are mass assignable.
     *
     * @var string[]
     */
    protected $fillable = [
        'name',
        'email',
        'password',
    ];

    /**
     * The attributes that should be hidden for serialization.
     *
     * @var array
     */
    protected $hidden = [
        'password',
        'remember_token',
    ];

    /**
     * The attributes that should be cast.
     *
     * @var array
     */
    protected $casts = [
        'email_verified_at' => 'datetime',
    ];
}
Step 4: Add New Migration Table
Now, let's add a simple table named products. Run the following command to generate migration.
php artisan make:migration create_products_table
Below is the complete code of products table migration. You can find it here database/migrations/create_products_table.php .
<?php

use Illuminate\Database\Migrations\Migration;
use Illuminate\Database\Schema\Blueprint;
use Illuminate\Support\Facades\Schema;

class CreateProductsTable extends Migration
{
    /**
     * Run the migrations.
     *
     * @return void
     */
    public function up()
    {
        Schema::create('products', function (Blueprint $table) {
            $table->id();
            $table->string('title');
            $table->string('description');
            $table->decimal('price', 15, 2);
            $table->timestamps();
        });
    }

    /**
     * Reverse the migrations.
     *
     * @return void
     */
    public function down()
    {
        Schema::dropIfExists('products');
    }
}
Now, let's create our Product model. Run the following command:
php artisan make:model Product
Then it will generate a file app/Models/Product.php then we will add columns to $fillable array. Here is the complete Product model code.
Then it will generate a file app/Models/Product.php then we will add columns to $fillable array. Here is the complete Product model code.
Then run the migration command below:
php artisan migrate
Step 5: Building API Resources
Next, we will create a Laravel API resource for our Product model that will help us not directly show the query result from the database and able us to transform what we allow to return to our user end.
Run the following command to create resources for our Product API.
php artisan make:resource ProductResource
Then it will generate the app/Http/Resources/ProductResource.php file. Here is the full source code for our ProductResource class.
<?php

namespace App\Http\Resources;

use Illuminate\Http\Resources\Json\JsonResource;

class ProductResource extends JsonResource
{
    /**
     * Transform the resource into an array.
     *
     * @param  \Illuminate\Http\Request  $request
     * @return array|\Illuminate\Contracts\Support\Arrayable|\JsonSerializable
     */
    public function toArray($request)
    {
        return [
            'id' => (int) $this->id,
            'title' => $this->title,
            'description' => $this->description,
            'price' => (float) $this->price,
            'updated_at' => (string) $this->updated_at,
            'created_at' => (string) $this->created_at,
        ];
    }
}
Just edit if base on your Model API fields requirement.
Step 6: Setting Up Controller
Next, we will need to set up our controllers with this tutorial. This is the list of our controllers ApiController, AuthController, ProductsController see below for each code.
For ApiController which handles the success and error response. You will find it here App\Http\Controllers\API\ApiController.php. See below the complete code of this controller.
<?php

namespace App\Http\Controllers\API;

use Illuminate\Http\Request;
use App\Http\Controllers\Controller;

class ApiController extends Controller
{
    /**
     * Success response method.
     *
     * @return \Illuminate\Http\Response
     */
    public function successResponse($message, $result = [], $code = 200)
    {
        $response = [
            'success' => true,
            'message' => $message,
            'data'    => $result
        ];

        return response()->json($response, $code);
    }

    /**
     * Error response method.
     *
     * @return \Illuminate\Http\Response
     */
    public function errorResponse($message, $result = [], $code = 400)
    {
        $response = [
            'success' => false,
            'message' => $message,
        ];

        if (!empty($result)) {
            $response['data'] = $result;
        }

        return response()->json($response, $code);
    }
}
Next setup our AuthController that will handle the authentication which handles the login, registration, and logout you will find this code with this path App\Http\Controllers\API\AuthController.php. Below is the complete code:
<?php

namespace App\Http\Controllers\API;

use App\Models\User;
use Illuminate\Http\Request;
use Illuminate\Http\Response;
use Illuminate\Support\Facades\Auth;
use Illuminate\Support\Facades\Validator;
use App\Http\Controllers\API\ApiController;

class AuthController extends ApiController
{
    public function login(Request $request)
    {
        if(Auth::attempt(['email' => $request->email, 'password' => $request->password])) {
            $user = Auth::user();

            $response['token'] =  $user->createToken($request->device_name)->plainTextToken;
            $response['name'] =  $user->name;

            return $this->successResponse('User successfully logged-in.', $response);
        }
        else {
            return $this->errorResponse('Unauthorized.', ['error'=>'Unauthorized'], 403);
        }
    }

    public function register(Request $request)
    {
        $validator = Validator::make($request->all(), [
            'name' => 'required',
            'email' => 'required|email|unique:users,email',
            'password' => 'required',
            'confirm_password' => 'required|same:password',
            'device_name' => 'required'
        ]);

        if($validator->fails()){
            return $this->errorResponse('Validation error.', $validator->errors(), 400);
        }

        $data = $request->all();
        $data['password'] = bcrypt($data['password']);
        $user = User::create($data);

        $response['token'] =  $user->createToken($request->device_name)->plainTextToken;
        $response['name'] =  $user->name;

        return $this->successResponse('User created successfully.', $response);
    }

    public function logout()
    {
        auth()->user()->currentAccessToken()->delete();

        return $this->successResponse('Logout successfully.');
    }
}
Next is our ProductsController which can be found here App\Http\Controllers\Api\ProductsController.phpthis controller will handle our basic CRUD API operation for our products. See below the complete code:
<?php

namespace App\Http\Controllers\Api;

use App\Models\Product;
use Illuminate\Http\Request;
use App\Http\Resources\ProductResource;
use Illuminate\Support\Facades\Validator;
use App\Http\Controllers\API\ApiController;

class ProductsController extends ApiController
{
    public function index()
    {
        return $this->successResponse('Products successfully fetched.', ProductResource::collection(Product::all()));
    }


    public function store(Request $request)
    {
        $validator = Validator::make($request->all(), [
            'title' => 'required',
            'description' => 'required',
            'price' => 'required'
        ]);

        if ($validator->fails()) {
            return $this->errorResponse('Error validation.', $validator->errors());
        }

        return $this->successResponse('Post successfully created.', new ProductResource(
            Product::create($validator->validated())
        ));
    }


    public function show($id)
    {
        $product = Product::find($id);

        if (is_null($product)) {
            return $this->errorResponse('Product does not exist.');
        }
        return $this->successResponse('Product successfully fetched.', new ProductResource($product));
    }


    public function update(Request $request, Product $product)
    {
        $validator = Validator::make($request->all(), [
            'title' => 'required',
            'description' => 'required',
            'price' => 'required'
        ]);

        if($validator->fails()){
            return $this->errorResponse('Error validation.', $validator->errors());
        }

        $input = $validator->validated();

        $product->title = $input['title'];
        $product->description = $input['description'];
        $product->price = $input['price'];
        $product->save();

        return $this->successResponse('Product successfully updated.', new ProductResource($product));
    }

    public function destroy($id)
    {
        $product = Product::find($id);

        if (is_null($product)) {
            return $this->errorResponse('Product does not exist.');
        }

        $product->delete();

        return $this->successResponse('Product successfully deleted.');
    }
}
Step 7: Creating API Routes
Now, let's create API routes for this tutorial see below complete code:
Open the file routes\api.php and insert below code:
<?php

use Illuminate\Http\Request;
use Illuminate\Support\Facades\Route;
use App\Http\Controllers\API\AuthController;
use App\Http\Controllers\Api\ProductsController;

/*
|--------------------------------------------------------------------------
| API Routes
|--------------------------------------------------------------------------
|
| Here is where you can register API routes for your application. These
| routes are loaded by the RouteServiceProvider within a group which
| is assigned the "api" middleware group. Enjoy building your API!
|
*/

Route::post('login', [AuthController::class, 'login']);
Route::post('register', [AuthController::class, 'register']);

Route::middleware('auth:sanctum')->group( function () {
    Route::post('logout', [AuthController::class, 'logout']);

    Route::resource('products', ProductsController::class);
});
Step 8: Testing Laravel Sanctum API using Postman
Now, let's test our app we need to run the first artisan command below:
php artisan serve
Once running let's do the test.
Test Registration REST API
Open your installed Postman then input the URL below:
Method: POST
http://127.0.0.1:8000/api/register
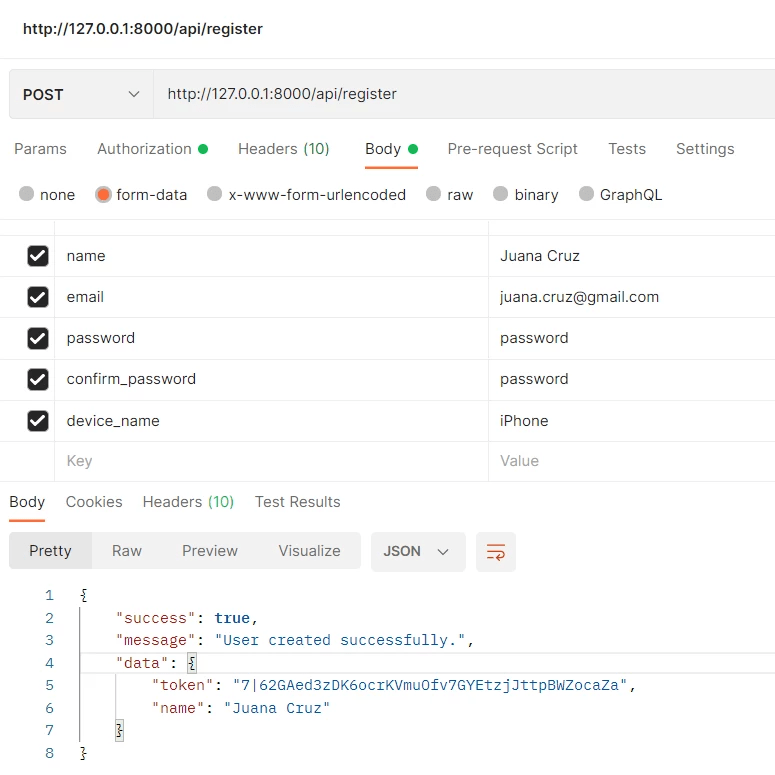
As you can see above we already registered a user successfully.
Test Login REST API
Next, we will test our Login REST API. Just open the Postman and input the URL for login/authentication.
Method: POST
http://127.0.0.1:8000/api/login
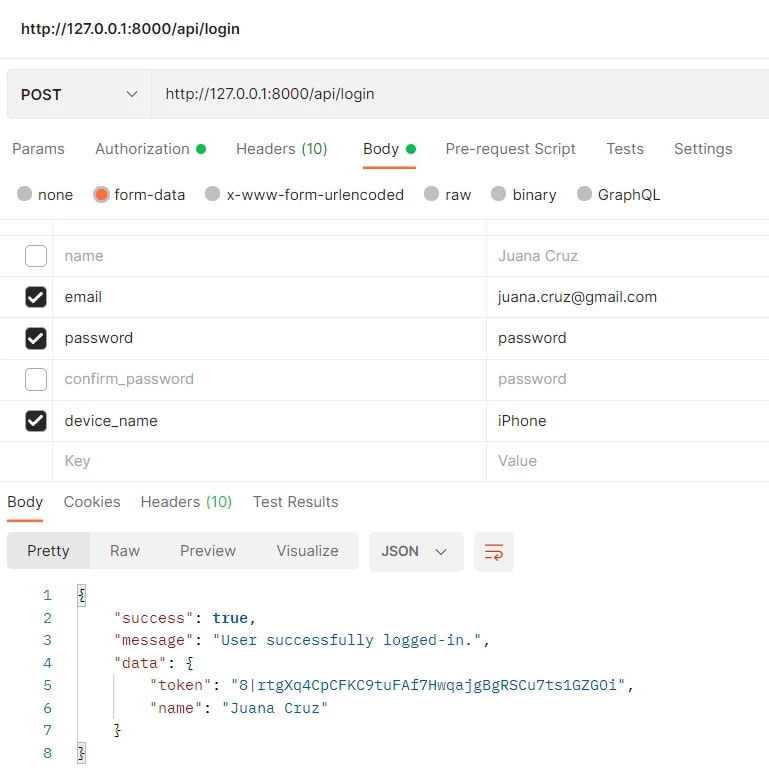
Now, we already successfully logged and response to the user token.
Set Authorization User Token
Next, we will set our authorization token using the generated token about for logged users. See below screenshot of our Postman.

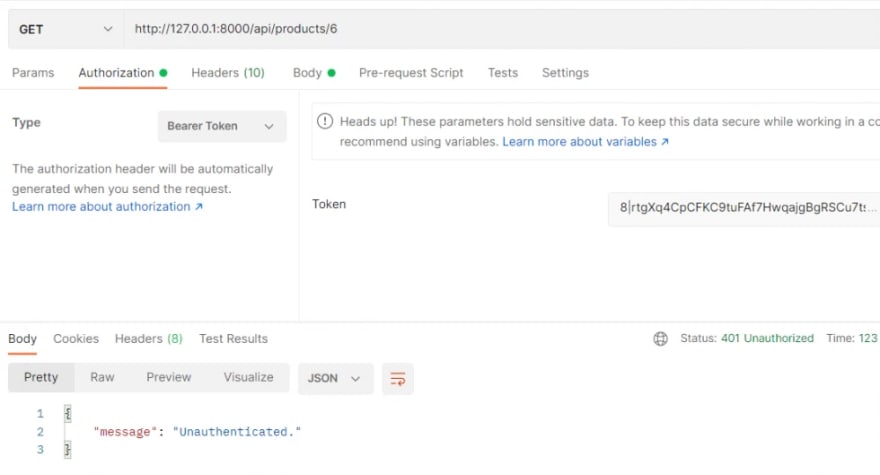
As you can see above we clicked the Authorization Tab and select the type as Bearer Token then in Token value we input the user-generated token.
Now, let's put an incorrect token by just adding 1 in the last part of the token.

Testing API and Get All Records
In this API we will get all available lists of records via API and it is secured already if we put an invalid token it turns to Unauthenticated as you can see above. See below the success request.
Method: GET
http://127.0.0.1:8000/api/products

Test Saving Product API
Now let's do the test for saving product vai API. See below sample screenshot.
Method: POST
http://127.0.0.1:8000/api/products

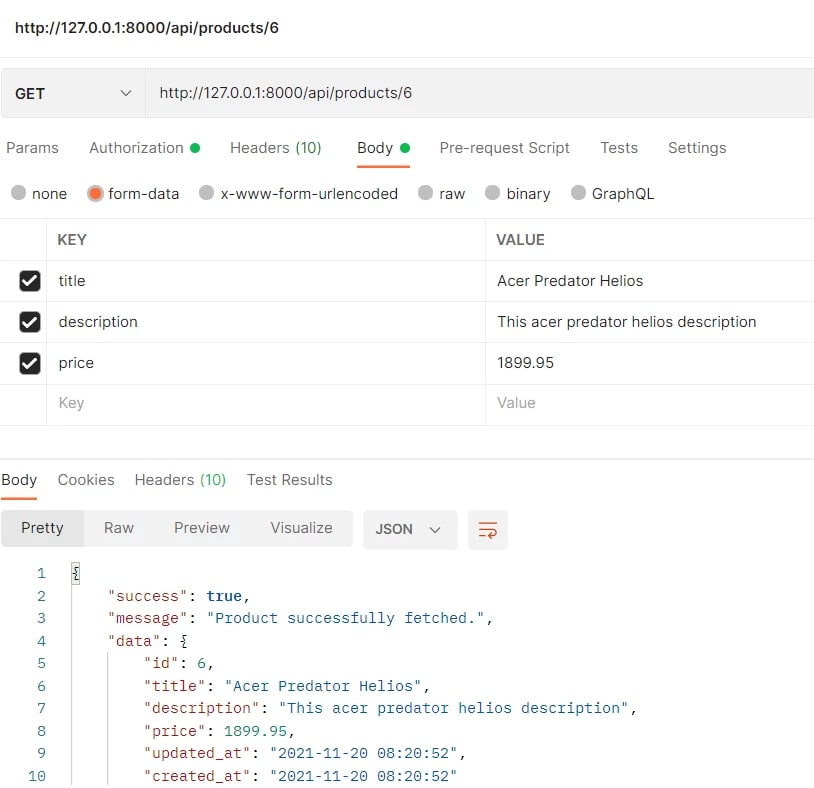
Test Getting Single Product API
Next, I will show you how to get a single product via API. Let's get what we saved above using ID. See the below example:
Method: GET
http://127.0.0.1:8000/api/products/{id}
Test Updating Products API
Now, let's update the product we added. See below example of how to do it.
Method: PUT
http://127.0.0.1:8000/api/products/{id}

Test Delete Product API
Now let's delete a record that we added previously. See the below example:
Method: DELETE
http://127.0.0.1:8000/api/products/{id}

Let's verify if successfully deleted. We will try to get the specific ID we deleted.
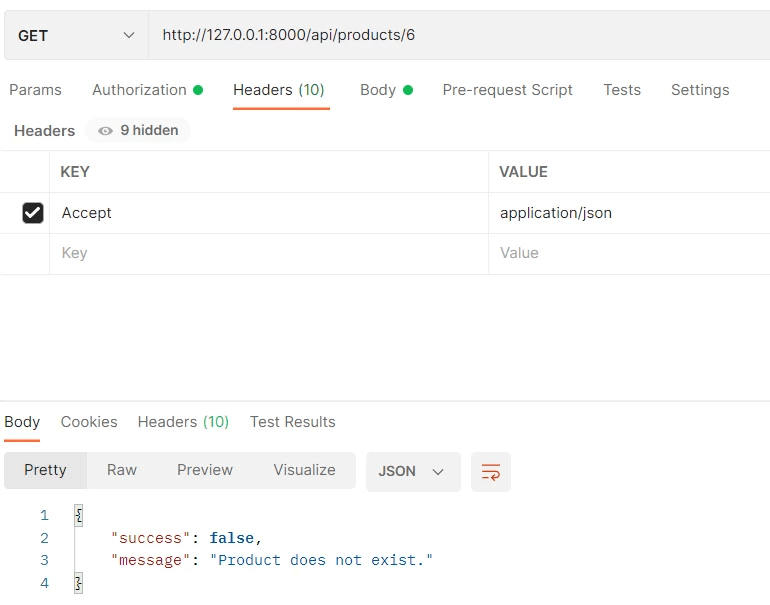
As you can see the product does not exist anymore.
Test Logout API
Now, let's test to log out the user and validate if the token is not active.

As you can see we have already logged out the current active token. Let's test if the toke is successfully logout.
As you can see we are already Unauthenticated because we have already logout it above.
Additional Notes: When working with Postman don't forget to add Headers that accept application/json. See the below screenshot:

Now You have the basic foundation of implementation RESTful API using Laravel sanctum. I hope this tutorial can help you. Kindly visit here https://codeanddeploy.com/blog/laravel/building-secured-php-restful-api-in-laravel-8-with-sanctum if you want to download this code.
Happy coding :)


Top comments (0)