What is Illuminate?
PubNub Illuminate is an in-the-moment decision-making and actionability solution based on live analytics-tracking of your game's data. Illuminate gives you the power to map the KPIs that are important to your game, trigger decisions based on user behaviors, and see instant outcomes — all without heavily involving your engineering team. With Illuminate, you can immediately make smart data-backed decisions as real-time interactions and gameplay are occurring to drive growth and optimize efficiency for your game. 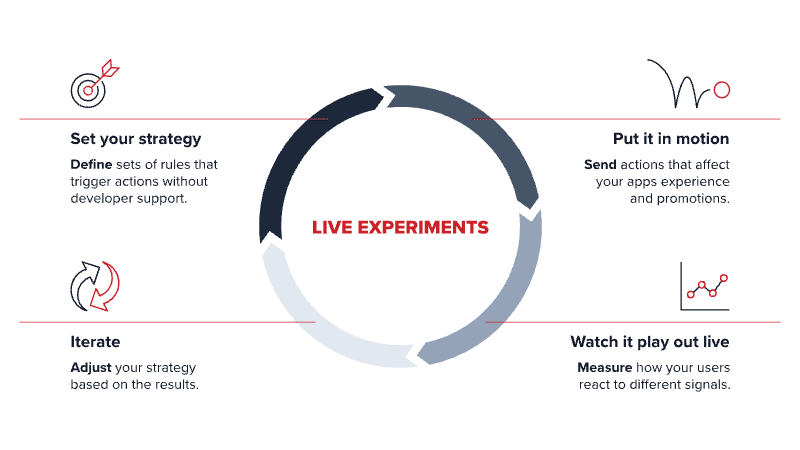
In this tutorial, you’ll learn more about Illuminate, why it is important for your game’s (and your studio’s) success, and how to set up Illuminate to create in-the-moment decisions that trigger actions based on your game’s data.
Why Illuminate for Gaming?
With most traditional analytics tools, taking action on real-time data is usually reactive. Adjustments, such as price changes based on player feedback, are hindered by lengthy patch cycles that involve data collection, testing, and deployment across platforms, further diverting resources from development and future content creation. There's a critical need for real-time visibility into player engagement and monetization to enable swift tactical decisions, as actionable insights become ineffective if delayed even by a few hours past the event's occurrence. 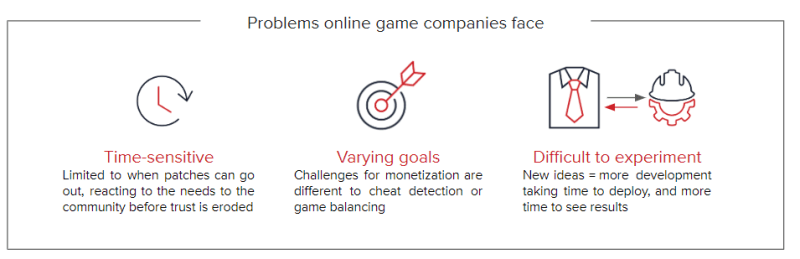
Illuminate is a low-code, customizable product that allows game managers and data analysts to apply and evaluate the impact of their strategic decisions instantly. Illuminate enables teams to perform on-the-fly adjustments to game balance, more effective and appropriate monetization strategies through real-time experimentation, and personalized player rewards to improve retention and the player experience, all while detecting fraudulent activities without burdening your game developers.
With Illuminate, you can manage your platform and make in-the-moment actions all in real time:
- Run targeted monetization experiments in channels and see immediate results
- Send personalized recommendations immediately based on player actions as they happen.
- Trigger actions based on user or cohort behaviors, and see instant outcomes.
- Improve fraud detection and identify and act upon suspicious behavior in real time.
- Adjust and experiment with the prices of in-game shop items. Adjust prices if players are purchasing a number of the same item and trigger in-game events to affect all store prices.
- Reward players for completing challenges/achievements with discount codes for in-game items. Adjust where players are spending the least amount of time and consider rewarding players to spend time in that area or change what kind of rewards players are getting.
- Spawn helpful items and adjust core gameplay features on the fly, without needing to bug the engineers.
You can learn more about how Illuminate powers games through our Illuminate for Gaming video.
How to Set up Illuminate for Your Game
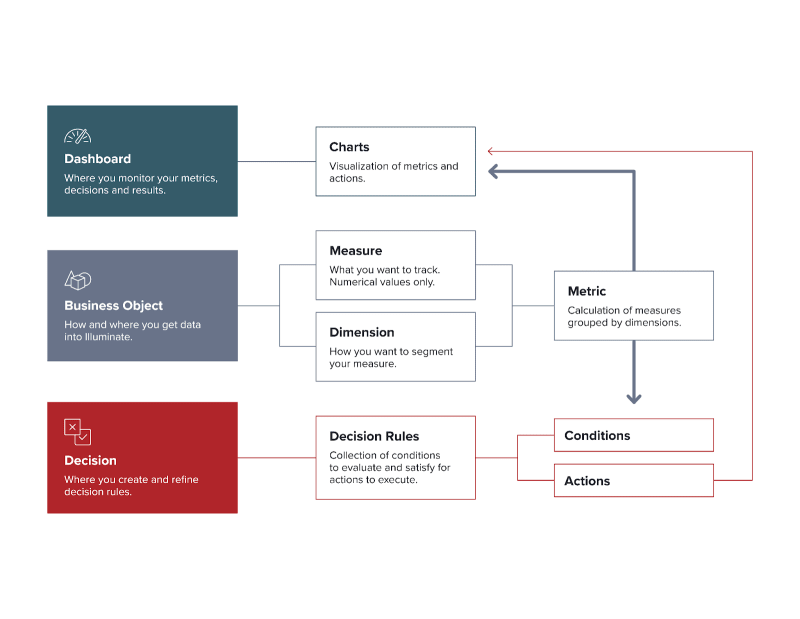
Before diving into setting up Illuminate for your game, you need to understand some key terminology used throughout the set up. Illuminate consists of these three modules:
- Business Object: How you get data into Illuminate. You can define, create, and activate Business Objects, which are containers for capturing data from the selected apps and keysets. Through a series of options (measures, dimensions, or metrics), you can decide which particular data you want to track in real time and how you want to aggregate it.
- Decision: Where you take action on the metrics you’ve created. You can do that by defining rules with conditions to be met, and actions triggered whenever these rules are met.
- Dashboard: Where you visualize the metrics you’ve created in Business Objects and actions executed in Decisions through charts and dashboards (collections of charts).
Now that we’ve defined key terminology, integrating Illuminate with your game consists of six steps:
- Understand the Message Schema
- Select where your data is coming from.
- Choose Your Data
- Visualize Your Data
- Put Your Data to Work
- Visualize and Make Adjustments
Understand the Message Schema
It’s crucial to understand the data schema of your game. This means identifying the types of data you want to track and analyze, such as player actions, in-game transactions, and system events. By understanding and documenting what is exactly contained in the payload, developers can ensure that analysts and other team members can map data to the appropriate sources effectively using JSONPath. You’ll understand why this is important when you are choosing your data when creating Business Objects.
Select Where Your Data is Coming From
Illuminate can be used with any game that connects online, whether or not PubNub powers it. If PubNub does power the infrastructure for your game, it’s as simple as selecting the appropriate App and KeySet used for your game when creating the Business Object (more on that soon) in the Admin Portal.
If your game is not powered by PubNub, your data can be sent using the Fire API, either through the REST API or through one of our SDKs. The Fire endpoint allows the client to send a message to Functions event handlers. These messages will go directly to any event handlers registered on the channel that you fire to and will trigger their execution.
To utilize the PubNub Fire API, you’ll need to create a PubNub account and set up your keyset with the features you’ll need for your game. This keyset contains the publish and subscribe keys necessary for the Fire API. You can learn how to do so by following our how-to guide.
Choose Your Data: Business Objects
Business Objects are fundamental in Illuminate. They are containers for the data you want to use for decisioning and visualization within Illuminate and are essentially how you get data into Illuminate.
Three elements make up a Business Object:
- Select the data (Measures and Dimensions)
- Data source (where is the data coming from
- Conditions (metrics)
Although not related to databases, it helps to think of the structure of a Business Object in terms of SQL’s SELECT (measures and dimensions), FROM (data source), WHERE (metrics). When you are creating your Business Objects, be sure to follow the documentation for any specific details or workarounds to be aware of.
Select the Data
There are two different types of values you can select for a Business Object: Measures and Dimensions.
Measures are numeric, quantitative values. Examples of measures include game duration, coin count, number of kills, weapon damage, or order value.
Dimensions are qualitative values, such as player language, selected cosmetics, quest type, weapon type picked, or game level.

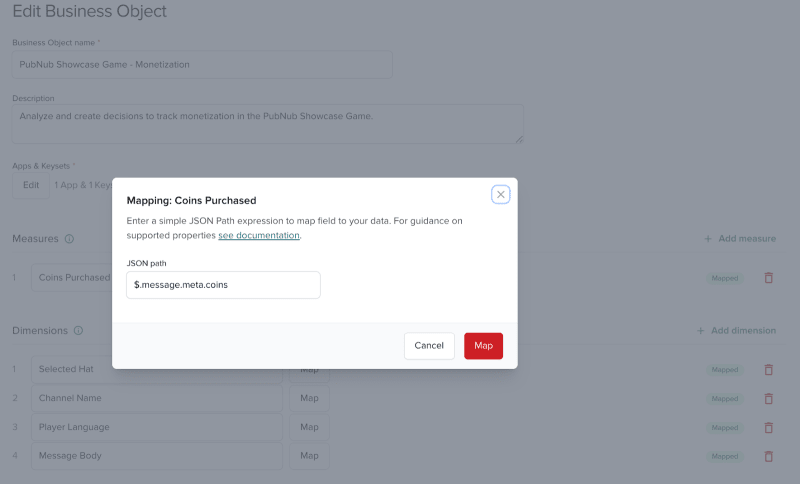
Depending on the type of data you want to track, you’ll need to map the data to your measures and dimensions using JSONPath. Illuminate needs to understand where to look to start capturing this data from your data source (that you set up in the previous step). To define the data source, select the Map button next to each measure and dimension and provide the corresponding JSON paths.
This is the most tricky part of setting up Business Objects, as you’ll need to understand your message schema. Since you have your message schema documented or understood from earlier, you’ll need to map this to how Iluminate is looking for the data.
If you are capturing Messages (specifically Publish Message API), Illuminate is looking for the following structure. If your infrastructure is not powered by PubNub, your data will need to be mapped in the same structure as the Publish Message API:
{
 "message":{ // data from the published message
   "body": JSON | message body payload defined by you
   "meta": JSON | meta query params defined by you
   "userId": string | user ID a.k.a UUID / sender ID
   "channel": string | the channel on which the message is published
 },
}
To correctly map a measure or dimension, you must provide the message object followed by another field. It will always follow this structure: $.message.{obligatory-secondary-field}.{optional-further-fields}.
The way you map the data is entirely based on your message structure. Here are a few examples of mapping the data for messages:
- Track number of coins (measure) => $.message.meta.coins
- Equipped Cosmetic Item (dimension) => $.message.body
- Channel Name (dimension) => $message.channel
- Damage Done (measure) => $.message.body[6]
- Obtain Certain User Names (dimension) => $.message.userId
- Number of friends (measure) => $.message.body.user.friends_count
Illuminate can also capture data utilizing PubNub’s App Context, which allows you to persist metadata about channels, channel members, channel members, and users sent across the PubNub network. You can access this information by following exactly how Illuminate captures this data.
{
 "user": { // data from the sending user metadata, can be null
   "externalId": string | user’s external ID
   "type": string | user type
   "status": string | user status
   "custom": JSON | JSON user metadata defined by you
 },
 "channel":{ // data from the channel the message is sent on, can be null
   "name": string | channel name
   "type": string | channel type
   "status": string | channel status
   "custom": JSON | JSON channel metadata defined by you
 },
 "membership":{ // data from the user's membership to the channel, can be null
   "status": string | membership status
   "custom": JSON | JSON membership metadata defined by you
 }
}
Similar to Messages, to correctly map a measure or dimension, you must provide the user, channel, or membership object followed by at least one key from your JSON. It will always follow this structure: $.user.{obligatory-secondary-field}.{optional-further-fields}. Here are a few examples of mapping the data for App Context:
- Shop Item Details (dimension) => $.channel.custom.details
- Friend’s list status (dimension) => $.membership.status
- Player Language (dimension) => $.user.custom.language
- Player’s Average Score (measure) => $.user.custom.team_deathmatch_score
Note: To create a Business Object, you must add at least one dimension or one measure.
Data Source
Once you’ve mapped your measures and dimensions, you’ll need to determine where your data is coming from. This is what you’ve determined earlier. Be sure to select the appropriate App and Keyset that you defined earlier to ensure Illuminate is capturing the data from the right source.
Conditions (Metrics)
Once you’ve selected your data source, you can add conditions called metrics. Analogous to SQL’s WHERE statement, metrics are not required for Business Objects to capture data but are extremely useful to filter for and apply calculations to your measures and dimensions. Just keep in mind that metrics are required to create a Decision or visualize on Dashboards through charts (more on that later).
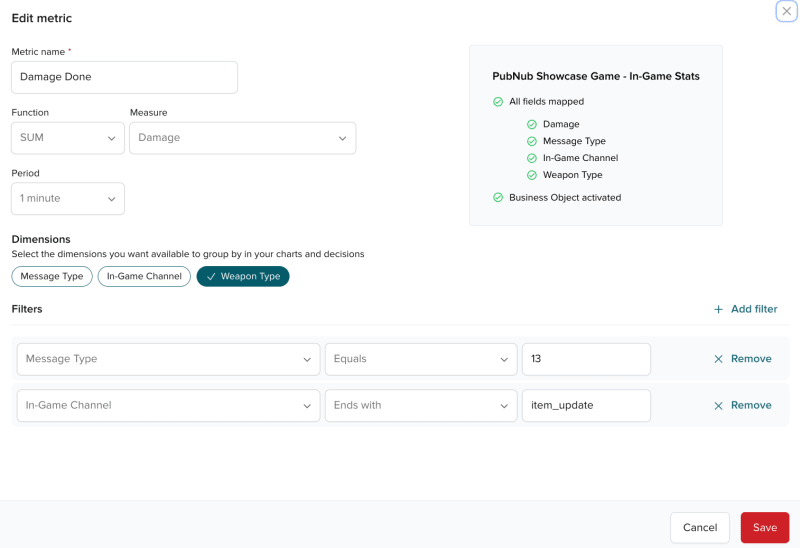
When creating metrics, you’ll need to assign and select fields to the filters. There are a few fields to take note of:
- Name your metric that makes sense, as the chart to visualize the data in the Dashboard will be named the same.
- When selecting the Function, Measures are currently able to be aggregated using
SUM,AVG,MAX, andMIN. Dimensions can only utilize theCOUNTfunction. Choosing the Function allows you to select the Measure or Dimension in a drop-down list. - For Period, select the Aggregation window or the time period for your function.
- Be sure you select the Dimensions you want available in your charts and decisions (as you won’t be able to segment in Charts and apply them to rules in the Decisions without selecting these later on).
- Filter for specific messages or App Context data based on different Dimensions. Keep in mind that to visualize on Dashboards and gather the data, you do not need to apply filters to the metric.
You can create multiple metrics for one Business Object that capture different data. Below is an example of a metric for capturing the damage done for a Measure and the type of weapon that performed that damage:
Visualize Your Data: Dashboards and Charts
Illuminate lets you visualize not only the metrics you want to track but also the decision actions and their results through charts on Dashboards.
This way, you can observe trends in your product in real time, react and refine your approach with data-driven business decisions. It’s also a great way to determine if Illuminate is properly capturing your data based on the Business Objects you set up earlier!
You can create a Dashboard, which is a collection of charts that lets you see all of your metrics in one place and add charts to your Dashboard. A chart is a visual representation of a metric defined for a given Business Object.
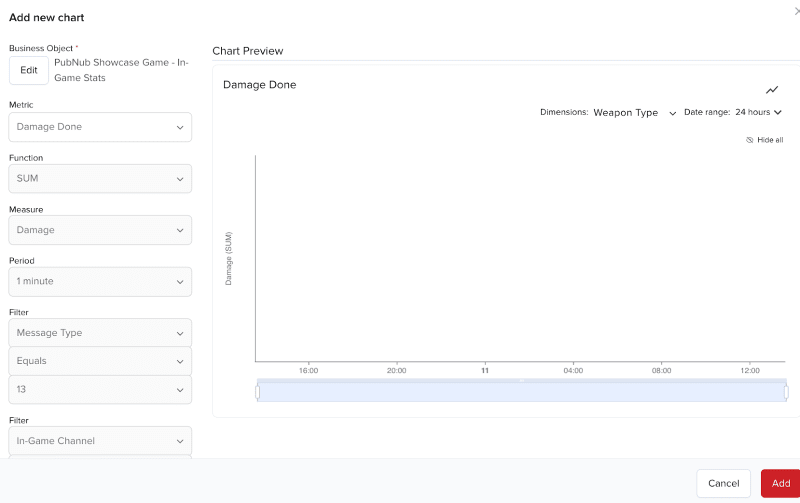
At any time, you can customize the way metric data is displayed in a chart, such as showing a different time range (like 30 minutes, 1 hour, or a custom date) and displaying metrics data through different chart types, either as a bar chart (default view) or a line graph.
You can add multiple charts (metrics) to one Dashboard, as well as have different Dashboards to visualize different areas of your game (monetization, gameplay, quest rewards, etc). Once you’ve configured your Decisions, you’ll be able to view the decision actions being triggered and their results through charts on Dashboards.
Put Your Data to Work: Decisions and Actions
Once your metric is created, you can start evaluating that data, monitor trends, and most importantly, act on them.
Illuminate contains the Decisions module that lets you define the metrics you want to act on by creating actions of different types and rules defining when these actions are to be executed.
When creating a decision, you:
- Choose a Business Object and one of the metrics linked to it.
- Define actions they want to take.
- Set up [rules}(https://www.pubnub.com/docs/illuminate/decisions/basics#rules) using the chosen conditions and configured actions. These rules will trigger actions.
Decisions are aimed at helping product managers experiment with engagement and monetization strategies before codifying and deploying. With Illuminate, they can make decisions based on actual data instead of assumptions and then act on that data through automated conditions and actions.
Decisions consist of two parts: Actions and Rules.
Actions
Actions define what will happen when conditions (discussed next) are met.
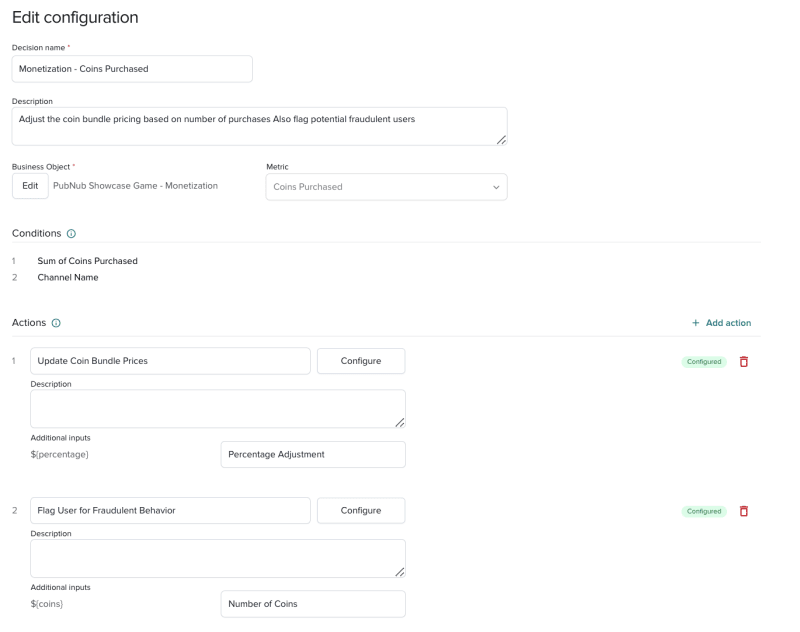
There are five action types you can choose from when setting up Actions:
- Send Message: Publishes a message to a user or channel and utilizes the PubNub Publish API. You can optionally add variables (${variableThatChanges}) that you can control and change dynamically when setting up decision rules.
- Webhook: Sends a call to a specific URL by connecting to a third-party service integration. You can optionally add variables (${variableThatChanges}) that you can control and change dynamically when setting up decision rules.
- Update User: Sets any predefined or custom user metadata by providing the desired information as key/value pairs, utilizing the PubNub App Context API for users.
- Update Channel: Sets any predefined or custom channel metadata by providing the desired information as key/value pairs, utilizing the PubNub App Context API for channels.
- Update Membership: Sets any predefined or custom membership metadata by providing the desired information as key/value pairs, utilizing the PubNub App Context API for memberships.
Although you can only configure one metric per Decision, you can create multiple Decisions to cover your use cases. Be sure to follow the documentation when creating Actions for your Decision.
Once you’ve finished configuring your Actions, you’ll need to set up the rules for the actions to trigger.
Rules
Rules consist of conditions, which are criteria that must be met to trigger an action, to evaluate and actions to be executed when conditions are met. A single rule is a definition (row in a decision table) stating which action should be triggered for which condition.
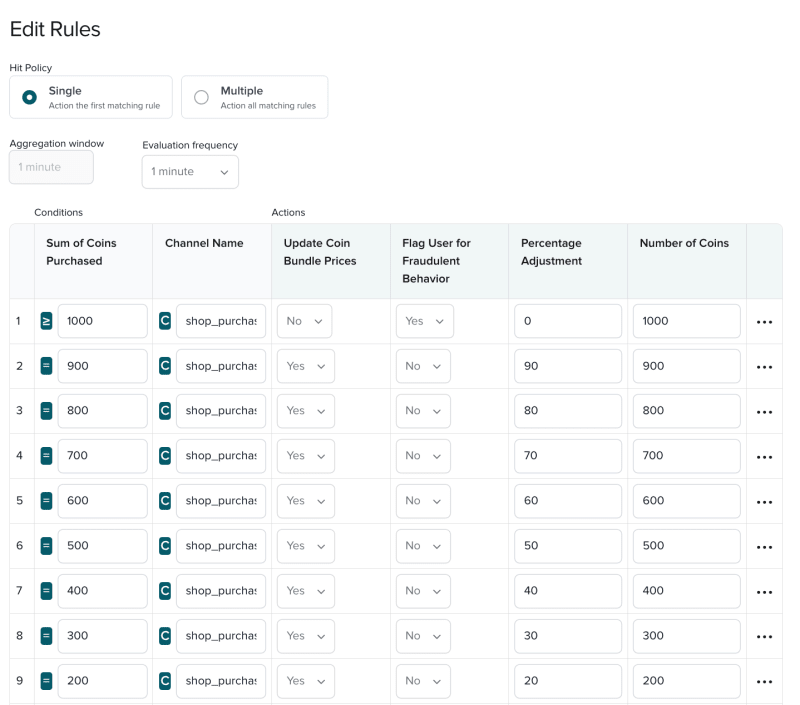
The decision table consists of four parts:
- Hit policy: Setting that defines if you want to trigger action(s) only for the first matching rule (Single) or for all of them (Multiple) if their conditions are met.
- Aggregation window: The only value you cannot edit in the rule configuration window. It auto-populates from the Period value chosen for Function when creating a metric. It denotes how frequently a metric runs a given function (COUNT, AVG, MAX, or other) for a measure or dimension.
- Evaluation frequency: Lookback window for the rule that defines how frequently Illuminate should run rule(s) in this Decision.
- Conditions: Set of requirements you define on your own using the configuration table. This is where you define which conditions (and thresholds they meet) should trigger which actions.
Keep in mind that each row in the decision table is a separate decision rule that consists of conditions and actions. The order of the rules determines the order in which they are executed. If you want to change the existing order, select Edit Rules in a Decision and change the order using the Move up or Move down options under the "Actions" menu next to each rule.
Visualize and Make Adjustments
Once you have set up your Business Objects, Dashboards and Charts, and your Decisions, you can then analyze and experiment with changes in real time. You no longer need to wait for balance patches to see if the changes you’ve made are positively affecting gamers or game.
You’ll be spending most of your time here, where you’ll be making experimentation decisions to make adjustments to help boost engagement within your game.
What's Next
Illuminate puts the power of real-time experimentation into the hands of the teams directly responsible for growth and the company’s bottom line. It’s a valuable platform to experiment and make smart data-backed decisions based on gameplay and user behaviors by mapping the KPIs that are important to your game and triggering decisions based on those behaviors.
Check out our Illuminate resources to see how Illuminate can help your game and learn how to try out Illuminate yourself. As always, if you have any questions, feel free to reach out to the Developer Relations team at devrel@pubnub.com.


Top comments (0)