A few weeks back, I set out to create my own chrome extension with Typescript and React. I had a rough understanding from a talk I had attended at work some years back. So, I approached it assuming it was going to be as simple as getting back in the swing of my previous understanding.
It was in fact pretty simple to get started and even more easy to render visible changes. But there was something else that took up most of the time I spent that day setting up - understanding the anatomy of a chrome extension. That is, there seemed to be a few key files but I wasn't sure which one to change when. I browsed several articles and youtube tutorials but nothing seemed to click. After a while, it was as if my brain had picked a little bit from each tutorial and started to make sense of it all. To further solidify my understanding, I begin to draw out a representation of the anatomy. This diagram would be updated upon testing if the assumptions I had made were in fact correct.
Turns out they were, and this diagram is what I'd like to break down today.
The file names I'm using come from a typescript chrome extension template I started with. When attempting to build an extension, do yourself a favor and don't start from scratch. Start with this, or a different template of your choosing. Most of my annoyances involved setting up the precious manifest.json file, but starting from a template helps to avoid all of this. Before proceeding, I recommend having either the template repo up or a chrome extension project you have already started open on your choice of text editor. This is so when I mention a file name it'll be easier to follow along.
If you're on the repo, take a look at the contents of the src and public folders. Identify the files: background.ts, content.ts, index.tsx, and options.tsx. If you're using a different template they might be named differently, but that's a pretty standard naming convention for an extension. (Sometimes index can be named popup). These are the four vital bones of the extension. Let's break down each bone and help grasp what they support.
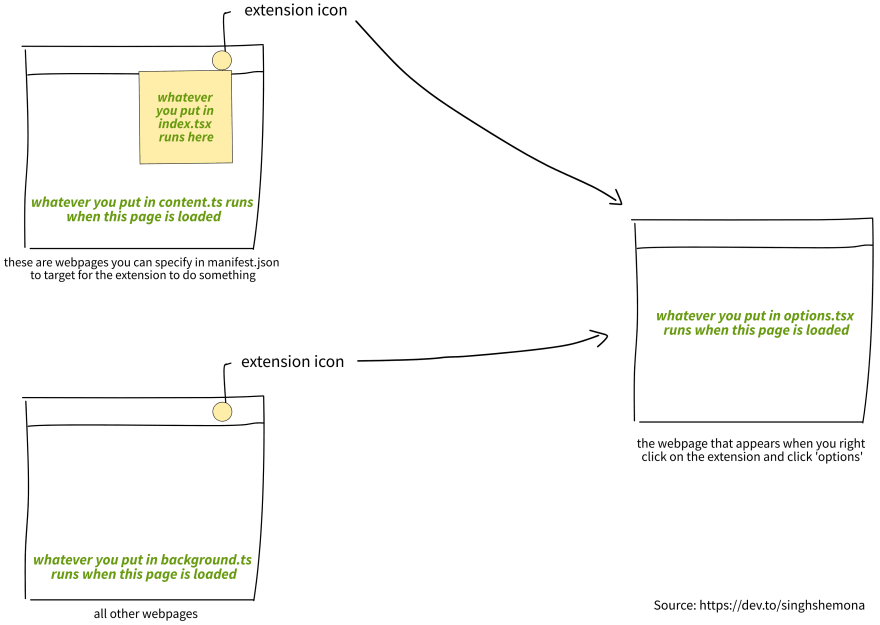
For the purposes of explaining this diagram, let's create an example to work with. Let's say you want to make a chrome extension that makes it rain images of coffee cups every time someone is on the Starbucks website. Let's dissect the diagram with this example in mind:
- The labels in green are for the 4 files I mentioned earlier.
- The labels in black are for what each webpage represents.
- The webpage on the top left I labeled as 'specified in manifest.json' would be the Starbucks homepage. We would specify the url of Starbucks in the
manifest.json. - The webpage on the bottom left represents all the webpages that are not the Starbucks webpage. We don't have to specify these urls anywhere, it's just important to note what file you would have to edit if you want your extension to do something no matter what webpage you are on.
Note that putting something into each of these 4 files is optional. Say you set up your falling coffee cups script on content.js, that will trigger on the Starbucks page. If that's all you want to do and don't want anything to happen on webpages that are not Starbucks, feel free to leave background.ts empty.
The realization of each file's purpose and knowing what to change when was the single biggest factor in continuing the successful development of an extension. It's hard to get something to trigger properly when you're not sure which file it belongs in. My hope is that you come across this diagram in your journey of chrome extension tutorials, and everything will finally click the way it did for me.


Top comments (0)