OS DISK
The OS disk on a Windows VM refers to the virtual hard disk that contains the operating system. It’s the primary disk that a virtual machine (VM) boots from and is pre-installed with the selected OS when the VM is created.
This disk includes the boot volume and it's recommended to store only the OS information on the disk.
TEMPORARY DISK
The Temporary disk is a storage space that is provided automatically with each VM
This disk is located on the physical server where the VM is hosted and is intended for temporary data storage.
Data on the temporary disk may be lost during a maintenance event, when you redeploy a VM, or when you stop the VM.
On Azure Linux VMs, the temporary disk is typically /dev/sdb and on Windows VMs the temporary disk is D: by default.
DATA DISK
Data disk is a managed disk that's attached to a virtual machine to store application data instead of storing them on the OS also for storing other data you need to keep.
The size of your virtual machine will determine how many data disks you can attach to it and the type of storage you can use to host the disks.
Data Disk offer the following benefits:
Improved Backup and Disaster Recovery, More flexibility and scalability,
Performance isolation, Easier maintenance, Improved security and access control.
Let's delve into the practical hands-on of how to attach a data disk and initialize it for use
Login to the Azure portal open and connect to your windows 11 VM
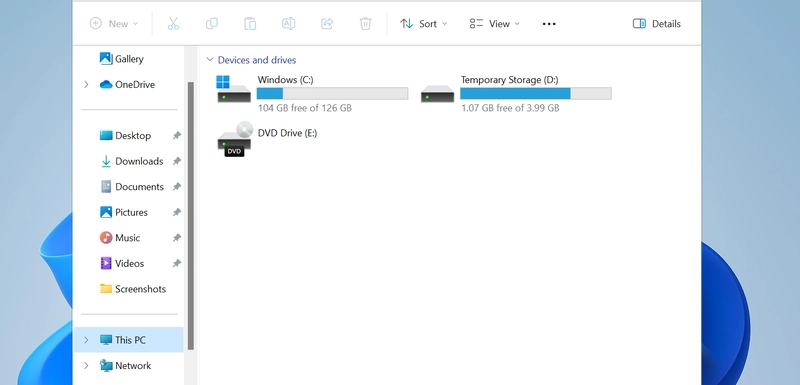
Once connected click on the File explorer as highlighted(red) on the image

The file explorer opens up this page; observe and note the disks available, you will notice there 3 disks:
Disk (C:) - Windows OS Disk, Disk (D:) - Temporary Disk and Disk (E:) The DVD Drive
There isn't a Data disk yet, we shall be attaching the Data disk either by creating an independent data disk and attach to an existing VM or from the VM create and attack the disk
- From the Portal open the existing windows VM, from the menu click on Settings, then click on Disks click create and attach a new disk


Give a name to the disk, pick a storage type e.g Standard SSD, or Premium SSD according to your desired need. You can also decide to increase or decrease the size of your disk from 4-8GiB or more then Apply
Once you apply it will create and update the VM
Now Connect back to the VM and right click on the windows icon below then click on Disk management

Click on OK to initialise the disk from the initialise prompt from the context menu
Scroll down the disks and right-click on "Disk 2", click on "New Simple volume" from the context menu that pops up

- When the New Simple Volume Wizards context menu appears, click on "Next" till "Finish"

- once the initialization is complete, it opens up to the page below.
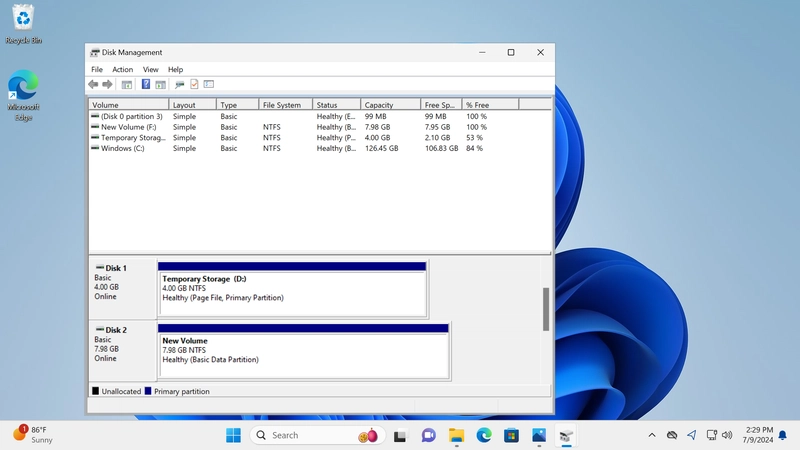
- You can close up this page and click on file explorer, click on my PC and it will open up the page that displays the Disks, you now see the New Volume (F:)

And Voila!! your Data disk is ready for use
- You can click on the disk to rename for your personal need, also upload files for your local machine

Top comments (0)