
Having variations for products is a common thing in e-commerce websites. If your website is built with Oxygen, let’s dig in this tutorial to know how to have product variations using custom fields and display them on a single product page beautifully.
This is an example:

Please be noticed that we’ll use a lot of code in this practice since this is a kind of advanced thing. You can follow this one or use MB Views as the previous tutorial (even when you are using Oxygen instead of Gutenberg).
Video Version
Before Getting Started
For custom fields, we need the Meta Box plugin which is free and available on wordpress.org. For advanced features, I use some extensions of Meta Box as follows:
- MB Custom Post Types & Custom Taxonomies: the name said it all, it helps to create a custom post type that we need for products.
- Meta Box Builder: to have a UI to create custom fields right in the back end.
- Meta Box Conditional Logic: to show/hide fields precisely as any rules you want.
- Meta Box Group: to organize custom fields into repeatable/cloneable and collapsible groups.
And the last one, you should use the Oxygen versions 3.9+ that has native integration with Meta Box already.
Step 1: Create a New Custom Post Type
We’ll need a post type for products, so go to Meta Box > Post Types > New Post Type to create one.
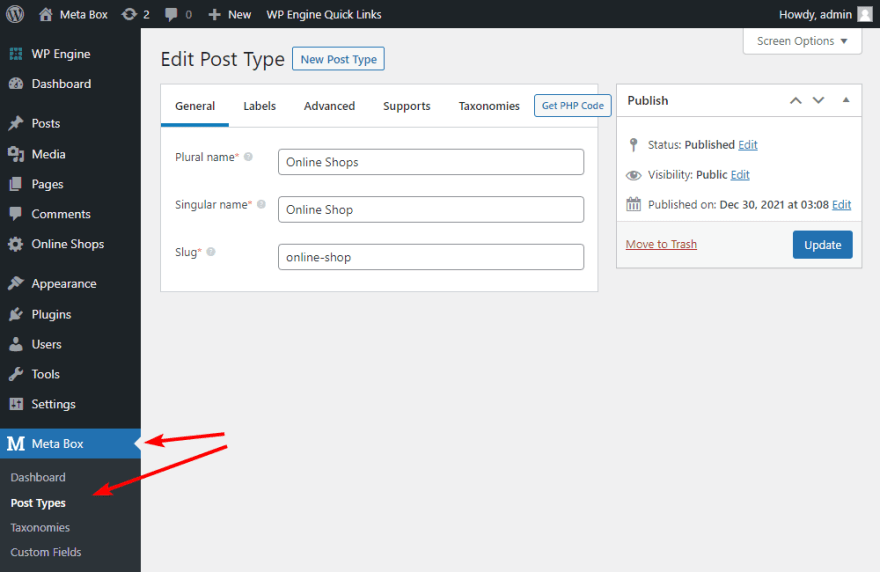
After publishing the new post type, a new menu will appear on the admin menu. In this case, my post type is Online Shops.

Step 2: Create Custom Fields for Products
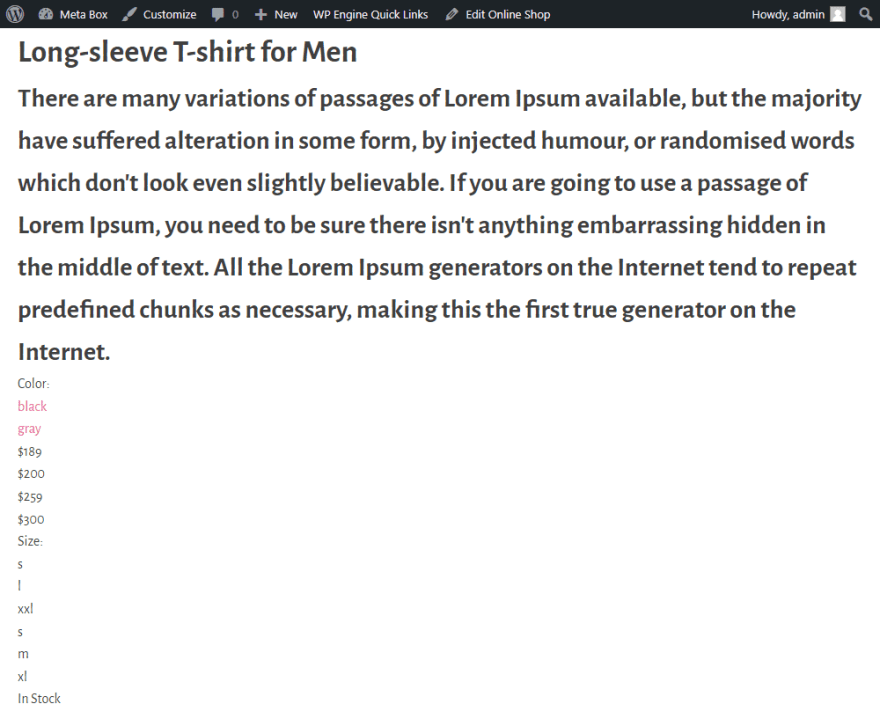
The product normally has a lot of information that we need to save in custom fields. For example product images, price, color, size, dimension, technical information, etc.
In this tutorial, just take a typical example of a fashion product and look at the below structure for fields:
| Field | Types of Field | ID |
| Does This Product Have Variations? | Switch | Does_this_product_have_variaitons |
| Simple Product | Group | simple_product |
| Product Image | Image Advanced | product_image |
| Size | Checkbox List | size |
| Original Price | Text | original_price |
| Promotional Price | Text | promotional_price |
| Status | Select | status |
| Variations of Product | Group | variations_of_product |
| Product Image | Image Advanced | product_image |
| Size | Checkbox List | size |
| Original Price | Text | original_price |
| Promotional Price | Text | promotional_price |
| Status | Select | status |
| Color Name | Select | color_name |
I have a Switch field at first to define if the product has variations or not. Depending on the chosen option, we will display the corresponding group of fields: Simple Product or Variations of Product.
Note: Logically, there is no need to have the Simple Product group in reality, we just need to use the Variations of Product only. However, I create both of them in this practice to show the differences of display fields from a cloneable group to the normal one.
To set when each group should be displayed, there is Meta Box Conditional Logic extension. Go to the Advanced tab in the group settings, add a rule as below.

0 stands for the value of the option No in the Switch field, and 1 stands for the Yes option.
In both groups, I have the same subfields, except the Color which is just used for variations. And there’s also a difference between those groups is that the Variations of Product group is cloneable while the Simple Product is not.

This setting allows you to add information for more than one variation for a product.
Now, back to the post editor of Product, you will see the fields. Change the Switch field status, you will see different groups of fields display.

Enter information for the product then move to the next step.
Step 3: Display the Product Variations Information on the Product Page
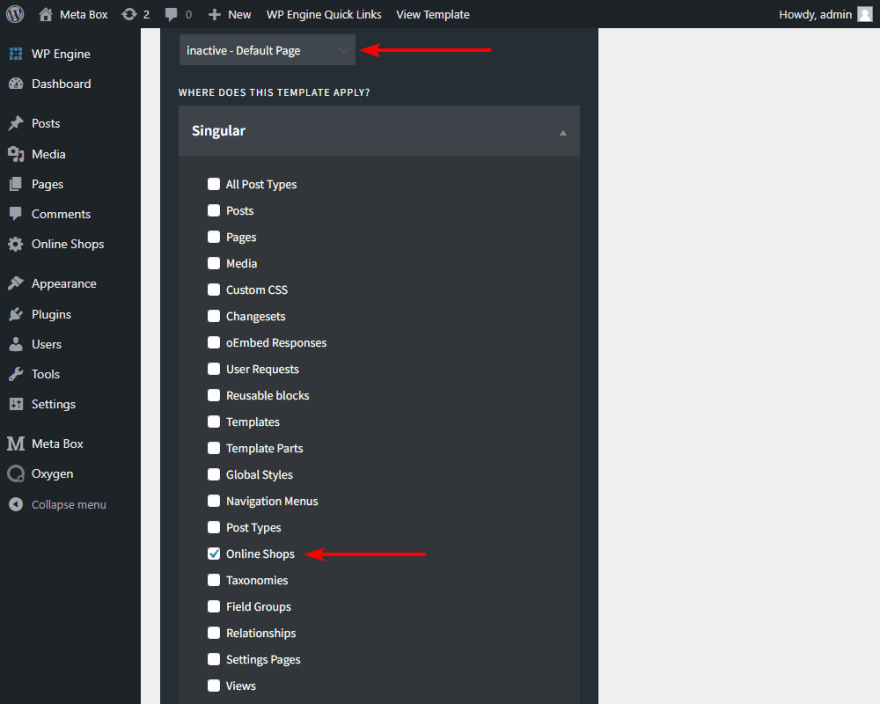
Go to the Oxygen menu and choose to create a new template.
In the settings of the template, choose a design that you want the template to inherit from, then choose your post type in the Singular section to apply the template to it.
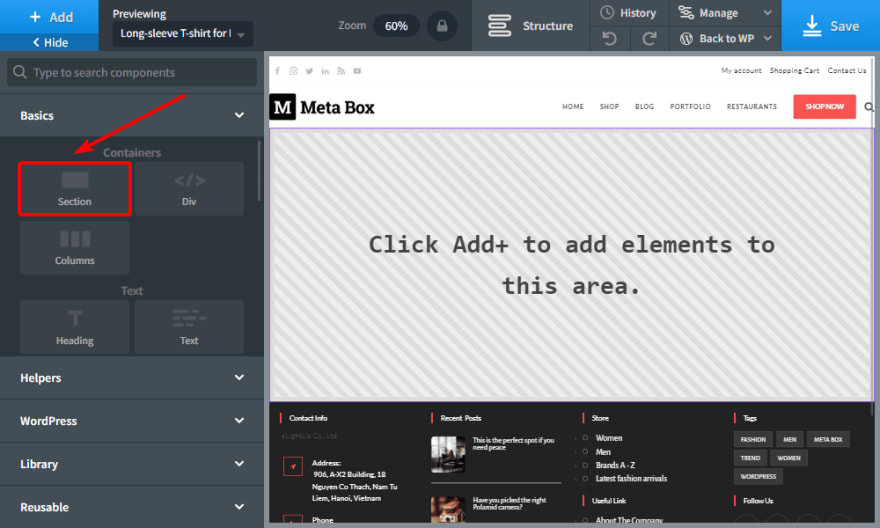
Back to the post editor of your post type, you will see the section with Edit with Oxygen button. Click there to edit the template.

Now, add a Section component for having a container.
Then, add the Code Block inside and choose the PHP & HTML section to add code.
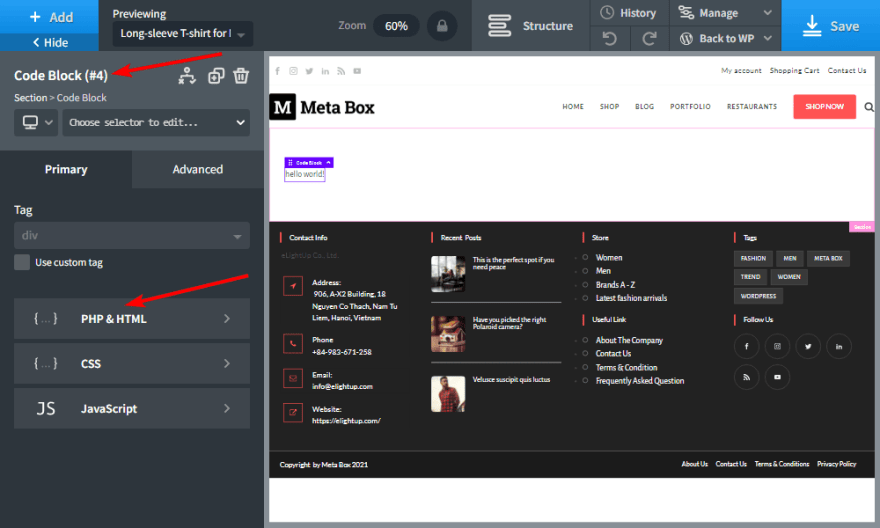
[caption id="" align="aligncenter" width="1200"] Add code to the Code Block[/caption]
There are many lines of code so I uploaded it to Github, you can refer to it for more details.
There are some important things that I want to point out here.
We’ll use the rwmb_meta() function to get value from the custom fields created by Meta Box. It will be used throughout this practice.
<?php
    $product_types  = rwmb_meta( 'does_this_product_have_variations' );
?>
I created a variable here to get the value from the Switch field. does_this_product_have_variations is the ID of this field, you should change it to the ID of your field when applying.
The Switch field has two default values which are 1 and 0. As I said before, they stand for the option Yes and No.
If the product has no variation, this field will be set No. It means that the $product_types variable will obtain the 0 value. In this case, the value of sub-fields from the Simple Product group, which has the ID as simple_product, will be loaded and displayed through this lines of code:
<?php if ( $product_types == "0" ): ?>
    <?php $simple_product = rwmb_meta( 'simple_product' ); ?>
……………………………
            ?>
<?php endif; ?>
Since the Simple Product is a group of fields, this function will return values in an array with all the values from the sub-fields. To get the value of any subfield inside a group, we use this syntax:
$simple_product['ID_of_the_subfield']
To get product images, I use this code:
<?php $simple_image_ids = $simple_product['product_images'];?>
<?php foreach ( $simple_image_ids as $large_img ) : ?>
    <?php $large_size = RWMB_Image_Field::file_info( $large_img, ['size' => 'large'] ); ?>
    <img src="<?php echo $large_size['full_url'] ?>">
<?php endforeach; ?>
<?php foreach ( $simple_image_ids as $thumb_img ) : ?>
    <?php $thumb_size = RWMB_Image_Field::file_info( $thumb_img, ['size' => 'thumbnail'] ); ?>
    <img src="<?php echo $thumb_size['full_url'] ?>">
<?php endforeach; ?>
In there:
-
<?php $simple_image_ids = $simple_product['product_images'];?>is to get value from the field that has IDproduct_images. - I created a loop to display all the images saved in the field thanks to this code:
<?php foreach ( $simple_image_ids as $large_img ) : ?> -
RWMB_Image_Field::file_info(): is to get images url. - I displayed all the images twice, one in large size, and one in thumbnail size. They’ll be used to set in the slider later.
For the price, there are Promotional Price and Original Price, but the promotional price is not always available. So, I set a rule to display them as below:
<?php if ($simple_product['promotional_price']): ?>
    <?php echo $simple_product['promotional_price'] ?>
    <?php echo $simple_product['original_price'] ?>
<?php else: ?>
    <?php echo $simple_product['original_price'] ?>
<?php endif; ?>
For the Size, it is a checkbox list field with several options and allows choosing more than one option. So that we need a loop to get all the saved options. In addition, each option always has both the value and label. We use this syntax to get the values of options:
<?php $values = $simple_product['size']; ?>
<?php foreach ( $values as $value ) : ?>
<?php echo $value; ?>
<?php endforeach;?>
The Status field is a select field (which has options as well as the checkbox list), but instead of getting the value of options as the Size, we should get the label. Then, the code will be much different from the Size’s one.
<?php
    $status = isset( $simple_product['status'] ) ? $simple_product['status'] : '';
    $group  = rwmb_get_field_settings( 'simple_product' );
    foreach ( $group['fields'] as $field ) {
        if ( empty( $field['options'] ) ) {
            continue;
        }
?>
<?php if($field['options'][$status]): ?>
    <?= $field['options'][$status]; ?>
    <?php endif; ?>
    <?php
        }
    ?>
In the event that the product has variation, we will display subfields of the Variations of Product group which are cloneable. Since it’s cloneable, to get value from each subfield, we must create a loop for each one. For example, to get the product images, there is an extra line of code at first as below:
<?php foreach ( $variations_of_product as $gallery ) : ?>
    <?php $variation_image_ids = $gallery['product_images'];?>
    <?php foreach ( $variation_image_ids as $large_image ) : ?>
        <?php $large = RWMB_Image_Field::file_info( $large_image, ['size' => 'large'] ); ?>
        <img src="<?php echo $large['full_url'] ?>">
    <?php endforeach; ?>
    <?php foreach ( $variation_image_ids as $thumbnail_image ) : ?>
        <?php $thumbnail = RWMB_Image_Field::file_info( $thumbnail_image, ['size' => 'thumbnail'] ); ?>
        <img src="<?php echo $thumbnail['full_url'] ?>">
    <?php endforeach; ?>
<?php endforeach; ?>

Or, for the Size:

<?php foreach ( $variations_of_product as $size_group ) : ?>
    <?php $values = $size_group['size']; ?>
    <?php foreach ( $values as $value ) : ?>
        <?php echo $value; ?>
    <?php endforeach;?>
<?php endforeach; ?>
Furthermore, variations are differentiated by color, so we have this code to get colors:
<?php foreach ( $variations_of_product as $color ) : ?>
    <?php $variation_color = $color['color_name']; ?>
            <a href="#<?php echo $variation_color ?>" class="color <?php echo $variation_color ?>" title="<?php echo $variation_color ?>"><?php echo $variation_color ?></a>
<?php endforeach; ?>
In there, I added an <a> tag and a dynamic class. There will be different classes for each color and each one will be the name of the color. This class plays an important role in helping us to define which variations are showing.
Then, I added some div tags to the code to set elements in a reasonable layout. I also added an attribute named data-id in the gallery, price, size, and status sections.
data-id="<?php echo $price['color_name'] ?>
This attribute will obtain the name of the corresponding color, then we’ll know which images, prices, status, or sizes are of which variation. So that we can easily choose which information should be shown to fit the chosen color.
Apply the code then back to a single product page, you will see all the information of the product display.
Let’s set rules to display the information and style them for a better look.
Step 4: Set Rules to Display the Variations Information
Download the JS and CSS Library
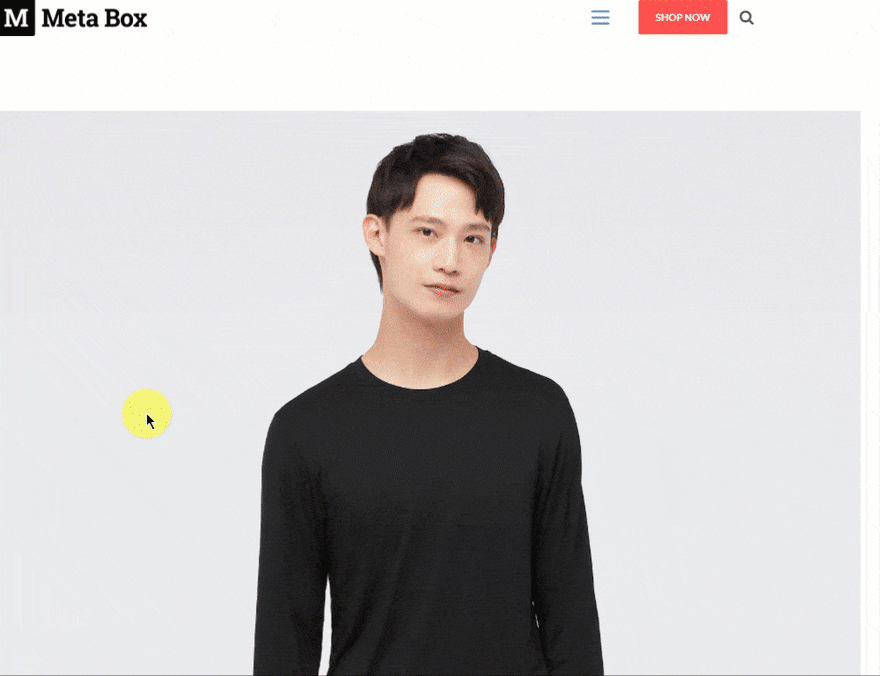
As the example at the beginning of this post, the images of the product variations are in a slider, and all the information of each variation appears only when you choose the matching color.
To have it, I use some JS and CSS. Instead of adding them directly to the theme, I’m using the My Custom Functionality plugin. You can download it from GitHub or choose to use an alternative one for the same feature such as the Code Snippets plugin.
For the slider, I use the Slick library. It is also available on Github. Just download these three files and upload them to the js and css folders in the My Custom Functionality plugin’s folder.

Create Custom JS for Slider and Rules
Next, create a new custom.js file in the js folder and add code to it.

jQuery(document).ready(function ($) {
    $('.slider-single').slick({
        slidesToShow: 1,
        slidesToScroll: 1,
        arrows: false,
        adaptiveHeight: false,
        infinite: false,
        useTransform: true,
        speed: 400,
        cssEase: 'cubic-bezier(0.77, 0, 0.18, 1)',

    });

    $('.slider-nav')
        .on('init', function (event, slick) {
            $('.slider-nav .slick-slide.slick-current').addClass('is-active');
        })
        .slick({
            slidesToShow: 4,
            slidesToScroll: 4,
            dots: false,
            focusOnSelect: false,
            infinite: false,
            responsive: [{
                breakpoint: 1024,
                settings: {
                    slidesToShow: 5,
                    slidesToScroll: 5,
                }
            }, {
                breakpoint: 640,
                settings: {
                    slidesToShow: 4,
                    slidesToScroll: 4,
                }
            }, {
                breakpoint: 420,
                settings: {
                    slidesToShow: 3,
                    slidesToScroll: 3,
                }
            }]
        });

    $('.slider-single').on('afterChange', function (event, slick, currentSlide) {
        $('.slider-nav').slick('slickGoTo', currentSlide);
        var currrentNavSlideElem = '.slider-nav .slick-slide[data-slick-index="' + currentSlide + '"]';
        $('.slider-nav .slick-slide.is-active').removeClass('is-active');
        $(currrentNavSlideElem).addClass('is-active');
    });

    $('.slider-nav').on('click', '.slick-slide', function (event) {
        event.preventDefault();
        var goToSingleSlide = $(this).data('slick-index');

        $('.slider-single').slick('slickGoTo', goToSingleSlide);
    });
    jQuery(".grouped-product .color-contain-group .color-group .color-name a").click(function (e) {
jQuery(".color-contain-group .color-group .color-name").removeClass("active");
jQuery(this).show();
jQuery(this).parent().addClass("active");
jQuery("div[data-id]").removeClass("active");
jQuery("div[data-id='" + jQuery(this).attr("href").replace("#", "") + "']").addClass("active");
jQuery('.slider-single').slick('refresh');
jQuery('.slider-nav').slick('refresh');
e.preventDefault();
    });

    jQuery(".size-contain-group .size-group .info .list-size a").click(function (e) {
        e.preventDefault();
    });

    jQuery('.size-contain-group .size-group .info .list-size .size-name').click(function(){
        jQuery(this).addClass('active');
        jQuery('.size-contain-group .size-group .info .list-size .size-name').not(this).removeClass('active')
    })
})
Explaination:
-
$('.slider-single').slick({ })to create a slider for the elements that have the.slider-singleclass. They are product images that I set to display in the large size. -
$('.slider-nav'): to create a slider as well. The elements which have the.slider-navclass are product images that I set to display in the thumbnail size. -
.on('init', function (event, slick) { }): to identify which thumbnail is in the current slide. And, that thumbnail will be added a class as“is active”. -
$('.slider-single').on('afterChange', function (event, slick, currentSlide) { }): to trigger the event that someone clicks on the large image to move to the other one, then the thumbnail slider will be changed to the corresponding thumbnail. -
$('.slider-nav').on('click', '.slick-slide', function (event) { }): to trigger that event when someone clicks on the thumbnail slider. Then, it also displays the corresponding large image in the large slider. -
jQuery(".grouped-product .color-contain-group .color-group .color-name a").click(function (e) { }): to trigger when someone clicks on a product color using the A tag we added in the view. -
jQuery(".color-contain-group .color-group .color-name").removeClass("active"); jQuery(this).show(); jQuery(this).parent().addClass("active"): to remove the active class from the unselected color and add it to the selected one. -
jQuery("div[data-id]").removeClass("active"); jQuery("div[data-id='" + jQuery(this).attr("href").replace("#", "") + "']").addClass("active"): to remove and add the active class to all the elements that have the value of thedata-idattribute as the name of the color. It means that when you click on a color, all the corresponding information of that variation such as price, size, status, and image gallery will be displayed. -
jQuery('.slider-single').slick('refresh') and jQuery('.slider-nav').slick('refresh'): to refresh both sliders to load new images.
Declare the JS and CSS Files
Add code inside the function custom_enqueue_files() in the plugin.php file to declare all the above js and css files.
 wp_enqueue_style('slick', plugin_dir_url( __FILE__ ).'/assets/css/slick.css');
    wp_enqueue_style('slick-theme', plugin_dir_url( __FILE__ ).'/assets/css/slick-theme.css');

    wp_enqueue_script('custom', plugin_dir_url( __FILE__ ).'/assets/js/custom.js', ['jquery']);
    wp_enqueue_script('slick-min', plugin_dir_url( __FILE__ ).'/assets/js/slick.min.js', ['jquery']);
    wp_enqueue_script('script', plugin_dir_url( __FILE__ ).'/assets/js/script.js', ['jquery']);
Now, go back to a single product page, there is a slider and some differences. Let’s move to the next step to style this page.
Step 5: Style the Product Page Using CSS
Back to page editor by Oxygen, go to Manage > Stylesheets > Add Stylesheet to have space to add CSS.

Then add code into the box. All the code is uploaded into Github, so you can refer to it.

Finally, go to the single product page once again and you will see a new look. When you select a color, the photo gallery will change to that color automatically. At the same time, the sizes and prices also change correspondingly. All the things will be exactly the same with the example that I show at the beginning of this post. If not, check the ID of the fields and the name of variables carefully.
Last Words
Displaying product variations is not a simple task, it is quite advanced and must use coding. In the real case, you can abate the advanced things by creating only the cloneable groups for variations. The goal of this practice is to show you a comprehensive way to display fields with Oxygen using code, so I added additional things for more instances. You should pick up a part only to apply to your own cases.
If you are confused or have any ideas, let us know by leaving a comment. See you next blog!

Top comments (0)