Introduction:
In modern software development, Continuous Integration and Continuous Deployment (CI/CD) play a vital role in achieving efficient and error-free software delivery. Azure DevOps, a leading DevOps tool, offers powerful pipeline capabilities to automate software delivery processes. One advanced feature that can significantly enhance CI/CD efficiency is the ability to trigger one pipeline from another. In this blog, we will explore how to implement this functionality using the classic editor in Azure DevOps. By leveraging pipeline triggers, we can unlock a range of possibilities, such as orchestrating complex build and deployment workflows, improving dependency management, and achieving better collaboration between teams.
Step 1: Set Up Your Azure DevOps Project
Ensure you have an Azure DevOps account and a project created for your software development. If you haven’t set up a project yet, go to dev.azure.com and create one.
Step 2: Set Up Personal Access Token (PAT)
We need personal access token for setting up the service connection.
-
To generate a PAT, go to your Azure DevOps account, click on the small icon on the left side of your profile picture in the top-right corner, and select Personal access tokens from the dropdown menu.
-
Generate a new token with appropriate permissions for the agent. I have given the build and release permission.
After clicking the Create button, you will come to other screen where the PAT token will be shown. You just have to copy that. Remember that the token will be shown only once.
Step 3: Create a Service Connection
We will be creating a service connection of type Azure DevOps API. This will help in triggering the pipeline.
- Open your Azure DevOps organization and navigate to your project.
-
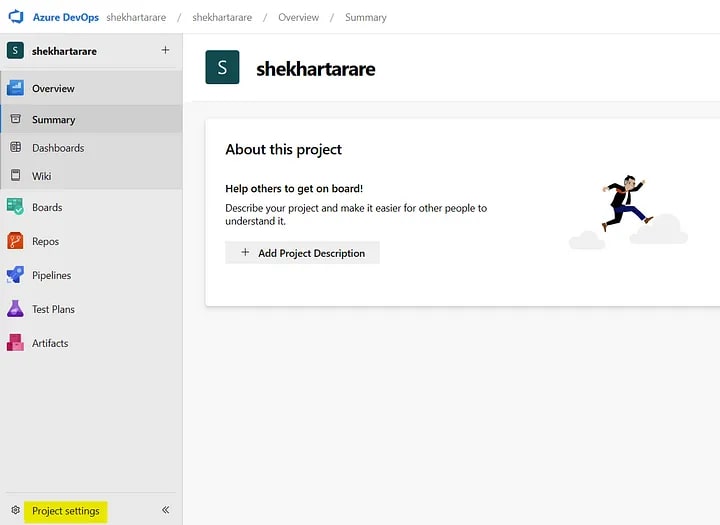
Go to Project settings.
-
Select Service connections under the Pipelines section and click on New service connection.
-
Select Azure DevOps API.
-
Enter the details and also the Personal Access Token, which we have generated on the previous step and click on Save.
Step 4: Configure target pipeline
We are going to create 2 pipelines. The Target pipeline will be triggered from the Source pipeline. Follow the steps below to create the target pipeline:
- Open your Azure DevOps organization and go to your project.
-
Navigate to the Releases section and create a new release pipeline. Add a new empty stage to it and name it anything. I have named it Test stage.
-
Open the stage, under the Agent job, select the appropriate agent. I have selected my self-hosted agent. If you want to know how we can create the self-hosted agent then please check this tutorial.
-
For the testing, I am just adding a single task which is going to pause the pipeline for few seconds using PowerShell script. Add a new task. Search for Powershell and add it. Select inline radio button as the Type.
-
Add the below code under Script. The code just pause the pipeline for 120 seconds.
Start-Sleep -Seconds 120
Step 5: Configure source pipeline
Follow the steps below to create the source pipeline from which we will trigger the target pipeline:
-
Navigate to the Releases section and create a new release pipeline. Add a new empty stage to it and name it anything. I have named it Test stage.
-
Open the stage, under the Agent job, select the appropriate agent.
-
Click on +. Search for Trigger Azure DevOps and click on Get it free.
-
It will open a new tab and take it to the Marketplace page. Click on Get it free.
-
Select your Organization and click on Install.
-
Now, go back to the pipeline. Click on + and search again for trigger azure devops. It will show the add button this time. Click on it to add it to the pipeline.
-
Select the service connection, project and the pipeline which you want to trigger (I have selected the Target pipeline) and click on Save.
Step 6: Testing time
Our setup is completed. Let’s run the source pipeline:
-
Click on Source pipeline and click on Create release button.
-
Source pipeline triggered the Target pipeline.
Tips for Effective Implementation
- Regularly review your triggers to ensure they align with your project’s evolving requirements.
- Utilize variable parameters to control the triggered pipeline’s behavior dynamically.
- Implement appropriate error handling to address potential issues in both the source and target pipelines.
Conclusion:
In conclusion, leveraging pipeline triggers in Azure DevOps enables the automation of your CI/CD processes, providing significant benefits in terms of efficiency, reliability, and maintainability. By following the outlined steps and best practices, you can seamlessly orchestrate your pipelines, streamlining your development workflow and delivering software with unprecedented speed and accuracy. Embrace the power of automation and propel your development journey towards success with Azure DevOps pipeline triggers!


Top comments (0)