
In the previous posts in this series, we’ve gone through several methods to display the latest products in a section on the homepage using Meta Box and some page builders. In today's practice, we're going to figure out another way to do it using Meta Box and Zion Builder.
This is my example.

Video Version
Before Getting Started
In this case, my products are restaurants. Each one’s information will be saved in a post of a custom post type. The extra information such as address, logo, voucher will be saved in custom fields.
So to get started, we need the Meta Box core plugin to have the framework for creating custom post type and custom fields. It’s free, so you can download it directly from wordpress.org.
For the advanced features from Meta Box, we need some of its extensions:
- MB Custom Post Types & Custom Taxonomies: to create custom post types;
- Meta Box Builder: to have an intuitive UI to create custom fields in the backend;
They’re all in the Meta Box AIO. If you haven’t had it, you can download and install each extension individually.
Finally, make sure you have Zion Builder Pro on your site.
Step 1: Create a Custom Post Type
Go to Meta Box > Post Types > Add New to create a new post type.

After publishing, we’ll have a new menu named Restaurants in the admin dashboard.

Then, let’s create custom fields in the next step.
Step 2: Create Custom Fields
Go to Meta Box > Custom Fields to create fields. I’ll create all the fields with the structure like this:
 There are no special settings for them.
After creating all the fields, move to the Settings tab. Remember to choose the Location as Post type and select your product’s post type to apply these fields to it.

Now, when creating a new post in my Restaurant post type, the custom fields will be here.

Let’s move to the next step to create a section for the latest restaurants on the homepage.
Step 3: Add a Section for the Latest Products on Homepage
Go to Pages > Homepage and click Edit with Zion Builder.

First, add a Section element to the page. Then, add a Heading for it.
 Add a Section element in the homepage
 Add a heading for the section
Next, add a Container and a Column element inside it.
 Add a container inside the section
 Add a Column element
In the settings of the Column element, go to the Advanced tab > Repeater Options and enable the repeater provider.

Choose the Query type as Query builder and select the Post type as the post type you want. In my case, it is Restaurant.

Since we’re going to display the latest posts first then the oldest ones, set order posts by date and then choose the Descending option.

To display all the posts in the chosen post type, remember to enable the repeater consumer.

Because we haven’t chosen any kind of information of the product to show yet, it’s still blank there.
Now, add some elements to display the information such as restaurants’ name, featured image, address, voucher and logo.
To display the featured images of the post, add an Image element. Then, connect it to the featured image of the post by using the Use dynamic data button. In the list of displaying options, find the Featured image in the Post section.

Now, all the featured images of the restaurants are shown.

Do likewise for the name of the restaurant, means the post title. Choose a Heading element > Use dynamic data > Post Title.

For the address, choose the Text element. Then, also click the Use dynamic data button. Since the address is saved in a custom field created by Meta Box, find Meta Box Field in the list of options.

Then, choose the corresponding field.

Now, the addresses corresponding to each restaurant will be shown.

For other information such as voucher and logo, do likewise.
 Add a Text element and link it to the Voucher field[/caption]
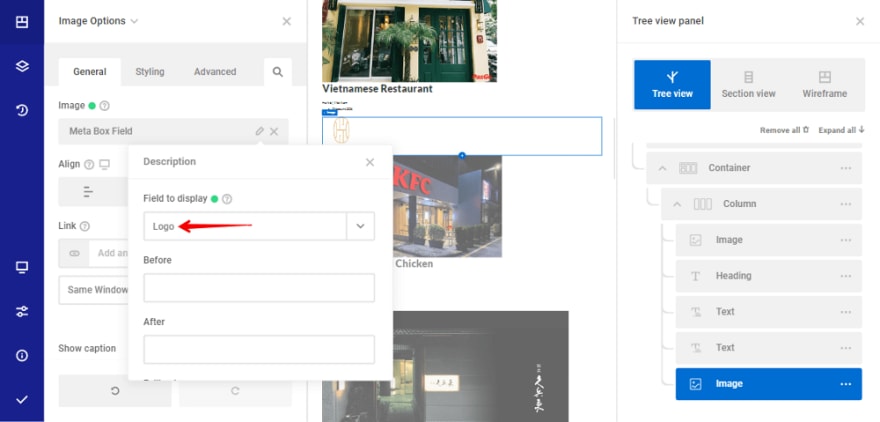 Add an Image element and link it to the Logo field
Now, all the information of the restaurant has been obtained and displayed in a section on the homepage.

Step 4: Style the Section
You can easily style the layout of the section as you want in Zion visual builder.

For advanced styling, you may need some CSS code. For example, I use this one.

Then the section will have a new look as below:
Last Words
We’ve gone through all the steps to display the latest products section using Meta Box plugin and Zion Builder. Try it out and share the results in the comment section.
In the event that you have projects using another page builder, refer to the other posts in this series. Or, if you want to suggest any tutorials, feel free to leave a comment. Thank you for reading. Good luck!

Top comments (0)