When building an API, I like to start by first creating a formal definition before starting the actual development. One of the most established standards for such API definitions is OpenAPI (formerly Swagger). One pleasant aspect of starting with a definition is that, once the definition is created and agreed upon, we can generate part of our codebase using the OpenAPI Generator. As the name suggests, the OpenAPI Generator generates code from an OpenAPI specification. More specifically, the generator is able to create code for client libraries, server stubs, documentation, and configuration in many different languages and frameworks.
I know this generator from my Java projects and decided to use it with Kotlin as well. Lucky for me, there is actually a generator for Spring Boot-based Kotlin projects! I, however, could not find a tutorial dedicated to it and therefore I share my steps here in this tutorial.
TL;DR
You can find the full project (including target) at https://github.com/BjornvdLaan/kotlin-spring-boot-open-api-example.
What we want to achieve
We wish to generate the server stub using the OpenAPI Generator via its Maven plugin. An advantage of using the Maven (or Gradle) plugin is that the generation becomes part of our API’s build lifecycle and the generated code is always in sync with your OpenAPI definition when you clean compile your code.
For our example in this tutorial, we will use the PetStore OpenAPI specification from this tutorial on Baeldung. After running the Maven plugin, the generated code is found in the target/generated-sources/openapi directory (see below). After generation, we ‘only’ still need to implement the generated Delegate interfaces within our own src directory and, voila, the API is implemented. We will implement one of the routes in the PetStore specification and test it using curl.
Create your Spring Boot project
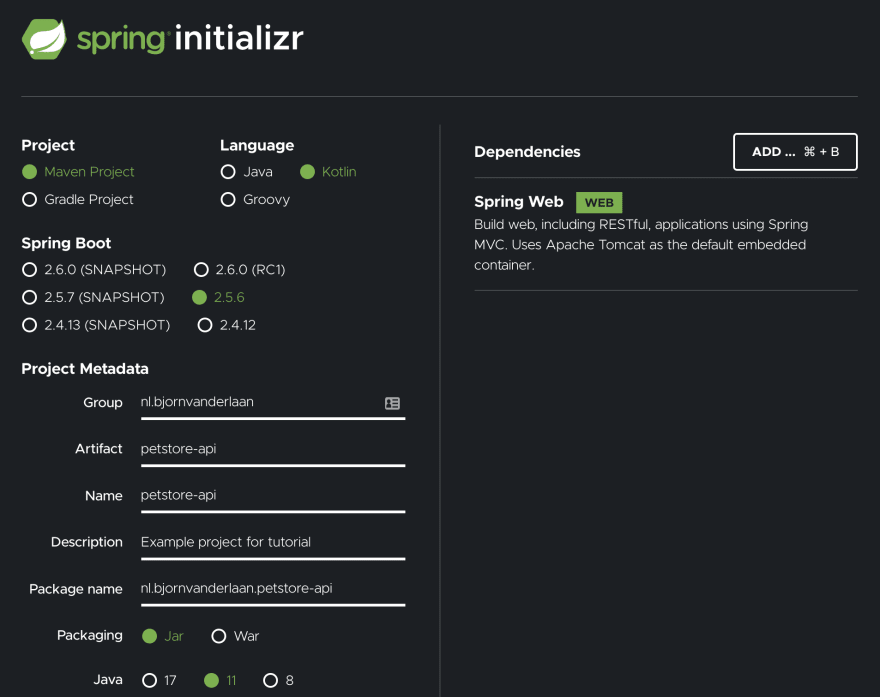
We start by creating a fresh Spring Boot project using the Spring Initializr. We tell it to be a Maven project using Kotlin and packaged as a jar. We also add the Spring Web dependency because the generated code depends on this dependency.
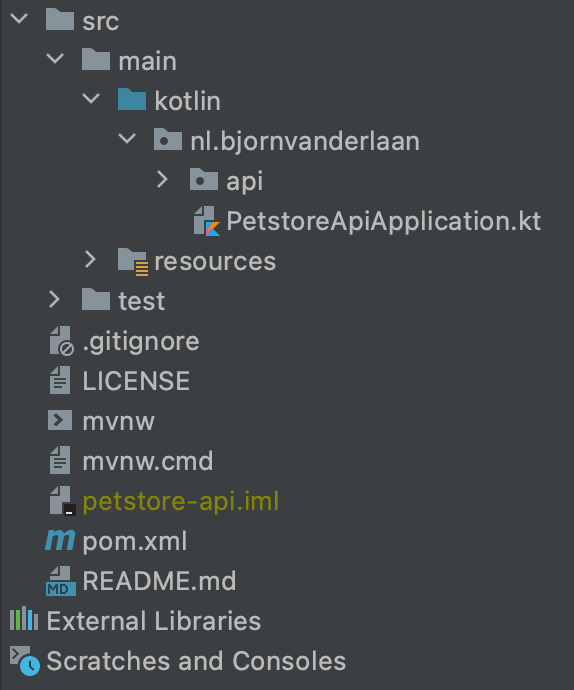
After downloading the project, we open it in our favorite IDE and we add the petstore.yml OpenAPI definition to src/main/resources to end up with the following project structure.
Before we can start, we need to add one more dependency to our pom.xml that the generated code depends on:
<dependency>
    <groupId>org.springframework.boot</groupId>
    <artifactId>spring-boot-starter-validation</artifactId>
</dependency>
Add the Maven plugin
Now it's time to add the OpenAPI Generator's Maven plugin to pom.xml.
<plugin>
    <groupId>org.openapitools</groupId>
    <artifactId>openapi-generator-maven-plugin</artifactId>
    <version>5.1.0</version>
    <executions>
        <execution>
            <goals>
                <goal>generate</goal>
            </goals>
            <configuration>
                <inputSpec>
                    ${project.basedir}/src/main/resources/petstore.yml
                </inputSpec>
                <generatorName>kotlin-spring</generatorName>
                <configOptions>
                    <basePackage>nl.bjornvanderlaan.petstoreapi</basePackage>
                    <apiPackage>nl.bjornvanderlaan.petstoreapi.api</apiPackage>
                    <modelPackage>nl.bjornvanderlaan.petstoreapi.model</modelPackage>
                    <configPackage>nl.bjornvanderlaan.petstoreapi.config</configPackage>
                    <delegatePattern>true</delegatePattern>
                    <interfaceOnly>false</interfaceOnly>
                    <modelNameSuffix>Dto</modelNameSuffix>
                </configOptions>
            </configuration>
        </execution>
    </executions>
</plugin>
An overview of all configuration options is found here. I would like to highlight three options where I made a design decision:
- [delegatePattern = true] - I asked the generator to use the Delegate pattern so the routes and their logic are separated. The Delegate implementations that we write ourselves can be injected in the generated code, without any need to manually touch the generated sources.
- [interfaceOnly = false] - This option determines whether the controller implementation will also be generated. This controller implementation essentially just autowires the relevant Delegate to be used in the routes. I feel its good to let it be generated because then no engineer can be tempted to add other functionality to the controller, maintaining better separation of concerns. If you really want to do a lot more in your controller then it is worth considering to set this option to true.
- [modelNameSuffix = Dto] - I prefer to use the Dto (Data Transfer Object) pattern to separate these objects from the entities that I will use in the service layer. As such, I add a suffix to make the pattern usage explicit.
Generate the code
We can generate the code by running mvn clean generate-sources and we then obtain the following project structure:
For IntelliJ users: the target/generated-sources/openapi/src/main/kotlin folder can be marked as an generated sources root. Right-click this folder, then go to 'Mark Directory as' and select Generated Sources Root.
The target/generated-sources/openapi/src/main/kotlin now contains two packages with a couple of classes each. Let's quickly go through them one by one.
api.PetsApi.kt
This interface class defines one method for each API route from our specification using Spring Web annotations like @RequestMapping, @GetMapping, and @PostMapping.
The methods are all one-liners as they simply delegate the work to the Delegate, exactly as we configured.
The interface also has an unimplemented getDelegate() which will be implemented by PetsApiController.
api.PetsApiDelegate
This interface defines the methods used by the PetsApi with a standard implementation that just returns status 501 Not Implemented. We will implement the interface in our src folder.
api.PetsApiController.kt
The Controller implements the PetsApi interface by autowiring the PetsApiDelegate implementation. As mentioned, I configured OpenAPI Generator to generate this class for me because I feel this is all the Controller should do.
api.Exceptions
This @ControllerAdvice class defines default exception handling for three exceptions that are commonly encountered.
api.ApiUtils
This object (singleton) defines a utility method used by a utility method for GET mappings.
model.ErrorDto
This Dto can be used to send back erroneous response to the requestor.
model.PetDto
The Dto that resembles our pets and is used to respond to, for instance, GET requests that want to retrieve data. Our generated code contains two examples of such routes: listPets and showPetById.
Implement the Delegate
Now it's finally time to start coding. We create a new class in nl.bjornvanderlaan.petstoreapi.api package (in src, not target!!) and we override the listPets method to let it return an hardcoded response with my three favorite cat names and status 200 (Ok).
package nl.bjornvanderlaan.petstoreapi.api

import org.springframework.http.HttpStatus
import org.springframework.http.ResponseEntity
import org.springframework.stereotype.Component
import nl.bjornvanderlaan.petstoreapi.model.PetDto

@Component
class PetsApiDelegateImpl : PetsApiDelegate {
    override fun listPets(limit: Int?): ResponseEntity<List<PetDto>> {
        return ResponseEntity(
            listOf(
                PetDto(1L, "Charlie"),
                PetDto(2L, "Obi"),
                PetDto(3L, "Loki"),
            ),
            HttpStatus.OK
        )
    }
}
Verify the API
Great, so we have some generated classes in our target directory based on our OpenAPI specification and we also added some code of our own in src. Let's run this with IntelliJ and see what happens.
We learn that the Spring Boot application is now running on port 8080. But does it actually work?
$ curl -I http://localhost:8080/pets
HTTP/1.1 200
Content-Type: application/json
Transfer-Encoding: chunked
Date: <redacted my author>

$ curl http://localhost:8080/pets
[{"id":1,"name":"Charlie","tag":null},{"id":2,"name":"Obi","tag":null},{"id":3,"name":"Loki","tag":null}]
Compile your code
We might suspect that this tutorial is finished as we have verified the API's response. However, when we try to compile our code using mvn clean compile we are met with some red text: compilation fails because the generated classes cannot be resolved.
Why does this happen? The problem is that the kotlin-maven-plugin does not see target/generated-sources/openapi as a source directory and so these files are not compiled after cleaning. We resolve this by explicitly adding the path to the plugin's configuration:
<plugin>
    <groupId>org.jetbrains.kotlin</groupId>
    <artifactId>kotlin-maven-plugin</artifactId>
    <configuration>
        <!-- omitted by author -->
    <executions>
        <execution>
            <id>compile</id>
            <goals>
                <goal>compile</goal>
            </goals>
            <configuration>
                <sourceDirs>
                    <sourceDir>${project.build.directory}/generated-sources/kotlin/src/main/kotlin</sourceDir>
                </sourceDirs>
            </configuration>
        </execution>
    </executions>
    <dependencies>
        <!-- omitted by author -->
    </dependencies>
</plugin>
Adding the above execution resolves our issue and Maven now tells us the build is successful.
Great! Now we are done, right? Not exactly. When we go a step further and run our Spring Boot application via mvn spring-boot:run then we are met with another error:
So now what? The issues is caused by our design choice to generate not only the interfaces but also the Controller classes as the generator then also gives us an Application.kt class. As we already also have a main class in our src project, Spring now cannot determine which to pick. There are essentially two ways to fix this. The first option is to delete our own PetStoreApplication.kt and use the generated class. This could be a reasonable choice if you are use that you do not want to do anything custom in the main class. Alternatively, we can configure spring-boot-maven-plugin to point out the correct main class:
<plugins>
    <plugin>
        <groupId>org.springframework.boot</groupId>
        <artifactId>spring-boot-maven-plugin</artifactId>
        <configuration>
            <mainClass>nl.bjornvanderlaan.petstoreapi.PetstoreApiApplicationKt</mainClass>
        </configuration>
    </plugin>
</plugins>
Regardless of which option you choose, we can run mvn spring-boot:run again and are then at last greeted with our beloved Spring banner and the message that our application can now be found at port 8080!
Conclusion
OpenApi allows us to create a specification for our API that we can share among teams and stakeholders to communicate our contracts. The OpenAPI Generator and its Maven plugin help us to generate code from our specification. We ourselves can then focus on the business logic. In this tutorial, we saw how we can generate a server stud from our specification for Spring Boot-based Kotlin projects.


Oldest comments (0)